FUFU&GAGA KF210106-03 Operating instructions
- Type
- Operating instructions
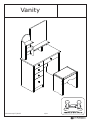
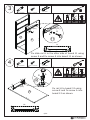
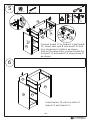
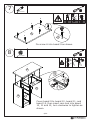
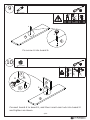
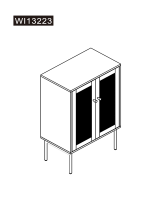
FUFU&GAGA KF210106-03: This versatile furniture piece combines ample storage space with a sleek and modern design. Its sturdy construction ensures durability, while its carefully considered compartments and drawers provide efficient organization solutions. With its spacious desktop, you can comfortably work or study, while the designated sections for drawers and shelves allow you to keep your belongings neatly arranged.
FUFU&GAGA KF210106-03: This versatile furniture piece combines ample storage space with a sleek and modern design. Its sturdy construction ensures durability, while its carefully considered compartments and drawers provide efficient organization solutions. With its spacious desktop, you can comfortably work or study, while the designated sections for drawers and shelves allow you to keep your belongings neatly arranged.


-
 1
1
-
 2
2
-
 3
3
-
 4
4
-
 5
5
-
 6
6
-
 7
7
-
 8
8
-
 9
9
-
 10
10
-
 11
11
-
 12
12
-
 13
13
-
 14
14
-
 15
15
-
 16
16
-
 17
17
-
 18
18
-
 19
19
-
 20
20
-
 21
21


FUFU&GAGA KF210106-03 Operating instructions
- Type
- Operating instructions
FUFU&GAGA KF210106-03: This versatile furniture piece combines ample storage space with a sleek and modern design. Its sturdy construction ensures durability, while its carefully considered compartments and drawers provide efficient organization solutions. With its spacious desktop, you can comfortably work or study, while the designated sections for drawers and shelves allow you to keep your belongings neatly arranged.
Ask a question and I''ll find the answer in the document
Finding information in a document is now easier with AI
Related papers
-
FUFU&GAGA KF200202-01-c Operating instructions
-
FUFU GAGA KF200050-01-ddd User manual
-
-
-
-
FUFU GAGA KF210157,158,160 -01 User manual
-
-
-
-
Other documents
-
Kingdely TDJW-EBKF170010-c User manual
-
Kmart 42823513 User manual
-
 Baxton Studio SR192045-Rustic Brown/Black-Cart Assembly Instructions
-
-
-
-
-
-
 Baxton Studio SR221175-Wooden/Rattan-Cabinet Assembly Instructions
-
 Homestar Z1710462 Installation guide


