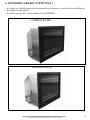
M Design INTERRA 68 Instructions For Installation And Use Manual
- Category
- Stoves
- Type
- Instructions For Installation And Use Manual
This manual is also suitable for

INSTRUCTION FOR INSTALLATION AND USE
INTERRA 60-68-74-78
download this document on www.m-design.be
UK 08/2012

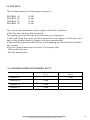
SUMMARY
1. GENERAL ................................................ 3
1.1 TRANSPORT AND INSTALLATION 3
1.2 FUEL ....................................................... 3
1.2.1 Wood
1.2.2 Forbidden fuel
1.3 STARTING THE FIRE ........................ 4
2. INSTALLATION .................................... 5
2.1 ACTIONS TO BE TAKEN UPON INSTALLATION 5
DISMANTLING THE COMBUSTION CHAMBRE 6
2.2 CONVECTION CURRENT................ 7
2.2.1 Natural convection
2.2.2 Convection generated by a fan (optional)
2.2.3 Fan dimmer
2.3 AIR SUPPLY FOR COMBUSTION .. 8
2.4 INSTALLATION WITHOUT FAN ... 9
2.4 FLUE ....................................................... 10
2.4.1 MINIMUM HEIGHT FLUE ............ 10
2.4.2 ADJUSTING THE BAFFLE PLATE 11
3. GENERAL RECOMMENDATIONS .. 12
3.1 MAINTENANCE ................................. 12
4. GUARANTEE ......................................... 13
4.1 TERMS AND ITEMS COVERED ..... 13
4.2 PROVISO .............................................. 13
4.3 DISCLAIMER ....................................... 13
5. DRAWINGS ............................................ 14-17
6. FINISHING FRAMES ........................... 18
6.1 MEASUREMENTS FRAMES 4-side 19
6.2 MEASUREMENTS FRAMES 3-side 20
6.3 SPARE PARTS ...................................... 21
INSTRUCTION FOR INSTALLATION AND USE - INTERRA - WOOD
2

INSTRUCTION FOR INSTALLATION AND USE - INTERRA - WOOD
1. GENERAL
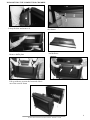
1.1 TRANSPORT AND INSTALLATION
-
1.2 FUEL
1.2.1 Wood
1.2.2 Forbidden fuel
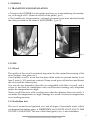
3
pic. 1 pic.2

INSTRUCTION FOR INSTALLATION AND USE - INTERRA - WOOD
1.3 STARTING THE FIRE
CAUTION :
It is not necessary to overload the replace with wood.
1 kg dry wood gives a 4 kW power.
Example : a replace with a 78% return gives a power for about 4kw x 78% = +/- 3
kW for 1 kg dry wood.
If you want a power of +/-12 kW , it is just enough to put 4 kg wood in the re-
place. This is like two normal pieces of wood.
Be carefull not to use palletwood (this gives an enormous heat) for continuous
heating. This can lead to re hazard. We are not responsible for the bad use of the
replaces and any consequence for not following this guideline.
4

INSTRUCTION FOR INSTALLATION AND USE - INTERRA - WOOD
-
2. INSTALLATION
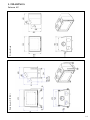
2.1 ACTIONS TO BE TAKEN UPON INSTALLATION
-
-
without stand
with stand
-
-
-
Remark : In some situation it’s easy to install the replace with an optionally stand.
5

INSTRUCTION FOR INSTALLATION AND USE - INTERRA - WOOD
3
24
1
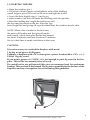
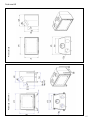
DISMANTLING THE COMBUSTION CHAMBRE
Lift up the door and remove it. Remove metal piece nr 1 and in order 2,3 and 4,
the chamot
Remove bafe plate and deector
Lift up with two persons the front and slide it
out of the exterior frame
6

INSTRUCTION FOR INSTALLATION AND USE - INTERRA - WOOD
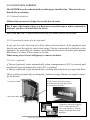
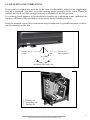
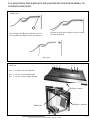
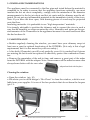
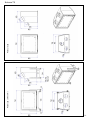
2.2 CONVECTION CURRENT
The INTERRA can be ordered with or without pre-installed fan . This must be con-
rmed when ordening.
2.2.1 Natural convection
Without fan you are not obliged to use the hot air vents.
But if above the replace there is a decorative wooden beam or other combustible
material you have to install Hot Air Vents.
PICTURE BELOW : CIRCULATION FLOW OF THE CONVCTION AIR.
2.2.2 Convection by means of a fan (optional)
When using a fan it is not obligatory to connect air ducts.
2.2.3 Fan ( optional )
-
Convection inlet
Convection outlet To have access to the fan, remove
the chamot on the back and remove
the screwed metal plate.
7
Connection side power supply
220V is situated at the left
side of the appliance. You can
change to the right side of the
appliance.

INSTRUCTION FOR INSTALLATION AND USE - INTERRA - WOOD
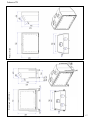
Closed Open
1
0
1/2
MIN
MAX.
MIN MAX.
1 : Primary air
2 : Secondary air
3 : Tertiary air
Primary Air
inlet regulation
Secondary and Tertiary Air
Primary Air
closed
0 --> 1/2
2.3 AIR SUPPLY FOR COMBUSTION
-
-
8
1/2 --> 1
0
1
01

INSTRUCTION FOR INSTALLATION AND USE - INTERRA - WOOD
Without fan you are not obliged to use the hot air vents.
But if above the replace there is a decorative wooden beam or other combu-
stible material you have to install Hot Air Vents.
When using a fan it is not obligatory to connect air ducts.
2.4 INSTALLATION WITHOUT FAN AND WITH HOT AIR VENTS
OR
9

INSTRUCTION FOR INSTALLATION AND USE - INTERRA - WOOD
2.5 THE FLUE
2.5.1 MINIMUM HEIGHT CHIMNEY DUCT.
10

INSTRUCTION FOR INSTALLATION AND USE - INTERRA - WOOD
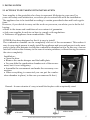
Door open
1
2.5.2 ADJUSTING THE BAFFLE PLATE AND DEFLECTOR FOR INTERRA TO
CONTROL DRAUGHT.
max closing of bafe plate with door closed
max geschlossen klappe mit tür geschlossen
unscrew to have max closing. Screw to let baf-
e plate inclinated.
11
Bafe plate deector ( chamot)
Deector ( metal )
Pos. 2 = Position out of production
Pos. 1 = In case of to much draught
Pos. 3 = In case of not enough draught
123123
Deector
Bafe plate

INSTRUCTION FOR INSTALLATION AND USE - INTERRA - WOOD
3. GENERAL RECOMMENDATIONS
-
-
3.1 MAINTENANCE
-
Cleaning the window:
-
pic.10 pic.11
12
ashpan furnished with replace

INSTRUCTION FOR INSTALLATION AND USE - INTERRA - WOOD
8
4 GUARANTEE
4.1 TERMS AND ITEMS COVERED
4.2 PROVISO
-
-
4.3 DISCLAIMER
13
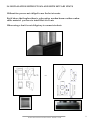
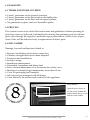
Serial number :
Open the door. Above in
the left corner, behind the
bended metal sheet you can
nd the serial number

INSTRUCTION FOR INSTALLATION AND USE - INTERRA - WOOD
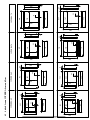
5. DRAWINGS
14
With Stand ( OPTION ) Without Stand

INSTRUCTION FOR INSTALLATION AND USE - INTERRA - WOOD
15
With Stand ( OPTION ) Without Stand

INSTRUCTION FOR INSTALLATION AND USE - INTERRA - WOOD
16
Without stand With Stand ( OPTION )

INSTRUCTION FOR INSTALLATION AND USE - INTERRA - WOOD
17
With Stand ( OPTION ) Without Stand

INSTRUCTION FOR INSTALLATION AND USE - INTERRA - WOOD
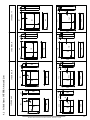
6. FINISHING FRAME ( OPTIONAL )
18

INSTRUCTION FOR INSTALLATION AND USE - INTERRA - WOOD
662
560
742
610
807
660
847
730
486
60
40
588
480
582
37
530
662
40
37 536
668
580
727
733
60
40
650
767
40
773
656
37
586
37
622
520
480
582
20
60
486
17
588
702
570
530
662
20
536
60
17
668
767
620
20
580
727
586
60
733
807
690
656
60
773
650
767
20
17
17
INTERRA 78
6.1 4 sided frame INTERRA 4 cm and 2cm
19

INSTRUCTION FOR INSTALLATION AND USE - INTERRA - WOOD
662
523
573
623
693
480
582
40
742
40
530
662
588
60
486 37
60
37
536
668
807
733
60
40
586 37
727
580
767
650
40
847 60
656 37
773
622
503
60
17
480
582
20
702
553
530
662
60
17
588 668
767
603
580
727
60
17
733
20
20
807
673
650
767
773
20
60
17
656
486
536
586
6.2 3 sided frame INTERRA 4cm and 2cm
20
INTERRA 78
Page is loading ...
-
 1
1
-
 2
2
-
 3
3
-
 4
4
-
 5
5
-
 6
6
-
 7
7
-
 8
8
-
 9
9
-
 10
10
-
 11
11
-
 12
12
-
 13
13
-
 14
14
-
 15
15
-
 16
16
-
 17
17
-
 18
18
-
 19
19
-
 20
20
-
 21
21


M Design INTERRA 68 Instructions For Installation And Use Manual
- Category
- Stoves
- Type
- Instructions For Installation And Use Manual
- This manual is also suitable for
Ask a question and I''ll find the answer in the document
Finding information in a document is now easier with AI
Other documents
-
 Friant & Associates Interra Installation guide
-
Protocol 7402-7A Fire Starter User manual
-
LG DHA1260HL Owner's manual
-
Klipsch RSW SUB Owner's manual
-
-
Cessna 150 Aerobat 1975 Owner's manual
-
Avid Interplay MAM 5.9 Installation guide
-
Hergom BENNINGTON User manual
-
Stovax Elise Edge Operating instructions
-
