Page is loading ...

MOST IMPORTANT- WHEN RETURNING UNIT FOR SERVICE
1. All units returned under warranty must be accompanied by copy of
original dated invoice. Failure to do this will incure repair charges.
2. Please include full details of the fault.
3. Include payment of £8 for return carriage.
4. Send unit to: SERVICE DEPARTMENT: Pentechnic, 1 Grange
Cottages, Penkridge, Staffs ST19 5NH
LIMITED ON (1) YEAR WARRANTY (UK)
This warranty gives you specific legal rights, and you may also have other
rights. TESORO/LASER assures you of the finest electronic equipment and
service. TESORO/LASER warrants that each detector manufactured by it will
be free from defects in materials and workmanship for a period of one (1) year.
Should any failure to conform to the foregoing warranty appear within this pe-
riod, TESORO/LASER will, at its option, repair or replace the defective detector
without any charge except any transportation charges. This warranty does not
cover any detector that has been abused, tampered with, or repaired by an
unauthorized party. This warranty applies only to units purchased from AU-
THORIZED UK DEALERS. This warranty excludes batteries, damage caused
by leaking batteries, cable faults due to flexing on body mount units, and wear
of the search coil housing. Complete, detach and mail the portion below within
10 days of purchase in order to activate your warranty. Send the WARRANTY
to : TREASURE WORLD, 192 Albany st. LONDON NW1 4AP.
≫ Cut along this line
MODEL SERIAL No.
DATE
PURCHASER’S NAME
ADDRESS
Where did you first learn of TESORO/LASER products?
What made you decide to buy TESORO/LASER?
Purchased where?
What do you like or dislike about the product?
LASER METAL DETECTORS
192 Albany Street
London, NW1 4AP
Telephone 207-387-3142
OPERATOR INSTRUCTION MANUAL
━━━━━━━━━━━━━━━━━━━━━━━━━━━━━━━━━

What does the factory include with my detector?
See UNPACKING THE BOX on page 6.
How do I put my detector together?
See ASSEMBLING YOUR DETECTOR on pages 8-9.
How do I install a new battery?
See INSTALLING THE BATTERY on page 7.
Is my battery working and when should I change it?
See Performing the Audio Battery test on page 16.
How does my detector work?
See GENERAL DESCRIPTION on page 5.
What features does my detector have?
See Rapier FEATURES on page 24.
What are Discriminate Mode and Pinpoint Mode?
See Selecting the Proper Operating Mode on page 14.
How do I select one of the operating modes?
See Selecting the Proper Operating Mode on page 14.
How do I adjust the discrimination feature?
See DISC LEVEL Control on page 12.
How much discrimination should I use?
See Setting the Discrimination Level on page 15.
How do I adjust the sensitivity feature?
See SENSITIVITY CONTROL on page 11.
How much sensitivity should I use?
See Setting the Sensitivity Level on page 14.
When do I use the MAXBoost feature?
See Setting the Sensitivity Level in MAXBoost on page 15.
Can I adjust the speaker volume?
See Controlling Audio Volume on page 13.
How do I hold and move my detector when using it?
See Handling you detector on page 17.
How do I find the exact location of a metal object?
See Pinpointing a target on page 19.
How do I dig up a buried metal object?
See Recovering a target on Pages 19-21.
What can I do to get better at using my detector?
See Basic Care and Protecting you Investment on pages 22-23.
What is my warranty and where can I get service?
See the back cover
INDEX OF COMMON QUESTIONS
25
GENERAL INFORMATION

CONGRATULATIONS!
Thank you for purchasing the Laser Rapier. The Rapier was
designed for the user who requires top of the line performance com-
bined with total ease of use.
The Laser Rapier has the power and stability to handle the
most hostile terrain. Its ability to punch through the ground should
satisfy the most demanding operator. Sensitivity to tiny gold, silver &
bronze coins and artifacts should result in more of this class to find.
Take the time to study this manual and familiarize yourself with your
detector and you can look forward to many hours of fruitful searching
in the years to come.
Good Hunting
Frank Mellish
High Gain Sensitivity Circuitry – designed specifi-
cally to deliver greater depth, sensitivity and stability.
MAXBoost Feature- extra power of super high gain can
add inches to search depth.
High-sensitivity Searchcoil- a 9x8 inch spoked,
concentric for broad sweep, good pinpointing and deep ground
penetration.
Ultra-lightweight-Search longer without fatigue.
3 piece Knockdown Pole-convenient storage and
travel
Turn-on-and-go-factory preset for “mineral free” operation.
Two Operating Modes-Pinpoint and Discriminate.
QuickCheck PINPOINT-simple push-button pinpointing.
Easy to Operate-simple controls at your fingertips.
Silent Search Operation-in Discriminate Mode.
Economical to Use-up to 20 hours plus on a single battery.
What it doesn’t have
A big, heavy, high-powered speaker. Loud, heavy speakers are popu-
lar with many manufacturers. The “fuller” sound they produce gives
the illusion of greater sensitivity to small and deep targets - a great
showroom sales tool! Most serious detectorists hunt with headphones
and a Rapier will work well with standard headphones. If you choose
not to use headphones, the Rapier speaker will be loud enough for most
environments. It will allow you to hear the small and deep targets
found by the high power circuitry-without excessive battery drain.
A hip mount, arm strap or battery recharging system. These kinds
of “built-in accessories” are simply unnecessary in a Rapier detector.
The power and features of the Laser Rapier make it an ideal detector for
a beginner who wants a machine they will never outgrow. It is also ideal
for the serious detectorist who wants power, performance, simplicity,
and versatility in a single lightweight detector.
24
LASER RAPIER
OPERATOR INSTRUCTION MANUAL
LASER RAPIER OPERATOR INSTRUCTION MANUAL

strain relief. Inspect the strain relief frequently to make sure it is firmly
attached and intact.
☑ Keep cables properly wound around the pole stems and protect them
during use. Floppy, pinched, or snagged cables may short, causing er-
ratic noises or unnecessary replacement of the searchcoil.
☑ Sweep the searchcoil carefully, especially when using around rocks
and building foundations and avoid hitting the searchcoil against hard,
solid objects and surfaces.
☑ Keep your searchcoil slightly off of the ground during the sweep es-
pecially when using in gravel or hard, rocky dirt.
☑ Always use a properly designed protective scuff cover on the search-
coil.
☑ Remove and clean out scuff covers periodically to avoid buildup of
mineralized dirt particles which will affect performance.
☑ The searchcoil is waterproof and can be submerged in either fresh or
salt water. After the searchcoil is used in salt water, rinse it and the
lower stem assembly well with fresh water to prevent corrosion of the
metal parts.
☑ The searchcoil is waterproof but the electronics are not, so always
prevent any moisture or water from entering the control housing and
never allow the cable connectors to become submerged in water.
☑ If working in or near water, or if there is a possibility of rain, use a pro-
tective weather resistant pouch or plastic bag to cover the control hous-
ing. Make sure it can “breath” in order to ensure against condensation
buildup inside.
☑ After each use, clean the detector with a soft cloth to remove dust,
moisture, or other contaminants.
☑ When transporting the detector in a car during hot weather, store it on
the floor of the passenger compartment if possible. Using a carry bag
gives additional protection. In any case, never allow the detector to
roll around unprotected in the trunk or back of a pickup truck.
☑ Protect your detector from dust, moisture, and extreme temperatures
during storage.
☑ When shipping, use the original factory carton or similar heavy-duty
container, and provide a minimum one inch of padding around all
parts.
☑ Treat your detector as you would any sensitive electronic instrument.
Though ruggedly constructed and designed to withstand the demands
of normal treasure hunting, proper care is essential.
INTRODUCTION ................................................ 4
GENERAL DESCRIPTION ...................................5
GETTING STARTED
UNPACKING THE BOX .......................................6
INSTALLING THE BATTERY ...............................7
ASSEMBLING YOUR DETECTOR........................8
ADJUSTING THE POLE & SEARCHCOIL..........10
OPERATING TECHNIQUES
CONTROLS.......................................................11
SENSITIVITY Control ..............................................................11
DISC LEVEL Control...............................................................12
THRESHOLD LEVEL Control.................................................12
QuickCheck PINPOINT Push-button.....................................13
Controlling Audio Volume......................................................13
TUNING YOUR DETECTOR...............................13
Selecting the proper operating mode...................................14
Setting the Sensitivity Level..................................................14
Setting the Sensitivity Level in MAX Boost .........................15
Setting the Discrimination Level...........................................15
Chart - Discrimination Level Settings...................................15
Setting the Threshold Level ..................................................16
Performing the Audio Battery Test .......................................16
FIELD USE ........................................................17
Handling Your Detector..........................................................17
Planting a Test Garden...........................................................18
23
2
CONTENTS
LASER RAPIER OPERATOR INSTRUCTION MANUAL
GENERAL INFORMATION

3
Recognizing false signals in Discriminate Mode................18
Pinpointing a Target......................................................19
Recovery ........................................................................19
Specifications................................................................20
Recommended Recovery Methods .............................21
GENERAL INFORMATION
CARE AND USE ................................................22
Basic Care......................................................................22
Protecting Your Investment..........................................22
RAPIER FEATURES .........................................24
INDEX OF COMMON QUESTIONS ....................25
WARRANTY SERVICE ............................Back Cover
The INDEX OF COMMON QUESTIONS on page
25 is a quick reference that guides you to the
page containing the answers to some of the
more common questions new metal detector
owners have.
Basic Care
The Rapier is a sturdy instrument, but it is not designed to
withstand abuse. In caring for your Rapier, there are several important
“DO NOTs” to remember. DO NOT use it to pry rocks loose or to beat
bushes out of the way. DO NOT drop the machine into water. DO
NOT use it unprotected in the rain. DO NOT leave it exposed at night
where dew could form on it. DO NOT store it in places that could be
extremely hot (next to a woodstove, in an attic). DO NOT leave it in
the truck of a car or in the back of a hatchback style car where high
temperatures could build up. DO NOT store it with the battery in-
stalled as batteries may leak. DO NOT spray lubricants such as WD-
40, or any type of cleaner, solvents, sealants or other chemicals into or
onto the electrical parts, switches or controls. And finally, DO NOT
attempt to modify or repair the detector’s electronics as this will void
your detector’s warranty.
THE WARRANTY DOES NOT COVER DAMAGE
RESULTING FROM AN ACCIDENT, NEGLECT OR ABUSE.
Protecting your investment
Often detectorists are disappointed when their new detector
slowly becomes less and less responsive and seems to have lost some
of its original peak performance. You can help avoid this from hap-
pening to your detector by following these basic care and protection
guidelines.
☑ Operate your detector exactly as recommended in this OPERATROR
INSTRUCTION MANUAL.
☑ Use only high-quality alkaline batteries of the correct voltage. Never
substitute a different voltage. When using a Ni-Cad battery always use
a separate convertible pack with the proper voltage output for the
detector’s design.
☑ Remove the battery from the detector after each use. This will prevent
damage to the detector if the battery leaks.
☑ The searchcoil cable is hard wired to the searcoil and protected by a
22
GENERAL INFORMATION
CARE AND USE
LASER RAPIER OPERATOR INSTRUCTION MANUAL
CONTENTS

To be successful in treasure hunting with a detector you must:
♦ Use a high-performance metal detector designed for
the type of treasure hunting you will be doing.
♦ Learn how to use your metal detector properly.
♦ Search where there is buried treasure to be found.
♦ Be persistent.
The Rapier was designed for coin hunting, competition hunt-
ing and all-purpose use. This multifunction detector is very powerful,
yet very easy to use.
This OPERATOR INSTRUCTION MANUAL is designed to
help you learn to operate the detector properly for maximum perform-
ance in various search conditions. Complete instructions on how to
operate the Rapier are found in the two main sections: GETTING
STARTED and OPERATING TECHNIQUES.
If you are new to metal detecting, we highly recommend read-
ing and following the entire GETTING STARTED section to develop
the “feel” of your detector. Then, study and practice the OPERATING
TECHNIQUES.
If you are an experienced detectorist and are familiar with the
concepts of metal detecting, you may want to go directly to the OP-
ERATING TECHNIQUES section. Whatever your prior detecting ex-
perience is, the more skilled you become at operating this detector, the
more rewarding your results will be.
If you are new to treasure hunting with metal detectors, keep
in mind that if there are no valuable metal objects buried where you
are searching, it won’t matter how good your metal detector is or how
skilled and persistent you are. To learn more about where to search for
valuable buried metals, check with your detector dealer or bookseller
for magazines and books on treasure hunting.
21
4
LASER RAPIER OPERATOR INSTRUCTION MANUAL
INTRODUCTION
Figure 2A
Figure 2B
Figure 2D
“PLUGGING”
Used only where allowed in natural wooded areas and very moist lawn areas.
Plugging in hard dry ground can damage grass roots, leaving yellow “dead spots” in
time.
After pinpointing target, cut three sides of a four-inch cube around target cen-
ter using a six-inch sturdy hunting knife (Fig. 2A). Cutting a “hinged” cube rather
than a cone shaped plug will properly orient its return, prevent removal by a lawn-
mower, and lessen the chance of scratching the target. With the knife blade, carefully
pry against the cube side opposite the “hinge” (uncut side) and fold back (Fig. 2B).
Scan searchcoil over plug and hole to isolate target location. If target is in plug, care-
fully probe until located. If target is in hole and not visible, probe bottom and sides
until located and remove (Fig. 2C). Repeat scan for additional targets. Replace all
loose dirt with plug. Seat plug firmly with foot (Fig. 2D).
Figure 2C
RECOMMENDED RECOVERY METHOD
Adapted from “Tools ‘N Techniques” By Robert H. Sickler
OPERATING TECHNIQUES

The Rapier is one of the first of its kind: an ultra-lightweight,
compact detector that packs the power and performance of a full-
sized, heavier detector. By simplifying features and complicated ad-
justments that cause a loss of performance when used improperly,
Laser has created an easy to operate, grab-and-go detector that’s per-
fect for hobby, sport and travel.
The Rapier is a Transmitter-Receiver (TR) type detector that
operates in the Very Low Frequency (VLF) portion of the Radio Fre-
quency (RF) spectrum. The detector uses only three control knobs and
push-button to provide full VLF capabilities.
The performance of the Rapier will satisfy the requirements of
the serious detectorist, whether experienced or a beginner. The Rapier
uses the latest Surface Mount Technology and Laser’s proven cir-
cuitry to create one of the most unique Printed Circuit Boards in the
industry. This circuit board helps provide greater depth and more sen-
sitivity to small, less conductive metal objects or “targets” such as
fine gold jewelry.
The Rapier has features that make its power easy to use. The
factory preset ground rejection circuitry allows “turn-on-and-go” op-
eration in virtually any ground mineralization * The Discriminate
Mode is Silent Search, meaning the searchcoil must be moving to de-
tect a target. The QuickChick Pinpointing makes it simple to identify
the exact location of the target.
The electronic miniaturization of Surface Mount Technology
permits the complex powerful circuitry of the Rapier detector to fit
into a very small space. The result is a detector that is so incredibly
light there is no need to body mount the control housing. This exclu-
sive design features adds to the Rapier’s ease of use and makes those
longer searches more enjoyable.
The Rapier comes with an 9”x8” round concentric searchcoil
for best all-around performance with good depth. A variety of optional
Rapier searchcoils are also available and will enhance the detector’s
performance under various conditions.
*Operation may be more difficult in black sand or certain other extreme ground conditions.
soil/sand with a small/medium trowel, taking care to reinstate the dis-
turbed ground after recovery. However, it is especially important when
working on an amenity or cut grass sites to remove your targets and to
restore the areas around your finds without leaving a mess. Use a
straight-edged trowel to cut a neat plug with three or four edges ap-
proximately 200mm long. Cut the plug with sloping sides to help its
keying when you replace it. Lift out the plug, invert it and place it on a
piece of cloth. Remove the find from the hole, then loosen up the soil
in the bottom of the hole. Align the plug correctly when refitting it,
then re-firm the ground with your foot. Score the surface of the plug
so that the cut edges will quickly knit together again. Any soil remain-
ing on the surface should be brushed into the grass with your gloved
hand. Place any scrap metal or sharp objects in your junk bag for safe
disposal later
Operating Frequency ..............................10 kHz
Searchcoil Type.......................................Concentric, “spoked”
Searchcoil Size .......................................9”x8” Oval
Cable Length...........................................Approx. 3’
Audio Frequency .....................................Approx. 630 Hz
Audio Output ..........................................1-1/2” speaker and headphone jack
Headphone Compatibility ........................¼ “ stereo plug
Weight (may vary slightly) .......................2.2 lbs.
Battery Requirement ...............................One 9 volt DC (alkaline)
Battery Life (typical) ................................10 to 20 hours
Optimum Temperature Range .................30° to 100° F
Optimum Humidity...................................0 to 75% R.H.
Operating Modes.....................................QuickCheck Pinpoint
................................................................Silent Search Discriminate
5
20
GENERAL DESCRIPTION
LASER RAPIER OPERATOR INSTRUCTION MANUAL
SPECIFICATIONS
GENERAL DESCRIPTION

rings are rejected when the DISC LEVEL is set to reject pull tabs on
any metal detector that is a TR Discriminator like the Rapier. If you
don’t dig any junk at all, you are surely passing up a lot of good finds
as well. Set the DISC LEVEL only high enough to suit the conditions
where you are searching. If there is any doubt whether a target is good
or not, dig it.
Pinpointing a target
Pinpointing a target in Discriminate Mode is probably best
done by “X-ing” as well. Remember that the detector will beep just as
the target passes under the center of searchcoil Slowing the sweep
speed down will help you pick out the center of the X because the tar-
get response is reduced at very slow speeds making it easier to corre-
late the sound with the coil center.
Another easy method is to sweep the coil from side to side
across the target in very short sweeps as you slowly move forward
and backward across the target. Slow down the sweep rate and shorten
the sweeps until you just barely get a response at one spot. The target
will be directly below the coil center at this response time.
Another method of pinpointing in Discriminate Mode is to
quickly change to Pinpoint Mode to check the target response. Re-
member that Pinpoint Mode is not susceptible to the false signals of
Discriminate Mode and can sometimes give a clearer and more con-
sistent response to difficult targets such as a dime buried next to a pull
tab. By switching back and forth between modes and comparing the
target response sound in Pinpoint to the target response sound in Dis-
criminate, you can often better identify the likely location of the tar-
get. The QuickCheck PINPOINT Push-button allows you to do this
easily and without looking away from the ground at your controls.
Finally, raising the searchcoil during pinpointing can also help
by narrowing the response to the target. Practice pinpointing often,
and you will soon become more accurate and faster.
Recovery
Very basically, this means digging up the target. On farm
fields and on beaches this entails extracting the target from the
Your Rapier was shipped with these parts:
1 Upper Pole Assembly
Fully assembled, including upper pole stem with handle grip,
padded arm bracket and control housing.
1 Middle Pole Assembly With Pole Lock
1 Lower Pole Assemby
Fully assembled with nylon pole tip complete with two friction
washers, wingbolt, and thumb nut.
1 9”x8”round concentric searchcoil with 3’ cable
1 9-volt alkaline battery
1 Operator Instruction Manual
If any of these items are missing, contact the Laser Authorized
Dealer where you purchased your detector immediately.
Assembly of the Rapier is simple and requires no special tools.
Just install the battery, mount the searchcoil on the lower pole assem-
bly, connect the two pole assemblies together, wrap the excess cable
around the pole and plug the cable into the control housing. Finally,
adjust the pole length and searchcoil angle and you’re ready!
19
6
LASER RAPIER OPERATOR INSTRUCTION MANUAL
GETTING STARTED
UNPACKING THE BOX
OPERATING TECHNIQUES

Your Rapier is equipped with an automatic battery test circuit
so that you can always be sure you are getting top performance. The
battery should be checked after the detector has been on for about 10
minutes, and then periodically when used for long durations. For
more detailed information turn to Performing the Audio Battery Test
on page 16.
To install or replace the battery, first make sure the SENSI-
TIVITY control is set to POWER OFF-turned completely counter-
clockwise past the “click”. Remove the battery door from the back of
the control housing. Do this by pressing your thumb firmly on the lou-
vered square-at the bottom of the battery door-and sliding the battery
door upward (in the direction of the arrow) while pushing.
Check the polarity on the battery and on the diagram inside the
battery compartement. Make sure that they match and simply drop a
fresh 9-volt alkaline battery into the compartment.
against this). Sweep the coil as close to the ground as possible without
touching. Hitting the ground or rocks may cause a false signal much
like a desired target would. Sweeping the coil too high above the
ground results in a loss of depth.
Planting a Test Garden
To learn better how your detector will perform in the field, it
would be helpful to bury some coins and trash metal junk items in an
area that you know is clear of other metal objects. Check the area with
Disc set at zero to be sure it’s clear of trash, then bury the targets at
least 1 foot apart, and from 2 to 4 inches deep to start. Make a map of
the area to be sure you know what each target is and how deep it is.
Practice on these targets to familiarize yourself with your detector’s
target response. This will also help you learn the proper sweep speed
for best operation. This type of practice area is often called a “test gar-
den” or “test bed” and is one of best tools to help you develop your
metal detecting skills.
Recognizing false signals in Discriminate Mode
When operating in the Discriminate Mode, some “false sig-
nals” may be caused by 1) heavy concentrations of trash metal ob-
jects, 2) very large trash metal objects, or 3) electrical interference.
These signals are generally short, choppy sounds and sound different
than “good signals” (good target response sounds).
At the end of your sweep, as you reverse the coil direction, the
detector is most susceptible to trash induced noise. There are two
ways to tell whether these sounds are good deep signals or trash
“noise.” The first is by repeatability. Trash induced noises will not be
regular as you sweep the coil over the suspected target several times,
Whereas a good target response will be repeatable. The second
method is to switch to Pinpoint Mode and check the target response
sound. If the response is weak, it may well be a deep, good target. But
if the response is very strong, it is probably trash. Note that a coin
close to the surface can give a double beep sound, but it is regular and
repeatable. Raising the coil an inch or two will restore the single beep
on surface targets.
When searching in the Discriminate Mode, it is best not use a
higher DISC LEVEL setting than necessary. Nickels and most smaller
7
18
GETTING STARTED
INSTALLING THE BATTERY
LASER RAPIER OPERATOR INSTRUCTION MANUAL

it. The battery should be checked after the detector has been on for
about 10 minutes and then periodically if you are using it for long pe-
riods.
To activate the Audio Battery Test, simply turn the detector off
momentarily and then back on again. If the battery is fresh, the detec-
tor should emit a continuous and loud “beep” sound that lasts for
about 4 or 5 seconds, and then slowly fades into silence. As the bat-
tery ages, this sound is less intense and fades out more quickly. When
you hear only a brief “buzz” or no sound at all, replace the battery
with a fresh one.
If you prefer, a rechargeable Nickel-Cadmium (Ni-Cad) battery
can be substituted for the standard 9 volt alkaline battery. Individual 9
volt size Ni-Cad cells, as well as the chargers for them, are readily avail-
able at most electronic supply stores. They are installed into your de-
tector in the same manner as non-rechargeable batteries. The battery test
sound on a Ni-Cad will be weaker than an alkaline in the beginning,
but will not weaken as much with use.
Handling your detector
The detector should be held in a position that is comfortable
for you as shown in the ADJUSTING THE POLE & SEARCHCOIL
section in a three foot arc, overlapping succeeding strokes well. This
motion is called a “sweep.” The Rapier was designed to get maximum
depth without the frantic pace required of earlier motion detectors, so
go at a pace that is comfortable for you. In fact, trying to hunt too fast
may even cause a loss of depth in heavily mineralized locations.
Regardless of which mode you are using, try to keep your
searchcoil height constant and close to the ground. Most people tend
to raise the coil at the end of the sweep-much like a pendulum-espe-
cially if they are hurrying. Try to avoid this, as any increase in height
from the ground will cause a corresponding loss of depth.
In areas with well-kept lawns, the easiest way to maintain a
constant searchcoil height is to allow the coil to rest on the grass as
you sweep from side to side. In rough and rocky areas, it is best not to
“scrub” the coil on the ground, as the rocks will act like abrasives, and
wear away the coil bottom (an optional coil scuff cover will protect
1) On the lower pole assembly, remove the mounting screw and
thumb nut from the black nylon pole tip.
2) Insert the pole tip between the mounting ears of the searchcoil
and align the holes of the pole tip and washers with those of the
mounting ears.
NOTE: the pole tip should fit very snugly unto the mounting ears; however, it
may be necessary to use the thin friction washers instead.
3) Insert the mounting screw through the holes in the mounting
ears and pole tip-entering from the side opposite the cable connection.
4) Install the thumb nut on the mounting screw and tighten by
hand.
(NOTE: Do not overtighten the thumb nut. It should be snug, but not too difficult to
loosen up.)
17
8
LASER RAPIER OPERATOR INSTRUCTION MANUAL
ASSEMBLING YOUR DETECTOR
OPERATING TECHNIQUES
FIELD USE

5) On the upper pole assembly, depress the two spring buttons
and slide the middle pole assembly into the upper pole assembly until
the spring buttons click into the hole-locking the two assemblies into
place. Tighten the pole lock to secure the two assemblies together.
6) Slide lower pole into middle pole until spring buttons click
into the first set of adjustment holes. Turn pole lock to tighten-lock
the assembly into place.
7) Wrap the cable around the pole leaving enough slack near the
searchcoil to permit searchcoil adjustment.
(NOTE: Do not allow the cable to flop loosely over the searchcoil. Since the
detector is sensitive enough to “see” the tiny wires in the cable, a floppy
cable can cause false signals as the searchcoil senses the moving wires.
8) Plug the male cable end into the female connector on the con-
trol housing and tighten the cable thumb nut. You are finished!
(NOTE: You
will want to
adjust the pole
length and the
searchcoil
angle to your
preference.
The DISC LEVEL should be set to your desired “rejection
level” for the particular area you are searching. We recommend start-
ing at a low setting if you are unsure of how much trash is in the area.
Adjust the level higher if you find yourself digging more trash than
you like. Remember that with any metal detector, you will lose target
response to small gold rings and nickels when discrimination is set at
the pull-tab rejection level. So, digging some trash will increase your
number of good finds.
The diagram “DISC LEVEL- Discrimination Level Settings”
shows the settings where many of the common metal objects are ig-
nored by a typical detector. Each detector can vary a little – due to
manufacturing tolerances- so you should experiment with your detec-
tor and become familiar with its rejection levels for these trash metal
objects.
Earlier motion detectors that operated with a continueous
“threshold” sound would give the user a definite indication of trash
metal by either “nulling” completely (no sound made temporarily) or
by generating short, choppy sounds. Since the Rapier’s Discriminate
Mode is Silent Search and operates without threshold sound, there is
no nulling to indicate that the area is extremely trashy. When search-
ing in the discriminate Mode, we recommend that you periodically
switch to Pinpoint Mode and check the area your are searching to get
an idea of how much trash is really there.
Setting the Threshold Level
The Threshold Level must be set so that the sound that you
hear in the pinpoint mode is a low volume, steady hum. To start, press
the PINPOINT push-button and listen for the threshold sound. Adjust
the Threshold Level by turing the THRESHOLD control. To increase
Threshold Level, turn the control clockwise. To decrease, turn the
control counterclockwise. Adjust the control until the low steady hum
is achieved and release the PINPOINT push-button. Once the desired
tone is set, it will not require frequent resetting.
Performing the Audio Battery Test
Your Rapier is equipped with an automatic battery test circuit
so that you can always be sure you are getting top performance from
16
9
GETTING STARTED
LASER RAPIER OPERATOR INSTRUCTION MANUAL

Setting the Sensitivity Level in MAXBoost
The MAXBoost feature is a high gain boost over and above
the normal maximum of 10 and is indicated by the red area on the
SENSITIVITY control. Using MAXBoost will cause no harm to your
detector, but in certain conditions, it can result in the annoying chirp-
ing sound that may make if difficult to hear a good target response
sound.
In ideal conditions, MAXBoost can add inches of depth to your
search with no chirping. In difficult conditions, the extra depth will
still be there but heavy chirping may make the feature too difficult to
use. You must determine when and how much of the MAXBoost fea-
ture to use for your search site conditions.
Setting Discrimination Level
The DISC LEVEL control is used to adjust the detector’s re-
sponse to unwanted trash metal when operating in the Discriminate
Mode. At the lowest setting (MIN), the detector will ignore most
small iron objects, but will still respond to light foil, bottle caps, pull-
tabs and most other metal objects. As the Discrimination Level is in-
creased, more of these trash metal objects are ignored and give no
target response sound when inside the searchcoil’s range.
The pole length should be adjusted so that the detector does
not become uncomfortable or tiring after long periods of use. The de-
tector grip should rest in your hand with your arm relaxed, your elbow
straight but not locked, with the pole extending out in front of you at
the approximate angle shown
in the photo.
You should be able to
swing the detector back and
forth in front of - using relaxed
shoulder movement - while
keeping the searchcoil as close
to the ground as possible. This
swinging movement is often
called a “sweep”.
The searchcoil should
not touch the ground during
your sweep. The pole length
should be adjusted to allow
this without having to lift the
detector with your elbow or
shoulder. The searchcoil
should rest about one inch
above the ground while you
are standing erect. The angle
of the searchcoil should allow
the bottom to be parallel to the ground.
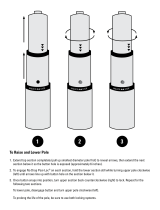
The pole length is adjusted by depressing the spring buttons
and extending or shortening the pole until the spring buttons click into
the set of holes that give you the most comfortable pole length.
To adjust the searchcoil angle, simply loosen the searchcoil
thumb nut slightly and move the searchcoil into the desired position.
Tighten the searchcoil thumb nut by hand so that the searchcoil will
hold in place.
10
15
LASER RAPIER OPERATOR INSTRUCTION MANUAL
ADJUSTING THE POLE & SEARCHCOIL
OPERATING TECHNIQUES
DISC LEVEL - Discrimination Level Setting
0 1 2 3 4 5 6 7 8 9 10
MOST IRON OBJECTS
TIN FOIL
STEEL BOTTLE CAPS
NICKEL COINS
SMALL GOLD RINGS
PULL TABS
ALUMINUM BEER CANS
COINS
Solid black bars indicate likely audio target responses while white
bars indicate possible audio target responses. No bar indicates
“rejected area” with no audio target responses.
Levels shown are typical

11
The Rapier has only four controls, all mounted on the front
panel of the housing for fingertip adjustment. How these controls
should be set for peak performance will depend on the type of metal
you are searching for, search site conditions, and so forth. Use the in-
formation in this section and the TUNING YOUR DETECTOR sec-
tion as a basis for setting the controls on your detector. Using your
detector in the field will allow you to learn fine tuning the detector’s
operating controls
SENSITIVITY
ON/OFF-Battery Test – Sensitivity Control
As its name suggests, this is in fact a three-function control: First, it is
used to turn the power on and off. Rotating it clockwise past the an
initial “click” turns the detector on. Rotating it fully counterclock-
wise until it clicks disconnects the batteries from the circuit, turning
the detector off. Secondly it activates an automatic battery test when
Selecting the Proper Operating Mode
The Rapier offers two operating modes, Discriminate Mode
and Pinpoint mode. Both modes are also “mineral free.” This means
the detector’s circuitry has been factory preset to ignore all but the
most extreme ground mineral conditions.
The Discriminate Mode is “Silent Search.” This means that the
detector will make no sound until it encounters a metal target. This
mode requires that the searchcoil be moving slightly for target detec-
tion.
The Pinpoint Mode, however, is “no-motion.” This means the
detector will make a continuous sound until it encounters a metal tar-
get. This mode does not require motion so the searchcoil can be held
still for target detection.
Setting the Sensitivity Level
In lightly to moderately mineralized ground, you can usually
set the SENSITIVITY control as high as 8 to 10 (normal maximum
setting). In the right conditions, you can move the SENSITIVITY
control clockwise as far as possible until the detector just begins to
“chirp” Intermittently. If the chirping is too frequent, simply turn the
control counterclockwise just enough to cause the chirping to subside.
Once set, this control should not require readjusting unless site condi-
tions change.
Occasionally, you may need to reduce the setting to eliminate
“false signals” casued by difficult conditions such as highly mineral-
ized ground on trashy sites or nearby sources of electrical interfer-
ence. These false signals are generally short, choppy sounds that can
be easily distinguished from a good target response sound. Extreme
conditions such as wet salt sand may require you to lower your sensi-
tivity setting into the 2 to 5 range.
14
OPERATING TECHNIQUES
CONTROLS
OPERATING TECHNIQUES
LASER RAPIER OPERATOR INSTRUCTION MANUAL
DISC LEVEL
Discrimination
Level
Control
THRESHOLD
Threshold
Level
Control
SENSITIVITY
Sensitivity
Control
PINPOINT
QuickCheck
Pinpoint
Push-button

detector itself. Although this control is placed on the front panel for
convenience, once it is set to the desired threshold tone, it will not re-
quire frequent resetting.
PINPOINT
QuickCheck Pinpointing Push-button
This push-button control has two functions:
Places the detector in Pinpoint Metal Mode
Adjusts the Threshold sound
When the detector is in the Discriminate Mode, the PIN-
POINT push-button is used to momentarily change the operating
mode for improved pinpointing. Pressing the push-button places the
detector in Pinpoint Mode. The detector remains in Pinpoint as long
as the push-button is held down. Releasing the push-button returns the
detector to Discriminate Mode. Pinpoint push-button must be held to
adjust the threshold.
Controlling Audio Volume
The speaker in the Rapier does not have a volume control. The
volume should be sufficient to accurately hear the target response
sound in most environments. If more or less volume is required in
your particular situation, we recommend using a set of good quality
headphones with a built-in volume control.
Since the most troublesome adjustments of standard detectors
have been automated in the Rapier, Tuning this detector is simply a
matter of:
➊ Setting the Sensitivity level using the SENSITIVITY control.
➋ Setting the Discrimination level using the DISC LEVEL control.
➌ Setting the Threshold level using the THRESHOLD and PINPOINT
control.
the detector is first turned on.
(NOTE: This test should be performed with the Mode switch in the
Discriminate position.)
If the batteries are satisfactory, there will be a loud tone gradu-
ally fading to silence over 3 to 5 seconds. The fresher the batteries, the
louder the tone. When the tone becomes weak and brief, or there is no
sound at all, it is time to replace the batteries. Always fit 9 volt alka-
line batteries. Third, it is used to adjust the detector’s sensitivitiy. The
recommended setting for most conditions is around 9-10 on the scale.
On occasion you may need to reduce this to eliminate false signals
when encountering difficult conditions, i.e., highly mineralized
ground on junk infested sites. Wet salt sand may require you to drop to
between 2-5 sensitivity. Your Rapier incorporates a high gain boost
over and above normal maximum of 10. This is indicated by a red
section on the scale. Entering this setting will cause no harm to the
unit, but may very well cause instability. The boost section will give
increased performance only if conditions are ideal, so we would ad-
vise caution in its use.
DISC LEVEL
Discrimination Level Control
This rotary control has one function:
Adjusts the Discrimination Level
While the detector is in the Discriminate Mode, the DISC
LEVEL control is used to adjust the detector’s Discrimination Level.
Turning the DISC LEVEL knob clockwise increases the detector’s
Discrimination Level and vice versa.
THRESHOLD
Threshold Level Control
This rotary control has one function:
Adjusts the Threshold Control
The THRESHOLD control is used to adjust the audio level of
the detector’s threshold up or down to its desired level. Normal setting
would be a barely audible hum. This is not a volume control for the
13
12
LASER RAPIER OPERATOR INSTRUCTION MANUAL
OPERATING TECHNIQUES
TUNING YOUR DETECTOR
/