Bryton Rider 60 Quick start guide
- Category
- Bicycle accessories
- Type
- Quick start guide
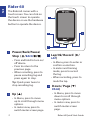
Bryton Rider 60 is a high-tech cycling computer that combines advanced GPS functionality with comprehensive training features, providing you with an unparalleled cycling experience. With its 3” color touchscreen display, you can easily view your speed, distance, time, and other important metrics at a glance. The device also features ANT+ and Bluetooth connectivity, allowing you to pair it with external sensors such as heart rate monitors, speed and cadence sensors, and power meters. With these sensors, you can track your performance in real-time and monitor your progress over time.
Bryton Rider 60 is a high-tech cycling computer that combines advanced GPS functionality with comprehensive training features, providing you with an unparalleled cycling experience. With its 3” color touchscreen display, you can easily view your speed, distance, time, and other important metrics at a glance. The device also features ANT+ and Bluetooth connectivity, allowing you to pair it with external sensors such as heart rate monitors, speed and cadence sensors, and power meters. With these sensors, you can track your performance in real-time and monitor your progress over time.


-
 1
1
-
 2
2
-
 3
3
-
 4
4
-
 5
5
-
 6
6
-
 7
7
-
 8
8
-
 9
9
-
 10
10
-
 11
11
-
 12
12


Bryton Rider 60 Quick start guide
- Category
- Bicycle accessories
- Type
- Quick start guide
Bryton Rider 60 is a high-tech cycling computer that combines advanced GPS functionality with comprehensive training features, providing you with an unparalleled cycling experience. With its 3” color touchscreen display, you can easily view your speed, distance, time, and other important metrics at a glance. The device also features ANT+ and Bluetooth connectivity, allowing you to pair it with external sensors such as heart rate monitors, speed and cadence sensors, and power meters. With these sensors, you can track your performance in real-time and monitor your progress over time.
Ask a question and I''ll find the answer in the document
Finding information in a document is now easier with AI
Related papers
-
Bryton Rider 60 User manual
-
-
-
-
-
Bryton Rider 20 Owner's manual
-
Bryton Rider 50 User manual
-
-
-
Bryton Rider User manual
