Page is loading ...

12
89 7 6
45 3
RUN
SETUP
100M LINK
ETHERNET (DCE)
RS232 B A - + COM DIO
RS-485 SUPPLY
B A
B A
(HUB)
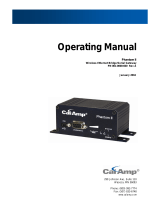
FCC Statutory Requirements
Unlicensed operation limits the radio power. High gain aerials may only be
used to compensate for cable losses.
RJ-45 Ethernet
Connection
Factory
Default Switch
RS485 Resistor
Termination
Switch
Connect M4 screw terminal on
rear of module to GROUND for
surge protection
REV 1.10 ELPRO Technologies Pty. Ltd. 2012
* Connect to Ground as
close as possible to the
module.
NOTES
ALL connections must be SELV (Safety Extra Low Voltage <50V AC & <120V DC)
Ethernet Port wiring is that of a hub or switch.
‘-' Supply terminal and 'M4 GND screw on rear of module' must be connected to EARTH /
GROUND as close as practical to the unit.
Module Power Supply -Ve terminal is not Isolated from Earth/GND
DIO channel can be wired as either input or output.
Care must be taken with antenna selection and proximity to the radio.
For short distance paths, RX signal level should be checked and if it exceeds -40dBm a 20dB
attenuator must be fitted in line with coax cable.
Demo Antennas must not be used for final installation.
The non-metallic cover of the Wireless Ethernet Modem is considered to constitute an
electrostatic discharge hazard. Clean only with a damp cloth
The Wireless Ethernet Modem enclosure contains aluminum and is considered to constitute a
potential risk of ignition by impact or friction and must be taken into account during installation.
If the Wireless Ethernet Modem is installed as Category 3 equipment, then it shall be installed
in an Enclosure which maintains an ingress protection rating of IP54 and meets the enclosure
requirements of EN 50014 or EN60079-0.
If installed in a hazardous environment coaxial cable shall be installed in a metallic conduit as
per NEC requirements
9-30V
DC Supply
2A Fuse or
Circuit Breaker
BEWARE OF
GROUND LOOPS
THIS EQUIPMENT IS SUITABLE FOR USE IN CLASS I DIVISION 2 GROUPS A,B,C AND D HAZARDOUS LOCATIONS, OR NONHAZARDOUS LOCATIONS ONLY.
WARNING - EXPLOSION HAZARD - DO NOT DISCONNECT EQUIPMENT WHILE THE CIRCUIT IS LIVE OR UNLESS THE AREA IS KNOWN TO BE FREE OF IGNITABLE CONCENTRATIONS.
WARNING - EXPLOSION HAZARD - SUBSTITUTION OF ANY COMPONENT MAY IMPAIR SUITABILITY FOR CLASS I, DIVISION 2.
RS232 Connections
DCE HOST
DB9
MALE
MODEM
DB9
MALE
RD
TD
SG
RTS
CTS
DSR
DTR
DCD
RD
TD
SG
RTS
CTS
DSR
DTR
DCD
2
5
7
8
6
4
1
3
2
5
7
8
6
4
1
3
DTE HOSTMODEM
DB9
MALE DB9
FEMALE
RD
TD
SG
RTS
CTS
DSR
DTR
DCD
RD
TD
SG
RTS
CTS
DSR
DTR
DCD
2
5
7
8
6
4
1
3
2
5
7
8
6
4
1
3
PC’s
PC’s, Dataloggers
RS485 Connections
HOST HOST
-
+
Antenna Installation
COLINEAR
ANTENNA
MAST
MODULE
SURGE
ARRESTOR
(RECOMENDED)
COAXIAL CABLE
WEATHERPROOF
CONNECTORS WITH
“3M 23” TAPE
PROVIDE GOOD GROUND
CONNECTION TO MAST, MODULE
AND SURGE ARRESTOR
CONNECTION ON
REAR OF MODULE
1 Wavelength
minimum
IF GROUND CONDITIONS ARE
POOR, INSTALL MORE THAN
ONE STAKE
STRESS RELIEF
LOOP
M4 x 5mm
INSTALL ANTENNA ABOVE
LOCAL OBSTRUCTIONS FOR
MAXIMUM RADIO DISTANCE
Wavelengths
900 MHz = 33 cm
Digital Output Wiring
Max
30VDC
0.5A -
+
DC Load,
eg Relay
MODULE
COM
DIO

Installation Guide
REV 1.10 ELPRO Technologies Pty. Ltd. 2012
12) From the Home Page select Quick Start from the right-hand column (see Quick Start Configuration
screenshot below).
13) Assign the Operating Mode of the first modem to be the Access Point.
14) Enter the IP address as required for your network. Each radio must have a different IP address but
typically be within the same subnet. (i.e. 192.168.0.120 and 192.168.0.121 ).
15) Create a unique System Address (ESSID) to be used for all radios. (case sensitive).
16) If encryption is required, select an appropriate method and enter a passphrase. Record, as all
radios must use the same method and passphrase. (case sensitive).
17) Select the “Save Changes and Reset” button.
18) Repeat steps 11-16 on all other radios except make the operating mode a Client.
19) When all modems have restarted, connect antennas to the TX/RX port and confirm connection
(Link LED is on).
Setting up a bridge network with 2 radios.
1) Set the Run/Setup DIP switch on the bottom of the radio to the SETUP position
2) Connect a straight-through Ethernet cable to the RJ45 jacks of the PC and the radio.
3) Apply 24VDC power to the SUPPLY terminals on the radio.
4) Go to the PC’s Control Panel, select “Network and Sharing Center”, “Change Adapter Settings”,
double click “Local Area Connection”, select Properties. Windows 7 instructions, other versions
will be similar but not identical
5) Select “Internet Protocol Version 4 (TCP/IPv4)”, click properties.
6) Select “Use the following IP address:” and enter an IP address in the range -192.168.0.xxx (xxx
can be 1-99). Make sure the chosen IP is not the same as the default IP on the modems.
7) Set the Subnet mask to 255.255.255.0
8) Run Internet Explorer version 7 or greater.
9) Enter the Setup IP address printed on the back label in the address bar. Do not include http, www,
or any pre-fix.
10) Proceed through the security warnings and enter the user name and password, “user” and
“user”. (case sensitive)
11) Put Run/Setup DIP switch back to the RUN position.
a) On the Access Point radio, select the“Radio” link in the right-hand column of the webpages.
b) From the “Channel (AP Only)” drop down list, select a channel that suits the data throughput of
the application . Estimated throughputs are listed below (country dependent).
20MHz channel yields approximately 22Mbps throughput
10MHz channel yields approximately 12Mbps throughput
5MHz channel yields approximately 6Mbps throughput
2.5MHz channel yields approximately 3Mbps throughput
1.25MHz channel yields approximately 1Mbps throughput
c) Select “Save Changes and Reset” and when both modems have restarted, connect antennas to
the TX/RX port and confirm they connect (Link LED is on).
Note: The factory default Channel is 2.5MHz which will provide a maximum of 3Mbps throughput.
To configure radios with higher data throughput, complete the following steps.
If radio has had some parameters changed, restoring the modem to factory defaults will ensure correct
radio settings. This can be done by selecting “System Tools ,Factory Default Configuration Reset”.
LAN Ethernet
Device
Access
Point Client
/