Page is loading ...

Croydex, Central Way, Andover, Hampshire, SP10 5AW, UK
Tel: +44 (0) 1264 365881 Fax: +44 (0) 1264 367223
Sales: [email protected] Helpline: [email protected]
www.croydex.com
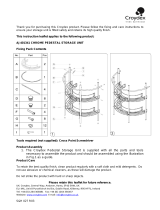
Dispenser Components:
1. Container
2. Lid
3. Button
4. Bottom Retainer
5. Mounting Bracket
6. Pump
7. Valve
Two-Sided Tape
Two-Sided Tape
Removing Backplate
Flat wall
Corner
B
C
D
A
E
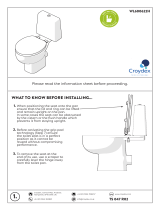
MOUNTING INSTRUCTIONS
1. Make certain that the wall area provides a clean,
dry mounting surface. Clean & rinse mounting
surface thoroughly, to remove soap film and
allow to dry before beginning the installation.
If mounting onto moulded fibreglass, surface
should be cleaned with nail polish remover
without oil to eliminate any wax residue from
the fibreglass moulding process.
2. Place and mark the position of the dispenser on
the wall allowing sufficient clearance above the
product so that the soap container (1) can be
easily removed.
3. Remove the Dispenser Container Assembly
(1) from the Mounting Bracket (5) by sliding
the container up and away from the bracket.
(A)
For Flat Wall Installations
1. Install double faced tape tabs onto all
mounting locations, as shown (B). Remove
tape cover strips
2. Press the backplate securely into position on
the wall (C). Press and hold firmly to ensure
strong adhesion of the tape.
For Corner Installations IMPORTANT:
For corner installations, it is essential that the
backplate bracket fits perfectly into a square
corner, so that the double sided tape can achieve
a strong bond to the wall. Test the corner with the
backplate (D) before applying tape to ensure the
two application surfaces of the bracket make full
contact to the wall. If this full surface contact is
not possible (because the corner is not square)
please install your dispenser on a flat wall instead
(see above).
1. Install four double faced tape tabs onto
mounting locations, as shown (E). Remove
tape cover strips.
2. Slide the dispenser unit back onto the
backplate. This ensures that the backplate will
not twist during installation. Press the
backplate securely into position on the wall,
ensuring full contact with both wall surfaces.
Remove the dispenser from the backplate.
Press and hold firmly to ensure strong
adhesion of the tape.
FILLING CHAMBERS AND PRIMING
PUMPS:
1. Only after the tape is fully cured can the
mounting bracket support the weight of the
liquids. Fill the chamber(s) with your choice
of liquid(s)
2. Prime the pump(s).
a. Push button in.
b. While holding the pump button in, place your
finger over the spout of the pump to block the
airflow up into the pump. (This creates a
partial vacuum in the pump chamber, when the
button is released).
c. Keep your finger over the spout and release
the pump button.
d. Remove your finger from the spout and repeat
these steps until you have a continuous flow of
liquid. (This may take several cycles,
especially when using very thick liquids).
MAINTENANCE:
Bathroom cleaners often contain aggressive
chemicals and abrasives, designed to clean
ceramic and porcelain surfaces. These cleaners
are likely to damage, deteriorate or discolour the
dispenser.
DO NOT FILL OR MOUNT
CONTAINER ONTO MOUNTING
BRACKET UNTIL TAPE IS FULLY
CURED AFTER 24 HOURS.
THE BEST METHOD FOR CLEANING
THE DISPENSER IS WITH A
SOFT DAMP CLOTH.
Do not use chemical or abrasive cleaners.
S&H 019 R02
Installing Mounting Bracket
/