Vista QX960H Installation and User Manual
- Category
- Digital Video Recorders (DVR)
- Type
- Installation and User Manual
This manual is also suitable for

Installation and User manual
Quantum 960H DVR Range
Real time 960H DVRs
QP960H and QX960H models

2
Quantum 960H DVR range manual V1.2

3
Quantum 960H DVR range manual V1.2
Before You Begin
Read these instructions before installing or operating this product.
Note: This installation should be made by a qualified service person and should conform to local codes.
This manual provides installation and operation information. To use this document, you must have the following
minimum qualifications:
A basic knowledge of CCTV systems and components
A basic knowledge of electrical wiring and low-voltage electrical connections
Intended use
Only use this product for its designated purpose; refer to the product specification and user documentation.
Customer Support
For assistance in installing, operating, maintaining and troubleshooting this product refer to this document and any
other documentation provided. If you still have questions, please contact Norbain Technical Support and Sales:
Norbain SD Ltd, 210 Wharfedale Road, IQ Winnersh, Wokingham, Berkshire RG41
5TP, England.
UK +44 (0) 118 912 5000
Note: You should be at the equipment and ready with details before calling Technical Support.
Conventions Used in this Manual
Boldface or button icons highlight command entries. The following WARNING, CAUTION and Note statements
identify potential hazards that can occur if the equipment is not handled properly:
* WARNING:
Improper use of this equipment can cause severe bodily injury or equipment damage.
** Caution:
Improper use of this equipment can cause equipment damage.
Note: Notes contain important information about a product or procedure.
This apparatus is manufactured to comply with the radio interference.
A Declaration of Conformity in accordance with the following EU standards has been made.
The manufacturer declares that the product supplied with this document is compliant the p
rovisions of the EMC Directive 2004/108/EC, the CE Marking Directive 93/68 EEC and all
associated amendments.
All lead-free products offered by the company comply with the requirements of the European law
on the Restriction of Hazardous Substances (RoHS) directive: 2011/65/EU, which means our
manufacture processes and products are strictly “lead-free” and without the hazardous
substances cited in the directive.
The crossed-out wheeled bin mark symbolizes that within the European Union the product must
be collected separately at the product end-of-life. This applies to your product and any
peripherals marked with this symbol. Do not dispose of these products as unsorted municipal
waste.
* This symbol indicates electrical warnings and cautions.
** This symbol indicates general warnings and cautions.

4
Quantum 960H DVR range manual V1.2
NORBAIN SD LTD reserves the right to make changes to the product and specification of the product from time to
time without prior notice.
WARNINGS AND CAUTIONS:
To reduce the risk of fire or electric shock, do not insert any metallic objects through the ventilation grills or other
openings on the equipment.
CAUTION
WARNING: TO REDUCE THE RISK OF ELECTRIC SHOCK,
DO NOT REMOVE COVER (OR BACK).
NO USER-SERVICABLE PARTS INSIDE.
REFER SERVICING TO QUALIFIED SERVICE PERSONNEL.
RISK OF ELECTRIC SHOCK
DO NOT OPEN
CAUTION

5
Quantum 960H DVR range manual V1.2
Contents
OVERVIEW ........................................................................................................................... 7
1. CONTENTS OF PACKING .................................................................................................... 7
2. FEATURES ....................................................................................................................... 8
INSTALLATION .................................................................................................................... 9
1. FRONT PANEL CONTROLS ................................................................................................. 9
2. REAR PANEL CONNECTORS ............................................................................................. 11
3. REMOTE CONTROL ..........................................................................................................13
4. CONNECTION GUIDE ........................................................................................................14
5. TURNING ON THE DVR ....................................................................................................16
OPERATION ........................................................................................................................17
1. NAVIGATION ....................................................................................................................17
1-1. Mouse Control ........................................................................................................................................ 17
1-2. Menu Navigation .................................................................................................................................... 17
2. MONITORING ...................................................................................................................18
2-1. OSD Description ..................................................................................................................................... 18
2-2. Select Channel ....................................................................................................................................... 18
2-3. Digital Zoom ........................................................................................................................................... 19
3. PLAYBACK ......................................................................................................................20
3-1. OSD Description ..................................................................................................................................... 20
3-2. Playback Control .................................................................................................................................... 21
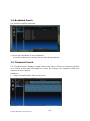
3-3. Playback Search .................................................................................................................................... 22
4. PTZ CONTROL ................................................................................................................22
4-1. PTZ Control by mouse ............................................................................................................................ 22
4-2. PTZ Control by remote keyboard ........................................................................................................... 24
4-3. PTZ Control by remote controller ........................................................................................................... 24
4-4. PTZ Control by Client software ............................................................................................................... 25
SETUP MENU ......................................................................................................................25
1. DISPLAY .........................................................................................................................25
2. RECORDING ....................................................................................................................30
3. SYSTEM ..........................................................................................................................36
4. NETWORK .......................................................................................................................45
5. EVENT ............................................................................................................................49
SEARCH MENU ...................................................................................................................53
1. SEARCHING RECORDED DATA ..........................................................................................53
1-1. Date/Time Search................................................................................................................................... 53
1-2. Event Search .......................................................................................................................................... 54
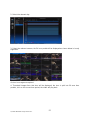
1-3. Calendar Search .................................................................................................................................... 54
1-4. Bookmark Search ................................................................................................................................... 56
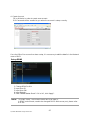
1-5. Thumbnail Search .................................................................................................................................. 56
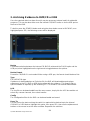
2. ARCHIVING EVIDENCE TO DVD/CD OR USB .....................................................................58
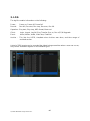
3. LOG ..............................................................................................................................60
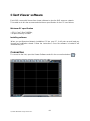
CLIENT VIEWER SOFTWARE ............................................................................................61
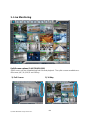
1. LIVE MONITORING ...........................................................................................................64
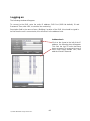
2. REMOTE SEARCH ............................................................................................................67
2-1. Search .................................................................................................................................................... 67
2-2. Archive.................................................................................................................................................... 69
2-3. Remote Log ............................................................................................................................................ 71
2-4. Information ............................................................................................................................................. 72
3. REMOTE SETUP (MENU SETTINGS - SAME AS DVR) ...........................................................73

6
Quantum 960H DVR range manual V1.2
3-1. Display .................................................................................................................................................... 73
3-2. Recording ............................................................................................................................................... 75
3-3. System ................................................................................................................................................... 79
3-4. Event ...................................................................................................................................................... 85
4. LOCAL SEARCH (VIEWING DOWNLOADED FOOTAGE) ...........................................................87
4-1. Search .................................................................................................................................................... 87
4-2. Log ......................................................................................................................................................... 89
4-3. Info ......................................................................................................................................................... 89
5. LOCAL SETUP .................................................................................................................90
5-1. Global ..................................................................................................................................................... 90
5-2. Opacity ................................................................................................................................................... 90
5-3. Audio Buffer ............................................................................................................................................ 91
5-4. Camera Name ........................................................................................................................................ 91
6. TELEMETRY CONTROL (PAN/TILT/ZOOM/FOCUS) ...............................................................92
6-1. Pan / Tilt / Zoom / Focus ........................................................................................................................ 92
6-2. Preset / Learn ......................................................................................................................................... 93
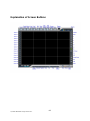
7. SCREEN POSITION SAVE/LOAD ........................................................................................94
7-1. Screen Position Save ............................................................................................................................. 94
7-2. Screen Position Load ............................................................................................................................. 94
8. FIRMWARE UPGRADE ......................................................................................................95
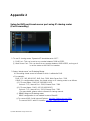
APPENDIX 1 ........................................................................................................................96
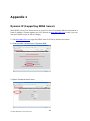
DYNAMIC IP (SUPPORTING DDNS SERVER) .........................................................................96
APPENDIX 2 ........................................................................................................................98
SETUP FOR DVR PORT & WEB SERVER PORT USING IP SHARING ROUTER ...............................98
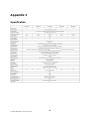
APPENDIX 3 ........................................................................................................................99
SPECIFICATION ...................................................................................................................99

7
Quantum 960H DVR range manual V1.2
Overview
1. Contents of Packing
Mouse
Power Cable
User Manual
Remote Controller
Battery
(AAA x2)
Installation
CD

8
Quantum 960H DVR range manual V1.2
2. Features
● Convenience
- User-friendly GUI (Graphical User Interface)
- Easy-to-use menu structure
- Easy-to-use recorded data search (Time, Date, Motion, and Alarm)
- Easy-to control via Front Panel, IR remote control and USB 2.0 mouse.
● Stability
- Auto restart after power interruption
- DB structure offers data stabilisation and better storage utilisation
● Expandability
- Remote DVR’s can be controlled using the supplied software client viewer.
● Technology
- Embedded LINUX OS
- Maximum record rate 400fps@960H(PAL)
- High-resolution & high-quality H.264 algorithm
- Uses watermarking & scrambling technologies,
● Functionality
- Variable recording function (normal, alarm, motion, schedule, duration, Time Lapse,)
- RS485 and FSK Telemetry
- Full channel real-time monitoring
- Live monitoring, recording, playback, backup, remote access simultaneously
- Multi channel playback (QX960H real-time on all views, QP960H real-time on quad display)
- Variable events notification to e-mail, buzzer or PC Client system

9
Quantum 960H DVR range manual V1.2
①②③④ ⑤ ⑥ ⑦ ⑧ ⑨
⑩⑪⑫ ⑬ ⑭ ⑮
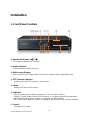
Installation
1. Front Panel Controls
① Volume Up & Down ( / )
To increase or decrease the volume.
② Audio Selection
Switches between audio channels
③ Multi-screen Display
Use the Multi-screen display button to select the display mode (single/4/9/16 way).
④ PTZ Channel Selection
Used to select the PTZ channel on multi-screen.
⑤ Menu
Displays the menu on the screen
⑥ Indicator
- REC: Recording status (When recording is on, the red light will flash)
- POWER: System Power On/Off (When power is on, the green light will be illuminated)
- NET: Network status (When network is connected, the light will lash)
- HDD: HDD status (When the system is reading or writing to the HDD, the light will flash)
⑦ Search
Entering search mode

10
Quantum 960H DVR range manual V1.2
⑧ Stop / Eject (■)
To stop playback and go back to live mode. To eject DVD-RW
Pause ( ▌▌)
To freeze picture on playback mode and live mode.
Forward Play (▶)
Playback of the recorded data. When in play mode press again to enter fast forward mode.
Reverse Play / Rewind ()
Reverse play of recorded data. When in play mode press again to enter fast rewind mode.
Rec (●)
It starts & stop manual recording, password protected.
⑨ Power
System Power On/Off
⑩ Pan / Tilt
To control the pan & tilt of PTZ camera, press this button to browse virtual key on screen.
⑪ Arrow Buttons
Moves the cursor while in menu mode
⑫ Select
Menu selection
⑬ Zoom
To control the zoom in & out of PTZ camera
⑭ Numeric & Character
Input for numbers & letters within the setup menus and searches
⑮ USB Port
USB connector for mouse control & downloading to USB memory.

11
Quantum 960H DVR range manual V1.2
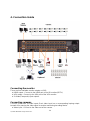
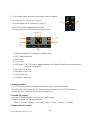
2. Rear Panel Connectors
① Spot Monitor Outputs
Spot Video Output (Composite Video)
② Video Inputs
16 camera inputs
③ Video Outputs
16 camera loop outputs
④ Audio Input
QX960H – Audio per channel, QP960H: 16way – 4 Audio inputs; 4 and 8 way – 1 Audio
input
⑤ AC Power Input
AC 100-240V 50/60Hz
⑥ Audio Output
Audio output
⑦ HDMI Output
HDMI output port (1080p)
⑥
⑫
⑬
⑭
⑮
①
②
③
④
⑤
⑦
⑧
⑨
⑩
⑪
16

12
Quantum 960H DVR range manual V1.2
⑧ VGA Output
VGA video output for main monitor (1024x768 to 1920x1080)
⑨ Network Port
Connecting to the DVR through Internet or LAN
⑩ USB Port
USB 2.0 port for mouse
⑪ RS232
Serial Communication (for service)
⑫ PTZ Camera Controller
Serial Communication for Pan / Tilt Camera
⑬ Keyboard Controller
Serial Communication for P/T/Z Control Keyboard
⑭ Alarm Output
Alarm(relay) output port
⑮ Sensor Input
16 Sensor input
E-SATA Port ( Only on the QX960H models)
Port for e-SATA HDD
16

13
Quantum 960H DVR range manual V1.2
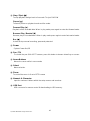
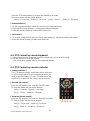
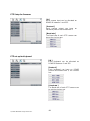
3. Remote Control
① POWER : Power on/off
② P/T/Z : Entering PTZ Setup menu directly
③ REC : Start & Stop Recording
④ Numbers and letters (1 to 9)
⑤ INFO : Direct access system information
ID : Entering ID set mode
MUTE : Audio Mute
AUDIO : Switches through Audio channels
⑥ MENU: Entering system menu
SEARCH: Entering search
ARROW : Left, Right, Up and Down
SEL : Select/Enter
⑦ VOL +/- : Up, down volume
⑧ CH +/- : Up, down channel
⑨ (◀)◀ : Reverse play
▶(▶) : Play (or fast forward)
I I : Pause
■ : Stop playback
⑩ OSD : On Screen Display ON/OFF
SEQ : Sequence operation
LOG : Direct access Log list
⑪ CAM : Changing PTZ icon
P/T : Pan &Tilt
Z/F : Zoom/ & Focus
DIS : Channel Division
⑩
①
②
③
④
⑤
⑥
⑧
⑨
⑦
⑪

14
Quantum 960H DVR range manual V1.2
4. Connection Guide
Connecting the monitor
There are four available monitor outputs on DVR.
● HDMI output : Connect to the HDMI port of the HD monitor(HDTV).
● VGA output : Connect to the VGA port of the VGA monitor.
● 2v Video(Composite) Spot outputs.
Connecting cameras
This unit comes with 16 video inputs. Each video input has a corresponding looping output
beneath it for passing the video signal to another monitoring/recording device.
● Video input : Connect to the video out of the camera.

15
Quantum 960H DVR range manual V1.2
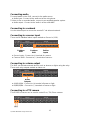
Connecting audio
To record audio on the DVR, connect to the audio source.
● Audio input : Connect to the audio out of the microphone.
To listen to live or recorded audio, connect to an amplified speaker system.
● Audio output : Connect to the audio in of the audio AMP.
Connecting to a network
Use the ethernet port to connect to remote PC via ethernet network.
Connecting to a sensor input
There are 16 individual alarm inputs marked as Sensor In (1-16).
● Sensor inputs : Connect to (+) terminal of a sensor.
● Common GND : Connect to (–) terminals of sensors.
Connecting to a alarm output
The DVR can activate external devices such as buzzers or lights using the relay.
There are 4 relay outputs marked as Alarm out.
● A1/A2/A3/A4 : Connect to (+) terminal of buzzer or light.
● B1/B2/B3/B4 : Connect to (–) terminals of buzzer or light.
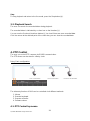
Connecting to a PTZ camera
This RS485 connector can be used to control Pan / Tilt / Zoom camera.
Common
GND
Sensor
Inputs
(+)
(-)
Alarm
Outputs
Common
GND

16
Quantum 960H DVR range manual V1.2
● Telemetry (+) : Connect to RS485 Rx(+) of PTZ camera.
● Telemetry (-) : Connect to RS485 Rx(-) of PTZ camera.
Connecting to a remote keyboard
This RS485 connector is for a control keyboard.
● Keyboard (+) : Connect to RS485 Tx(+) of the keyboard.
● Keyboard (-) : Connect to RS485 Tx(-) of the keyboard.
Connecting to a mouse
● USB 2.0 : Connect to the mouse.
Connecting to a external HDD
To expand the HDD capacity, connect the external storage.
● e-SATA : Connect to the e-Sata HDD storage.
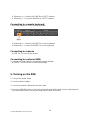
5. Turning on the DVR
1. Connect the power cable.
2. Connect camera cables.
3. Connect a network cable and a monitor cable.
4. Press the POWER button on the front panel and wait until the main screen is displayed on
the connected monitor; this process may take a couple of minutes.
(+)
(-)

17
Quantum 960H DVR range manual V1.2
Operation
1. Navigation
You can navigate the on screen menus using the front panel buttons, IR remote control,
remote keyboard or mouse.
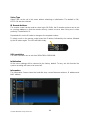
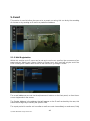
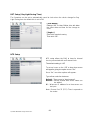
1-1. Mouse Control
Right clicking the mouse brings up the following popup menu.
① Setup Menu
② Search Menu
③ PAN/Tilt Menu
④ Focus/Zoom Menu
⑤ Power Button
⑥ Sequence Button
⑦ Playback Button
⑧ Eject Button
⑨ Volume Up/Down Button
⑩ Multiscreen Display Button
⑪ Channel Up/Down Button
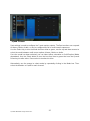
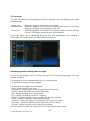
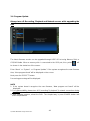
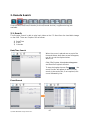
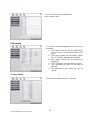
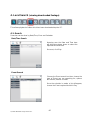
1-2. Menu Navigation
To enter the Setup menu, the user has to have the required access rights and be logged on.
Press the Menu button or right click with mouse on screen and select the menu icon.
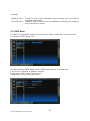
The following screen will be displayed asking for password.
① Select the user ID.
② Enter the password.
The default password is 00000000(8 zeros).
③ Press OK, the setup menu will be displayed
on screen.
All menus are navigated around using the Left/
Right/ Up/ Down and the Select button or mouse.
To step back out of the menus, press MENU button
or click the right button of the mouse.
①
②
③
⑦
⑨
⑪
⑤
⑧
⑩
①
③
⑥
⑨
⑪
②
④

18
Quantum 960H DVR range manual V1.2
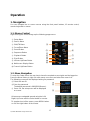
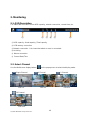
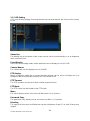
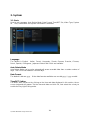
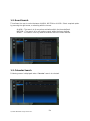
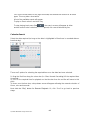
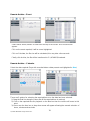
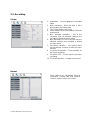
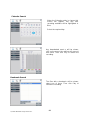
2. Monitoring
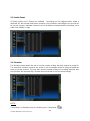
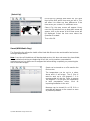
2-1. OSD Description
The Status Bar on screen shows HDD capacity, network connection, current time, etc.
① HDD capacity : Used capacity / Total capacity
② USB memory connection
③ Network connection : It is shown that admin or user is connected.
④ Archiving
⑤ Mouse connection
⑥ Current Date/Time
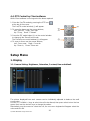
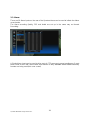
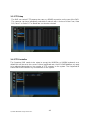
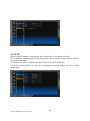
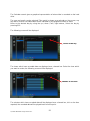
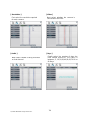
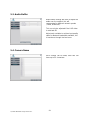
2-2. Select Channel
Use the Multiscreen display button ( ) on the popup menu to select the display mode.
Single Channel 4 Channel 9 Channel
Live 1ch Live 4ch Live 9ch
16 Channel
Live 16ch
①
④
⑥
②
③
⑤

19
Quantum 960H DVR range manual V1.2
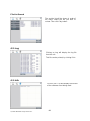
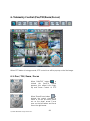
Also you can use the DIS button on the remote controller to change the display mode.
Display switches in the following order when the DIS button is pressed.
Single Channel 4 Channel 9 Channel 16 Channel Single Channel
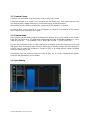
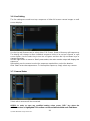
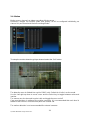
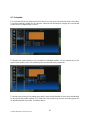
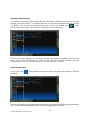
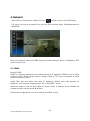
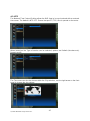
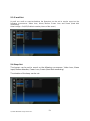
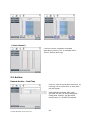
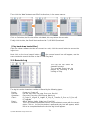
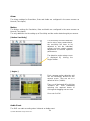
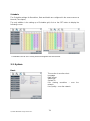
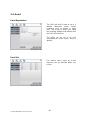
2-3. Digital Zoom
Left-click and drag the mouse to set the desired area for zoom in live or playback mo
de. (It is available in single screen mode.)
Click the left button on the mouse.
The screen will change to the zoomed image with a small image displayed in the upper right
hand corner of the screen
The red box on the small picture indicates the position of the magnified image.
You can change the magnification of image and move the position of the magnified
Image, by rotating the mouse wheel
.
Drag the image to move the position of the magnified image.
Click the right button on the mouse to return to the original mage.
Red box

20
Quantum 960H DVR range manual V1.2
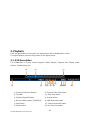
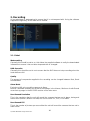
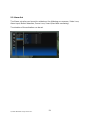
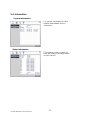
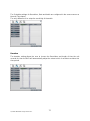
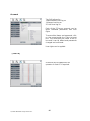
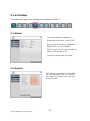
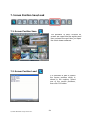
3. Playback
Click the right button on the mouse, the popup menu will be displayed on screen.
To begin playback, press the Play button on the popup menu.
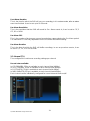
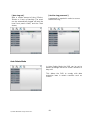
3-1. OSD Description
The Control Bar on screen shows Playback control buttons, Progress bar, Display mode
buttons, Playback time, etc.
① Previous/ Next time buttons ⑨ Reverse Slow Play button
② Time Bar ⑩ Slow Play button
③ Playback Speed Display ⑪ Replay button
④ Display mode buttons (1/4/9/16ch) ⑫ Add Bookmark button
⑤ Stop button ⑬ Search Bookmark button
⑥ Pause button ⑭ Quick Archive button
④
⑫
⑬
③
⑮
⑭
①
①
②
⑩
⑧
⑥
⑤
⑦
⑨
⑪
Page is loading ...
Page is loading ...
Page is loading ...
Page is loading ...
Page is loading ...
Page is loading ...
Page is loading ...
Page is loading ...
Page is loading ...
Page is loading ...
Page is loading ...
Page is loading ...
Page is loading ...
Page is loading ...
Page is loading ...
Page is loading ...
Page is loading ...
Page is loading ...
Page is loading ...
Page is loading ...
Page is loading ...
Page is loading ...
Page is loading ...
Page is loading ...
Page is loading ...
Page is loading ...
Page is loading ...
Page is loading ...
Page is loading ...
Page is loading ...
Page is loading ...
Page is loading ...
Page is loading ...
Page is loading ...
Page is loading ...
Page is loading ...
Page is loading ...
Page is loading ...
Page is loading ...
Page is loading ...
Page is loading ...
Page is loading ...
Page is loading ...
Page is loading ...
Page is loading ...
Page is loading ...
Page is loading ...
Page is loading ...
Page is loading ...
Page is loading ...
Page is loading ...
Page is loading ...
Page is loading ...
Page is loading ...
Page is loading ...
Page is loading ...
Page is loading ...
Page is loading ...
Page is loading ...
Page is loading ...
Page is loading ...
Page is loading ...
Page is loading ...
Page is loading ...
Page is loading ...
Page is loading ...
Page is loading ...
Page is loading ...
Page is loading ...
Page is loading ...
Page is loading ...
Page is loading ...
Page is loading ...
Page is loading ...
Page is loading ...
Page is loading ...
Page is loading ...
Page is loading ...
Page is loading ...
Page is loading ...
-
 1
1
-
 2
2
-
 3
3
-
 4
4
-
 5
5
-
 6
6
-
 7
7
-
 8
8
-
 9
9
-
 10
10
-
 11
11
-
 12
12
-
 13
13
-
 14
14
-
 15
15
-
 16
16
-
 17
17
-
 18
18
-
 19
19
-
 20
20
-
 21
21
-
 22
22
-
 23
23
-
 24
24
-
 25
25
-
 26
26
-
 27
27
-
 28
28
-
 29
29
-
 30
30
-
 31
31
-
 32
32
-
 33
33
-
 34
34
-
 35
35
-
 36
36
-
 37
37
-
 38
38
-
 39
39
-
 40
40
-
 41
41
-
 42
42
-
 43
43
-
 44
44
-
 45
45
-
 46
46
-
 47
47
-
 48
48
-
 49
49
-
 50
50
-
 51
51
-
 52
52
-
 53
53
-
 54
54
-
 55
55
-
 56
56
-
 57
57
-
 58
58
-
 59
59
-
 60
60
-
 61
61
-
 62
62
-
 63
63
-
 64
64
-
 65
65
-
 66
66
-
 67
67
-
 68
68
-
 69
69
-
 70
70
-
 71
71
-
 72
72
-
 73
73
-
 74
74
-
 75
75
-
 76
76
-
 77
77
-
 78
78
-
 79
79
-
 80
80
-
 81
81
-
 82
82
-
 83
83
-
 84
84
-
 85
85
-
 86
86
-
 87
87
-
 88
88
-
 89
89
-
 90
90
-
 91
91
-
 92
92
-
 93
93
-
 94
94
-
 95
95
-
 96
96
-
 97
97
-
 98
98
-
 99
99
-
 100
100


Vista QX960H Installation and User Manual
- Category
- Digital Video Recorders (DVR)
- Type
- Installation and User Manual
- This manual is also suitable for
Ask a question and I''ll find the answer in the document
Finding information in a document is now easier with AI
Related papers
-
Vista Quantum QP960H16-series Quick User Manual
-
-
-
-
-
Quantum QVNR User manual
-
-
Vista QE16-XXXh Installation and User Manual
-
-
Other documents
-
COP-USA CL-DVR Owner's manual
-
CNB SDS4812CD Owner's manual
-
 Visus EVD16NCF User manual
-
Xvision EVD16NCF User manual
-
 SAFE-TECH kd67x_16 Quick start guide
-
Clover Electronics CDR0430 User manual
-
RHINO 16CH User manual
-
Q-See QSD2304L Remote Monitoring Guide
-
LILIN DVR708 User manual
-

