Lexmark E260d Series Maintenance Manual

Category
Multifunctionals
Type
Maintenance Manual
Lexmark E260, E260d, and E260dn
Series
Maintenance Guide
May 2008 www.lexmark.com
Contents
Maintaining the printer................................................................................3
Cleaning the exterior of the printer..........................................................................................................3
Storing supplies.........................................................................................................................................3
Conserving supplies...................................................................................................................................3
Checking the status of supplies.................................................................................................................4
Checking the status of supplies from a network computer................................................................................ 4
Ordering supplies......................................................................................................................................5
Ordering toner cartridges ................................................................................................................................... 5
Ordering a photoconductor kit ........................................................................................................................... 5
Replacing supplies.....................................................................................................................................6
Replacing the toner cartridge ............................................................................................................................. 6
Replacing the photoconductor kit ...................................................................................................................... 8
Recycling Lexmark products....................................................................................................................11
Moving the printer..................................................................................................................................11
Before moving the printer ................................................................................................................................ 11
Moving the printer to another location............................................................................................................ 11
Shipping the printer.......................................................................................................................................... 11
Contents
2
Maintaining the printer
Periodically, certain tasks are required to maintain optimum print quality.
Cleaning the exterior of the printer
1 Make sure that the printer is turned off and unplugged from the wall outlet.
CAUTION—SHOCK HAZARD: To avoid the risk of electric shock when cleaning the exterior of the printer,
unplug the power cord from the wall outlet and disconnect all cables to the printer before proceeding.
2
Remove all paper from the printer.
3 Dampen a clean, lintfree cloth with water.
Warning—Potential Damage: Do not use household cleaners or detergents, as they may damage the finish of
the printer.
4 Wipe only the outside of the printer.
Warning—Potential Damage:
Using a damp cloth to clean the interior may cause damage to your printer.
5 Make sure all areas of the printer are dry before beginning a new print job.
Storing supplies
Choose a cool, clean storage area for the printer supplies. Store supplies right side up in their original packing until you
are ready to use them.
Do not expose supplies to:
Direct sunlight
Temperatures above 35°C (95°F)
High humidity above 80%
Salty air
Corrosive gases
Heavy dust
Conserving supplies
Conserving supplies using the printer menus
There are some settings you can change in the printer menus that will help you conserve toner and paper.
Maintaining the printer
3
To access printer menus:
Open the Embedded Web Server by typing the printer IP address into the address field of your Web browser.
Note: If you do not know the IP address of the printer, print a network setup page and locate the IP address in
the TCP/IP section.
If the printer is connected to the computer by a USB or parallel cable, open the Local Printer Settings Utility for
Windows or Printer Settings for Macintosh. One of these utilities installs with the printer software.
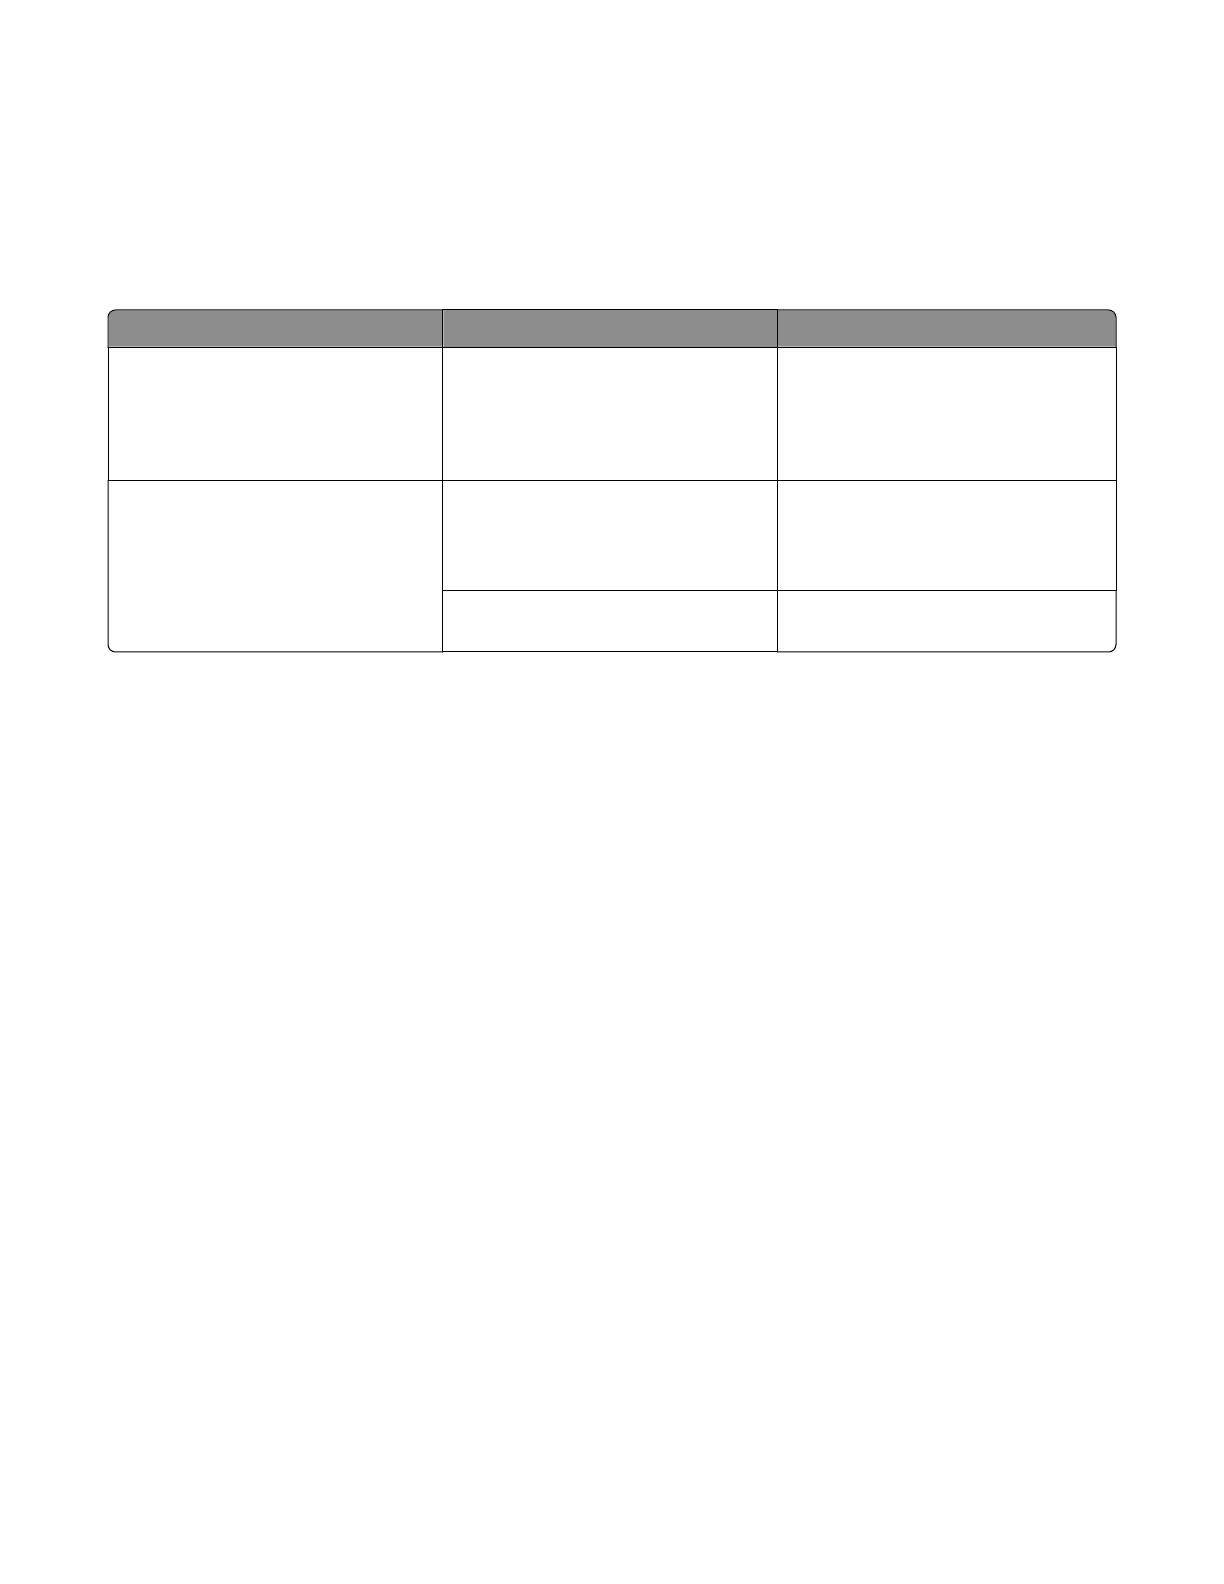
Supply Path to menu item Purpose of menu item
Toner From the Quality menu, you can adjust
the Toner Darkness setting.
Lets you adjust the level of toner
released on a sheet of paper or specialty
media. The values range from 1 (lightest
setting) to 10 (darkest setting) with 8
being the factory default setting.
Paper or specialty media From the Finishing menu, you can adjust
the Nup (Multipage Print) setting.
Lets you select to print two or more page
images on one side of a sheet. Values for
Nup are 2-Up, 3-Up, 4-Up, 6-Up, 9-Up,
12-Up, and 16Up.
From the Finishing menu, you can select
Duplex.
Lets you print on both sides of a sheet of
paper
Conserving supplies when printing multiple copies
If you need to print several copies, you can conserve supplies by printing the first copy and checking it for accuracy
before printing the remaining copies.
Checking the status of supplies
A message appears on the display when a replacement supply item is needed or when maintenance is required.
Checking the status of supplies from a network computer
Note: The computer must be connected to the same network as the printer.
1
Type the printer IP address into the address field of your Web browser.
Note: If you do not know the IP address of the printer, print a network setup page and locate the IP address in
the TCP/IP section.
2
Click Device Status. The Device Status page appears, displaying a summary of supply levels.
Maintaining the printer
4
Ordering supplies
To order supplies in the U.S., contact Lexmark at 1-800-539-6275 for information about Lexmark authorized supplies
dealers in your area. In other countries or regions, visit the Lexmark Web Site at www.lexmark.comor contact the place
where you purchased the printer.
Note: All life estimates for printer supplies assume printing on letteror A4size plain paper.
Ordering toner cartridges
When 88 Toner is low appears or when the print becomes faded, you may be able to extend the life of the toner
cartridge:
1 Remove the toner cartridge.
2
Firmly shake the cartridge sidetoside and fronttoback several times to redistribute toner.
3
Reinsert the cartridge and continue printing.
Note:
Repeat this procedure multiple times until the print remains faded, and then replace the cartridge.
The recommended toner cartridges specifically designed for your printer are as follows. The part
numbers are indicated.
Part name
Regular cartridge Lexmark Return Program Cartridge
For the US and Canada
Toner cartridge E260A21A E260A11A
For Europe, the Middle East, and Africa
Toner cartridge E260A21E E260A11E
For the Asia Pacific Region, including Australia, New Zealand, and India
Toner cartridge E260A21P E260A11P
For Latin America
Toner cartridge E260A21L E260A11L
Ordering a photoconductor kit
Depending on your printer model, the printer issues a message or a light sequence to let you know the photoconductor
kit is near its end of life. At this time, order a photoconductor kit. You can also see the status of the photoconductor
kit by printing a network setup page.
Maintaining the printer
5
Part name Part number
Photoconductor kit E260X22G
Replacing supplies
Replacing the toner cartridge
Light sequence
Toner is low
On
On
When the “Toner is low” light sequence appears, or when you experience faded print, remove the toner cartridge.
Firmly shake it sidetoside and fronttoback several times to redistribute the toner, and then reinsert it and continue
printing. When shaking the cartridge no longer improves the print quality, replace the toner cartridge.
Note:
You can check to see approximately how much toner is left in your cartridge by printing a menu settings page.
To replace the toner cartridge:
1 Open the front door by pressing the button on the left side of the printer and lowering the door.
Maintaining the printer
6
2 Press the button on the base of the photoconductor kit, and then pull the toner cartridge out using the handle.
3 Unpack the new toner cartridge.
Warning—Potential Damage:
When replacing a toner cartridge, do not leave the new cartridge exposed to
direct light for an extended period of time. Extended light exposure can cause print quality problems.
4 Rotate the cartridge in all directions to distribute the toner.
5
Install the new toner cartridge by aligning the rollers on the toner cartridge with the arrows on the tracks of the
photoconductor kit. Push the toner cartridge in as far as it will go. The cartridge clicks into place when correctly
installed.
6 Close the front door.
Maintaining the printer
7
Replacing the photoconductor kit
The printer notifies you when the photoconductor kit reaches a page maximum. The printer does this by displaying the
“Photoconductor life warning” light sequence or the “Replace photoconductor” light sequence.
Light sequences
Photoconductor life warning
Blinking
On
Replace photoconductor
Blinking
Blinking
On
When you first receive either light sequence, you should immediately order a new photoconductor kit. While the printer
may continue to function properly after the photoconductor kit has reached its official endoflife, print quality
significantly decreases.
Note:
The photoconductor kit is one item only.
Maintaining the printer
8
To replace the photoconductor kit:
1 Open the front door by pressing the button on the left side of the printer and lowering the front door.
2
Pull the photoconductor kit and toner cartridge together as a unit out of the printer by pulling on the toner cartridge
handle.
Note: The photoconductor kit and toner cartridge form a unit.
Place the unit on a flat, clean surface.
3
Press the button on the base of the photoconductor kit. Pull the toner cartridge up and out using the handle.
4 Unpack the new photoconductor kit.
Warning—Potential Damage:
Be careful not to touch the photoconductor drum. Doing so may affect the print
quality of future print jobs.
Maintaining the printer
9
5 Insert the toner cartridge into the photoconductor kit by aligning the rollers on the toner cartridge with the tracks.
Push the toner cartridge in until it clicks into place.
6 Install the unit into the printer by aligning the arrows on the guides of the unit with the arrows in the printer. Push
the unit as far as it will go.
7 After you replace the photoconductor kit, reset the photoconductor counter. To reset the counter, see the
instruction sheet that came with the new photoconductor kit.
Warning—Potential Damage:
Resetting the photoconductor counter without replacing the photoconductor kit
may damage your printer and void your warranty.
8 Close the front door.
Maintaining the printer
10
Recycling Lexmark products
To return Lexmark products to Lexmark for recycling:
1
Visit our Web site at www.lexmark.com/recycle.
2
Find the product type you want to recycle, and then select your country from the list.
3
Follow the instructions on the computer screen.
Moving the printer
Before moving the printer
CAUTION—POTENTIAL INJURY: Follow these guidelines to avoid personal injury or printer damage:
Turn the printer off using the power switch, and then unplug the power cord from the wall outlet.
Disconnect all cords and cables from the printer before moving it.
Lift the printer off of the optional drawer and set it aside instead of trying to lift the drawer and printer at the same
time.
Note: Use the handholds located on both sides of the printer to lift it off the optional drawer.
Make sure your fingers are not under the printer when you set it down.
Warning—Potential Damage:
Damage to the printer caused by improper moving is not covered by the printer
warranty.
Moving the printer to another location
The printer and options can be safely moved to another location by following these precautions:
Any cart used to move the printer must have a surface able to support the full footprint of the printer. Any cart
used to move the options must have a surface able to support the dimensions of the options.
Keep the printer in an upright position.
Avoid severe jarring movements.
Shipping the printer
When shipping the printer, use the original packaging or call the place of purchase for a relocation kit.
Maintaining the printer
11
  • Page 1 1
  • Page 2 2
  • Page 3 3
  • Page 4 4
  • Page 5 5
  • Page 6 6
  • Page 7 7
  • Page 8 8
  • Page 9 9
  • Page 10 10
  • Page 11 11

Lexmark E260d Series Maintenance Manual

Category
Multifunctionals
Type
Maintenance Manual

Ask a question and I''ll find the answer in the document

Finding information in a document is now easier with AI