-
Lexmark E260d Series Administrator's Manual
-
Lexmark E260d Series Maintenance Manual
-
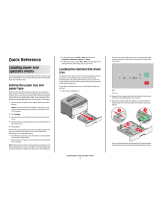
Lexmark E260d Series Reference
-
Lexmark E260d Series Reference guide
-
Lexmark E260d Series User manual
-
Lexmark E260d Series User manual
-
Lexmark E260d Series User manual

-
Lexmark E260d Series User manual
-
Lexmark E260d Series User manual
-
Lexmark E260d Series User manual
-
Lexmark E260d Series User manual
-
Lexmark E260d Series User manual
-
Lexmark E260d Series User manual