Fujitsu ARTG24LMLC Operating instructions

Category
Fireplaces
Type
Operating instructions

Fujitsu ARTG24LMLC duct type indoor unit air conditioner offers energy-saving and comfortable operation with its inverter technology. It features automatic changeover between cooling, dry, and heating modes to maintain a constant temperature. The wired remote controller enables convenient control, while the optional wireless remote controller (not included) provides additional functions like sleep timer and weekly timer. Its economy operation mode helps save energy while maintaining comfort.

Fujitsu ARTG24LMLC duct type indoor unit air conditioner offers energy-saving and comfortable operation with its inverter technology. It features automatic changeover between cooling, dry, and heating modes to maintain a constant temperature. The wired remote controller enables convenient control, while the optional wireless remote controller (not included) provides additional functions like sleep timer and weekly timer. Its economy operation mode helps save energy while maintaining comfort.

AIR CONDITIONER
Duct Type
Indoor Unit
ARTG24LMLC
PART No. 9381857135
KEEP THIS MANUAL FOR FUTURE REFERENCE
OPERATION MANUAL
9381857135-01_OM_200819.indd 1 2020/09/02 9:56:09
2
CONTENTS
SAFETY PRECAUTIONS ........................................ 2
FEATURES AND FUNCTIONS ............................... 3
NAME OF PARTS ................................................... 4
PREPARATORY OPERATION ................................ 5
OPERATION ........................................................... 6
TIMER FUNCTIONS ............................................... 8
ON/OFF TIMER ....................................................... 8
WEEKLY TIMER ...................................................... 9
SAFETY PRECAUTIONS
●Donotattempttoinstallthisairconditionerbyyourself.
●Thisunitcontainsnouser-serviceableparts.Alwaysconsultauthorizedservicepersonnel
forrepairs.
●Whenmoving,consultauthorizedservicepersonnelfordisconnectionandinstallationof
theairconditioner.
●Donotbecomeexcessivelychilledbystayingformanyhoursinthedirectcoolingairflow.
●Donotinsertngersorobjectsintotheoutletportorintakegrilles.
●Donotstartandstopairconditioneroperationbyturningotheelectricalbreakerandsoon
.
●Intheeventofamalfunction(burningsmell,etc.),immediatelystopoperation,turnothe
electricalbreaker,andconsultauthorizedservicepersonnel.
●Intheeventofrefrigerantleakage,besuretokeepawayfromreoranyflammables.
(consultauthorizedservicepersonnel)
●Provideoccasionalventilationduringuse.
●Donotdirectairflowatreplacesorheatingapparatus.
●Donotclimbon,orplaceobjectson,theairconditioner.
●Donothangobjectsfromtheindoorunit.
●Donotsetflowervasesorwatercontainersontopofairconditioners.
●Donotexposetheairconditionerdirectlytowater.
●Donotoperatetheairconditionerwithawethand.Anelectricshockmayresult.
●Donottouchtheswitcheswithsharpobjects.
●Turnopowersourcewhennotusingtheunitforextendedperiods.
●Alwaysturnotheelectricalbreakerwhenevercleaningtheairconditionerorchangingthe
airlter.
●ConnectionvalvesbecomehotduringHeating;handlewithcare.
●Checktheconditionoftheinstallationstandfordamage.
●Donotplaceanimalsorplantsinthedirectpathoftheairflow.
●Whenrestartingafteralongperiodofdisuseinthewinter,turnthepowerswitchonatleast
12hoursbeforestartingtheunit.
●Donotdrinkthewaterdrainedfromtheairconditioner.
●Donotusetheairconditionerforotherpurposes.Inordertoavoidanyqualitydeterioration,
donotusetheunitforcoolingprecisioninstruments,food,planets,animalsorworksofart.
●Donotapplyanyheavypressuretoradiatorns.
●Operateonlywithairltersinstalled.
●Donotblockorcovertheintakegrilleandoutletport.
●Ensurethatanyelectronicequipmentisatleast1mawayfromeithertheindoororoutdoor
units.
●Avoidinstallingtheairconditionernearareplaceorotherheatingapparatus.
●Wheninstallingtheindoorandoutdoorunits,takeprecautionstopreventaccessbyinfants.
●Donotuseflammablegasesneartheairconditioner.
Beforeusingtheappliance,readthese“SAFETYPRECAUTIONS”thoroughlyandoperateinthecorrectway.
Theinstructionsinthissectionallrelatetosafety;besuretomaintainsafeoperatingconditions.
“DANGER”,“WARNING”and“CAUTION”havethefollowingmeaningsintheseinstructions:
TEMPERATURE SET BACK TIMER ......................11
ECONOMY OPERATION ...................................... 12
CLEANING AND CARE ......................................... 12
TROUBLESHOOTING .......................................... 13
OPERATING TIPS ................................................. 14
SELF-DIAGNOSIS ................................................ 16
TEMPERATURE AND HUMIDITY RANGE ........... 16
DANGER
Thismarkindicatesprocedureswhich,ifimproperlyperformed,aremostlikelytoresult
inthedeathoforseriousinjurytotheuserorservicepersonnel.
WARNING
Thismarkindicatesprocedureswhich,ifimproperlyperformed,mightleadtothedeath
orseriousinjuryoftheuserorservicepersonnel.
CAUTION
Thismarkindicatesprocedureswhich,ifimproperlyperformed,mightpossiblyresultin
personalharmtotheuser,ordamagetoproperty.
DANGER
CAUTION
9381857135-01_OM_200819.indd 2 2020/09/02 9:56:10
3
●Thisapplianceisnotintendedforusebypersons(includingchildren)withreducedphysical,
sensoryormentalcapabilities,orlackofexperienceandknowledge,unlesstheyhavebeen
givensupervisionorinstructionconcerninguseoftheappliancebyapersonresponsible
fortheirsafety.
Childrenshouldbesupervisedtoensurethattheydonotplaywiththeappliance.
●Ifyouseelightningorhearthunder,theremightbealightningstrike.Topreventelectric
shockhazard,turnofftheairconditionerbyusingtheremotecontroller,anddonottouch
theunitorthepowerplugduringthunderstorm.
●Donotplaceanyotherelectricalproductsorhouseholdbelongingsunderindoorunitor
outdoorunit.Drippingcondensationfromtheunitmightgetthemwet,andmaycausedam
-
ageormalfunctionofyourproperty.
●Keepcleanandtidyaroundtheoutdoorunit,anddonotplacethethingsaroundit.Ifitis
coveredwithfallenleaves,therecouldbeaninfiltrationofsmallanimalsorinsectswhose
contactwiththeinternalelectricalcomponentsleadstotheproductmalfunction.
●Donotstandonunstablestepswhenoperatingorcleaningtheairconditioner.Itmayoverturn
andcancausetheinjury.
CAUTION
SAFETY PRECAUTIONS
FEATURES AND FUNCTIONS
EnergysavingandComfortablefunction
Remotecontroller
WIREDREMOTECONTROLLER
The wired remote controller allows convenient control of indoor
unit operation.
WIRELESSREMOTECONTROLLER(OPTION)
The optional wireless remote controller can be used. When
you use remote controller, there are following dierent points
as compared with using wired remote controller.
[The additional function for wireless ones]
• SLEEP timer
• TIMER
• 10 °C HEAT operation
And you can use both wireless and wired remote controller
simultaneously. (But function is limited.)
[The restricted functions for wired ones]
• Weekly timer
• Temperature set back timer
WEEKLYTIMER
Use this timer function to set operating times for each day of
the week. Use the DAY OFF setting to switch o timed opera
-
tion for a selected day in the coming week. Because all days
can be set together, the weekly timer can be used to repeat
the timer settings for all of the days.
TEMPERATURE SET BACK TIMER
Use this timer function to change the set temperature in the
operation times set for each day of the week. This can be used
together with other timer settings.
Convenientfunction
INVERTER
At the start of operation, large amount of power is used to
bring the room quickly to the desired temperature. Afterwards,
the unit automatically switches to a low power setting for eco
-
nomic and comfortable operation.
ECONOMY OPERATION
When ECONOMY operation mode is operated, the room tem-
perature will be little higher than the set-temp under cooling
mode and lower than set-temp under heating mode. Therefore,
the ECONOMY mode is able to save more energy than other
normal mode.
AUTO CHANGEOVER
The operation mode (cooling, dry, heating) is switched auto-
matically to maintain the set temperature, and the temperature
is kept constant at all times.
9381857135-01_OM_200819.indd 3 2020/09/02 9:56:10
4
NAME OF PARTS
Remotecontroller
START/STOPbutton
SETTEMP.(temperature)button
MODEbutton
FANbutton
ECONOMYbutton
TIMERMODE(CLOCKAD-
JUST)button
DAY(DAYOFF)button
SETBACKbutton
SETTIME(<>)button

TIMERDELETEbutton

TIMERSETbutton

Up/Downairflowdirectionand
Swingbutton
*1

Left/rightairflowdirectionand
Swingbutton
*2

MAINTENANCE(FILTERRE-
SET)button
#1

Operationlamp

TimerandClockindicator

Operationmodeindicator

Fanspeedindicator

Operationlockindicator

Temperatureindicator

Functionindicator
Defrostindicator
Thermosensorindicator
ECONOMYindicator
 Verticalswingindicator
*3
Filterindicator
#1
*
1~3 These functions cannot be used.
(Please also see the operating manual
of the option when using it with options,
etc.)
#
1 Can be used if set correctly during
installation. Please consult authorized
service personnel when using this
function.
9381857135-01_OM_200819.indd 4 2020/09/02 9:56:13
5
PREPARATORY OPERATION
Press the TIMER MODE (CLOCK
ADJUST) button for 2 seconds or
more. The time indicator on the
remote controller will blink.
2
SU MO TU WE TH FR SA
Press the DAY button and select the current day.
A
appears around the selected day.
Press the SET TIME (< >) buttons to set the current time.
Press repeatedly to adjust the current time in 1-minute incre
-
ments. Press and hold to adjust the current time in 10-minute
increments.
ex. Monday 23:00
Press again to end.
SU
MO
TU
WE
TH FR
SA
1
3
5
Press the SET BACK button to switch between the
12- and 24-hour time displays.
3
4
SU
MO
TU
WE
TH FR
SA
SU
MO
TU
WE
TH FR
SA
Setthecurrentdayandtime
9381857135-01_OM_200819.indd 5 2020/09/02 9:56:13
6
OPERATION
AUTO COOL DRY HEAT*FAN
Temperaturesettingrange
AUTO ............................................... 18 to 30°C
COOL/DRY ...................................... 18 to 30°C
HEAT
*
.............................................. 16 to 30°C
Lower Rise
Operationlamp
Air conditioner ON: Lit brightly
Air conditioner OFF: Not lit
Press the START/STOP button.
Press the MODE button to set the operation mode.
If DRY is selected, the fan speed will be set to AUTO.
Press the SET TEMP. buttons to set the room temperature.
Press the FAN button to set the fan speed.
Press the ECONOMY button to start or stop ECONOMY opera-
tion.
For details on the function, refer to page 12.
Tostart/stopoperation
Tosettheoperationmode
●Operationmodesetting
●Roomtemperaturesetting
●Fanspeedsetting
ECONOMYoperation
AUTO
HIGH
MED
LOW
QUIET
9381857135-01_OM_200819.indd 6 2020/09/02 9:56:14
7
Press the ECONOMY button for more than 2 seconds to select
whether the room temperature is detected at the indoor unit or
the remote controller.
When the
thermo sensor indicator appears, the room
temperature is detected at the remote controller.
NOTES
If this function is locked, the location where the room temperature is detected cannot be changed and the mark blinks
when the ECONOMY button is pushed for 2 seconds or more.
Indoor unit
Roomtemperaturesensorselection
OPERATION
Childlockfunction
Press the DAY (DAY OFF) button and TIMER SET button
simultaneously for 2 seconds or more to activate the child lock
function and lock all of the buttons on the remote controller
except the START/STOP button, SET TEMP. buttons, MODE
button, and FAN button. Press the buttons again for 2 seconds
or more to deactivate the child lock function.
When the child lock function is activated, the
mark
appears. If any button is pressed during the child lock, the
CL
indicator blinks.
Thisfunctionislockedatthefactory.Inordertodetecttheroomtemperaturecorrectly,consultauthorizedser
-
vicepersonnelwhenusingthisfunction.
9381857135-01_OM_200819.indd 7 2020/09/02 9:56:14
8
TosettheOn/Otimer
TIMER FUNCTIONS
ON/OFF TIMER
Press the TIMER MODE button to
select the On timer or O timer.
2
Press the TIMER DELETE button to cancel the timer mode.
The timer mode can also be canceled by changing the timer mode using the TIMER MODE button
.
1
NON
STOP
OFF
TIMER
ON
TIMER
WEEKLY
TIMER
No indicator
SU
MO
TU
WE
TH FR
SA
Press the SET TIME (< >) buttons to set the time.
After the time is set, the timer will start automatically.
The amount of time until the O timer operates that is displayed
on the timer indicator decreases as time passes.
From 1 to 24 hours
ex. O timer set for 6 hours
●Tocancel
Otimer(Seepage8.)
Use this timer function to stop air conditioner operation. The timer operates and air conditioner operation stops after the
set time has passed. The timer can be set up to 24 hours in advance.
Ontimer(Seepage8.)
Use this timer function to start air conditioner operation. The timer operates and air conditioner operation starts after the
set time has passed. The timer can be set up to 24 hours in advance.
Weeklytimer(Seepage9.)
Use this timer function to set operating times for each day of the week.
Use the DAY OFF setting to switch o timed operation for a selected day in the coming week.
Because all days can be set together, the weekly timer can be used to repeat the timer settings for all of the days.
Temperaturesetbacktimer(Seepage11.)
Use this timer function to change the set temperature in the operation times set for each day of the week.
This can be used together with other timer settings.
9381857135-01_OM_200819.indd 8 2020/09/02 9:56:14
9
WEEKLYTIMER
Press the TIMER MODE button to select the weekly timer.
2
Press the TIMER SET button for
2 seconds or more.
1
3
●Dayoftheweeksetting
Press the DAY button to select the day of the week, and then press the TIMER
SET button to conrm the setting.
For ALL, all of the days can be set together when a appears around
each day.
ALL SU MO TU WE TH FR SA
4
●Timesetting
Press the SET TIME (< >) buttons to set the time, and then press the TIMER SET
button to conrm the setting and proceed to the next on or o time setting.
Up to 2 times on and o times can be set per day.
Press the DAY button to complete the time setting and return to the day of the week
setting.
5
Repeat steps 3 and 4.
To complete the weekly timer settings, press the TIMER
SET button for 2 seconds or more.
●Todeletetheoperatingtime
If the TIMER DELETE button is pressed dur-
ing steps 3 or 4, the operating time for the
selected day will be deleted.
If all the days are selected, the operating
times for all of the days will be deleted.
NOTES
The operating time can be set in 30 minute increments only.
The o time can be carried over to the next day.
The On timer and the O timer functions cannot be set using the weekly timer. Both an On and O time must be set.
ON-1 OFF-1 ON-2 OFF-2
ex. The timer is set for 7:00-18:00.
1
2
1
2
3
Weeklytimersetting
When the operating time is set,
the
mark appears.
9381857135-01_OM_200819.indd 9 2020/09/02 9:56:15
10
SU
MO
TU
WE
TH FR
SA
369
12 15 18 21
SU
MO
TU
WE
TH FR
SA
369
12 15 18 21
WEEKLYTIMER
●Tostart
When the weekly timer is selected, the
timer starts automatically.
The operating time for the current
day is displayed.
●Tocancel
Press the TIMER DELETE button to
cancel the timer mode.
The timer mode can also be
cancelled by changing the timer
mode using the TIMER MODE
button.
1
During the weekly timer, press
the TIMER SET button for
2 seconds or more to set the
day.
Select the day to set the
day o.
Press the DAY (Day o) button
for 2 seconds or more to set
the day o.
Press the TIMER SET but-
ton for 2 seconds or more to
complete the day o setting.
2 43
● Tocancel
Follow the same procedures as those
for setup.
ex. The day o is set for Monday.
NOTES
The day o setting is only available for days for which weekly settings already exist.
If the operating time carries over to the next day (during a next day setting), the eective day o range will be set as shown
below.
●Normal ●Nextdaysetting
Setting dayPreceding day Next day Setting dayPreceding day Next day
The day o setting can only be set 1 time. The day o setting is cancelled automatically after the set day has passed.
The
mark blinks under a day of the week.
ON OFF ON OFF
DAY OFF
WEEKLY WEEKLY
WEEKLY
WEEKLY
ON
OFF ON OFF
DAY OFF
ex. Operating time 7:00-18:00
Weeklytimeroperation
Tosetthedayo(foraholiday)
9381857135-01_OM_200819.indd 10 2020/09/02 9:56:16
11
TEMPERATURE SET BACK TIMER
Press the SET BACK button to change to the set back conrma-
tion display.
The Set back operating time and the set temperature will be
displayed.
2
Press the TIMER SET button
for 2 seconds or more.
1
3
●Daysetting ●Operatingtimesetting
Follow the same procedures to set the operating time as those for the weekly timer. The TIMER DELETE button is also used
as described in the procedures for the weekly timer.
4
NOTES
The Set back timer only changes the set temperature, it cannot be used to start or stop air conditioner operation.
The Set back timer can be set to operate up to 2 times per day but only 1 temperature setting can be used.
The Set back timer can be used together with the On, O, and weekly timer functions.
The Set back operating time is displayed only in the Set back conrmation display. (Refer to step 1 for the Set back conrma
-
tion display.)
ex. When setting all days together
●Temperaturesetting
Press the SET TEMP. buttons to set the
temperature. (The temperature setting range
is the same as the range for the operation
mode.)
ex. Operating time 15:00–22:00
5
Repeat steps 3 and 4.
Press the TIMER SET button for
2 seconds or more to complete
the temperature Set back timer
settings.
SET BACK temperature
Normal temperature
●Tostart
Press the SET BACK button. The Set back conrmation display appears for 5
seconds, and then the timer starts automatically.
ex. Display during set back timer operation
(The operating time will not be displayed.)
●Tocancel
Press the SET BACK button, and then
press the TIMER DELETE button while
the Set back confirmation display is
displayed. Even if the SET BACK button
is pressed again, the Set back timer will
be cancelled.
If there is no existing
Set back temperature
setting, “- -” will be
displayed for the tem
-
perature.
1
3
2
4
1
2
Temperaturesetbacktimersetting
Temperaturesetbacktimeroperation
ON
24°C
28°C
24°C
OFF
9381857135-01_OM_200819.indd 11 2020/09/02 9:56:16
12
CLEANING AND CARE
CleaningtheAirFilter
Before cleaning the unit, be sure to stop the unit and disconnect the power supply.
Turn o the electrical breaker.
A fan operates at high speed inside the unit, and personal injury could result.
When used for extended periods, the unit may accumulate dust inside, reducing its performance. We recommend that the unit
be inspected regularly, in addition to your own cleaning and care. For more information, consult authorized service personnel.
When cleaning the unit’s body, do not use water hotter than 40°C, harsh abrasive cleansers, or volatile agents like benzene or
thinner.
Do not expose the unit body to liquid insecticides or hairsprays.
If the unit will not be operated for a period of 1 month or more, be sure to allow the inner parts of the unit to dry thoroughly, in
advance, by operating the unit in fan mode for half a day.
● Removethedustfromtheairltersbyvacuumingorwashingthem.Afterwashing,allowtheairlterstodrythoroughly
inanareaprotectedfromsunlight.
● Dustcanbecleanedfromtheairltereitherwithavacuumcleaner,orbywashingthelterinasolutionofmilddeter
-
gentandwarmwater.Ifyouwashthelter,besuretoallowittodrythoroughlyinashadyplacebeforereinstalling.
● Ifdustisallowedtoaccumulateontheairlter,airflowwillbereduced,loweringoperatingeciencyandincreasing
noise.
CAUTION
ECONOMY OPERATION
Begin air conditioner operation before performing this procedure.
ToUsetheECONOMYOperation
PresstheECONOMYbutton.
The ECONOMY indicator will light.
ECONOMY operation begins.
ToStoptheECONOMYOperation
PresstheECONOMYbuttonagain.
The ECONOMY indicator will go out.
Normal operation begins.
AboutECONOMYOperation
At the maximum output, ECONOMY operation is approximately 70% of normal air conditioner operation for cooling and heating.
● If the room is not cooled (or heated) well during ECONOMY operation, select normal operation.
During the monitor period in the AUTO mode, the air conditioner operation will not change to ECONOMY operation even if
ECONOMY operation is selected by pressing the ECONOMY operation button.
When ECONOMY operation mode is operated, the room temperature will be little higher than the set-temp under cooling mode
and lower than set-temp under heating mode. Therefore, the ECONOMY mode is able to save more energy than other normal
mode.
Can be used if set correctly during installation. Please consult authorized service personnel when using this
function.
It lights on when it is time to clean the air lters.
After turning the power on.
Press the MAINTENANCE button for
2 seconds or more on the remote control.
The lter indicator will disappear.
FilterIndicatorReset(Specialsetting)
9381857135-01_OM_200819.indd 12 2020/09/02 9:56:16
13
TROUBLESHOOTING
Symptom Problem
See
Page
NORMAL
FUNCTION
Does not operate im-
mediately:
If the unit is stopped and then immediately started again, the compressor will
not operate for about 3 minutes, in order to prevent fuse blowouts.
Whenever the electrical breaker is turned o then on again, the protection circuit
will operate for about 3 minutes, preventing unit operation during that period.
Noise is heard:
During operation and immediately after stopping the unit, the sound of water
owing in the air conditioner’s piping may be heard. Also, noise may be par
-
ticularly noticeable for about 2 to 3 minutes after starting operation (sound of
refrigerant owing)
.
*● During heating operation, a sizzling sound may be heard occasionally. This
sound is produced by the automatic defrosting operation.
14
Smells:
Some smell may be emitted from the indoor unit. This smell is the result of room
smells (furniture, tobacco, etc.) which have been taken into the air conditioner.
Mist or steam are
emitted:
During cooling or dry operation, a thin mist may be seen emitted from the
indoor unit. This results from the sudden cooling of room air by the air emitted
from the air conditioner, resulting in condensation and misting.
During heating operation, the outdoor unit’s fan may stop, and steam may be
seen rising from the unit. This is due to the automatic defrosting operation.
14
Airow is weak or stops: When heating operation is started, fan speed is temporarily very low, to allow
internal parts to warm up.
During heating operation, if the room temperature rises above the thermostat
setting, the outdoor unit will stop, and the indoor unit will operate at very low fan
speed. If you wish to warm the room further, set the thermostat to a higher setting.
During heating operation, the unit will temporarily stop operation (between 4
and 15 minutes) as the automatic defrosting mode operates. During the auto
-
matic defrosting operation, will be shown on the remote controller display.
14
In case of multi-split type, if multiple units are operated in dierent operation
modes as shown below, the units operated afterward will stop
and will
be shown on the remote controller display of the stopped indoor units.
• Heating mode and cooling mode (or dry mode)
• Heating mode and fan mode
16
The fan may operate at very low speed during dry operation or when the unit
is monitoring the room’s temperature.
During QUIET operation, the fan will operate at very low speed.
During monitoring in Auto mode, the fan will operate at very low speed.
Water is produced from
the outdoor unit:
During heating operation, water may be produced from the outdoor unit due to
the automatic defrosting operation.
14
The FILTER indicator
blinks:
Clean the lter. Afterwards, turn the FILTER indicator o.
12
thermo sensor
display on the remote
controller is blinking:
The room temperature sensor may be malfunctioning. Please consult author
-
ized service personnel.
CHECK
ONCE
MORE
Does not operate at all: Has the circuit breaker been turned o?
Has there been a power failure?
Has a fuse blown out, or a circuit breaker been tripped?
Is the timer operating?
8 to 11
Poor cooling (or Heating*)
performance:
Is the air lter dusty?
Are the air conditioner’s intake grille or outlet port blocked?
Did you adjust the room temperature settings (thermostat) correctly?
Is there a window or door open?
In the case of cooling operation, is a window allowing bright sunlight to en
-
ter? (Close the curtains.)
In the case of cooling operation, are there heating apparatus and computers
inside the room, or are there too many people in the room?
Is the unit set for QUIET operation?
If the problem persists after performing these checks, or if you notice burning smells, stop operation immediately, turn o electric
breaker, and consult with authorized service personnel.
WARNING
In the event of a malfunction (burning smell, etc.), immediately stop operation, turn o the electrical
breaker, and consult authorized service personnel.
Merely turning o the unit’s power switch will not completely disconnect the unit from the power
source. Always be sure to turn o the electrical breaker to ensure that power is completely o.
Before requesting service, perform the following checks:
9381857135-01_OM_200819.indd 13 2020/09/02 9:56:16
14
HeatingPerformance*
This air conditioner operates on the heat pump principle,
absorbing heat from outdoor air and transferring that heat
indoors. As a result, the operating performance is reduced
as outdoor air temperature drops. If you feel that insucient
heating performance is being produced, we recommend you
use this air conditioner in conjunction with another type of
heating appliance.
Heat pump air conditioners heat your entire room by recircu
-
lating air throughout the room, with the result that some time
may be required after rst starting the air conditioner until the
room is heated.
WhenIndoorandOutdoorTemperature
areHigh*
When both indoor and outdoor temperatures are high during use
of the heating mode, the outdoor unit’s fan may stop at times
to protect the unit.
Fanspeed:AUTO
Heating* : The fan will operate at very low speed when the
temperature of the air issued from the indoor unit
is low.
Cooling : As the room temperature approaches that of the set
temperature, the fan speed becomes slower.
Fan : The fan runs at the low fan speed.
OPERATING TIPS
AutomaticDefrosting*
When using the heating mode under conditions of low out-
door temperature and high humidity, frost may form on the
outdoor unit, resulting in reduced operating performance.
In order to prevent this kind of reduced performance, this unit
is equipped with a automatic defrosting function. During the
defrost cycle, the indoor fan will shutdown and
will be
displayed on the remote controller. It will take anywhere from
4 to 15 minutes before the air conditioner starts up again.
After heating operation stops, if frost forms on the outdoor
unit, the unit will start automatic defrosting operation.
At this time, the outdoor unit will automatically stop after
operating for a few minutes.
LowAmbientCooling
When the outdoor temperature drops, the outdoor unit’s fans may
switch to low speed, or one of the fans may stop intermittently.
HotStart*
The indoor unit prevents cold drafts when heating operation
begins.
The indoor unit fan will not operate until the heat exchanger
reaches the set temperature.
DualRemoteControllers(optional)
An additional remove controller can be added up to the maximum
of two remote controllers. Either remote controller can control
the air conditioner. However, the timer functions cannot be used
at the secondary unit.
GroupControl
1 remote controller can control up to 16 air conditioners.
All of the
air conditioners will be operated with the same settings.
9381857135-01_OM_200819.indd 14 2020/09/02 9:56:16
15
OPERATING TIPS
Modeoperation
Duringheatingmode:
Set the thermostat to a temperature set
-
ting that is higher than the current room
temperature. The heating mode will not
operate if the thermostat is set lower than
the actual room temperature.
Duringcooling/drymode:
Set the thermostat to a temperature set-
ting that is lower than the current room
temperature. The cooling and dry modes
will not operate if the thermostat is set
higher than the actual room temperature
(in cooling mode, the fan alone will ope-
rate).
Duringfanmode:
You can not use the unit to heat and cool
your room.
HEAT*: Use to warm your room.
When heating mode is selected, the air conditioner will operate at very
low fan speed for about 3 to 5 minutes, after which it will switch to the
selected fan setting. This period of time is provided to allow the indoor
unit to warm up before beginning full operation.
When the outdoor temperature is very low, frost may form on the outdoor
unit, and its performance may be reduced. In order to remove such frost,
the unit will automatically enter the defrost cycle from time to time. During
automatic defrosting operation, the heat operation will be interrupted.
After the start of heating operation, it takes sometime before the room
gets warmer.
COOL: Use to cool your room.
DRY: Use for gently cooling while dehumidifying your room.
You cannot heat the room during dry mode.
During dry mode, the unit will operate at low speed; in order to adjust
room humidity, the indoor unit’s fan may stop from time to time. Also, the
fan may operate at very low speed when adjusting room humidity.
The fan speed cannot be changed manually when dry mode has been
selected.
FAN: Use to circulate the air throughout your room.
AUTO[inHEAT&COOL(Reversecycle)model]:
When AUTO (automatic changeover) is selected, the air conditioner selects the appropriate operation mode (cooling
or heating) according to your room’s present temperature.
When AUTO operation rst selected, the fan will operate at low speed for about a few minute, during which time the
indoor unit detects the room conditions and selects the proper operation mode.
Room temperature is higher than the dened temperature in
temperature setting → Cooling mode or dry mode
Room temperature is close to the dened temperature in temperature
setting → Determined by outdoor temperature
Room temperature is lower than the dened temperature in
temperature setting → Heating mode
When the air conditioner has adjusted your room’s temperature to near the thermostat setting, it will begin monitor op
-
eration. In the monitor operation mode, the fan will operate at low speed. If the room temperature subsequently chang-
es, the air conditioner will once again select the appropriate operation (heating, cooling) to adjust the temperature to
the value set in the thermostat.
If the mode automatically selected by the unit is not what you wish, select one of the mode operation (HEAT, COOL,
DRY, FAN).
Dened
temperature in
temperature
setting
Cooling or Dry
Heating
Determined by
outdoor temperature
AUTO(inCOOLINGmodel):
When AUTO (automatic changeover) operation rst selected, the fan will operate at very low speed for about a few
minutes, during which time the indoor unit detects the room conditions and selects the proper mode.
Room temperature is higher than the dened temperature in
temperature setting → Cooling mode or dry mode
Room temperature is close to or lower than the dened temperature in
temperature setting → Monitor operation
When the indoor unit has adjusted your room’s temperature to near the temperature setting, it will begin monitor oper
-
ation. In the monitor operation mode, the fan will operate at low speed. If the room temperature subsequently changes,
the indoor unit will once again select the appropriate operation (cooling) to adjust the temperature to the value set in
the temperature setting.
If the mode automatically selected by the unit is not what you wish, select one of the mode operation (COOL, DRY,
FAN).
Dened
temperature in
temperature
setting
Cooling mode
or Dry mode
Monitor operation
9381857135-01_OM_200819.indd 15 2020/09/02 9:56:16
16
OPERATING TIPS
If the power supply to the air conditioner is interrupted by a
power failure, the air conditioner will restart automatically in
the previously selected mode once the power is restored.
Use of other electrical appliances (electric shaver, etc.) or nearby
use of a wireless radio transmitter may cause the air conditioner to
malfunction. In this event, temporarily disconnect the power supply,
reconnect it, and then use the remote controller to resume operation.
AUTORestart
Multi-splittypeAirconditioner
InEventofPowerInterruption
SimultaneousUseofMultipleUnits
Notices
During use of the heating mode, the top of the indoor unit
may become warm, but this is due to the fact that refrigerant
is circulated through the indoor unit even when it is stopped;
it is not a malfunction.
During use of the heating mode, the outdoor unit will occasionally
commence the defrost operation for brief periods. During the
defrosting operation, if the user sets the indoor unit for heating
again, the defrosting mode will continue, and the heating opera
-
tion will begin after completion of defrosting, with the result that
some time may be required before warm air is emitted.
SELF-DIAGNOSIS
TEMPERATURE AND HUMIDITY RANGE
For the permissible ranges of temperature and humidity, refer to the installation manual.
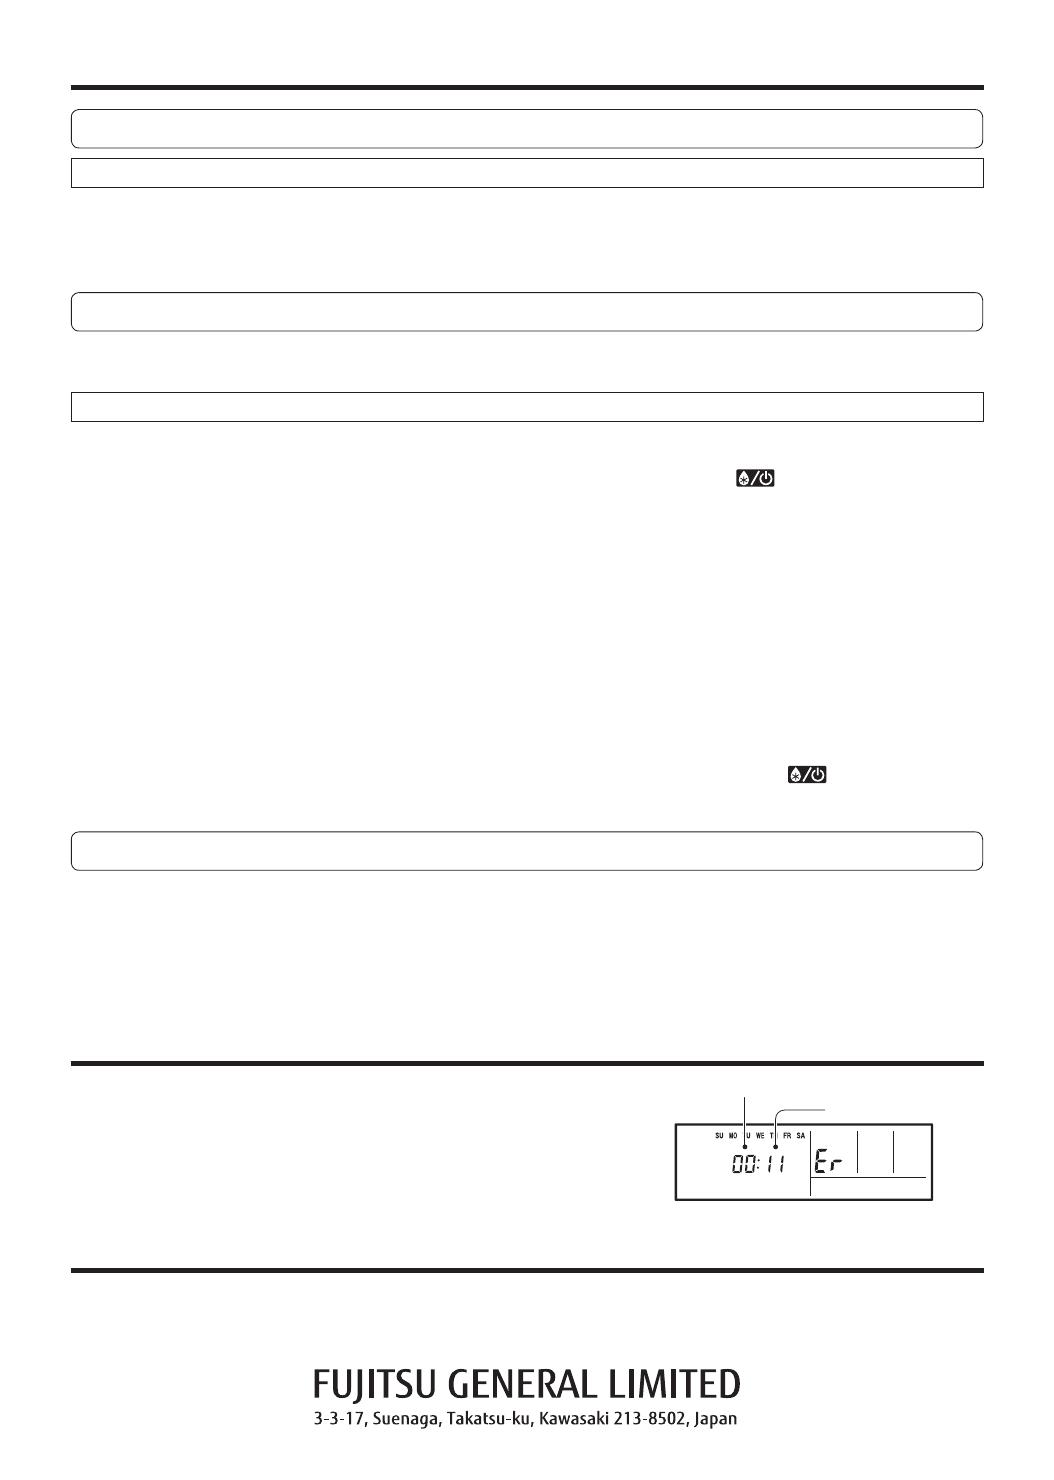
When “Er” in temperature indicator is displayed, inspection of the air conditioning
system is necessary. Please consult authorized service personnel.
Unit number (usually “00”)
Error code
ex. Self-diagnosis check
This indoor unit can be connected to a multi-
split
type outdoor unit. The multi-
split
type air conditioner allows multiple indoor units to be
operated in multiple locations. The indoor units may be operated simultaneously, in accordance with their respective output.
When using a multi-split type air conditioner, the multiple indoor
units can be operated simultaneously, but when 2 or more indoor
units of the same group are operated simultaneously, the heating
and cooling eciency will be less than when a single indoor unit
is used alone. Accordingly, when you wish to use more than 1
indoor unit for cooling at the same time, the use should be con
-
centrated at night and other times when less output is required.
In the same way, when multiple units are used simultaneously
for heating, it is recommended that they be used in conjunction
with other auxiliary space heaters, as required.
Seasonal and outdoor temperature conditions, the structure of
the rooms and the number of persons present may also result
in dierences of operating eciency. We recommend that you
try various operating patterns in order to conrm the level of
heating and cooling output provided by your units, and use
the units in the way that best matches your family’s lifestyle.
If you discover that 1 or more units delivers a low level of cool-
ing or heating during simultaneous operation, we recommend
that you stop simultaneous operation of the multiple units.
Operation cannot be done in the following dierent operating
modes. If the indoor unit is instructed to do an operating mode
that it cannot perform,
will be shown on the remote
controller display and the unit will go into the standby mode.
Operation can be done in the following dierent operating modes.
The operating mode (heating mode or cooling (dry) mode) of the
outdoor unit will be determined by the operating mode of the indoor
unit that was operated rst. If the indoor unit was started in fan mode,
the operating mode of the outdoor unit will not be determined. For
example, if indoor unit (A) was started in fan mode and then indoor
unit (B) was then operated in heating mode, indoor unit (A) would
temporarily start operation in fan mode but when indoor unit (B)
started operating in heating mode,
will be shown on the unit
(A) remote controller display and it would go into standby mode.
Indoor unit (B) would continue to operate in heating mode.
• Heating mode and cooling mode (or dry mode)
• Heating mode and fan mode
• Cooling mode and dry mode
• Cooling mode and fan mode
• Dry mode and fan mode
9381857135-01_OM_200819.indd 16 2020/09/02 9:56:17
1 / 1

Fujitsu ARTG24LMLC Operating instructions

Category
Fireplaces
Type
Operating instructions

Fujitsu ARTG24LMLC duct type indoor unit air conditioner offers energy-saving and comfortable operation with its inverter technology. It features automatic changeover between cooling, dry, and heating modes to maintain a constant temperature. The wired remote controller enables convenient control, while the optional wireless remote controller (not included) provides additional functions like sleep timer and weekly timer. Its economy operation mode helps save energy while maintaining comfort.

Ask a question and I''ll find the answer in the document

Finding information in a document is now easier with AI

Ask the document