Page is loading ...

LED SOLAR SPOTLIGHT
IAN 378350_2110 LTPL LV
DE AT CH
LED-SOLARSTRAHLER
Bedienungs- und Sicherheitshinweise
LV
AR SAULES BATERĀM
DARBINĀMS LED
PROŽEKTORS
Lietošanas un drošības norādījumi
EE
LED-SOLAARPROŽEKTOR
Käsitsus- ja ohutusjuhised
LT
LED PROŽEKTORIUS SU
SAULĖS BATERA
Valdymo ir saugos nurodymai
GB
LED SOLAR SPOTLIGHT
Operating and safety information
PL
REFLEKTOR SOLARNY LED
Uwagi dotyczące obsługi i bezpieczeństwa

GB
Before you start reading, please fold out the illustrations page and familiarise yourself with all of
the item’s functions.
PL
Przed lekturą instrukcji obsługi otworzyć stronę z rysunkami i zapoznać się z wszystkimi
funkcjami produktu.
LT
Prieš skaitydami atsiverskite puslapį su paveikslėliais ir paskui susipažinkite su visomis šio
gaminio funkcijomis.
EE
Avage enne lugemist joonistega lehekülg ja tutvuge seejärel toote kõikide funktsioonidega.
LV
Pirms lasīšanas atveriet lapu ar attēliem un iepazīstieties ar visām izstrādājuma funkcijām.
DE AT CH
Klappen Sie vor dem Lesen die Seite mit den Abbildungen aus und machen Sie sich
anschließend mit allen Funktionen des Artikels vertraut.
GB Operating and safety information page 7
PL Uwagi dotyczące obsługi i bezpieczeństwa strona 15
LT Valdymo ir saugos nurodymai puslapis 23
EE Käsitsus- ja ohutusjuhised lehekülg 31
LV Lietošanas un drošības norādījumi lappuse 39
DE/AT/CH Bedienungs- und Sicherheitshinweise Seite 47

E F
A B
C D
1
11
19
16
15
1314 12 18
10
12 13 14
3
4
9
8
9
7
5
17
2
6
20
21
22

G
H
I
23 24
24
21
25
11
25
27
26
25 26
9

5
Įžanga ������������������������������������������������� 23
Ženklų paaiškinimas ������������������������� 23
Naudojimas pagal paskirtį �������������� 24
Tiekiamas rinkinys ����������������������������� 24
Dalių aprašas ������������������������������������� 24
Techniniai duomenys ������������������������� 25
Saugos nurodymai ���������������������������� 25
Akumuliatorių ištekėjimo pavojus �� 26
Surinkimas ������������������������������������������ 26
Akumuliatoriaus įkrovimas �������������� 28
Baterų pakeitimas ��������������������������� 28
Saulės bateros plokštės padėties
nustatymas ����������������������������������������� 28
Šviesos diodų šviestuvo su saulės
batera naudojimas �������������������������� 28
Trikčių šalinimas ��������������������������������� 29
Valymas ir laikymas ������������������������� 29
Šalinimas ��������������������������������������������� 29
Garanta ��������������������������������������������� 30
Klientų aptarnavimas ����������������������� 31
GB PL
LT EE
Introduction ������������������������������������������ 7
Explanation of symbols ���������������������� 7
Intended use ����������������������������������������� 7
Specications supplied ������������������������ 8
Description of parts ����������������������������� 8
Technical data �������������������������������������� 8
Safety information ������������������������������ 8
Risk of leakage from rechargeable
batteries ������������������������������������������������ 9
Assembly and installation ������������������ 9
Charging the battery ������������������������ 11
Exchanging the battery �������������������� 11
Positioning the solar panel �������������� 11
Operating the LED solar spotlight ��� 12
Troubleshooting ��������������������������������� 12
Cleaning and storage������������������������ 13
Disposal ����������������������������������������������� 13
Warranty �������������������������������������������� 13
Service ������������������������������������������������� 14
Sissejuhatus ���������������������������������������� 31
Märkide selgitus �������������������������������� 31
Sihtotstarbeline kasutamine ������������ 32
Tarnekomplekt ����������������������������������� 32
Osade kirjeldus ���������������������������������� 32
Tehnilised andmed ����������������������������� 33
Ohutusjuhised ������������������������������������ 33
Akude lekkimise risk ������������������������ 33
Montaaž ���������������������������������������������� 34
Aku laadimine ������������������������������������ 35
Aku vahetamine �������������������������������� 35
Päikesepaneeli väljarihtimine ��������� 36
LED-päikeseprožektori
kasutuselevõtmine ����������������������������� 36
Tõrgete kõrvaldamine ���������������������� 36
Puhastamine ja ladustamine ����������� 37
Jäätmekäitlus ������������������������������������� 37
Garantii ����������������������������������������������� 37
Teenindus �������������������������������������������� 38
Wstęp �������������������������������������������������� 15
Objaśnienie symboli �������������������������� 15
Użytkowanie zgodne
zprzeznaczeniem ������������������������������ 15
Zakres dostawy �������������������������������� 16
Opis części ������������������������������������������ 16
Dane techniczne ��������������������������������� 16
Uwagi dotyczące bezpieczeństwa �� 16
Niebezpieczeństwo wycieku
elektrolitu zakumulatorów ������������� 17
Montaż ������������������������������������������������ 17
Ładowanie akumulatora ������������������ 19
Wymiana akumulatora �������������������� 19
Ustawianie położenia panelu
solarnego �������������������������������������������� 20
Uruchamianie reektora solarnego LED
20
Usuwanie usterek ������������������������������ 21
Czyszczenie iprzechowywanie ������� 21
Utylizacja �������������������������������������������� 21
Gwarancja ������������������������������������������ 22
Serwis �������������������������������������������������� 23

6
Ievads �������������������������������������������������� 39
Simbolu skaidrojums ������������������������� 39
Paredzētais lietojums ������������������������ 39
Piegādes komplekts �������������������������� 39
Daļu apraksts ������������������������������������� 40
Tehniskie dati ������������������������������������� 40
Drošības norādījumi �������������������������� 40
Akumulatoru iztecēšanas risks�������� 41
Montāža ���������������������������������������������� 41
Akumulatora uzlāde ������������������������� 43
Akumulatora nomaiņa ��������������������� 43
Solārā paneļa pozicionēšana ���������� 43
LED solārā gaismekļa lietošanas
sākšana ����������������������������������������������� 44
Problēmu novēršana ������������������������� 44
Tīrīšana un glabāšana ���������������������� 44
Utilizāca �������������������������������������������� 45
Garanta ��������������������������������������������� 45
Serviss ������������������������������������������������� 46
Einleitung �������������������������������������������� 47
Zeichenerklärung ������������������������������ 47
Bestimmungsgemäße
Verwendung ��������������������������������������� 47
Lieferumfang �������������������������������������� 48
Teilebeschreibung ������������������������������ 48
Technische Daten ������������������������������� 48
Sicherheitshinweise ��������������������������� 48
Risiko des Auslaufens von Akkus ��� 49
Montage ���������������������������������������������� 49
Akku auf laden ����������������������������������� 51
Akku austauschen ����������������������������� 51
Solarpanel ausrichten ����������������������� 52
LED-Solarstrahler in Betrieb
nehmen ����������������������������������������������� 52
Fehlerbehebung ��������������������������������� 53
Reinigung und Lagerung ������������������ 53
Entsorgung ������������������������������������������ 53
Garantie ���������������������������������������������� 54
Service ������������������������������������������������� 55
DE AT CH
LV

7
GB
LED Solar Spotlight
zIntroduction
Congratulations on the purchase of
your new product� You have chosen
a high-quality product� Please read
these operating instructions thoroughly and
carefully� These instructions are an essential
part of the product and contain important
information on rst-time use and handling.
Always observe all safety instructions� If you
have any questions or are unsure how to
operate the product, please contact your
retailer or service centre� Please keep this
manual in a safe place and pass it on to
third parties where necessary�
zExplanation of symbols
Read the operating instructions!
Issue date of instruction manual
(month/year)
Date of manufacture
(month/year)
Direct current
Risk of fatal injury and
accidents for infants and
children!
Observe warning notices and
safety instructions!
Explosion hazard!
Wear protective gloves!
b
a
Dispose of packaging and
product in an environmentally
friendly manner!
Risk of environmental damage
from incorrect disposal of
batteries/rechargeable
batteries!
This symbol indicates that the
product operates with safety
extra-low voltage (SELV/PELV,
protection class III)�
Not suitable for indoor lighting
Detection range
Motion sensor
Luminous power
Integrated Li-ion battery
Protected against solid foreign
objects with a diameter of
≥ 1.0 mm, splash-proof
A cracked protective cover
must always be replaced�
Discontinue use of the product
immediately if damaged in any
way, and contact the service
address�
Packaging made of
FSCcertied
wood mix
With the CE label, the
manufacturer conrms that this
product complies with the
applicable European directives�
zIntended use
The LED solar spotlight is intended for
automatic illumination in outdoor areas (e�g�
garden, patio, etc�)� The spotlight must not
be installed indoors, as the battery cannot
be charged inside� The spotlight is not
suitable for room lighting in the household�
The spotlight is intended for use in private
households only�

8GB
zSpecications supplied
1 LED solar spotlight
1 wall bracket for solar panel
1 wall bracket for spotlight (for mounting on
building walls and corners)
1 ground spike
1 extension cable (separate)
1 xing materials
(6 wall plugs and 6 screws)
1 instruction manual
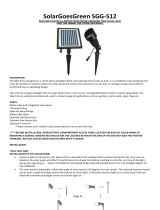
zDescription of parts
1Solar panel
2Connecting sleeve
3Bracket (solar panel)
4Bracket (solar panel/spotlight)
5Guide bar
6Power cord with plug (permanently
attached)
7Fixing bolts (reectors)
8Lamp head
9Motion sensor
10
Guide holes
11
LED solar spotlight
12
LUX control (for setting sensitivity to
ambient light)
13
TIME control (for setting how long the
spotlight stays on)
14
SENS control (for adjusting the
detection distance of the motion sensor)
15
Charging socket (with rubber cover)
16
ON/OFF/AUTO switch
17
Ground spike
18
Extension cable with plug (loose)
19
Wall bracket (solar panel)
20
Wall bracket mounting holes (solar
panel)
21
Wall bracket (spotlight)
22
Wall bracket mounting holes (spotlight)
23
Wall plugs
24
Screw
25
Screws (housing/batteries)
26
Battery compartment
27
Rechargeable batteries
zTechnical data
Model number: 898-S-2/898-W-2
Solar panel: 6 V , max� 3 W
Li-ion battery: 3,7 V ,
4000 mAh(18650)
Motion sensor:
Detection range:
1 - 8 m
Field of view:
approx� 100°
Protection class: IP44
Recommended
installation height: 2 - 4 m
Maximum
projection area: 2x 78 cm2
Weight: 900 g
Dimensions: 20 x 26,5 x 20,5 cm
zSafety information
Safety information
WARNING!
RISK OF FATAL INJURY AND
ACCIDENTS FOR INFANTS AND
CHILDREN!
Never leave children
unsupervised with the packaging material�
There is a danger of suffocation from the
packaging material� Children often
underestimate the dangers� Always keep
children away from the product�
This product can be used by children aged
8 years and over, as well as by persons
with limited physical, sensory or mental
abilities or lacking in experience and

9
GB
knowledge if they have been supervised
and instructed as to the safe use of the
product and understand the resulting
hazards� Do not let children play with the
product� Cleaning and maintenance may
not be carried out by children without
proper supervision�
Do not use the product if you notice any
damage�
The light source may only be replaced by
the manufacturer, service technician or a
similarly qualied person.
RISK OF FATAL INJURY!
Keep children
away from the work area during assembly�
The product as supplied includes a number
of screws and other small parts� These can
be fatal if they are swallowed or inhaled�
RISK OF INJURY!
Make sure you remove
the ground spike when removing the spot
light to avoid any risk of injury (e�g� trip
hazard)�
TRIP HAZARD!
Please make sure that the
power cable is routed in such a way that
nobody can tread on it or trip over it�
Safety instructions for
rechargeable batteries
RISK OF DEATH!
Keep rechargeable
batteries out of the reach of children� If
swallowed, seek medical advice
immediately!
EXPLOSION HAZARD!
Never
recharge non-rechargeable
batteries� Do not short-circuit and/
or open up batteries/rechargeable
batteries. They could overheat, cause a re
or explode�
Never throw rechargeable batteries into re
or water�
Do not expose the rechargeable batteries to
mechanical stress�
Remove the batteries from the battery
compartment as soon as they are empty or
if you are not going to use the product for a
longer period of time�
Never combine different types of
rechargeable batteries or batteries with
different charge statuses�
zRisk of leakage from
rechargeable batteries
Avoid exposing rechargeable batteries to
extreme conditions and temperatures, e�g�
radiators or direct sunlight�
Avoid contact with skin, eyes and mucous
membranes! In the event of skin contact
with battery acid, rinse the affected area
immediately with plenty of clean water and
seek medical advice immediately!
WEAR PROTECTIVE GLOVES!
Leaking or damaged rechargeable
batteries can cause chemical burns
if they come into contact with skin�
Therefore, wear suitable protective gloves in
such cases�
In the event that of battery leaks, remove
battery from the product immediately to
avoid damage��
zAssembly and installation
Please note:
dispose of all packaging
material�
Decide prior to installation where the
product is to be mounted�
Before drilling the xing holes, satisfy
yourself that there is no danger of drilling
into or damaging gas or water pipes or
electricity cables in the position where you
are about to drill the holes�
Use a drill to drill the holes into the
masonry� Observe all safety instructions
provided in the operation and safety
manual for your drill� Otherwise there is a
risk of death or injury from electric shock�
When deciding where to mount the
light, pay attention to the following:
Ensure the product illuminates the desired
area� Make sure that the motion sensor 9

10 GB
(see Fig� B) covers the desired area�
The motion sensor has a maximum
detection range of 8 m with a eld of view
of approx� 100°�
Ensure that the motion sensor 9 is not in a
position where street lighting will shine on it
at night� This may impair the function�
The recommended installation height is 2 to
4 m�
Use the xing holes
22
in the spotlight wall
bracket
21
(for mounting on building walls
or corners) to mark the positions for drilling
the holes (see Fig� G)�
Drill the holes (ø 5�5 mm, about 30 mm
deep)�
Now insert the wall plugs
23
into the
drilled holes (see Fig� G)�
Offer the wall bracket
21
up to the
mounting surface and x it in place with
the screws
24
without fully tightening them�
Tighten the screws in the xing holes and
align the LED solar spotlight
11
as
required�
The LED solar spotlight
11
can now simply
be slotted onto the wall bracket (see Fig�
H)�
Aligning the LED Solar Spotlight
The lamp heads 8 (see Fig� B) can be
individually adjusted both vertically and
horizontally at an angle of about 65°� To do
so, remove the xing bolt 7 (see Fig� B) and
then align the lamp heads as desired�
Now align the motion sensor 9, ensuring
that it faces directly towards the desired
detection zone�
Please note:
the motion sensor has a eld
of view of up to 100°�
Mounting the solar panel
You have the option of mounting the solar
panel 1 (see Fig� A) directly on the
spotlight, on a at surface (wall/roof), or on
the lawn, for example, using the ground
spike
17
(see Fig� D) supplied with the
product�
Please note:
the solar panel 1 should be
positioned where it will be exposed to as
much direct sunlight as possible� Even partial
shade during the day can signicantly
impair the charging process�
Orientation:
The optimum alignment is facing south� It is
better to face the solar panel slightly to the
west than slightly to the east�
Mounting the solar panel on the
spotlight
Screw the screw xing 3 together with the
connecting sleeve 2 (see Fig� A) and
tighten it hand-tight�
Now x the solar panel/spotlight bracket
4 in the guide holes
10
in the LED solar
spotlight by pushing the guide rail 5 of
the bracket into the guide holes of the LED
solar spotlight until they lock into place�
Slot the solar panel 1 onto the solar
panel/spotlight bracket 4�
Please note:
to detach the bracket again,
very carefully press the tabs on the sides of
the guide rail 5 until the bracket can be
removed�
Now plug the power cable 6 into the
charging socket
15
(see Fig� C); to do so
you must rst remove the rubber cap.
Please note:
the cap cannot be screwed on
in this position and hangs loosely on the
cable� This has no effect on the functioning
of the product�
Mounting the solar panel on a wall/
roof
Screw the solar panel screw xing 3 onto
the solar panel/spotlight bracket 4 using
the connecting sleeve 2 and tighten it
hand-tight�
Use the xing holes
20
in the solar panel
wall bracket
19
to mark the positions for
drilling the holes (see Fig� F)�
Drill the holes (ø 5�5 mm, about 30 mm
deep)�
Now insert the wall plugs
23
into the xing

11
GB
holes
20
�
Offer the wall bracket
19
up to the
mounting surface and x it in place with
the screws
23
�
Now push the solar panel/spotlight bracket
4 onto the solar panel wall bracket
19
until it very lightly snaps into place�
Now connect the plug of cable 6 to the
socket of the extension cable
18
(see Fig�
D) and then connect the plug of cable
18
to the charging socket
15
of the LED solar
spotlight�
Now align the LED solar spotlight as
desired�
Please note:
to detach the bracket again,
very carefully press the tabs on the sides of
the guide rail 5 until the bracket can be
removed�
Mounting the solar panel on the ground
spike
Screw the solar panel screw xing 3 onto
the connecting sleeve 2 and tighten it
hand-tight�
Now join the LED solar spotlight
11
together with the ground spike
17
(see Fig�
D) using the connecting sleeve 2 and
push the spike into the ground (lawn, soil,
etc�) where desired�
Please note:
make sure the solar panel is
attached rmly!
Now connect the plug of cable 6 to the
socket of the extension cable
18
(see Fig�
D) and then connect the plug of cable
18
to the charging socket
15
of the LED solar
spotlight�
The spotlight and solar panel are now ready
for use�
RISK OF INJURY!
Make sure you remove
the ground spike when removing the
spotlight to avoid any risk of injury (e�g� trip
hazard)�
zCharging the battery
The battery is charged regardless of the
position of the switch� To optimise initial
charging, charge the LED solar spotlight
while it is turned off�
Please note: the battery is fully charged after
it has been well exposed to sunlight for 6 to 8
hours� The duration of the charging process
depends on the battery‘s charge level and the
quality of the sunlight�
zExchanging the battery
Loosen the screws
25
on the underside of
the product� Fold the motion detector 9
upwards so that you can reach two of the
ve screws (see Fig. I).
Carefully take the product apart� Take care
not to tug on the cables�
Loosen the screws
25
on the underside of
the battery compartment
26
and remove
the battery compartment (see Fig� I)�
Remove the exhausted rechargeable
batteries
27
and dispose of it in
accordance with applicable guidelines�
Insert new rechargeable batteries� Only use
batteries of the same type (see section
‘Technical specications’). Pay attention to
the correct polarity when inserting batteries�
Screw the battery compartment back in
place�
Put the product together again� Attention:
Make sure not to get any cables trapped
between the different parts�
Refasten the ve screws.
zPositioning the solar panel
Orientation
The optimum alignment is facing south� It is
better to face the solar panel slightly to the
west than slightly to the east�
Please note:
to ensure the solar panel
functions as effectively as possible, make
sure that the surface of the solar panel 1 is

12 GB
not dirty�
Now align the solar panel 1 and x it in
position using the screw xing 3�
zOperating the LED solar
spotlight
Please note:
Only operate the oodlight
with the solar panel supplied� Do not
connect the oodlight or the solar panel to
any external devices�
When you switch the ON/OFF/AUTO
switch
16
(see Fig� C) to “ON” (II) the
spotlight remains permanently on�
When you switch the ON/OFF/AUTO
switch
16
to “OFF” (0) the spotlight
remains permanently off�
When you switch the ON/OFF/AUTO
switch
16
to “AUTO” (I) the spotlight is set
to AUTOMATIC mode� In this switch
position, the spotlight will switch on/off
according to control settings (for
illumination time, ambient light response
and detection range)�
When the spotlight is turned off after the
specied burn time, it will continue to burn
with reduced brightness� This setting is only
activated when in “AUTO” mode, and is
deactivated if the switch is in the “ON”
position�
Please note:
battery charging via the solar
panel does not depend on the position of
the ON/OFF/AUTO switch
16
� The battery
is charged continuously at all times�
Information about functionality:
in
twilight or darkness, the solar cell will turn
on the product as soon as the motion sensor
detects movement�
Adjusting the illumination time
Turn the TIME adjuster control
13
(see Fig� E)
clockwise to set the spotlight ON time to the
maximum duration of 60 seconds� Turn the
TIME adjuster control
13
anticlockwise to set
the spotlight ON time to the minimum
duration of 10 seconds�
Adjusting ambient light response
The LUX adjuster control
12
(see Fig� E) can
be used to adjust the “response” (i�e�
sensitivity) of the twilight sensor to the
ambient light level� Turn the adjuster control
clockwise to have the spotlight switch on at
ambient light levels up to as high as 50,000
lux� Turn the LUX adjuster control
12
anticlockwise to have the spotlight switch on
at ambient light levels from as low as 5 lux�
Adjusting detection range
Turn the SENS adjuster control
14
(see Fig�
E) clockwise to increase the motion sensor
detection range up to a maximum of 8
metres� The motion sensor will then activate
the spotlight when motion is detected within
a range of 8 metres� Turn the SENS adjuster
control
14
anti-clockwise to reduce the
motion sensor detection range to a minimum
of 1 metre� The motion sensor 9 will then
not activate the spotlight until motion is
detected within 1 metre�
zTroubleshooting
= Fault
=Cause
= Solution
= The LED solar spotlight does not turn
on�
= The LED solar spotlight is turned off�
= Press the ON/OFF/AUTO switch
(I/0/II) to switch the LED solar
spotlight on�
= The light is ickering.
= The battery is almost fully discharged�
= Charge the battery (see section
”Charging the battery”)�

13
GB
zCleaning and storage
Switch the spotlight
11
off if you want to
stop using it, store it away or clean it�
Regularly inspect the motion sensor 9 and
the solar panel 1 to make sure they are
not dirty� Remove any dirt to ensure the
spotlight works correctly�
Keep the spotlight and especially the solar
panel free of snow and ice in winter�
Clean the spotlight with a lint-free, damp
cloth and a mild detergent�
zDisposal
Note the labels on the packaging
materials when sorting the waste;
they are marked with abbreviations
(a) and numbers (b) with the
following meanings:
1-7: Plastics
20-22: Paper and cardboard
80-98: Composite materials
You can nd out how to dispose of
the used product by contacting your
local district or city council�
In the interest of environmental
protection, when the product has
reached the end of its useful life, do
not dispose of it as general
household waste but have it
properly recycled� For information
on recycling centres and their
opening times, please contact your
local council�
Faulty or used batteries must be recycled in
accordance with Directive 2006/66/EC
and its amendments� Return batteries and/or
the product to the local recycling facilities
provided�
Risk of environmental damage
from incorrect disposal of
rechargeable batteries!
Batteries must not be disposed of as general
household waste� They may contain toxic
heavy metals* and are subject to special
waste treatment� Batteries and rechargeable
batteries that are not permanently xed
inside the product must be removed before
disposal of the product and disposed of
separately� Please ensure batteries/
rechargeable batteries are fully discharged
when disposed of! Wherever possible, use
rechargeable batteries rather than single-use
batteries�
*) Marked as followed: Cd = cadmium,
Hg = mercury, Pb = lead
zWarranty
Dear customer, This product comes with a
3-year warranty from the date of purchase�
In the event that this product is faulty, you
have legal rights against the seller of the
product� These statutory rights are not
restricted by our warranty as set out below�
Warranty terms
The warranty period begins with the date of
purchase� Please keep the original receipt in
a safe place� It is required as proof of
purchase� If a material or manufacturing
defect occurs within three years of the date
of purchase, we will repair or replace the
product for you free of charge, or refund the
purchase price, at our discretion� This
warranty service is granted provided that the
faulty device and the proof of purchase
(receipt) are presented within three years,
along with a brief written description of the
fault and of when it occurred� If the fault is
covered by our warranty, we will return the
xed product or send you a new one. No
new warranty period shall begin upon repair
or replacement of the product�
Warranty period and statutory
warranty claims
The warranty period is not renewed after a
warranty service has been granted� This rule
shall also apply for any replaced or repaired

14 GB
parts� Any damage or faults that already
existed when buying the product must be
reported immediately upon unpacking the
product� A fee is charged for any repairs that
are carried out after the end of the warranty
period�
Warranty scope
The device was carefully manufactured
according to the strictest quality guidelines
and thoroughly tested before delivery� The
warranty applies to material or
manufacturing defects� This warranty does
not apply to product parts that are subject to
normal wear and tear and can therefore be
regarded as wearing parts, or damage to
fragile parts, such as switches, rechargeable
batteries or parts that are made of glass� This
warranty is void if the product has been
damaged, improperly used or serviced� To
ensure proper use, all instructions included in
the manual must be followed carefully� All
uses and actions that users are discouraged
from or warned of in the manual must be
avoided under all circumstances� The product
is intended for private household use only,
and not for commercial activities� The
warranty is void, if the product is treated
inappropriately, if force is applied, and in
the case of any manipulation that is not
carried out by our authorised service branch�
Warranty processing
To ensure your request is handled swiftly,
please observe the following
Notes:
Please have the receipt and the article
number (e�g� IAN 123456) ready as proof
of purchase for all enquiries�
Please refer to the type plate on the product,
an engraving on the product, the cover of
the manual (bottom left) or the sticker on the
back or base of the product to nd out the
product number�
In the case of any malfunctions or other
defects, please call or email the service
department indicated below as a rst step.
After your product has been registered as
faulty, you can send it to the specied
service address, free of charge� Please
include the proof of purchase (receipt) and
information about the defect and about
when it occurred�
zService
GB
Service Great Britain
Tel�: 00800 80040044
E-Mail: administration@mynetsend�de
IAN 378350_2110
Please have the receipt and the article
number (e�g� IAN 123456) ready as proof of
purchase for all enquiries�
You can nd an up-to-date version of the
operating instructions at:
www�citygate24�de

15
PL
Reektor solarny LED
zWstęp
Gratulujemy zakupu nowego
produktu� Nasz produkt jest
wyrobem wysokiej jakości. Uważnie
przeczytać całą niniejszą instrukcję obsługi.
Stanowi ona nieodłączną część produktu
i zawiera istotne informacje dotyczące
uruchamiania oraz użytkowania produktu.
Zawsze przestrzegać uwag dotyczących
bezpieczeństwa. W razie pytań lub
wątpliwości związanych z użytkowaniem
produktu zapraszamy do kontaktu ze
sprzedawcą lub placówką serwisową.
Instrukcję starannie przechowywać i w razie
potrzeby przekazać innym użytkownikom.
zObjaśnienie symboli
Przeczytać instrukcję obsługi!
Data publikacji instrukcji
obsługi (miesiąc/rok)
Data produkcji (miesiąc/rok)
Napięcie stałe
Zagrożenie życia
i niebezpieczeństwo wypadku
niemowląt i dzieci!
Przestrzegać komunikatów
ostrzegawczych i uwag
dotyczących bezpieczeństwa!
Niebezpieczeństwo wybuchu!
Nosić rękawice ochronne!
b
aOpakowanie i produkt poddać
ekologicznej utylizacji!
Szkody środowiskowe
związane z nieprawidłową
utylizacją baterii/
akumulatorów!
Ten symbol wskazuje, że
produkt wykorzystuje bardzo
niskie napięcie znamionowe
(SELV/PELV) – klasa
ochronności III.
Produkt nie nadaje się do
oświetlania pomieszczeń.
Zasięg detekcji
Kąt detekcji
Strumień świetlny
Zintegrowany akumulator Li-Ion
Ochrona przed obcymi ciałami
stałymi o średnicy 1,0 mm
i większej, ochrona przed
bryzgami wody z dowolnego
kierunku�
Każdą pękniętą osłonę trzeba
wymienić. W razie
uszkodzenia niezwłocznie
wyłączyć produkt
i skontaktować się z serwisem,
którego adres można znaleźć
poniżej.
Opakowanie z drewna
mieszanego z certykatem FSC
Umieszczając znak CE
producent deklaruje, że
produkt spełnia wymogi
dyrektyw europejskich�
zUżytkowanie zgodne
zprzeznaczeniem
Reektor solarny LED jest przeznaczony do
automatycznego oświetlania terenów
zewnętrznych (np. ogrodu, tarasu itp.).
Reektora nie wolno montować we wnętrzach,
ponieważ uniemożliwia to ładowanie
akumulatora. Reektor jest nieodpowiedni do
oświetlania pomieszczeń w gospodarstwie
domowym. Reektor jest przeznaczony
wyłącznie do użytku prywatnego.

16 PL
zZakres dostawy
1 reektor solarny LED
1 panel solarny
1 uchwyt naścienny panelu solarnego
1 uchwyt naścienny reektora (do montażu
na ścianach i w narożnikach)
1 szpikulec
1 przedłużacz (luzem)
1 Materiał montażowy
(6× kołków rozporowych 6× wkrętów)
1 instrukcja obsługi
zOpis części
1Panel solarny
2Mufa
3Śrubunek (panel solarny)
4Uchwyt (panel solarny / reektor)
5Prowadnica
6Przewód z wtyczką (zmontowany)
7Rygiel mocujący (lampy)
8Głowice świetlne
9Detektor ruchu
10
Otwory prowadzące
11
Reektor solarny LED
12
Regulator LUX (regulacja jasności
otoczenia)
13
Regulator TIME (regulacja czasu
świecenia reektora)
14
Regulator SENS (regulacja zasięgu
detektora ruchu)
15
Gniazdo ładowania (z gumową
zaślepką)
16
Przełącznik ZAŁ./WYŁ./AUTO
17
Szpikulec
18
Przewód z wtyczką (luzem)
19
Uchwyt naścienny (panel solarny)
20
Otwory montażowe w uchwycie
naściennym (panel solarny)
21
Uchwyt naścienny (reektor)
22
Otwory montażowe w uchwycie
naściennym (reektor)
23
Kołki
24
Śruba
25
Śruby (obudowa/akumulatory)
26
Uchwyt (akumulatory)
27
Akumulatory
zDane techniczne
Model: 898-S-2 / 898-W-2
Panel solarny: 6 V , maks� 3 W
Akumulator Li-Ion: 3,7 V ,
4000 mAh (18650)
Detektor ruchu: Zasięg detekcji: 1–8 m
Kąt detekcji: ok. 100°
Stopień ochrony: IP44
Zalecana wysokość
instalacji: 2–4 m
Makszymalna
powierzchnia
projekcji: 2× 78 cm2
Ciężar: 900 g
Wymiary: 20 x 26,5 x 20,5 cm
zUwagi dotyczące
bezpieczeństwa
Uwagi dotyczące
bezpieczeństwa
OSTRZEŻENIE!
ZAGROŻENIE ŻYCIA
INIEBEZPIECZEŃSTWO
WYPADKU NIEMOWLĄT IDZIECI!
Dzieci
nie pozostawiać bez nadzoru w pobliżu
opakowania. Niebezpieczeństwo uduszenia
elementami opakowania. Dzieci często nie
dostrzegają niebezpieczeństw. Utrzymywać
dzieci z dala od produktu�

17
PL
Produktu wolno używać dzieciom od
8. roku życia i osobom o ograniczonych
zdolnościach zycznych, sensorycznych
oraz umysłowych, jak również osobom
niedoświadczonym i nieposiadającym
odpowiedniej wiedzy, wyłącznie pod
nadzorem i po udzieleniu instrukcji na
temat bezpiecznego obchodzenia się
z produktem oraz pod warunkiem
zrozumienia zagrożeń z tym związanych.
Dzieciom nie wolno bawić się produktem.
Dzieciom nie wolno bez nadzoru czyścić
i konserwować produktu.
W razie stwierdzenia jakichkolwiek
uszkodzeń produktu nie wolno użytkować.
Źródło światła tej lampy wolno wymieniać
wyłącznie producentowi, jego
przedstawicielowi serwisowemu lub osobie
o podobnych kwalikacjach.
ZAGROŻENIE ŻYCIA!
Podczas montażu
dzieci utrzymywać z dala od obszaru
roboczego. W komplecie znajduje się
wiele wkrętów oraz innych drobnych
elementów. W przypadku połknięcia lub
inhalacji mogą one stanowić zagrożenie
życia.
NIEBEZPIECZEŃSTWO OBRAŻEŃ!
Ze
względów bezpieczeństwa zapewnić, że
wraz z demontażem lampy zostanie
usunięty również szpikulec (np.
niebezpieczeństwo potknięcia).
NIEBEZPIECZEŃSTWO POTKNIĘCIA!
Zapewnić takie ułożenie przewodu, żeby
nie było możliwe potknięcie się o niego.
Uwagi dotyczące
bezpieczeństwa
akumulatorów
ZAGROŻENIE ŻYCIA!
Akumulatory
przechowywać poza zasięgiem dzieci.
W razie połknięcia bezzwłocznie
skontaktować się z lekarzem!
NIEBEZPIECZEŃSTWO
WYBUCHU!
Nigdy nie ładować
baterii nieprzeznaczonych do
ładowania. Nie zwierać biegunów
akumulatorów i/albo nie podejmować
prób ich otwierania. Działania takie mogą
doprowadzić do przegrzania, pożaru lub
wybuchu�
Nigdy nie wrzucać akumulatorów do
ognia ani wody�
Nie narażać akumulatorów na
oddziaływanie obciążeń mechanicznych.
Po rozładowaniu oraz w przypadku
dłuższej przerwy w użytkowaniu produktu
wyjąć akumulatory z produktu.
Nie stosować akumulatorów
niejednakowego typu ani akumulatorów
o różnym stopniu naładowania.
zNiebezpieczeństwo wycieku
elektrolitu zakumulatorów
Unikać narażania akumulatorów na
oddziaływanie ekstremalnych warunków
oraz temperatur, np. ze strony grzejników
lub wskutek bezpośredniej ekspozycji na
promienie słoneczne.
Unikać kontaktu ze skórą, oczami
i błonami śluzowymi! Miejsca, które miały
kontakt z elektrolitem, natychmiast
przepłukać dużą ilością czystej wody,
a następnie bezzwłocznie skontaktować
się z lekarzem!
NOSIĆ RĘKAWICE OCHRONNE!
Elektrolit wyciekający
z uszkodzonych akumulatorów
może w kontakcie ze skórą powodować
oparzenia chemiczne� Dlatego w razie
wycieku elektrolitu zawsze nosić
odpowiednie rękawice ochronne.
Aby uniknąć uszkodzeń, w razie wycieku
elektrolitu bezzwłocznie usunąć
akumulatory z produktu�
zMontaż
Informacja:
Usunąć wszystkie elementy
opakowania�
Przed rozpoczęciem montażu ustalić

18 PL
miejsce instalacji produktu�
Przed przystąpieniem do wiercenia
otworów montażowych upewnić się, że
w miejscu wiercenia nie znajdują się
przewody gazowe, wodociągowe lub
energetyczne, które mogłyby ulec
uszkodzeniu�
Do wykonania otworów w murze używać
wiertarki. Przestrzegać uwag dotyczących
bezpieczeństwa oraz instrukcji obsługi
wiertarki. Niebezpieczeństwo śmierci lub
obrażeń wskutek porażenia prądem
elektrycznym�
Wybierając miejsce montażu produktu
zwrócić uwagę na następujące kwestie:
Upewnić się, że produkt będzie oświetlał
odpowiedni obszar. Zapewnić, że detektor
ruchu 9 (patrz rys� B) obejmie swoim
zasięgiem odpowiedni obszar.
Zasięg detekcji detektora ruchu wynosi
maks. 8 m, wartość kąta detekcji to ok.
100°�
Zwrócić uwagę, aby w czasie nocy
detektor ruchu 9 nie znajdował się stree
działania oświetlenia ulicznego.
Oświetlenie uliczne może mieć negatywny
wpływ na działanie detektora ruchu.
Zalecana wysokość instalacji wynosi od 2
do 4 m�
Za pomocą otworów montażowych
22
uchwytu naściennego reektora
21
(do
ścian i narożników) zaznaczyć położenie
nawiercanych otworów (patrz rys. G).
Wywiercić otwory (ø 5,5 mm, głębokość
ok� 30 mm)�
Umieścić kołki rozporowe
23
w wykonanych otworach (patrz rys� G)�
Umieścić uchwyt naścienny
21
na
powierzchni montażowej i zamocować go
delikatnie wkrętami
24
�
Dokręcić wkręty w otworach montażowych
i wyrównać reektor solarny LED
11
�
Reektor solarny LED
11
można teraz
łatwo wsunąć na uchwyt naścienny (patrz
rys� H)�
Regulacja położenia reektora
solarnego LED
Głowice świetlne 8 (patrz rys. B) można
indywidualnie ustawiać w pionie i w
poziomie pod kątem do 65°. W tym celu
usunąć rygiel mocujący 7 (patrz rys� B)
i ustawić głowice świetlne w odpowiednim
położeniu.
Ustawić detektor ruchu 9 i upewnić się, że
jest ustawiony w linii prostej w kierunku
obszaru detekcji�
Informacja:
Kąt detekcji detektora ruchu
wynosi maks� 100°�
Montaż panelu solarnego
Panel solarny 1 (patrz rys. A) można
zamontować bezpośrednio na reektorze,
na płaskiej powierzchni montażowej
(ściana/dach) lub na trawniku za pomocą
dołączonego szpikulca
17
(patrz rys� D)�
Informacja:
Panel solarny 1 wymaga do
działania możliwie najbardziej
bezpośredniego nasłonecznienia. Nawet
częściowe zacienienie panelu solarnego
w czasie dnia może znacząco negatywnie
wpłynąć na ładowanie akumulatora.
Kierunki świata:
Optymalnie ustawiony produkt powinien być
skierowany na południe. W razie potrzeby
lepiej jest ustawić nieznaczny odchył na
zachód, odchylenie produktu na wschód jest
mniej korzystne�
Mocowanie panelu słonecznego do
reektora
Mocno skręcić dłonią śrubunek 3 z mufą
2 (patrz rys� A)�
Zamocować uchwyt panelu solarnego /
reektora 4 za pomocą otworów
prowadzących
10
reektora solarnego
LED, wsuwając prowadnicę 5 uchwytu
w otwory prowadzące aż do ich
zatrzaśnięcia się.
Osadzić panel solarny 1 na uchwycie
panelu solarnego / reektora 4�

19
PL
Informacja:
Aby ponownie zdemontować
uchwyt, delikatnie ścisnąć boczne zakładki
prowadnicy 5 aż będzie można zwolnić
uchwyt�
Wtyczkę przewodu 6 umieścić
w gnieździe ładowania
15
(patrz rys� C),
otwierając uprzednio gumową zaślepkę.
Informacja:
Zaślepki nie przykręca się
w żaden sposób po otworzeniu zwisa ona
swobodnie wzdłuż przewodu. Nie ma to
wpływu na działanie produktu.
Mocowanie panelu solarnego na
dachu/ścianie
Śrubunek 3 panelu solarnego przykręcić
do uchwytu panelu solarnego / reektora
4 za pomocą mufy 2, a następnie mocno
dokręcić dłonią.
Za pomocą otworów montażowych
20
uchwytu naściennego panelu solarnego
19
zaznaczyć położenie nawiercanych
otworów (patrz rys. F).
Wywiercić otwory (ø 5,5 mm, głębokość
ok� 30 mm)�
Umieścić kołki rozporowe
23
w wykonanych otworach montażowych
20
�
Umieścić uchwyt naścienny
19
na
powierzchni montażowej i zamocować go
wkrętami
23
�
Wsunąć uchwyt panelu solarnego /
reektora 4 na uchwyt naścienny panelu
solarnego
19
do momentu lekkiego
zatrzaśnięcia.
Połączyć wtyczkę przewodu 6 z
gniazdem przedłużacza
18
(patrz rys� D),
a następnie połączyć wtyczkę
przedłużacza
18
z gniazdem ładowania
15
reektora solarnego LED.
Ustawić reektor solarny LED
w odpowiednim położeniu.
Informacja:
Aby ponownie zdemontować
uchwyt, delikatnie ścisnąć boczne zakładki
prowadnicy 5 aż będzie można zwolnić
uchwyt�
Mocowanie panelu solarnego za
pomocą szpikulca
Śrubunek 3 panelu solarnego przykręcić
do mufy 2, a następnie mocno skręcić
dłonią.
Osadzić reektor solarny LED
11
za
pomocą mufy 2 na szpikulcu
17
(patrz
rys. D) i wetknąć go w odpowiednie
miejsce w podłożu (trawnik / ziemia itp.).
Informacja:
Upewnić się, że produkt jest
stabilnie osadzony w podłożu!
Połączyć wtyczkę przewodu 6 z
gniazdem przedłużacza
18
(patrz rys� D),
a następnie połączyć wtyczkę
przedłużacza
18
z gniazdem ładowania
15
reektora solarnego LED.
Reektor i panel solarny są teraz gotowe do
pracy�
NIEBEZPIECZEŃSTWO OBRAŻEŃ!
Ze
względów bezpieczeństwa zapewnić, że
wraz z demontażem lampy zostanie usunięty
również szpikulec (np. niebezpieczeństwo
potknięcia).
zŁadowanie akumulatora
Akumulator ładuje się niezależnie od
położenia przełącznika. Optymalne
ładowanie można osiągnąć na początku,
gdy reektor solarny LED jest wyłączona.
Informacja: Przy odpowiednim
nasłonecznieniu akumulator jest całkowicie
naładowany po upływie 6 do 8 godzin. Czas
ładowania jest uzależniony od początkowego
stanu naładowania akumulatora oraz
intensywności promieni słonecznych.
zWymiana akumulatora
Poluzować pięć śrub
25
na spodzie
produktu. Odchylić detektor ruchu 9 do
góry, aby uzyskać dostęp do dwóch z
pięciu śrub (patrz rys. I).

20 PL
Ostrożnie rozebrać produkt na części.
Podczas demontażu zwrócić uwagę, aby
nie pociągać za przewody.
Poluzować śruby
25
na uchwycie
akumulatorów
26
i zdjąć uchwyt (patrz
rys� I)�
Wyjąć zużyte akumulatory
27
i zutylizować je zgodnie z przepisami.
Umieścić nowe akumulatory w produkcie.
Używać wyłącznie akumulatorów tego
samego typu (patrz rozdział „Dane
techniczne”). Umieszczając akumulatory
w produkcie zawsze zwracać uwagę na
prawidłowe ułożenie biegunów.
Przykręcić uchwyt akumulatorów.
Ponownie zmontować produkt. Informacja:
zwrócić uwagę, aby żadne przewody nie
zostały przytrzaśnięte pomiędzy
elementami produktu�
Ponownie przykręcić pięć śrub.
zUstawianie położenia
panelu solarnego
Kierunki świata
Optymalnie ustawiony produkt powinien być
skierowany na południe. W razie potrzeby
lepiej jest ustawić nieznaczny odchył na
zachód, odchylenie produktu na wschód jest
mniej korzystne�
Informacja:
Aby zapewnić optymalne
działanie, powierzchnia panelu solarnego
1 nie może być zanieczyszczona.
Ustawić panel solarny 1 i zamocować go
za pomocą śrubunku 3�
zUruchamianie reektora
solarnego LED
Informacja:
Reektora wolno używać
wyłącznie w połączeniu z dostarczonym
panelem solarnym. Reektora i panelu
solarnego nie wolno podłączać do
urządzeń zewnętrznych.
Przełącznik OFF/OFF/AUTO
16
(patrz
rys. C) ustawić w położeniu „ON” (II), aby
trwale wyłączyć reektor.
Przełącznik OFF/OFF/AUTO
16
ustawić
w położeniu „OFF” (0), aby trwale
wyłączyć reektor.
Przełącznik OFF/OFF/AUTO
16
ustawić
w położeniu „AUTO” (I), aby przełączyć
reektor do trybu AUTOMATYCZNEGO.
W tym ustawieniu przełącznika reektor
świeci zgodnie z wprowadzonymi
ustawieniami (czas świecenia, jasność
otoczenia, zasięg detekcji).
Jeżeli po upływie ustawionego czasu
reektor ponownie się wyłączy, świeci ze
zmniejszoną jasnością. To oświetlenie jest
aktywne wyłącznie w ustawieniu „AUTO”
i jest wyłączone w ustawieniu „ON”.
Informacja:
Ładowanie akumulatora przez
panel solarny nie jest uzależnione od
aktualnego położenia przełącznika ON/
OFF/AUTO
16
. Ładowanie odbywa się
w trybie ciągłym (patrz rys. C).
Informacje dotyczące działania:
Ogniwo
solarne włącza produkt o zmierzchu lub po
nastaniu ciemności, gdy tylko detektor
wykryje ruch�
Regulacja czasu świecenia
Obrócić regulator TIME
13
(patrz rys� E)
w prawo, a czas świecenia zostanie
ustawiony na maksymalną wartość 60
sekund. Obrócić regulator TIME
13
w lewo,
a czas świecenia zostanie ustawiony na
minimalną wartość 10 sekund.
Regulacja jasności otoczenia
Za pomocą regulatora LUX
12
(patrz rys� E)
można regulować „czułość reakcji” czujnika
zmierzchowego na jasność otoczenia (lub
czułość zmierzchową).Obrócić regulator
w prawo, aby reektor zapalał się przy
maksymalnej jasności otoczenia 50 000
luksów.
Obróć regulator LUX
12
w lewo, aby
reektora zapalał się przy minimalnej
jasności otoczenia 5 luksów.
/