Page is loading ...

®
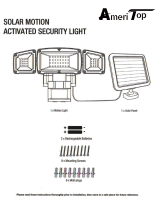
SOLAR SPOTLIGHT
User Manual
ID: #05007
m
y
h
a
n
s
e
c
o
n
t
r
o
l
.
c
o
m
M
A
N
U
A
L
D
E
V
E
L
O
P
E
D
I
N
G
E
R
M
A
N
Y
User-friendly
Manual

Dok./Rev.-Nr. 196772_20181128
Contents
Overview ......................................................................... 3
Use .................................................................................... 4
Package contents/device parts ..................................... 5
General information ....................................................... 6
Reading and storing the user manual ........................... 6
Explanation of symbols .................................................... 6
Safety ............................................................................... 8
Proper use ........................................................................... 8
Safety instructions ............................................................. 8
Start-up ..........................................................................14
Checking the spotlight and package contents ........... 14
Charging the rechargeable batteries
for the first time ................................................................. 15
Choosing an installation location .................................. 16
Assembly ........................................................................18
Mounting the spot light ...................................................18
Mounting the solar panel ................................................ 19
Operation .......................................................................19
Choosing a sensor area ................................................... 19
Choosing a lighting duration ........................................ 20
Choosing the sensitivity ................................................. 20
Adjusting the spotlight heads ........................................ 21
Aligning the solar panel .................................................. 21
Switching the spotlight on and off ............................... 21
Troubleshooting ............................................................22
Cleaning ..........................................................................25
Storage .......................................................................... 26
Technical data ............................................................... 26
Declaration of conformity ............................................ 28
Disposal ......................................................................... 28
Disposing of the packaging ........................................... 28
Disposing of the spotlight .............................................. 28

3
A
1
2
3
4
5
2
6
7
8
9

4
B
C
10 11
12
13
14
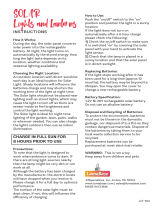
1,5 - 2 m
140°
10 m ± 1 m

Package contents/device parts
5
Package contents/device parts
1
Spotlight head, 2×
2
Fixing screw, 2×
3
Sensor housing
4
Sensitivity controller
5
Charging slot
6
Rear panel
7
Power switch
8
Controller for the lighting duration
9
Motion sensor
10
Wall bracket
11
Plug with charging cable
12
Solar panel
13
Screw, 6×
14
Dowel, 6×

General information
6
General information
Reading and storing the user manual
This user manual accompanies this solar spotlight
(referred to below as the “spotlight”). It contains
important information on start-up and handling.
Before using the spotlight, read the user manual carefully. This
particularly applies to the safety instructions. Failure to heed
this user manual may result in severe injury or damage to the
spotlight.
The user manual is based on the standards and rules in force
in the European Union. When abroad, you must also observe
country-specific guidelines and laws.
Store the user manual for future use. If you pass the spotlight on
to third parties, please be absolutely sure to include this user
manual.
Explanation of symbols
The following symbols and signal words are used in this user
manual, on the spotlight or on the packaging.
WARNING!
This signal symbol/word designates a hazard with moderate
risk, which may result in death or severe injury if not avoided.
CAUTION!
This signal symbol/word designates a hazard with low risk, which
may result in minor or moderate injury if not avoided.

General information
7
NOTICE!
This signal word warns against potential damages to property.
This symbol provides you with useful additional
information about start-up or operation.
Declaration of conformity (see chapter “Declaration
of conformity”): Products marked with this symbol
meet all applicable Community regulations for the
European Economic Area.
----1m
The minimum distance to objects to be lit is 1m.
IP44
The spotlight’s type of protection is IP44. This means
it is protected against splashing water and against
ingress of solid foreign objects with a diameter of
more than 1mm.
The spotlight is not dimmable and must not be
operated with an external dimmer.
This symbol identifies electric devices corresponding
to protection class III. This means the spotlight
operates at low voltage and is operated with a safety
extra low voltage (SELV).

Safety
8
Safety
Proper use
The spotlight is designed as a fixed installation in a location
protected against rain and is intended only for temporary
lighting outdoors, e.g. to light corridors, garages or pathways
and as a deterrent against burglary. Do not use it for indoor
lighting or for accent lighting.
Only use the spotlight as described in this user manual. Any other
use is considered improper and may result in damage to property.
The product is suitable for extreme temperatures under –20 °C.
The manufacturer or vendor accepts no liability for damage
caused by improper or incorrect use.
Safety instructions
WARNING!
Risk of explosion and fire!
Improper handling of the spotlight can
cause an explosion or a fire.
− Keep children away from the spotlight.
− Before start-up, remove all protective films.
− Keep the spotlight away from water, other
liquids, open flames and hot surfaces.
− Do not hang any objects over the spotlight
and do not cover it. Maintain a distance
of 1m between the spot light and easily

Safety
9
flammable materials.
− Do not continue to use the spotlight if it
exhibits damage. Only replace damaged
parts with corresponding original spare
parts.
− Do not open the housing and do not
make any modifications to the spotlight.
Have only qualified professionals perform
repairs.
− Do not position the spotlight over
bathtubs, sinks or other objects filled
with water.
− Only charge the rechargeable batteries
using the solar panel supplied.
− Protect the rechargeable batteries against
mechanical damage.
− Do not throw rechargeable batteries in
fire. They could explode or release toxic
vapours.
− Do not expose rechargeable batteries to
unrestricted sunshine or heat. Increased
risk of leaking!

Safety
10
− Do not take rechargeable batteries apart
and do not short-circuit them. Danger of
explosion!
− Never short circuit the supply terminals.
Avoid allowing them to come into contact
with metallic objects.
− The rechargeable batteries are located
inside the housing and are not
replaceable.
WARNING!
Risk of chemical burns!
Leaked fluid from the rechargeable batteries
could cause burns if it comes into contact with
skin or other body parts.
− If battery acid leaks out, avoid contact with
skin, eyes and mucous membranes. In the
event of contact, immediately rinse the
affected areas with plenty of clean water
and consult a physician.
− In the event that battery acid leaks out,
protective gloves must be worn and
the leaked acid removed using a dry,
absorbent cloth.

Safety
11
WARNING!
Risk of chemical burns!
The spotlight contains rechargeable batteries.
Swallowing rechargeable batteries may result
in severe internal injuries or even death.
− Store both new and used rechargeable
batteries so that they are not accessible
to children.
− If you are no longer able to securely close
the casing, in which the rechargeable
batteries are located, do not use the
spotlight. Remove the rechargeable
batteries and store them in a location that
is inaccessible to children.
− If you suspect that a rechargeable battery
has been swallowed or has otherwise
entered the body, promptly consult a
physician.

Safety
12
CAUTION!
Risk of injury!
The light emitted by the LEDs is very bright
and can damage the eyes if looked at directly.
− Never look directly into the light of the
spotlight’s LEDs.
− Ensure not to shine the light into the eyes
of people or animals when inspecting or
assembling the spotlight.
WARNING!
Danger for children and persons with
impaired physical, sensory or mental
capacities (e.g. partially disabled persons,
older persons with reduced physical and
mental capacities) or lack of experience
and knowledge (e.g. older children).
− This spotlight may be used by persons
with impaired physical, sensory or
mental capacities or those lacking
experience and knowledge, if they are
supervised or have been instructed

Safety
13
in how to safely use the spotlight and
understand the risks associated with
operating it. The spotlight is not suitable
for use by children. Children must not
play with the spotlight.
− Cleaning and user maintenance must not
be performed by children.
− Keep children away from the spotlight.
− Do not let children play with the packaging
wrapper. Children may get caught in it
when playing and suffocate.
NOTICE!
Risk of damage!
Improper handling of the spotlight may
result in damage to the spotlight.
− Do not place too much pressure on the
plastic housing when screwing in the
screws.
− Protect the spotlight against drastic
temperature fluctuations, e.g. those near
ventilators, air conditioning units and
heaters.

Start-up
14
− The LEDs are permanently installed and
cannot be replaced. If the light source has
reached the end of its service life, replace
the entire spotlight.
− Stop using the spotlight if its plastic parts
exhibit cracks or breaks or are deformed.
Only replace damaged parts with
corresponding original spare parts.
− Do not make any modifications to the
spotlight.
Start-up
Checking the spotlight and package contents
NOTICE!
Risk of damage!
If you are not cautious when opening the
packaging with a sharp knife or other
pointed objects, you may quickly damage
the spotlight.
− Be very careful when opening the
packaging.

Start-up
15
1. Take the spotlight out of the packaging.
2. Check to make sure that the delivery is complete
(see Fig.A and B).
3. Check whether the spotlight or the individual parts show
signs of damage. If this is the case, do not use the spotlight.
Contact the manufacturer at the service address specified
on the warranty card.
Charging the rechargeable batteries for the
first time
WARNING!
Danger of explosion!
Improper handling of the rechargeable
batteries can cause an explosion or a fire.
− Only expose the solar panel to direct
sunlight. Never expose the rechargeable
batteries to direct sunlight.
Before you can use the spotlight, you must fully charge the
rechargeable batteries. If there is sufficient sunlight on the
solar panel, this usually takes 5-6 hours.
1. Insert the plug
11
into the charging slot
5
.
2. Expose the solar panel
12
to direct sunlight. To achieve quick
and optimal charging, place the solar panel in a place where it
can absorb as much sunlight as possible. Positioning it so that
it is south-facing and therefore exposed to direct sunlight is
the best way of achieving this.
You can now mount the spot light.

Start-up
16
Choosing an installation location
Ideal installation location for the spotlight
Motion sensors are electronic sensors that recognise movement
in their environment and work as electrical switches, responding
to this movement. Heat sources are sensed using the lens. If a heat
source in the sensor’s range changes or moves, the spotlight will
switch one for the configured time. In order to ensure that the spot
light functions optimally, please note the following requirements:
• The spotlight must be mounted on the mounting surface in
an upright position. This means that the motion sensor
9
is facing the ground. Therefore, never mount the spotlight
on a ceiling.
• Choose a location for installation that is protected against
wind and rain (e.g. under the eaves of a roof). The installation
surface must also be free from shocks or vibrations. Therefore,
do not mount the spotlight on a pole.
• To avoid unwanted triggering of the motion sensor, no
moving objects such as trees or bushes should be in the
range of the motion sensor. If the sensor’s range is on a
street, vehicles driving past may switch the spotlight on
unintentionally.
• To avoid disturbing the proper functioning of the spotlight,
the motion sensor should be protected against direct sunlight
and from light from halogen lamps or light-reflective surfaces
such as swimming pools or ponds.
• Only intended for installation outside arm’s length: The
optimum height for installation is approx. 1-2.5m or above.
If the spotlight is installed lower than this, the sensor area
may be reduced (see Fig.C).

Start-up
17
• The spotlight works best if the sensor area of the motion
sensor is crossed horizontally. As far as possible, install the
motion sensor in such a way that the main direction of
approach is not straight in front of the sensor.
Ideal installation location for the solar panel
The solar panel is the main source of current for the spotlight.
It absorbs sunlight, converts it into electricity and then uses this
to charge the rechargeable batteries. The longer the solar panel
is subjected to direct sunlight, the quicker the rechargeable
batteries will charge. In order to ensure that the spotlight
functions optimally, please note the following requirements:
• Position the solar panel
12
in a place where it can absorb as
much sunlight as possible throughout the day. Positioning it
so that it is south-facing and therefore exposed to direct
sunlight with an inclination angle of approx.30°–40° is the
best way of achieving this.
• Avoid shade of any kind and ensure that it is not covered
(e.g. by dirt, foliage or snow).
• Do not mount the solar panel behind a pane of glass, as
this will filter out infrared rays necessary to charge the
rechargeable batteries.
• When choosing an installation location, note the length of
the charging cable (5m).
• To avoid condensation build-up, ensure that the drain
openings on the back of the solar panel are facing
downwards.

Assembly
18
Assembly
WARNING!
Risk of electric shock!
Improper installation may result in an electric
shock.
− Ensure that there are no cables or other
electrical lines behind the location where
the spotlight is attached.
To avoid triggering the spotlight unintentionally, the
spotlight must be fitted firmly. If the spotlight moves,
this has the same effect as moving heat sources in the
sensor area.
Mounting the spot light
1. Choose a suitable surface for installation (see chapter
“Choosing an installation location”).
2. Remove the rear panel
6
from the spotlight by unscrewing
both fixing screws
2
.
3. Hold the rear panel on the installation surface and mark
both locations for fastening. Use a spirit level if necessary.
4. Choose mounting materials which are suitable for the
installation surface. The supplied screws
13
and dowels
14
are suitable for concrete and brickwork.
5. Screw the rear panel into the locations for fastening according
to the properties of the installation surface. Do not apply
excessive force in the process.

Operation
19
6. Place the housing of the spotlight onto the rear panel.
7. Fasten the housing on the rear panel by screwing the fixing
screw tight.
Mounting the solar panel
1. Choose a suitable surface for installation (see chapter
“Choosing an installation location”).
2. Hold the wall bracket
10
on the installation surface and
mark the three locations for fastening. Use a spirit level if
necessary.
3. Choose mounting materials which are suitable for the
installation surface. The supplied screws
13
and dowels
14
are suitable for concrete and brickwork.
4. Screw the wall bracket into the locations for fastening
according to the properties of the installation surface.
Do not apply excessive force in the process.
5. Completely unfold the charging cable and insert the plug
11
into the charging slot
5
on the housing.
Operation
Choosing a sensor area
You can configure the sensor area by turning the motion sensor
housing. The motion sensor housing can be turned by 90°. The
sensor angle of approx. 140° does not change in the process.
− Choose the required sensor area by turning the motion
sensor housing
3
.

Operation
20
Choosing a lighting duration
1. If necessary, turn the motion sensor housing
3
to reach
the controller for the lighting duration
8
.
2. Choose the desired lighting duration between approx.
5 seconds and approx. 7 minutes by turning the controller
in the corresponding direction:
− Turning the controller clockwise increases the lighting
duration.
− Turning the controller anticlockwise decreases the
lighting duration.
Choosing the sensitivity
You can specify at what brightness (e.g. from dusk) the motion
sensor reacts and switches on the spotlight: Choose between
approx. 2 lux (dark) and 20,000 lux (bright).
1. If necessary, turn the motion sensor housing
3
to access
the sensitivity controller
4
.
2. Choose the desired sensitivity by turning the controller in
the corresponding direction:
• Turning the controller clockwise increases the sensitivity
so that the motion sensor
9
will react even in a bright
environment (e.g. in daylight).
• Turning the controller anticlockwise decreases the
sensitivity so that the motion sensor will only react in
a darker environment (e.g. at night-time).
• Whether the motion sensor reacts depends on the
speed at which the object is moving. The sensor will
not react to movements that are too fast or too slow.
• Electrical sensors are more sensitive in cold, dry
weather conditions than in warm, humid climates.
/