Page is loading ...

PART# 86605, 88605 Installation Instructions
Rear Rampage Recovery Bumper for Jeep Wrangler 2 & 4-door 2007 to 09
PARTS LIST
1 – Rear Bumper 6- 12mm x 30mm Flanged bolts 2- 12MM x 114.6MM bolts
8- 12mm Lock Washers 4- 12mm Nuts
PROCEDURE:
1. REMOVE CONTENTS FROM BOX. VERIFY ALL PARTS ARE PRESENT. READ
INSTRUCTIONS CAREFULLY.
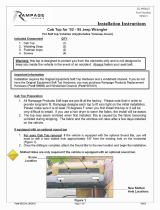
2. Remove rear factory bumper cover, See fig.1.
a) Loosen two bolts on the “S” brackets located on the steel bumper cross member.
b) Remove two bolts on “S” bracket that hold the Bumper cover, remove “S” brackets.
c) Remove four bolts and nuts on the brackets that extend from the outside bumper return near
the outer rear qtr panel.
d) Remove two long center bolts above hitch attachment area.
3. Install new RRB rear bumper
a) Have two other people help you hold the rear bumper up in place.
b) Attach the outer brackets to the factory brackets with the 12mm bolts, nuts and washers,
tighten loosely to allow adjustment. See fig.1
c) Align the two “S” brackets to the pre threaded holes on the frame member and the bumper.
d) Install two long center bolts above hitch attachment area. Push center of bumper up from
bottom to align these bolts through the frame into the bumper. Note. Install receiver hitch at
this time if you have purchased one. Part # 86611
e) Tighten all bolts and nuts to 45 ft lbs of torque.
4. RRB bumper Lighting; Rampage lamp kits part numbers:
a) 5083059 Fog Lamp Kit 5083060 Driving Lamp Kit
b) Use the wire harness kit provided with the lights.
“S” Bracket Outer Brackets Frame Member
Bumper
Fig 1
For Technical Support, please call (951) 277-4949
This product is guaranteed to be free of defects in materials and workmanship for a period of 12 months
Rampage Products 9225 Stellar Ct. #C, Corona Ca., 92883
Made In China
Part # 86605 Page 1 of 1 12-13-07

PART# 86605, 88605 Installation Instructions
Rear Rampage Recovery Bumper for Jeep Wrangler 2 & 4-door 2007 to 10
PARTS LIST
1 – Rear Bumper 6- 12mm x 30mm Flanged bolts 2- 12MM x 114.6MM bolts
8- 12mm Lock Washers 4- 12mm Nuts
PROCEDURE:
1. REMOVE CONTENTS FROM BOX. VERIFY ALL PARTS ARE PRESENT. READ
INSTRUCTIONS CAREFULLY.
2. Remove rear factory bumper cover, See fig.1.
a) Loosen two bolts on the “S” brackets located on the steel bumper cross member.
b) Remove two bolts on “S” bracket that hold the Bumper cover, remove “S” brackets.
c) Remove four bolts and nuts on the brackets that extend from the outside bumper return near
the outer rear qtr panel.
d) Remove two long center bolts above hitch attachment area.
3. Install new RRB rear bumper
a) Have two other people help you hold the rear bumper up in place.
b) Attach the outer brackets to the factory brackets with the 12mm bolts, nuts and washers,
tighten loosely to allow adjustment. See fig.1
c) Align the two “S” brackets to the pre threaded holes on the frame member and the bumper.
d) Install two long center bolts above hitch attachment area. Push center of bumper up from
bottom to align these bolts through the frame into the bumper. Note. Install receiver hitch at
this time if you have purchased one. Part # 86611
e) Tighten all bolts and nuts to 45 ft lbs of torque.
4. RRB bumper Lighting; Rampage lamp kits part numbers:
a) 5083059 Fog Lamp Kit 5083060 Driving Lamp Kit
b) Use the wire harness kit provided with the lights.
“S” Bracket Outer Brackets Frame Member
Bumper
Fig 1
For Technical Support, please call (951) 277-4949
This product is guaranteed to be free of defects in materials and workmanship for a period of 12 months
Rampage Products 9225 Stellar Ct. #C, Corona Ca., 92883
Made In China
Par t # 86 6 0P5a ge 1 o f 1 12-13-07
/