Page is loading ...

THANK YOU
We appreciate the trust and confidence you have placed in Everbilt through the purchase of this submersible sewage pump. We strive to continually
create quality products designed to enhance your home. Visit us online to see our full line of products available for your home improvement needs.
Thank you for choosing Everbilt!
Item #1000 026 319
Model #ESE60W-HD
USE AND CARE GUIDE
SUBMERSIBLE SEWAGE PUMP
Questions, problems, missing parts? Before returning to the store,
call Everbilt Customer Service
8 a.m. – 7 p.m., EST, Monday-Friday, 9 a.m. – 6 p.m., EST, Saturday
1-844-883-1872
HOMEDEPOT.COM

2
Table of Contents
Table of Contents .......................................................... 2
Safety Information ......................................................... 2
Precautions ..............................................................................2
Limitations ...............................................................................2
Electrical Safety .......................................................................3
Overload Protection .................................................................3
Warranty ......................................................................... 3
Additional Limitations ..............................................................4
Notice to Consumer .................................................................4
Pre-Installation .............................................................. 4
Installation Requirements ........................................................4
Performance Chart ...................................................................5
Materials Required (Not Included) ...........................................5
Installation ..................................................................... 6
Operation ....................................................................... 7
Care and Cleaning ........................................................ 8
Troubleshooting ............................................................ 9
Service Parts ............................................................... 10
Safety Information
PRECAUTIONS
1. Keep this instruction manual in a safe place for future
reference.
2. Do not cut off the ground pin or use an adapter fitting.
3. Do not use an extension cord.
4. The pump power cord should be connected to a separately
fused, grounded line with a minimum capacity of 20 A. It can
be connected to a non-fuse breaker at the recommended
amperes.
5. Installation and electrical wiring must adhere to
state/provincial and local codes and must be completed
before priming the pump. Check appropriate community
agencies, or contact local electrical and pump professionals.
6. The voltage of the power supply must match the voltage of
the pump.
7. Place pump on dedicated circuits to avoid low voltage.
8. Plastic PVC pipe can be installed in the outlet piping. A drain
hose, galvanized steel or copper pipe may be used if
desired. All piping must be clean and free of all foreign
matter to prevent clogging.
9. The pump will be inadequate if suspension liquids contain
solid particles larger than 2 in. (5.1 cm).
LIMITATIONS
This pump was designed to operate in pump basins of at least
30 in. depth.
DANGER: Keep pump equipment out of the reach of
children! Failure to follow the directions given could cause
serious risk to individuals or objects.
WARNING: Warnings indicate to the operator that the
failure to follow an instruction may damage the pump
and/or the system.
WARNING: Before installing or servicing this pump, be
certain the power source is disconnected.
WARNING: A permanent ground connection from the
pump to the grounding bar at the service panel is
mandatory. These pumps come with a grounding conductor
and a grounding type attachment plug. Do not connect the
pump to a power supply until permanently grounded. For
maximum safety, connect the pump to a circuit equipped
with a fault interrupter device when positioning the pump’s
grounding wire.
WARNING: The sewage basin must be vented in
accordance with local plumbing codes. These pumps are
not designed for and CANNOT be installed in locations
classified as hazardous.
WARNING: The following may cause severe damage to
the pump and will void the warranty:
(a) Using an extension cord
(b) Cutting off the ground pin or using an adapter fitting
(c) Working on pump or switch while plugged in
(d) Removing motor housing, unscrewing impeller, or
otherwise removing impeller seal
(e) Running the pump continuously
(f) Pumping chemicals or corrosive liquids
(g) Pumping gasoline or other flammable liquids

3 HOMEDEPOT.COM
Please contact 1-844-883-1872 for further assistance.
Safety Information (continued)
CAUTION: Call an electrician when in doubt. The pump
should be connected to a separate 20 A circuit breaker or
20 A fuse block. Plugging into existing outlets may cause
low voltage at the motor. This could cause blown fuses,
tripping of motor overload or a burned out motor.
ELECTRICAL SAFETY
WARNING: Verify that the voltage and frequency of the
pump shown on the nameplate corresponds to those
available on the mains. The installer must make sure that
the electrical system is grounded in accordance with code.
WARNING: For outdoor use it is necessary to use cable
with a length of at least 10 ft. (3 m). The plug and
connection should be protected from water splashes, and
should never be used with an extension cord. Before using
the pump, always inspect it visually (especially power cable
and plug).
WARNING: Do not use the pump if it is damaged.
WARNING: If the pump is damaged, have it inspected by
an authorized service center.
WARNING: Make sure that electrical connections are
protected from flooding. Protect the plug and the power
cable from heat or sharp edges.
WARNING: The power cable must be replaced by
qualified personnel only. Grounding: The plug of the power
cable has a double grounding contact, so that grounding
can be achieved by simply inserting the plug.
OVERLOAD PROTECTION
This pump series has a built in thermal protection switch, it will
protect motor from burning out due to overheating/overloading.
When motor cools down, overload protector will automatically
reset and start motor.
If overload trips frequently, check for cause. It could be a stuck
impeller, wrong/low voltage, or electrical failure in motor. If an
electrical failure in the motor is suspected, have it serviced by a
competent repairman.
Warranty
This product is guaranteed for a period of three years from the date of original retail purchase against defects in materials and workmanship.
DO NOT return this product (if it has ever been installed) to your local Home Depot store. Sewage pumps that have seen service and have
been removed carry a contamination hazard with them. If your sewage pump has failed:
□ Wear rubber gloves when handling the pump
□ Disconnect pump from power source and follow all appropriate safety precautions
Dispose of the pump according to local disposal ordinances.
Subject to the conditions and limitations described below, this product will be replaced with the same model or one of equal value or
specifications if the pump's cord end with cord tag and proof of purchase are returned to the retail store within the stated warranty period.
These warranties are subject to the following conditions and limitations:
a) a proof of purchase receipt verifying the purchase location and purchase data must be provided;
b) this warranty will not apply to any product or part thereof which is worn or broken or which has become inoperative due to abuse,
misuse, accidental damage, foreign materials in the system, operating at pressures in excess of recommended maximums, neglect or lack
of proper installation, operation or maintenance (as outlined in the applicable owner’s manual or operating instructions) or which is being
used for industrial, professional, commercial or rental purposes;
c) this warranty will not apply to normal wear and tear or to expendable parts or accessories that may be supplied with the product which
are expected to become inoperative or unusable after a reasonable period of use;
d) this warranty will not apply to routine maintenance and consumable items;
e) this warranty will not apply where damage is caused by repairs made or attempted by others (i.e. persons not authorized by the
manufacturer);
f) this warranty will not apply to any product that was sold to the original purchaser as a reconditioned or refurbished product (unless
otherwise specified in writing);
g) this warranty will not apply to any product or part thereof if any part from another manufacturer is installed therein or any repairs or
alterations have been made or attempted by unauthorized persons;

4
Warranty (continued)
h) this warranty will not apply to normal deterioration of the exterior finish, such as, but not limited to, scratches, dents, paint chips, or to
any corrosion or discoloring by heat, abrasive and chemical cleaners; and
i) this warranty will not apply to component parts sold by and identified as the product of another company, which shall be covered under
the product manufacturer’s warranty, if any.
ADDITIONAL LIMITATIONS
This warranty applies only to the original purchaser and may not be transferred. Neither the retailer nor the manufacturer shall be liable for
any other expense, loss or damage, including, without limitation, any indirect, incidental, consequential or exemplary damages arising in
connection with the sale, use or inability to use this product.
NOTICE TO CONSUMER
This warranty gives you specific legal rights, and you may have other rights, which may vary from state to state. The provisions contained in
this warranty are not intended to limit, modify, take away from, disclaim or exclude any statutory warranties set forth in any applicable
provincial or federal legislation.
Contact the Customer Service Team at 1-844-883-1872 or visit www.HomeDepot.com.
Pre-Installation
INSTALLATION REQUIREMENTS
This pump is provided with an on/off float switch for automatic
operation. Refer to the Installation instructions included with
switches and
controllers for installation.
Care should be taken to prevent the pump from running in a dry sump.
The pump must be installed in a suitable gas-tight basin which is
a minimum of 18 in. in diameter and a minimum of 30 in. deep
and vented
in accordance with local plumbing codes.
The pump must be placed on a hard level surface. Never place the pump directly on clay, earth or gravel surfaces.
The pump can be installed with ABS, PVC, polyethylene or galvanized steel pipe. Proper adapters are required to connect plastic
pipe to the
pump.
Always install a union in the discharge line, just above the sump
pit, to allow for easy removal of the pump for cleaning or repair.
A check valve must be used in the discharge line to prevent back flow of liquid into the basin. The check valve should be a free flow valve
that will easily pass solids.
CAUTION: Install the check valve per the manufacturer’s recommendation.
When a check valve is used, drill a relief hole 3/16 in. in diameter in the discharge pipe. This hole should be located below the floor line
between the pump discharge and the check valve. Unless such a relief hole is provided, the pump could “air-lock” and will not pump water
even though it will run.
A gate valve should follow the check valve to allow periodic cleaning of the check valve or removal of the pump.
The remainder of the discharge line should be as short as possible with a minimum of turns to minimize friction head loss. Do not restrict
the discharge to sizes below 2 in..
Sewage and effluent applications will require a separate sump vent. A connection is provided on top of the sump or cover which must be
piped to the existing building vent or extended outside with its own standpipe.

5 HOMEDEPOT.COM
Please contact 1-844-883-1872 for further assistance.
Pre-Installation (continued)
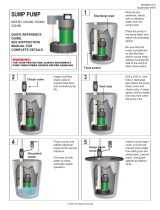
PERFORMANCE CHART
MATERIALS REQUIRED (NOT INCLUDED)
Before using this pump, ensure you have the following items:
2 in.
Discharge
pipe
Thread sealant
tape
2 in. Check valve
2 in. Elbow
2 in.
Union
2 in. Nipple
pipe
2 in. Gate valve
NOTE: The consumer/installer should purchase either a pre-threaded 2 in. MNPT pipe (or unthreaded pipe and pipe threader) or a 2 in.
adapter (2 in. MNPT x 2in. OD slip fit).
Gate valve
Inlet pipe
Piggyback cord
Power cord
Vent
3/16" O.D.
Air Bleed Hole
Discharge
pipe
Bottom of
inlet pipe
Elbow
Union
Check valve
Switch ON
Approx. 7.5 in.
Approx. 15.5 in.
Switch OFF
Min. 30 in.
3.5 in.
GPM of Water @ Total Feet of Lift
SKU HP Vo
lt
Am
ps
Max. Lif
t
28 ft.
0'
5'
10'
15' 20'
6/10
115V
0261000 319
10.8A
140
130
110
91 71

6
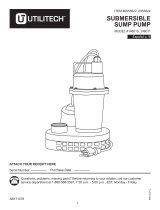
Installation
Connecting a discharge pipe to the
pump
Placing the pump in a basin
□ Wrap the threads of the 2 in. discharge pipe (1) with thread
sealant tape.
□ Attach the discharge pipe (1) to the discharge of the pump
(2).
□ Place the pump on a hard surface inside a sewage basin.
Connecting the check valve
□ Connect the discharge pipe (1) to the elbow (2), union (3),
check valve (4), and gate valve (5).
1
2
1
2
3
5
4

7 HOMEDEPOT.COM
Please contact 1-844-883-1872 for further assistance.
Operation
Connecting power
Operating the pump
□ Plug the pump power cord plug into the piggyback switch
plug outlet.
□ Plug the switch plug into a 115V GFCI power outlet.
□ When the float switch (1) moves up over the top of the
pump, the pump begins to operate. When the water lowers
to a certain level, the float switch (1) will turn the pump off.
□ Allow pump to operate through several on-off cycles.
NOTE: Ensure the pump is submerged in water. Running the
pump dry can damage the pump.
Switch tether height adjustment
Depending on the height of the inlet pipe, the pump float switch may
need to be adjusted. The switch cord is fastened to the side of the
motor housing with a clip and screw. If the water in the basin is
allowed to rise beyond the bottom of the inlet pipe before activating
the pump, lower the float switch cord per the instructions below.
Always maintain 3 in. of cord length between the switch and the clip.
□ Determine the height of the bottom of the inlet.
□ Raise the float switch to determine the height at which the
pump is activated. Only allow the pump to run for 1 second
dry.
□ Remove the screw from the float tether clip and replace in
to a lower threaded hole that allows the pump to operate
before water reaches the bottom of the inlet pipe.
□ Test the on/off operation of the switch by adding clean
water to the basin while observing the pump operation.
1
3 in. Min.
Switch
Attachment
Points

8
Care and Cleaning
To clear a pump that is clogged with debris:
□ Unplug the pump to disconnect the electrical power.
□ Unscrew the four screws (3) on the pump body and
remove the volute (1).
□ Remove debris from around the impeller (2).
□ Reassemble the pump.
NOTE: This pump features an oil filled motor for efficient
cooling. The oil also serves to permanently lubricate the
bearings. DO NOT disassemble the pump body as oil will
leak out and warranty will be void.
3
2

9 HOMEDEPOT.COM
Please contact 1-844-883-1872 for further assistance.
Troubleshooting
WARNING: Before servicing a pump, always shut off the
main power breaker and then unplug the pump. Under
flooded conditions, make sure you are not standing in water
and that you are wearing insulated protective sole shoes.
Contact your local electric company or a qualified licensed
electrician for disconnecting electrical service prior to pump
removal.
CAUTION: Call an electrician when in doubt. The pump
should be connected to a separate 20 A circuit breaker or
20 A fuse block. Note that plugging into existing outlets may
cause low voltage at the motor. This could cause blown
fuses, tripping of motor overload or a burned out motor.
Problem Probable Causes and Solutions
The pump does not run and makes a humming sound. □ The line circuit breaker is off, or the fuse is blown or loose.
□ The water level in the basin has not reached turn-on level as indicated in
the Installation Requirements drawing.
□ The pump cord is not making contact in the receptacle.
□ The float is stuck. It should operate freely in the basin.
□ If all of the above are OK, then the motor could be malfunctioning.
The pump runs but does not deliver water. □ Check if the check valve is installed backwards. The arrow on the check
valve should point in the direction of flow.
□ The gate valve (if used) may be closed.
□ The impeller or volute openings are fully or partially clogged. Remove the
pump and clean.
□ The pump is air-locked. Start and stop several times by plugging and
unplugging the cord. Check for clogged vent hole in the pump case or
discharge pipe and/or no vent hole in the pump case or discharge pipe.
□ The inlet holes in the pump base are clogged. Remove the pump and clean
the openings.
□ The vertical pumping distance is too high. Reduce the distance or change
the discharge fittings of the pump.
The pump runs and pumps out sump, but does not
stop.
□ The float is stuck in the up position. Be sure the float operates freely in the
basin.
□ The float switch is defective. Replace the float switch.
The pump runs but only delivers a small amount of
water.
□ The pump is air-locked. Start and stop several times by plugging in and
unplugging the cord. Check for a clogged vent hole in the pump case.
□ The vertical pumping distance is too high. Reduce the distance or change
the discharge fitting of the pump.
□ Inlet holes in the pump base are clogged. Remove the pump and clean the
strainer and openings.
□ The impeller or volute openings are fully or partially clogged. Remove the
pump and clean.
The fuse blows or circuit breaker trips when the pump
starts.
□ The pump impeller is partially clogged, causing the motor to run slowly and
overload. Remove the pump and clean.
□ The motor stator may be defective.
□ The fuse size or circuit breaker may be too small (must be 20 A).
□ The impeller or volute openings are fully or partially clogged. Remove the
pump and clean.
The motor runs for a short time and then stops. □ The inlet holes in the pump base are clogged. Remove the pump and clean
the openings.
□ The pump impeller is partially clogged, causing the motor to run slowly and
overload. Remove the pump and clean.
□ The motor stator may be defective.
□ The impeller or volute openings are fully or partially clogged. Remove the
pump and clean. Also clean the strainer if one is installed.

10
Service Parts
No. Description Part Number Quantity
1 Volute HDESE6001-2 1
2 Float switch HDESE6002 1


Questions, problems, missing parts? Before returning to the store,
call Everbilt Customer Service
8 a.m. – 7 p.m., EST, Monday-Friday, 9 a.m. – 6 p.m., EST, Saturday
1-844-883-1872
HOMEDEPOT.COM
Retain this manual for future use.

GRACIAS
Apreciamos la confianza que ha depositado en Everbilt por la compra de esta bomba sumergible de aguas residuales. Nos esforzamos por crear continuamente
productos de calidad diseñados para mejorar su hogar. Visítenos en Internet para ver nuestra línea completa de productos disponibles para sus necesidades de
mejorar su hogar. ¡Gracias por elegir a Everbilt!
Núm. de artículo
1000 026 319
Núm. de modelo
ESE60W-HD
GUÍA DE USO Y CUIDADO
BOMBA SUMERGIBLE DE AGUAS RESIDUALES
¿Tiene preguntas, problemas, o faltan piezas? Antes de regresar a la tienda,
llame a Servicio al Cliente de Everbilt
de lunes a viernes de 8 a.m. a 7 p.m., sábado de 9 a.m. a 6 p.m., hora local del Este.
1-844-883-1872
HOMEDEPOT.COM

2
Índice
Índice ....................................................................................... 2
Información de seguridad ...................................................... 2
Precauciones ...................................................................................... 2
Limitaciones ....................................................................................... 2
Seguridad eléctrica............................................................................. 3
Protección contra sobrecargas ........................................................... 3
Garantía ................................................................................... 3
Limitaciones adicionales .................................................................... 4
Aviso al consumidor ........................................................................... 4
Pre-instalación ....................................................................... 4
Requerimientos de instalación ........................................................... 4
Gráfico de rendimiento ....................................................................... 5
Materiales requeridos (no incluidos) .................................................. 5
Instalación .............................................................................. 6
Funcionamiento...................................................................... 7
Cuidado y limpieza ................................................................. 8
Resolución de fallas ............................................................... 9
Piezas de servicio ................................................................ 10
Información de seguridad
PRECAUCIONES
1. Guarde este manual de instrucción en un lugar seguro para
referencia futura.
2. No corte la cuchilla de conexión a tierra ni un accesorio adaptador.
3. No use un cable de extensión.
4. El cable eléctrico de la bomba debe conectarse a una línea con
fusible, con conexión a tierra y con una capacidad mínima de 20A.
Puede ser conectado a un disyuntor sin fusible a los amperios
recomendados.
5. La instalación y el cableado eléctrico deben acatar los códigos
estatales y provinciales y deben completarse antes de cebar la
bomba. Revise las agencias comunitarias apropiadas o póngase en
contacto con profesionales locales eléctricos y de bombas.
6. El voltaje del suministro de energía debe coincidir con el voltaje de
la bomba.
7. Coloque la bomba en circuitos dedicados para evitar bajo voltaje.
8. Se puede instalar tubería plástica de PVC en la tubería de salida. Si
se desea, se puede usar una manguera de desagüe o tubería de
acero galvanizado o de cobre. Toda la tubería debe estar limpia y
libre de materiales extraños para evitar que se atasque.
9. La bomba será inadecuada si los líquidos en suspensión contienen
partículas sólidas más grandes de 2 pulg. (5.1 cm).
LIMITACIONES
Esta bomba fue diseñada para funcionar en cuencos de bomba de al
menos 30 pulg. de profundidad.
PELIGRO: ¡Mantenga el equipo de la bomba fuera del
alcance de los niños! No seguir las instrucciones dadas
podría ocasionar riesgos serios a las personas u objetos.
ADVERTENCIA: Las advertencias le indican al operador
que no seguir una instrucción puede dañar la bomba y/o el
sistema.
ADVERTENCIA: Antes de instalar o darle servicio a la
bomba, asegúrese de que la fuente de energía esté
desconectada.
ADVERTENCIA: Es obligatoria una conexión de tierra
desde la bomba hasta la barra de tierra en el panel de
servicio. Estas bombas vienen con un conductor con
conexión a tierra y un enchufe de fijación tipo conexión a
tierra. No conecte la bomba a una fuente de energía sino
hasta que esté permanentemente conectada a tierra. Para
máxima seguridad, conecte la bomba a un circuito equipado
con un dispositivo interruptor de falla cuando coloque el
cable de tierra de la bomba.
ADVERTENCIA: La cuenca de aguas residuales debe
estar ventilada de acuerdo a los códigos locales de
fontanería. Estas bombas no están diseñadas y NO PUEDEN
ser instaladas en lugares clasificados como peligrosos.
ADVERTENCIA: Lo siguiente puede ocasionar serios
daños a la unidad y anulará la garantía:
(a) El uso de un cable de extensión.
(b) Cortar la cuchilla de conexión a tierra o usar un
accesorio adaptador.
(c) Trabajar en la bomba o encenderla mientras está conectada.
(d) Retirar la carcasa del motor, desenroscar el impulsor o
de otra manera retirar el sello del impulsor.
(e) Hacer funcionar la bomba de forma continua.
(f) Bombear productos químicos o líquidos corrosivos.
(g) Bombear gasolina u otros líquidos inflamables.

3 HOMEDEPOT.COM
Póngase en contacto con el 1-844-883-1872 para asistencia adicional.
Información de seguridad (continuación)
PRECAUCIÓN: Llame a un electricista cuando tenga
dudas. La bomba debe conectarse a un disyuntor de circuito
separado de 20A o a un bloque de fusibles de 20A. Conectar
la bomba en tomacorrientes existentes puede ocasionar
bajo voltaje en el motor. Esto podría hacer que exploten los
fusibles, que se active la sobrecarga del motor o que se
queme el motor.
SEGURIDAD ELÉCTRICA
ADVERTENCIA: Compruebe que el voltaje y la
frecuencia de la bomba mostrados en la placa de
identificación correspondan a los que están disponibles en
la red eléctrica. El instalador debe asegurarse de que el
sistema eléctrico esté conectado a tierra de acuerdo con los
códigos.
ADVERTENCIA: Para uso en exteriores es necesario
usar un cable con una longitud de al menos 10 pies (3 m). El
enchufe y la conexión deben estar protegidos de
salpicaduras de agua, y nunca deben ser usados con un
cable de extensión. Antes de usar la bomba, inspecciónela
visualmente siempre (especialmente el cable de energía y
el enchufe).
ADVERTENCIA: No use la bomba si está dañada.
ADVERTENCIA: Si la bomba está dañada, haga que la
inspeccione un centro se servicio autorizado.
ADVERTENCIA: Asegúrese de que las conexiones
eléctricas estén protegidas contra inundaciones. Proteja el
enchufe y el cable de energía del calor y bordes filosos.
ADVERTENCIA: El cable de energía debe ser
reemplazado por personal calificado solamente. Conexión a
tierra: El enchufe y el cable de energía tienen un contacto
doble con conexión a tierra, para que la conexión a tierra se
pueda lograr simplemente insertando el enchufe.
PROTECCIÓN CONTRA SOBRECARGAS
Esta serie de bombas tiene un interruptor de protección térmica
incorporado, protegerá el motor contra quemadura debido a
sobrecalentamiento/sobrecarga. Cuando los motores se enfrían, el
protector de sobrecarga se reajustará automáticamente y arrancará el
motor.
Si la sobrecarga se activa con frecuencia, revise en busca de la causa.
Podría ser un impulsor atascado, voltaje erróneo/bajo, o falla eléctrica
en el motor. Si se sospecha de una falla eléctrica en el motor, haga que
un técnico le dé servicio.
Garantía
NO devuelva este producto (si se ha instalado alguna vez) a su tienda local de Home Depot. Las bombas de aguas residuales que han estado en servicio y
han sido retiradas llevan un riesgo de contaminación con ellas. Si su bomba de aguas residuales ha fallado:
□ use guantes de goma cuando manipule la bomba
□ desconecte la bomba de la fuente de energía y siga todas las precauciones de seguridad adecuadas
Deseche la bomba de acuerdo con las ordenanzas de desecho locales.
Sujeto a las condiciones y limitaciones descritas antes, este producto será reemplazado (con el mismo modelo o uno de igual valor o especificación si el extremo del
cable de la bomba con la etiqueta del cable y la prueba de compra son devueltos a la tienda minorista dentro del periodo de garantía establecido.
Estas garantías están sujetas a las siguientes condiciones y limitaciones:
a) se deberá proporcionar un recibo de prueba de compra que compruebe el lugar de la compra y la fecha de compra;
b) Esta garantía no aplicará a ningún producto o parte del mismo que esté desgastado o roto o que se haya vuelto inoperante debido a abuso, mal uso,
daño accidental, materiales extraños en el sistema, operación a presiones superiores a las máximas recomendadas, negligencia o falta de instalación,
operación o mantenimiento apropiados (como están descritos en el manual del propietario aplicable o las instrucciones de operación) o que esté siendo
usado para fines industriales, profesionales, comerciales o de alquiler.
c) Esta garantía no aplica al desgaste y uso normales, ni a las piezas o accesorios fungibles que pueden ser suministrados con el producto las que se
espera se vuelvan inoperantes o inutilizables después de un periodo de uso razonable;
d) Esta garantía no aplicará a mantenimiento de rutina y elementos consumibles;
e) Esta garantía no aplicará cuando el daño sea causado por reparaciones hechas o intentadas por otros (es decir, personas no autorizadas por el fabricante);
f) Esta garantía no aplicará a ningún producto que haya sido vendido al comprador original como un producto reacondicionado o renovado (a menos que se
especifique lo contrario por escrito);
g) esta garantía no aplicará a ningún producto o parte del mismo si se instala en él alguna pieza de otro fabricante o se hayan hecho o intentado
reparaciones o alteraciones por personas no autorizadas:
Es
te producto está garantizado contra defectos en materiales y mano de obra por un periodo de cinco años a partir de la fecha de compra
original al por menor.

4
Garantía (continuación)
h) Esta garantía no aplicará al deterioro normal del acabado exterior, tal como, pero no limitado a, rayones, abolladuras, desprendimientos de pintura o
corrosión o decoloración por calor, abrasivos y limpiadores químicos; y
i) Esta garantía no aplicará a piezas componentes vendidas por e identificadas como el producto de otra compañía, que será cubierto bajo la garantía del
fabricante del producto, si la hay.
LIMITACIONES ADICIONALES
Esta garantía aplica solamente al comprador original y no puede ser transferida. Ni la tienda minorista ni el fabricante serán responsables de ningún otro
gasto, pérdida o daños, incluyendo, sin limitación, cualquier daño indirecto, incidental, consecuente o ejemplar que surjan relacionados con la venta, uso o
incapacidad de usar este producto.
AVISO AL CONSUMIDOR
Esta garantía le otorga derechos legales específicos y también puede tener otros derechos que pueden variar de un estado a otro. Las disposiciones
contenidas en esta garantía no están previstas para limitar, modificar, quitar, renunciar o excluir cualquier garantía legal descrita en cualquier legislación
provincial o federal aplicable.
Póngase en contacto con el Equipo de Servicio al Cliente llamando al 1-844-883-1872 o visite www.HomeDepot.com.
Pre-instalación
REQUERIMIENTOS DE INSTALACIÓN
Esta bomba está provista con un interruptor
flotante de encendido/apagado para operación automática Consulte las Instrucciones
de instalación incluidas
con los interruptores y controladores para la instalación.
Debe tenerse cuidado para evitar que la
bomba funcione en un sumidero seco.
La bomba debe instalarse en un cuenco a prueba de gas que tenga un mínimo de 18 pulg. de diámetro y un mínimo de 30 pulg. de profundidad y ventilado
de acuerdo con los códigos
locales de fontanería.
La bomba debe ser colocada sobre una superficie dura y a nivel.
Nunca coloque la bomba directamente sobre superficies de arcilla, tierra o grava.
La bomba puede ser instalada con tubería de ABS, PVC, polietileno
o acero galvanizado. Se requieren adaptadores apropiados para
conectar la tubería
plástica a la bomba.
Siempre instale una unión en la línea de descarga, justamente sobre la fosa del sumidero, para permitir un fácil retiro de la bomba para limpieza o
reparación.
Debe usarse una válvula de retención en la línea de descarga para evitar que el líquido fluya de nuevo al cuenco. La válvula de
retención debe ser una
válvula de flujo libre que permita con facilidad el paso de sólidos.
PRECAUCIÓN: Instale la válvula de retención según la recomendación del fabricante.
Cuando use una válvula de retención, perfore un agujero de alivio de 3/16 pulg. de diámetro en la tubería de descarga. Este agujero debe estar localizado
abajo de la línea del piso entre la descarga de la bomba y la válvula de retención. A menos que se proporcione tal agujero de alivio, la bomba se podría
bloquear por aire y no bombeará agua a pesar de que funcione.
Una válvula de compuerta debe seguir a la válvula de retención para permitir la limpieza periódica de la válvula de retención o el retiro de la bomba.
El resto de la línea de descarga debe ser lo más corta posible con un mínimo de vueltas para minimizar las pérdidas de cabeza de fricción. No restrinja la
descarga a tamaños menores de 2 pulg.
Las aplicaciones de aguas residuales y efluentes requerirán un respiradero de sumidero separado. Se proporciona una conexión en la parte superior del
sumidero o cubierta que debe ser canalizada al respiradero existente del edificio o extendida afuera con su propia tubería.

5 HOMEDEPOT.COM
Póngase en contacto con el 1-844-883-1872 para asistencia adicional.
Pre-instalación (continuación)
GRÁFICO DE RENDIMIENTO
MATERIALES REQUERIDOS (NO INCLUIDOS)
Antes de usar esta bomba, asegúrese de tener los siguientes artículos:
2 pulg.
Tubería de
descarga
Cinta selladora
de roscas
2 pulg. Válvula de
retención
2 pulg. Codo
2 pulg.
Unión
2 pulg. Niple
2 pulg. Válvula de
compuerta
NOTA: El consumidor/instalador debe comprar una tubería MNPT pre-roscada de 2 pulg. (o tubería sin rosca y terraja de tubería) o un
adaptador de 2 pulg. (2 pulg. MNPT x 2 pulg. OD adaptador deslizable).
6/10
115V
0261000 319
10.8A
530
492
416
344 269
28 ft.
SKU HP
Voltio
Amperios
LPM de agua a pies totales de elevación
Máx.
Elevación
0 pies 5 pies 10 pies 15 pies 20 pies

6
Instalación
Conexión de una tubería de
descarga a la bomba
Colocación de la bomba en un
cuenco
□ Envuelva las roscas de la tubería de descarga de 2 pulg. (1) con
cinta selladora de rosca.
□ Instale la tubería de descarga (1) en la descarga de la bomba (2).
□ Coloque la bomba sobre una superficie dura dentro del cuenco de
las aguas residuales.
Conexión de la válvula de
retención
□ Conecte la tubería de descarga (1) en el codo (2), la unión (3), la
válvula de retención (4), y la válvula de compuerta (5).
1
2
1
2
3
5
4

7 HOMEDEPOT.COM
Póngase en contacto con el 1-844-883-1872 para asistencia adicional.
Funcionamiento
Conexión de la energía
Operación de la bomba
□ Conecte el enchufe del cable eléctrico de la bomba en el
tomacorriente del enchufe de interruptor tipo adaptador.
□ Conecte el enchufe interruptor en un tomacorriente GFCI de 115V.
□ Cuando el interruptor flotante (1) se mueva hacia arriba sobre la
parte superior de la bomba, la bomba comienza a funcionar.
Cuando al agua baja hasta cierto nivel, el interruptor flotante (1)
apagará la bomba.
□ Deje que la bomba funcione a través de varios ciclos de
encendido/apagado.
NOTA: Asegúrese de que la bomba esté sumergida en agua.
Poner a funcionar la bomba sin suficiente agua puede dañar
la bomba.
Ajuste de altura de amarre de
interruptor
Dependiendo de la altura de la tubería de entrada, es posible que deba
ajustarse el interruptor flotante de la bomba. El cable del interruptor se
sujeta al lado de la carcasa del motor con un gancho y tornillo. Si se deja
que el agua en el cuenco suba más allá del fondo de la tubería de entrada
antes de activar la bomba, baje el cable del interruptor flotante según las
instrucciones a continuación. Mantenga siempre 3 pulg. de longitud del
cable entre el interruptor y el gancho.
□ Determine la altura del fondo de la entrada.
□ Eleve el interruptor flotante para determinar la altura a la que la
bomba está activada. Solo deje que la bomba funcione seca
durante 1 segundo.
□ Retire el tornillo del gancho de amarre del flotador y recolóquelo
en un agujero roscado inferior para permitir que la bomba
funcione antes de que el agua alcance el fondo de la tubería de
entrada.
□ Pruebe la operación encendido/apagado del interruptor agregando
agua limpia al cuenco mientras observa el funcionamiento de la
bomba.
1

8
Cuidado y limpieza
Para limpiar la bomba cuando está atascada con desechos:
□
Desenchufe la bomba para desconectar la energía eléctrica.
□
Quite los cuatro tornillos (3) en el cuerpo de la bomba y retire la
espiral (1).
□
Retire los desechos alrededor del impulsor (2).
□ Ensamble de nuevo la bomba.
NOTA: Esta bomba presenta un motor lleno de aceite para
un enfriamiento eficiente. El aceite también sirve para
lubricar permanentemente los cojinetes. NO desensamble
el cuerpo de la bomba ya que el aceite se fugará y esto
anulará la garantía.
3
2
/