Page is loading ...

Model E131G & F131G
SERVICE MANUAL
Manual No. 513537-3 Mar. 2004


This manual provides basic information about the machine. Instructions and suggestions are
given covering its operation and care.
The illustrations and specifi cations are not binding in detail. We reserve the right to make
changes to the machine without notice, and without incurring any obligation to modify or pro-
vide new parts for machines built prior to date of change.
DO NOT ATTEMPT to operate the machine until instructions and safety precautions in this
manual are read completely and are thoroughly understood. If problems develop or questions
arise in connection with installation, operation, or servicing of the machine, contact Stoelting.
Stoelting Foodservice Equipment
502 Highway 67
Kiel, WI 53042-1600
U.S.A.
Main Tel: 800.558.5807
Fax: 920.894.7029
Customer Service: 888.429.5920
Fax: 800.545.0662
Email: [email protected]
© 2014 PW Stoelting, LLC
stoeltingfoodservice.com

Safety Alert Symbol:
This symbol Indicates danger, warning or caution.
Attention is required in order to avoid serious per-
sonal injury. The message that follows the symbol
contains important information about safety.
Signal Word:
Signal words are distinctive words used throughout
this manual that alert the reader to the existence and
relative degree of a hazard.
CAUTION
The signal word “CAUTION” indicates a potentially
hazardous situation, which, if not avoided, may result
in minor or moderate injury and equipment/property
damage.
A Few Words About Safety
Safety Information
Read and understand the entire manual before
operating or maintaining Stoelting equipment.
This manual provides the operator with information
for the safe operation and maintenance of Stoelting
equipment. As with any machine, there are hazards
associated with their operation. For this reason safety
is emphasized throughout the manual. To highlight
specifi c safety information, the following safety defi ni-
tions are provided to assist the reader.
The purpose of safety symbols is to attract your at-
tention to possible dangers. The safety symbols, and
their explanations, deserve your careful attention
and understanding. The safety warnings do not by
themselves eliminate any danger. The instructions
or warnings they give are not substitutes for proper
accident prevention measures.
If you need to replace a part, use genuine Stoelting
parts with the correct part number or an equivalent
part. We strongly recommend that you do not use
replacement parts of inferior quality.
WARNING
The signal word “WARNING” indicates a potentially
hazardous situation, which, if not avoided, may result
in death or serious injury and equipment/property
damage.
CAUTION
The signal word “CAUTION” not preceded by the
safety alert symbol indicates a potentially hazardous
situation, which, if not avoided, may result in equip-
ment/property damage.
NOTE (or NOTICE)
The signal word “NOTICE” indicates information or
procedures that relate directly or indirectly to the
safety of personnel or equipment/property.

TABLE OF CONTENTS
SECTION DESCRIPTION PAGE
SECTION 1 INTRODUCTION
1.1 Description .....................................................................................1
1.2 Specifications .................................................................................1
SECTION 2 INSTALLATION INSTRUCTIONS
2.1 Safety Precautions .........................................................................3
2.2 Shipment and Transit .....................................................................4
2.3 Freezer Installation .........................................................................4
2.4 Floor Stand Installation ...................................................................5
2.5 Installing Permanent Wiring............................................................5
SECTION 3 INITIAL SET-UP AND OPERATION
3.1 Operator’s Safety Precautions ........................................................7
3.2 Operating Controls and Indicators ..................................................7
3.3 Sanitizing ........................................................................................8
3.4 Freeze Down and Operation...........................................................9
3.5 Mix Information...............................................................................10
3.6 Removing Mix Inlet Regulator.........................................................11
3.7 Cleaning the Freezer ......................................................................11
3.8 Disassembly of Freezer Parts.........................................................11
3.9 Cleaning the Freezer Parts.............................................................13
3.10 Sanitize Freezer & Freezer Parts....................................................13
3.11 Assembly of Freezer.......................................................................13
3.12 Routine Cleaning ............................................................................14
3.13 Preventive Maintenance .................................................................14
3.14 Extended Storage...........................................................................16
SECTION 4 REFRIGERATION SYSTEM
4.1 Refrigeration System ......................................................................17
4.2 Evaporators ....................................................................................18
4.3 Compressor Winding Test..............................................................18
4.4 Condensers ....................................................................................19
4.5 T.X.V. .............................................................................................20
4.6 T.X.V. Adjustment ..........................................................................20
4.7 T.X.V. Removal ..............................................................................20
4.8 T.X.V. Installation ...........................................................................21
4.9 Hopper............................................................................................22
4.10 E.P.R. Valve Adjustment ................................................................22
4.11 E.P.R. Removal ..............................................................................23
4.12 E.P.R. Valve Installation .................................................................23
4.13 Capillary Tubes...............................................................................24
4.14 Capillary Tube Removal .................................................................24
4.15 Capillary Tube Installation...............................................................24
4.16 Solenoid Valve................................................................................25
4.17 Solenoid Magnetic Coil Removal ....................................................26
4.18 Solenoid Magnetic Coil Installation .................................................26

4.19 Liquid and Suction Line Solenoid Valve Removal ...........................26
4.20 Liquid and Suction Line Solenoid Valve Installation ........................27
4.21 Water Valve....................................................................................27
4.22 Water Valve Adjustment .................................................................27
4.23 Water Valve Removal.....................................................................27
4.24 Water Valve Installation..................................................................28
4.25 Refrigerant Charge (All Models) .....................................................28
SECTION 5 CONTROLS
5.1 Control System ...............................................................................29
5.2 Power Board...................................................................................29
5.3 Program Module.............................................................................29
5.4 Plug-in Relays ................................................................................36
5.5 Contactors ......................................................................................36
5.6 Spigot Switches ..............................................................................37
5.7 Spigot Switch Removal...................................................................37
5.8 Spigot Switch Installation ................................................................37
5.9 Front Door Interlock Switch ............................................................37
5.10 Front Door Interlock Removal.........................................................37
5.11 Front Door Interlock Switch Assembly ............................................38
5.12 Touch Pad Switch Module ..............................................................38
5.13 Touch Pad Switch Module Removal ...............................................38
5.14 Touch Pad Switch Module Assembly..............................................39
5.15 Sensor ............................................................................................39
5.16 Sensor Removal .............................................................................39
5.17 Sensor Installation ..........................................................................40
5.18 Preparation for Major Component Removal ...................................40
5.19 Condenser Fan Motor and Lubrication ...........................................40
5.20 Condenser Fan Motor Removal......................................................40
5.21 Condenser Fan Motor Installation...................................................41
5.22 Drive Motor.....................................................................................41
5.23 Drive Motor Removal......................................................................41
5.24 Drive Motor Installation ...................................................................42
5.25 Speed Reducer...............................................................................43
5.26 Speed Reducer Removal................................................................43
5.27 Speed Reducer Installation.............................................................43
5.28 Compressor....................................................................................44
5.29 Compressor Removal.....................................................................44
5.30 Compressor Installation..................................................................44
5.31 Final Assembly of Freezer ..............................................................45
SECTION 6 TROUBLESHOOTING
6.1 Dispensing, Servability, and Overrun..............................................48
6.2 Barrel and Hopper Mix Temperature Maintenance .........................49
6.3 Electro-Mechanical .........................................................................50
6.4 Control Displayed Error Conditions.................................................56
SECTION 7 REPLACEMENT PARTS
7.1 How To Order Parts........................................................................59

LIST OF ILLUSTRATIONS
FIGURE TITLE PAGE
1 Model Endura/Futura 131Freezer ...........................................................1
2 Specifications .........................................................................................1
3 Warning Label Locations ........................................................................3
4 Space and Ventilation Requirements......................................................4
5 Installing Tray and Cover ........................................................................4
6 Power Cord ............................................................................................4
7 Floor Stand .............................................................................................5
8 Power Cord Connection..........................................................................5
9 Controls ..................................................................................................7
10 Mix Inlet Regulator..................................................................................9
11 Sanitizing Procedure...............................................................................9
12 Clean Control..........................................................................................9
13 Sanitizing Hopper ...................................................................................9
14 Spigot Opened and Solution Draining .....................................................9
15 Dispensing Product ................................................................................10
16 Removing Mix Inlet Regulator.................................................................11
17 Draining Mix ...........................................................................................11
18 Auger Flight Wear and Front Auger Support Bushing Wear ...................11
19 Removing Front Door .............................................................................12
20 Front Door Disassembly .........................................................................12
21 Removing Auger Support .......................................................................12
22 Auger Shafts...........................................................................................12
23 Removing “O” Ring.................................................................................13
24 Exploded View of Auger .........................................................................13
25 Exploded View of Front Door ..................................................................14
26 Mix Inlet Regulator Installation ................................................................14
27 Refrigeration System ..............................................................................17
28 Compressor Terminal Cover ..................................................................18
29 Compressor Connections .......................................................................18
30 Ohmmeter and Connections...................................................................18
31 Electrical Box Cover Removal ................................................................19
32 Condenser and Filter ..............................................................................19
33 Condenser Inspection.............................................................................20
34 T.X.V. (Thermostatic Expansion Valve) ..................................................20
35 Bulb Removal .........................................................................................21

36 T.X.V. Removal ......................................................................................21
37 Bulb Installation ......................................................................................22
38 Filter Drier...............................................................................................22
39 E.P.R. Schrader Access Fitting ..............................................................22
40 E.P.R. Valve Adjustment ........................................................................23
41 E.P.R. Valve and Lines...........................................................................24
42 Filter Drier...............................................................................................24
43 Capillary Tube and Drive Assembly ........................................................25
44 Filter Drier...............................................................................................25
45 Power Cord ............................................................................................25
46 Pressure Gauges ...................................................................................26
47 Solenoid Replacement............................................................................26
48 Solenoid Coil Removal ...........................................................................26
49 Gauge Connection..................................................................................27
50 Water Valve Adjustment .........................................................................27
51 Power Board...........................................................................................30
52 Program Module .....................................................................................31
53 Membrane Switch Panel Display Board..................................................32
54 Plug-in Relays ........................................................................................36
55 Spigot Switch Replacement ....................................................................37
56 Interlock Switch Removal .......................................................................38
57 Interlock Switch Assembly ......................................................................38
58 Switch Module Removal .........................................................................38
59 Electrical Box Removal...........................................................................39
60 Cover Plate Removal..............................................................................39
61 Foam Insulation Removal .......................................................................39
62 Ty-raps Removal ....................................................................................40
63 Fan Motor Connections ..........................................................................41
64 Fan Bracket Removal .............................................................................41
65 Drive Belt Removal.................................................................................42
66 Drive Motor Wire Removal .....................................................................42
67 Motor Pulley Adjustment.........................................................................42
68 Belt Tension Adjustment.........................................................................42
69 Speed Reducer Removal........................................................................43
70 Speed Reducer Adjustment....................................................................43
71 Belt Tension Adjustment.........................................................................43
72 Compressor Cover Removal ..................................................................44
73 Compressor Connections .......................................................................44
74 Compressor Oil Test Kit .........................................................................44
75 Filter Drier...............................................................................................45
76 O-Ring Identification Sheet.....................................................................59

1
SECTION 1
INTRODUCTION
1.1 DESCRIPTION
The Stoelting Endura/Futura 131 counter freezer is
gravity fed. The freezer is equipped with fully automatic
controls to provide a uniform product. The freezer is
designed to operate with almost any type of commercial
soft serve or non-dairy mixes available, including ice
milk, ice cream, yogurt, and frozen dietary desserts.
The freezer is designed to be used with both barrels in
operation. If you desire to use one barrel only, the
freezer must be cleaned, sanitized and filled with fresh
mix daily. For more information call your authorized
Stoelting Serviceperson.
This manual is designed to assist qualified service
personnel and operators in the installation, operation
and maintenance of the Stoelting Model Endura/Futura
131 gravity freezer.
Information Packet Location
Model Endura/Futura 131 - behind
Left Side Panel or behind the Front
Decorative Panel.
1.2 SPECIFICATIONS
Figure 1. Model Endura/Futura 131 Freezer
(This freezer is mounted on the
optional Floor Stand.)

2
MODEL ENDURA/FUTURA 131
COUNTER MODEL
GRAVITY FREEZER
Dimensions:
Freezer: 22" (56 cm) wide x 28" (72 cm) deep x 34.75" (88 cm) high
Crated: 28" (71 cm) wide x 35" (89 cm) deep x 38" (96 cm) high
Weight:
Freezer: 370 lbs. (168 kg) Crated: 450 lbs. (204 kg)
Electrical:
Use 20 amp HACR circuit breaker.
Automatic safeguard circuit built into electronic control - protects major freezer components under normal operating
conditions.
Cooling
Air cooled requires minimum 3" air clearance on right and left hand side. No clearance needed in the rear.
Water cooled required 3/8" I.D. water supply line and 3/8" I.D. drain line minimum.
Hopper
3 Gallons (11.35 liters) each refrigerated and insulated.
Refrigeration
NOITPIRCSED ARUDNE ARUTUF
CAegatloV
V032-802hp1V032-802hp1
gninnuRlatoT
spmA
0.110.21
srotoMevirD
hcaePH4/3hcaePH4/3
rosserpmoC
hUTB006,8HUTB000,21
ledoMG131EG131F
tnaregirfeR A404RA404R
egrahC .zo23C/A
.zo62C/W
.zo24C/A
.zo62C/W
fotuotaehrepuS
rotaropavEeht
Fº62-02Fº61-7
erusserPnoitcuS *gisp82-42*gisp82-62
erusserPdaeH gisp532-522gisp542-532
erusserPreppoH gisp17-96gisp17-96

3
SECTION 2
INSTALLATION INSTRUCTIONS
2.1 SAFETY PRECAUTIONS
Do not attempt to operate the freezer until the safety
precautions and operating instructions in this manual
are read completely and are thoroughly understood.
Take notice of all warning labels on the freezer (Fig. 3).
The labels have been put there to help maintain a safe
working environment. The labels have been designed to
withstand washing and cleaning. All labels must remain
legible for the life of the freezer.
Fig. 3. Warning Label Locations
Labels should be checked periodically to be sure they
can be recognized as warning labels.
If danger, warning or caution labels are needed, indicate
the part number, type of label, location of label, and
quantity required along with your address and mail to:
STOELTING, INC.
ATTENTION: Customer Service
502 Highway 67
Kiel, Wisconsin 53042-1600
THERMISTOR. HEAT SINK MUST BE
SEE SERVICE MANUAL.
USED WHEN BRAZING ON EVAPORATOR
OUTLET. CHECK RESISTANCE BEFORE
REMOVAL OF THERMISTOR.
UNDER THIS COVER. TEMPERATURE
MUST NOT EXCEED 220°F NEAR
HEAT SENSITIVE THERMISTOR LOCATED

4
Fig. 4. Space and Ventilation Requirements
2.2 SHIPMENT AND TRANSIT
The freezer has been assembled, operated and
inspected at the factory. Upon arrival at the final
destination, the complete freezer must be checked for
any damage which may have occurred during transit.
With the method of packaging used, the freezer should
arrive in excellent condition. THE CARRIER IS
RESPONSIBLE FOR ALL DAMAGE IN TRANSIT,
WHETHER VISIBLE OR CONCEALED. Do not pay the
freight bill until the freezer has been checked for damage.
Have the carrier note any visible damage on the freight
bill.
If concealed damaged and/or shortage is found later,
advise the carrier within 10 days and request inspection.
The customer must place claim for damages and/or
shortages in shipment with the carrier. Stoelting, Inc.
cannot make any claims against the carrier.
2.3 FREEZER INSTALLATION
Installation of the freezer involves moving the freezer
close to its permanent location, removing all crating,
setting in place, assembling parts, and cleaning.
A. Uncrate the freezer.
B. Accurate leveling is necessary for correct drainage
of freezer barrel and to insure correct overrun. Place
a spirit level on top of the freezer at each corner to
check for level condition. If adjustment is necessary,
level the freezer by turning the bottom part of each
leg in or out. Then separate freezer base gasket and
install with the seam to the back and the flat to the
bottom. (Fig.4).
C. Air cooled freezers require correct ventilation. The
right side of the freezer is the air intake and must
have a 3" (7.5cm) clearance. Air discharges out of
the left side of the unit and must have 3" (7.5cm)
clearance. Do not obstruct the intake or discharge
(Fig.4).
CAUTION
FAILURE TO PROVIDE ADEQUATE
VENTILATION WILL VOID WARRANTY!
D. Place the OFF-ON switch in the OFF position.
E. Install the drip tray, drain trays, covers and other
miscellaneous parts on the freezer. (Fig. 5)
F. Connect the power cord. The plug is designed for
208 or 230 volt/20 amp duty. Check the nameplate
on your freezer for proper supply. The unit must be
connected to a properly grounded receptacle. The
electrical cord furnished as part of the freezer has a
three prong grounding type plug (Fig. 6). The use of
an extension cord is not recommended. If one must
be used, use one with a wire size 12 gauge or heavier
with a ground wire. Do not use an adaptor to get
around grounding requirement.
CAUTION
DO NOT ALTER OR DEFORM PLUG IN ANY
WAY!
Figure 5. Installing Tray and Insert
Figure 6. Power Cord

5
Fig. 7. Floor Stand
2.4 FLOOR STAND INSTALLATION
To install the E/F 131 on to the floor stand, follow the
steps outlined below:
1. Uncrate the floor stand and place in an upright
position.
NOTE
Detailed instructions are included with each floor
stand.
2. Place a spirit level across the top of the stand to
check for level condition, side to side and front to
back. If adjustment is necessary, level the stand by
turning the bottom part of each caster in or out, then
tighten the lock nut, and lock caster.
3. Remove the four legs from the freezer and replace
with the four leg adapters provided. Adapters must
be fully tightened to the freezer.
4. Place the E/F131 freezer on the floor stand with the
front of the freezer to the door end of the stand.
Secure the freezer to the stand with the nuts and lock
washers provided. Then separate freezer base gasket
and install the seam to the back and the flat to the
bottom (Fig. 7).
2.5 INSTALLING PERMANENT WIRING
WARNING
ELECTRICAL TECHNICIANS MUST BE
CONTINUOUSLY ALERT TO THE PRACTICE
OF ALL NECESSARY SAFETY RULES AND
PRECAUTIONS WHEN SERVICING THIS
EQUIPMENT AS VOLTAGES ARE PRESENT
WHICH CAN CAUSE SERIOUS OR FATAL
INJURY.
ELECTRICAL WIRING MATERIALS,
ARRANGEMENT AND GROUNDING MUST
CONFORM WITH NATIONAL AND OTHER
APPLICABLE ELECTRICAL CODES.
If permanent wiring is required by local codes, the
following procedure must be performed:
A. Remove the back panel.
B. Disconnect the wires from the terminal block. Discon-
nect the green ground wire from the grounding stud.
C. Remove the power cord.
D. Install permanent wiring according to local code.
E. Replace the back panel.
Figure 8. Power Cord Connection

6

7
3.1 OPERATOR'S SAFETY PRECAUTIONS
SAFE OPERATION IS NOT AN ACCIDENT; Observe
these rules:
A. Know the freezer. Read and understand the
Operating Instructions.
B. Notice all warning labels on the freezer.
C. Wear proper clothing. Avoid loose fitting garments,
and remove watches, rings or jewelry which could
cause a serious accident.
D. Maintain a clean work area. Avoid accidents by
cleaning up the area and keeping it clean.
E. Stay alert at all times. Know which switch, push
button or control you are about to use and what
effect it is going to have.
F. Disconnect electrical cord for maintenance.
Never attempt to repair or perform maintenance on
the freezer until the main electrical power has been
disconnected.
G. Do not operate under unsafe operating condi-
tions. Never operate the freezer if unusual or
excessive noise or vibration occurs.
SECTION 3
INITIAL SET-UP AND OPERATION
Figure 9. Controls
3.2 OPERATION CONTROLS AND INDICATORS
Before operating the freezer, it is required that the
operator know the function of each operating
control. Refer to Figure 9 for the location of the
operating controls on the freezer.
WARNING
THE CLEAN-OFF-ON SWITCH MUST BE PLACED
IN THE OFF POSITION WHEN DISASSEMBLING
FOR CLEANING OR SERVICING. THE FREEZER
MUST BE DISCONNECTED FROM ELECTRICAL
SUPPLY BEFORE REMOVING ANY ACCESS
PANEL.
A. SPIGOT SWITCH
The SPIGOT switch will automatically actuate the
auger drive and refrigeration systems when the spigot
is opened to dispense product. When the spigot is
closed, the drive motor and compressor will remain
“on” until the product in the barrel reaches the proper
consistency.
B. OFF-ON SWITCH
The OFF-ON switch is a two position toggle switch
used to supply power to the control circuit. When the
switch is in the OFF position, nothing will turn. When
the switch is in the ON position, the freezer can be
run in the freezing mode or cleaning mode. the
freezer will be in the idle mode until a switch is
activated.

8
C. PUSH TO FREEZE SWITCH
The PUSH TO FREEZE switch is a "snap" switch
used to start the freezing cycle. During initial freeze
down, the OFF-ON switch is placed in the ON
position. Then the PUSH TO FREEZE switch is
pressed until the drive motor and compressor come
"ON".
NOTE
After the gearmotor starts, there is a 3 second
delay before the compressor starts.
During the normal operation, the red PUSH TO FREEZE
switch light will illuminate after the freezer has been idle
for the preset cycles. Before drawing product, press the
red PUSH TO FREEZE switch if it is illuminated. Wait
until the green light is illuminated before dispensing.
NOTE
If the freezer shuts off and the PUSH TO
FREEZE light flashes, you have an error condi-
tion. Turn the OFF-ON switch to the OFF
position, correct the problem and turn the
freezer back on. (See Troubleshooting.)
D. GREEN LIGHT
The green light is used to indicate that the product
has reached the proper consistency and is ready to
be dispensed. The light begins to flash at 98% of
consistency.
NOTE
If the PUSH TO FREEZE red light is illuminated,
push the PUSH TO FREEZE switch and wait
until the green light illuminates before dispens-
ing.
E. CLEAN SWITCH
The CLEAN switch is a "snap" switch. When the switch
is pushed the refrigeration system will be OFF and the
auger will rotate for cleaning. When the switch is
pushed again, the auger will stop and the CLEAN light
will flash indicating the freezer is in the CLEAN mode.
To exit the CLEAN mode turn the OFF-ON switch to
the OFF position. If the freezer is left in CLEAN for
more than 30 minutes or is pushed three times in ten
seconds, it will go in error.
F. DRIVE MOTOR OVERLOAD
The internal drive motor overload will trip if the drive
motor is overloaded. It will reset after approximately
10-12 minutes. If the drive motor continues to trip,
refer to Section 4-Troubleshooting.
G. RED MIX LOW LENS
The red MIX LOW light is designed to alert the
operator to a low mix condition. The lens will illumi-
nate with approximately one gallon of mix in the
hopper. When the MIX LOW lens is lit, refill hopper
immediately.
NOTE
Failure to immediately refill hopper may result in opera-
tional problems.
H. HOLD READY SWITCH
The HOLD READY switch is a push button switch.
When pushed in and held for 5 seconds, the hold ready
mode will be activated. The product will remain ready
to serve and the freezer will not go to idle. To return to
normal operation push and hold for 5 seconds.
I. HIGH PRESSURE CUTOUT
The HIGH PRESSURE CUTOUT switch is a safety
switch designed to protect the compressor from dam-
age due to excessive head pressure. When tripped,
the lever will be out, push in to reset.
J. DISPENSE RATE ADJUSTER
The DISPENSE RATE ADJUSTER limits the opening
of the spigot.
To adjust product dispense rate, turn the adjusting
knobclockwise for slower flow and counterclockwise
for faster flow.
K. DOOR INTERLOCK SWITCH
When the door is securely fastened, the freezer will
operate normally. When the door is removed, the
drive and compressor will not run.
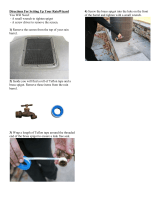
3.3 SANITIZING
Sanitizing must be done after the freezer is clean and
just before the hopper is filled with mix. Sanitizing the
night before is not effective. However, you should
always clean the freezer and parts after using it.
WARNING
THE UNITED STATES DEPARTMENT OF AGRICUL-
TURE AND THE FOOD AND DRUG ADMINISTRATION
REQUIRE THAT ALL CLEANING AND SANITIZING SO-
LUTIONS USED WITH FOOD PROCESSING EQUIP-
MENT BE CERTIFIED FOR THIS USE.
When sanitizing the freezer, refer to local sanitary
regulations for applicable codes and recommended
sanitizing products and procedures. The frequency of
sanitizing must comply with local health regula-
tions. Mix sanitizer according to manufacturer’s instruc-
tions to provide a 100 parts per million strength solution.
Mix sanitizer in quantities of no less than 2 gallons (7.5
liters) of 120°F of water. Allow sanitizer to contact the
surfaces to be sanitized for 5 minutes. Any sanitizer
must be used only in accordance with the
manufacturer’s instructions.
CAUTION
PROLONGED CONTACT OF SANITIZER WITH FREEZER
MAY CAUSE CORROSION OF STAINLESS STEEL
PARTS.

9
In general, sanitizing may be conducted as follows:
A. Push the mix inlet regulator into hopper with air inlet
(long) tube toward the front of the freezer.
(Fig. 10).
B. Prepare 2 gallons (7.5 liters) of sanitizing solution
following manufacturer’s instructions. Pour into
hopper with mix inlet regulator in place (Fig. 11).
Figure 10. Mix Inlet Regulator
C. Place the OFF-ON toggle switch in the ON position
while pressing the CLEAN switch. Check for leaks.
Figure 11. Sanitizing Procedure
Figure 12. Clean Control
D. Clean sides of hopper, mix inlet regulator and under-
side of hopper cover using a sanitized soft bristle
brush dipped in the sanitizing solution (Fig. 13).
E. After five minutes, place a bucket under the spigot
and open spigot to drain sanitizing solution. When
solution has drained, press the CLEAN snap switch
to stop the auger. Allow the freezer barrel to drain
completely (Fig. 14).
Figure 13. Sanitizing Hopper
3.4 FREEZE DOWN AND OPERATION
This section covers the recommended operating proce-
dures to be followed for the safe operation of the freezer.
A. Sanitize just prior to use.
B. Place the OFF-ON switch in the OFF position.
C. With spigots open, pour approximately 1 gallon (3.8
liters) of mix into the hopper. Allow the mix to flush
out about 8 ounces (0.23 liters) of sanitizing solution
and liquid mix. Close the spigot.
Figure 14. Spigot Opened and Solution Draining

10
D. Fill hopper with approximately 3 gallons (11.4 liters)
of prechilled (40°F or 4°C) mix.
CAUTION
DO NOT OVERFILL THE HOPPER. MIX LEVEL MUST
NOT BE HIGHER THAN 2 INCHES (5 CM) FROM THE TOP
OF THE AIR INLET TUBE ON THE MIX INLET REGULA-
TOR.
E. The freezer barrel will automatically fill until it is
about 1/2 full. If freezer barrel does not fill, check for
obstruction in the mix inlet regulator. If freezer barrel
fills over 1/2 full, indicated by low overrun, check for
leaks at the mix inlet regulator "O" Ring or check if
the mix inlet regulator was installed correctly or that
the freezer is level.
F. Place the OFF-ON switch in the ON position, then
press the PUSH TO FREEZE swtich until the freezer
starts.
NOTE
After the gearmotor starts, there is a 3 second
delay before the compressor starts.
G. After about 6 to 10 minutes the freezer will shut off
and the green lens will illuminate. The product will be
ready to serve. Freeze down time may be longer for
some frozen diet dessert mixes. High ambient
temperatures may extend freeze down time.
H. For normal dispensing, move the spigot handle fully
open (Fig. 15).
I. The freezer is designed to dispense the product at a
reasonable draw rate. If the freezer is overdrawn, the
result is a soft product or a product that will not
dispense at all. If this should occur, allow the freezer
to run for approximately 30 seconds before dispens-
ing additional product. After a while the operator will
sense or feel when the freezer is beginning to fall
behind, and will slow down on the rate of draw so as
not to exceed the capacity.
J. Do not operate the freezer when the MIX LOW light
ison or with less than 1-3/4" (4.4 cm) of mix in the
hopper. Refill the hopper immediately.
NOTE
The freezer has a standby mode sometimes
referred to as a sleep or energy conservation
mode. When the freezer is not used, after a
preset time, it will enter the standby mode and
remain there until someone draws a product or
pushes the push-to-freeze switch. In the
standby mode, the freezer will keep the product
below 45°F. Standby modes are not to be used
in place of cleaning and sanitizing. Frequency of
cleaning and sanitizing is determined by Fed-
eral, State, and local regulatory agencies.
3.5 MIX INFORMATION
Mix can vary considerably from one manufacturer to
another. Differences in the amount of butterfat content
and quantity and quality of other ingredients have a
direct bearing on the finished frozen product. A change
in freezer performance that cannot be explained by a
technical problem may be related to the mix.
When changing from one type of mix to another such as
yogurt to Vitari, you may have to change the mix inlet
regulator and/or control settings. Please call your
distributor for further information.
Proper product serving temperature varies from one
manufacturer’s mix to anther. Mixes should provide a
satisfactory product in the 18° to 20°F (-7° to -6°C)
range.
When checking the temperature, stir the thermometer in
the frozen product to read the true temperature.
Mix does not improve with age. Old mix, or mix that has
been stored at too high a temperature, can result in a
finished product that is less than satisfactory in taste
and appearance. To retard bacteria growth in dairy based
mixes, the best storage temperature range is between
36° to 40°F (2.2° to 4.4°C).
Some products tend to foam more than others. If excess
foam should occur, skim the foam off with a sanitized
utensil and discard. Periodically, stir the mix in the
hopper with a sanitized utensil.
Figure 15. Dispensing Product
CAUTION
REFRIGERATION IS AUTOMATICALLY
ACTIVATED WHEN THE SPIGOT IS OPENED.
CLOSE THE SPIGOT COMPLETELY AFTER
DISPENSING.

11
3.6 REMOVING MIX FROM THE FREEZER
To remove the mix from the freezer, refer to the following
steps:
A. Remove the mix inlet regulator from the hopper by
pulling straight up (Fig.16).
B. Place the OFF-ON rocker switch in the ON position
and push the CLEAN switch to rotate the auger.
Allow the mix to agitate in the freezer barrel until the
mix has become a liquid, about 5 minutes.
Figure 18. Auger Flight Wear and Front Auger
Support Bushing Wear
D. Place the OFF-ON switch in the OFF position.
3.7 CLEANING THE FREEZER
NOTE
The frequency of cleaning the freezer and freezer
parts must comply with local health regulations.
Figure 16. Removing Mix Inlet Regulator
C. Drain the liquid mix by opening the spigot. A bucket
or container should be placed under the spigot to
catch the liquid mix (Fig. 17).
Figure 17. Draining Mix
After the mix has been removed from the freezer, the
freezer must be cleaned. To clean the freezer, refer to the
following steps:
A. Close the spigot and fill the hopper with 2 gallons
(7.5 liters) of cold tap water.
B. Place the OFF-ON switch in the ON position while
pushing the CLEAN switch to rotate the auger.
C. Allow the water to agitate for approximately five
minutes.
NOTE
If freezer is left in CLEAN for more than 30
minutes, it will go to error.
D. Open the spigot to drain the water. Remember to
place a bucket or container under the spigot to catch
the water. When the water has drained, turn the
OFF-ON switch to the OFF position. Allow the freezer
barrel to drain completely.
E. Repeat steps A through D using a mild detergent
solution.
3.8 DISASSEMBLY OF FREEZER PARTS
CAUTION
PLACE THE OFF-ON TOGGLE SWITCH IN THE OFF
POSITION BEFORE DISASSEMBLING FOR CLEANING
OR SERVICING.
Inspection for worn or broken parts should be made at
every disassembly of the freezer for cleaning or other
purposes. All worn or broken parts should be replaced to
ensure safety to both the operator and the customer and
to maintain good freezer performance and a quality
product. Two normal wear areas are the auger flights and
front auger support bushing (Fig. 18). Frequency of
cleaning must comply with the local health regulations.

12
To disassemble the freezer, refer to the following steps:
A. Remove the mix inlet regulator from the hopper by
pulling straight up.
B. Remove the front door by turning off the circular
knobs and then pulling the front door off the studs
(Fig.19).
D. Remove the front auger supports and bushings
(Fig. 21).
E. Remove the auger assemblies from the freezer. Pull
the augers out of the freezer barrel slowly. As the
augers are being pulled out, carefully remove each of
the plastic flights with springs.
F. Keep the rear of the auger shafts tipped up once they
are clear of the freezer barrels to avoid dropping rear
seals (Fig. 22.)
Figure 19. Removing Front Door
G. Wipe socket lubricant from the drive end (rear) of the
auger with a cloth or paper towel.
H. Remove the rear seals.
I. Remove all "O" Rings from parts by first wiping off the
lubricant using a clean paper towel. Then squeeze the
"O" Ring upward with a dry cloth (Fig. 23). When a loop
is formed, roll out of the "O" Ring groove.
C. Remove the rosette caps from the front door. Push
the spigot body through the bottom of the front door
and remove. (Fig. 20).
Figure 20. Front Door Disassembly
Figure 21. Removing Auger Supports
Figure 22. Auger Shafts
/