VEGABAR 82

Vega VEGABAR 82, VEGABAR 81, VEGABAR 83 Product information

  • Hello! I am an AI chatbot trained to assist you with the Vega VEGABAR 82 Product information. I’ve already reviewed the document and can help you find the information you need or explain it in simple terms. Just ask your questions, and providing more details will help me assist you more effectively!
  • What is the basic function of VEGABAR series?
    What type of diaphragm is VEGABAR 81 equipped with?
    Which measuring cell technology does VEGABAR 82 utilize?
    What is the measuring cell technology employed by VEGABAR 83?
    What process variables can VEGABAR transmitters measure?
Product information
Process pressure
Pressure transmitter
VEGABAR 81
VEGABAR 82
VEGABAR 83
Document ID: 45078
2
Contents
Process pressure
45078-EN-190225
Contents
1 Measuring principle ............................................................................................................................................................................................... 3
2 Type overview ......................................................................................................................................................................................................... 4
3 Instrument selection .............................................................................................................................................................................................. 5
4 Selection criteria .................................................................................................................................................................................................... 6
5 Housing overview .................................................................................................................................................................................................. 7
6 Mounting ................................................................................................................................................................................................................. 8
7 Electronics - 4 … 20 mA - two-wire ...................................................................................................................................................................... 9
8 Electronics - 4 … 20 mA/HART - two-wire ......................................................................................................................................................... 10
9 Electronics-ProbusPA ....................................................................................................................................................................................11
10 Electronics-FoundationFieldbus .....................................................................................................................................................................12
11 Electronics-Modbus,Levelmasterprotocol ....................................................................................................................................................13
12 Adjustment ........................................................................................................................................................................................................... 14
13 Dimensions ...........................................................................................................................................................................................................16
Take note of safety instructions for Ex applications
Please note the Ex specic safety information that you can nd at www.vega.com and that comes with each instrument. In hazardous areas
you should take note of the appropriate regulations, conformity and type approval certicates of the sensors and power supply units. The sen-
sors must only be operated on intrinsically safe circuits. The permissible electrical values are stated in the certicate.
3
Measuring principle
Process pressure
45078-EN-190225
1 Measuring principle
1.1 Basic function
The pressure of the measured medium acts on the pressure measuring
cell, converting this pressure into an electronic signal. The ceramic-ca-
pacitive CERTEC
®
and MINI-CERTEC
®
as well as the metallic METEC
®
,
piezo and strain gauge measuring cells are used.
1.2 Measuring cell technology
VEGABAR 81
VEGABAR 81 is equipped with a chemical seal. It consists of a process
diaphragm as well as a transmission liquid.
The process pressure acts on the sensor element via the chemical seal.
Depending on the measuring range, the sensor element is piezoresistive
or a strain gauge system.
1
2
3
4
Fig. 1: Conguration of a chemical seal system
1 Sensor element
2 Sealed screw
3 Transmission liquid
4 Stainless steel diaphragm
VEGABAR 82
The sensor element is the ceramic CERTEC
®
measuring cell with front-
ush, abrasion-resistant ceramic diaphragm.
16 µm
1
2
3
Fig. 2: Conguration of the CERTEC
®
measuring cell in VEGABAR 82
1 Process diaphragm
2 Glass joint
3 Base element
The CERTEC
®
measuring cell is also equipped with a temperature sen-
sor. The temperature value can be displayed via the display and adjust-
ment module or processed via the signal output.
VEGABAR 83
Measuring ranges up to 40 bar: piezoresistive sensor element with inter-
nal transmission liquid is used.
1
3 4
2
Fig. 3: Conguration of the piezoresistive measuring cell in VEGABAR 83
1 Sensor element
2 Base element
3 Silicone oil lling
4 Process diaphragm
For measuring ranges above 100 bar, a strain gauge (DMS) sensor ele-
ment (dry system) is used.
1
2
3
Fig. 4: Conguration of the strain gauge measuring cell in VEGABAR 83
1 Sensor element
2 Process diaphragm
3 Pressure cylinder
With small measuring ranges or higher temperatures, the METEC
®
measuring cell is used. It consists of the ceramic-capacitive CERTEC
®
measuring cell and a special, temperature-compensated chemical seal
system.
4321
Fig. 5: Conguration of the METEC
®
measuring cell in VEGABAR 83
1 Process diaphragm
2 Isolating liquid
3 FeNi adapter
4 CERTEC
®
measuring cell
4
Type overview
Process pressure
45078-EN-190225
2 Type overview
VEGABAR 81 VEGABAR 82 VEGABAR 83
Measuring cell Piezoresistive/DMS CERTEC
®
Piezoresistive/strain gauge, METEC
®
Diaphragm Metal Ceramic Metal
Media gases, vapours and liquids, also aggres-
sive ones, at high temperatures
gases, vapours and liquids, also with
abrasive substances
gas, vapours and liquids, also viscous
Processtting Thread from G½ or ½ NPT
Flanges from DN 20
Boltings, tube isolating diaphragm each
from DN 25
Thread from G½ or ½ NPT
Flanges from DN 15
Extension ttings from 1"
Thread from G1 or ½ NPT
Flanges from DN 20
Boltings, tube isolating diaphragm each
from DN 25
Material
Processtting
316L 316L, PVDF, Alloy C22 (2.4602), Alloy
C276 (2.4819)
316L
Material
Diaphragm
316L, Alloy C276 (2.4819), Tantalum, gold
on 316L
Al
2
O
3
ceramic Alloy C276 (2.4819), gold-coated, gold/
rhodium-coated
Measuring cell seal - FKM, EPDM, FFKM -
Isolating liquid Silicone oil, high temperature oil, halocar-
bon oil, medical white oil
Dry measuring system Silicone oil, Halocarbon oil
Medical white oil
Measuring range -1 … +1000 bar/-100 … +100 MPa
(-14.5 … +14500 psig)
-1 … +100 bar/-100 … +10 MPa
(-14.5 … +1450 psig)
-1 … +1000 bar/-100 … +100 MPa
(-14.5 … +14500 psig)
Smallest measuring range 0.4 bar/40 kPa (5.802 psig) 0.025 bar/2.5 kPa (1.45 psig) 0.1 bar/10 kPa (1.45 psig)
Process temperature -90 … +400 °C (-130 … +752 °F) -40 … +150 °C (-40 … +302 °F) -40 … +200 °C (-40 … +392 °F)
Smallest deviation < 0.2 % < 0.05 % < 0.075 %
Signal output
4 … 20 mA
4 … 20 mA/HART
Probus PA
Foundation Fieldbus
Modbus
4 … 20 mA
4 … 20 mA/HART
Probus PA
Foundation Fieldbus
Modbus
4 … 20 mA
4 … 20 mA/HART
Probus PA
Foundation Fieldbus
Modbus
Interface Digital interface for Slave sensor Digital interface for Slave sensor Digital interface for Slave sensor
Indication/Adjustment
PLICSCOM
PACTwa re
VEGADIS 81
VEGADIS 62
PLICSCOM
PACTwa re
VEGADIS 81
VEGADIS 62
PLICSCOM
PACTwa re
VEGADIS 81
VEGADIS 62
Approvals
SIL
Shipbuilding
ATEX
Overll protection
FM
CSA
EAC (GOST)
SIL
Shipbuilding
ATEX
Overll protection
FM
CSA
EAC (GOST)
SIL
Shipbuilding
ATEX
Overll protection
FM
CSA
EAC (GOST)
5
Instrument selection
Process pressure
45078-EN-190225
3 Instrument selection
Application area
With VEGABAR process pressure transmitters, pressures and levels of
liquids, gases and vapours are detected. They are also developed for
use in chemically aggressive liquids as well as in hazardous or hygienic
areas.
All VEGABAR sensors can be upgraded to an electronic dierential pres-
sure system.
VEGABAR 81
VEGABAR 81 is a pressure transmitter with chemical seal for pressure
and level measurement. The process-adapted chemical seal systems of
VEGABAR 81 ensure reliable measurement even in highly corrosive and
hot media.
VEGABAR 82
The VEGABAR 82 pressure transmitter can be used universally for
measurement of gases, vapours and liquids. Even materials like sand are
no problem for the abrasion-resistant ceramic measuring cell. VEGABAR
82 is an economical solution for a multitude of applications in all areas of
industry.
VEGABAR 83
VEGABAR 83 is a pressure transmitter for pressure measurement of
gases, vapours and liquids in all industries. VEGABAR 83 oers special
advantages for applications with high pressures.
Congurationandhousingprotectionclasses
Pressure transmitters VEGABAR 81, 82 and 83 are available in dierent
materials and housing protection classes. The following illustrations show
typical examples.
1
2
3
Fig. 9: Example of a VEGABAR 82 with plastic housing with protection rating IP 66/
IP 67
1 Housing lid with integrated display and adjustment module (optional)
2 Housing with electronics
3 Process tting with measuring cell
1
2
3
4
5
Fig. 10: Example of a VEGABAR 82 with aluminium housing in protection class
IP 66/IP 68, 1 bar
1 Housing lid with integrated display and adjustment module (optional)
2 Housing with electronics
3 Process tting with measuring cell
4 Cable gland
5 Connection cable
1
2
3
5
4
Fig. 11: Example of a VEGABAR 82 with protection rating IP 68 and external
electronics
1 Housing lid with integrated display and adjustment module (optional)
2 Housing with electronics
3 Housing base
4 Connection cable
5 Process module
Measuredvariables
The pressure transmitters VEGABAR 81, 82 and 83 are suitable for
measurement of the following process variables:
Process pressure
Level
Fig. 12: Process pressure measurement
In conjunction with a Slave sensor for electronic dierential pressure
measurement, the instruments are also suitable for the measurement of
the following process variables:
Level, pressurized
Dierential pressure
Flow
Density
Interface
Fig. 13: Electronic dierential pressure measurement through Master/Slave combi-
nation
6
Selection criteria
Process pressure
45078-EN-190225
4 Selection criteria
VEGABAR 81 VEGABAR 82 VEGABAR 83
Wear through process Aggressive products
Abrasive products
Process temperature up to +150 °C (+302 °F)
+200 °C (+302 °F)
+400 °C (+752 °F)
Measuring system Dry
Oil-lled
Versionprocessttings Not front-ush
Front-ush
Hygienic
Largestmeasuringrange 100 bar (10 MPa)
1000 bar (100 MPa)
Smallest measuring range 25 mbar (2.5 kPa)
100 mbar (10 kPa)
400 mbar (40 kPa)
Vacuum applications up to 1 mbar
abs
(100 Pa)
Suitabilityforindustry-specicapplica-
tions
Aggregates and mining in-
dustry
Chemical
Power generation
Foodstus
Metal production
Oshore
Paper
Petrochemical
Pharmaceutical
Shipbuilding
Environment and recycling
industry
Water, waste water
Cement industry
7
Housing overview
Process pressure
45078-EN-190225
5 Housing overview
Plastic PBT
Protection rating IP 66/IP 67 IP 66/IP 67
Version Single chamber Double chamber
Application area Industrial environment Industrial environment
Aluminium
Protection rating IP 66/IP 67, IP 66/IP 68 (1 bar) IP 66/IP 67, IP 66/IP 68 (1 bar)
Version Single chamber Double chamber
Application area Industrial environment with increased me-
chanical stress
Industrial environment with increased me-
chanical stress
Stainlesssteel316L
Protection rating IP 66/IP 67
IP 69K
IP 66/IP 67
IP 66/IP 68 (1 bar)
Version Single chamber, electropolished Single chamber, precision casting Double chamber, precision casting
Application area Aggressive environment, food processing,
pharmaceutical
Aggressive environment, extreme mechanical stress
Separate version
Material Stainless steel 316L Plastic PBT
Stainless steel 316L
Protection rating IP 68 (25 bar) IP 65
IP 66/IP 67
Function Transmitter External electronics
Application area Extremely moist environment Industrial environment
8
Mounting
Process pressure
45078-EN-190225
6 Mounting
Installation position
The instruments function in any installation position. But the installation
position can inuence the measurement, depending on the measuring
system. This can be compensated by a position correction.
It is useful to select an installation position you can easily reach for
mounting and connecting as well as later retrotting of an display and
adjustment module. For this purpose, the housing can be rotated by 330°
without the use of any tools. You can also install the indicating and adjust-
ment module in four dierent positions (each displaced by 90°).
Mounting examples and measurement setups
The following illustrations show mounting examples and measurement
setups.
Process pressure measurement
The VEGABAR measures the pressure in a pipeline.
Fig. 23: Process pressure measurement on a pipeline with VEGABAR
Levelmeasurement
The VEGABAR measures the level in a vessel.
Fig. 24: Level measurement in a vessel with VEGABAR
9
Electronics - 4 … 20 mA - two-wire
Process pressure
45078-EN-190225
7 Electronics - 4 … 20 mA - two-wire
Congurationoftheelectronics
The plug-in electronics is mounted in the electronics compartment of the
instrument and can be exchanged by the user when servicing is required.
The electronics is completely encapsulated to protect against vibration
and moisture.
The terminals for voltage supply as well as the contact pins with I²C
interface for parameter adjustment are located on the upper side of the
electronics. In the double-chamber housing, the terminals are located in
the separate terminal compartment.
Voltage supply
Power supply and current signal are carried on the same two-wire cable.
The operating voltage can dier depending on the instrument version.
You can nd the data of the voltage supply in chapter "Technical data" in
the operating instructions manual of the respective instrument.
Provide a reliable separation between the supply circuit and the mains
circuits according to DIN EN 61140 VDE 0140-1.
Specications of the voltage supply:
Operating voltage
9.6 … 35 V DC
Permissible residual ripple - Non-Ex, Ex-ia instrument
for U
N
12 V DC: ≤ 0.7 V
e
(16 … 400 Hz)
for U
N
24 V DC: ≤ 1.0 V
e
(16 … 400 Hz)
Permissible residual ripple - Ex-d-ia instrument
for U
N
24 V DC: ≤ 1.0 V
e
(16 … 400 Hz)
Keep in mind the following additional factors that inuence the operating
voltage:
Lower output voltage of the power supply unit under nominal load
(e.g. with a sensor current of 20.5 mA or 22 mA in case of fault)
Inuence of additional instruments in the circuit (see load values in
chapter "Technical data" of the operating instructions of the respec-
tive instrument)
Connectioncable
The instrument is connected with standard two-wire cable without
screen. If electromagnetic interference is expected which is above the
test values of EN 61326-1 for industrial areas, screened cable should be
used.
Cablescreeningandgrounding
If screened cable is required, we recommend connecting the cable
screening on both ends to ground potential. In the sensor, the shielding
must be connected directly to the internal ground terminal. The ground
terminal on the outside of the housing must be connected to the ground
potential (low impedance).
Connection
Singlechamberhousing
5
1
2
+
( )
(-)
678
4...20mA
2
3
4
1
Fig. 25: Electronics and connection compartment, single chamber housing
1 Voltage supply/Signal output
2 For display and adjustment module or interface adapter
3 For external display and adjustment unit
4 Ground terminal for connection of the cable screening
10
Electronics - 4 … 20 mA/HART - two-wire
Process pressure
45078-EN-190225
8 Electronics - 4 … 20 mA/HART - two-wire
Congurationoftheelectronics
The plug-in electronics is mounted in the electronics compartment of the
instrument and can be exchanged by the user when servicing is required.
The electronics is completely encapsulated to protect against vibration
and moisture.
The terminals for voltage supply as well as the contact pins with I²C
interface for parameter adjustment are located on the upper side of the
electronics. In the double-chamber housing, the terminals are located in
the separate terminal compartment.
Voltage supply
Power supply and current signal are carried on the same two-wire cable.
The operating voltage can dier depending on the instrument version.
You can nd the data of the voltage supply in chapter "Technical data" in
the operating instructions manual of the respective instrument.
Provide a reliable separation between the supply circuit and the mains
circuits according to DIN EN 61140 VDE 0140-1.
Specications of the voltage supply:
Operating voltage
9.6 … 35 V DC
Permissible residual ripple - Non-Ex, Ex-ia instrument
for U
N
12 V DC: ≤ 0.7 V
e
(16 … 400 Hz)
for U
N
24 V DC: ≤ 1.0 V
e
(16 … 400 Hz)
Permissible residual ripple - Ex-d-ia instrument
for U
N
24 V DC: ≤ 1.0 V
e
(16 … 400 Hz)
Keep in mind the following additional factors that inuence the operating
voltage:
Lower output voltage of the power supply unit under nominal load
(e.g. with a sensor current of 20.5 mA or 22 mA in case of fault)
Inuence of additional instruments in the circuit (see load values in
chapter "Technical data" of the operating instructions of the respec-
tive instrument)
Connectioncable
The instrument is connected with standard two-wire cable without
screen. If electromagnetic interference is expected which is above the
test values of EN 61326-1 for industrial areas, screened cable should be
used.
We generally recommend the use of screened cable for HART multidrop
mode.
Cablescreeningandgrounding
If screened cable is required, we recommend connecting the cable
screening on both ends to ground potential. In the sensor, the shielding
must be connected directly to the internal ground terminal. The ground
terminal on the outside of the housing must be connected to the ground
potential (low impedance).
Connection
Singlechamberhousing
5
1
2
+
( )
(-)
678
4...20mA
2
3
4
1
Fig. 26: Electronics and connection compartment, single chamber housing
1 Voltage supply/Signal output
2 For display and adjustment module or interface adapter
3 For external display and adjustment unit
4 Ground terminal for connection of the cable screening
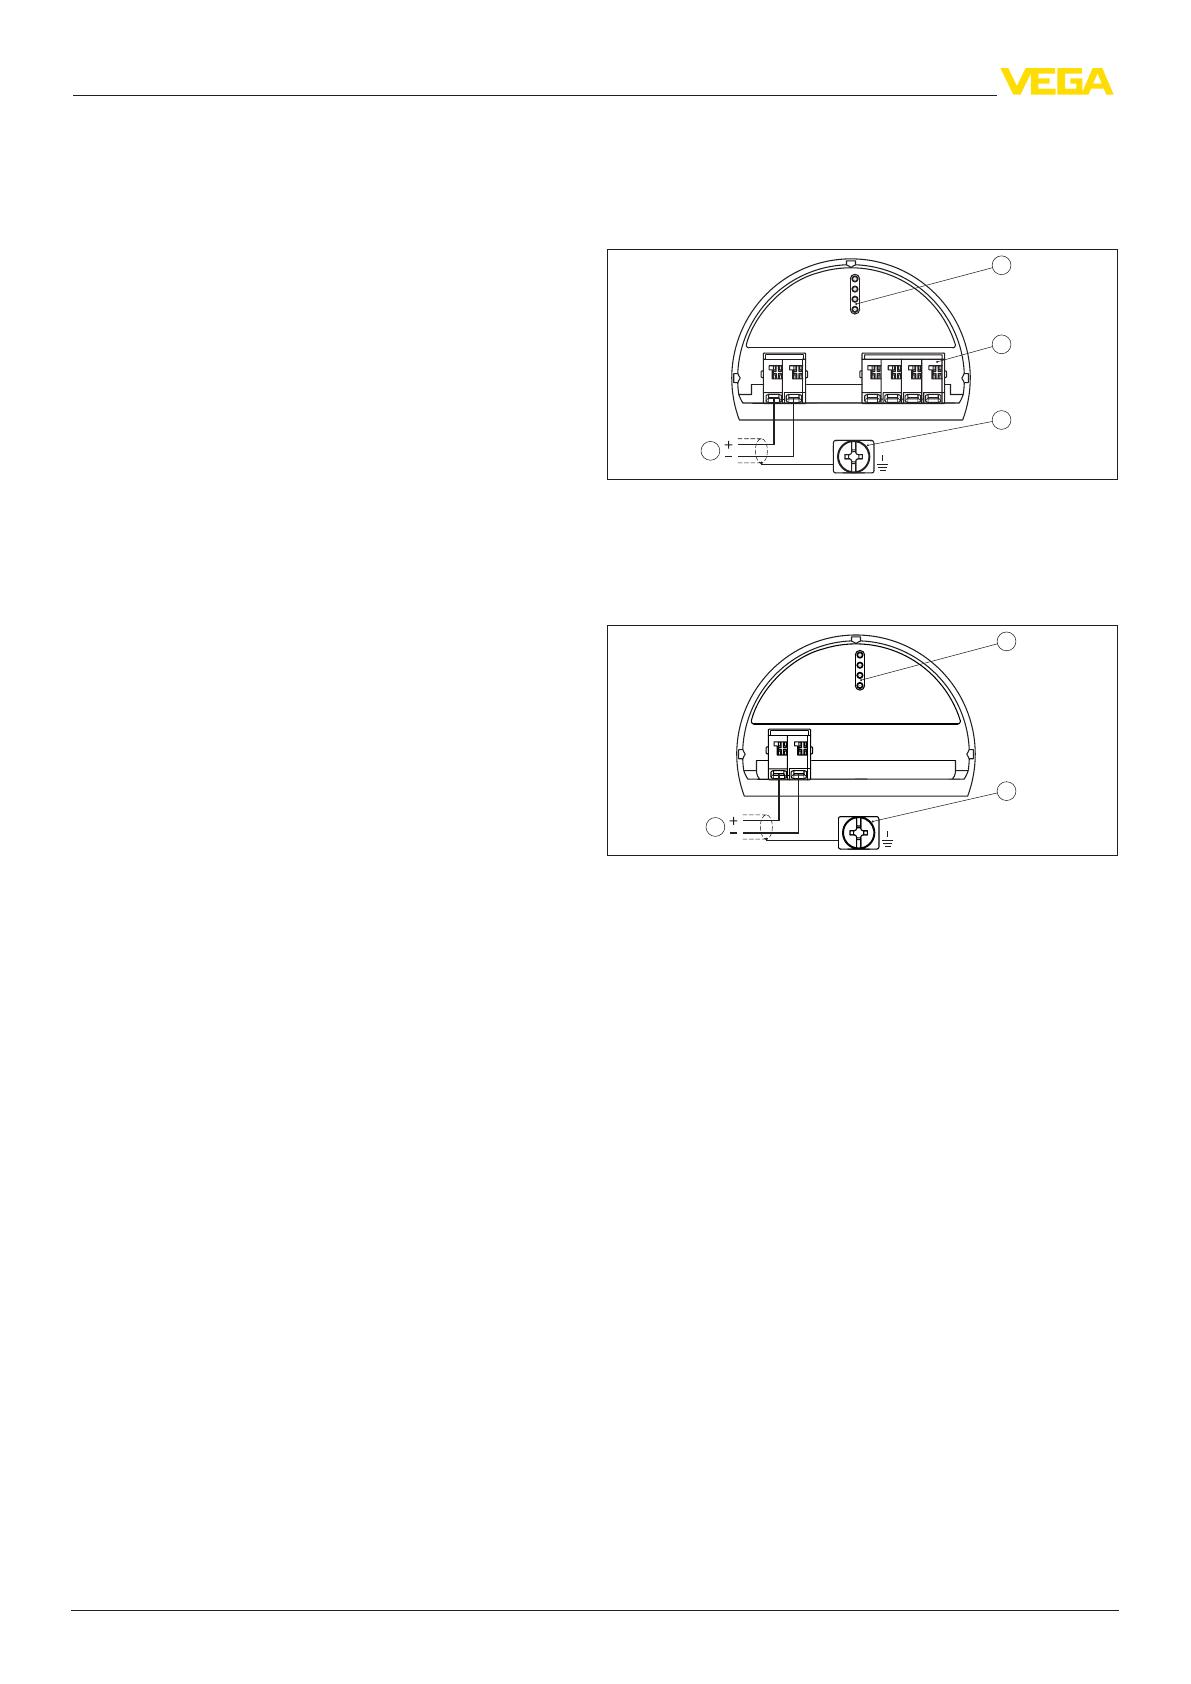
Doublechamberhousing
4...20mA
2
3
1
2
+
( )
(-)
1
Fig. 27: Connection compartment, double chamber housing
1 Voltage supply/Signal output
2 For display and adjustment module or interface adapter
3 Ground terminal for connection of the cable screening
11
Electronics - Probus PA
Process pressure
45078-EN-190225
9 Electronics-ProbusPA
Congurationoftheelectronics
The plug-in electronics is mounted in the electronics compartment of the
instrument and can be exchanged by the user when servicing is required.
The electronics is completely encapsulated to protect against vibration
and moisture.
The terminals for voltage supply as well as the plug with I²C interface for
parameter adjustment are located on the upper side of the electronics. In
the double-chamber housing, these connection elements are located in
the separate connection compartment.
Voltage supply
The voltage supply is provided by a Probus DP /PA segment coupler.
Specications of the voltage supply:
Operating voltage
9 … 32 V DC
Max. number of sensors per DP/PA segment coupler
32
Connectioncable
Connection is carried out with screened cable according to Probus
specication.
Make sure that the entire installation is carried out according to the Pro-
bus specication. In particular, make sure that the bus is terminated with
suitable terminating resistors.
Cablescreeningandgrounding
In systems with potential equalisation, connect the cable screening di-
rectly to ground potential at the power supply unit, in the connection box
and at the sensor. The screen in the sensor must be connected directly to
the internal ground terminal. The ground terminal outside on the housing
must be connected to the potential equalisation (low impedance).
In systems without potential equalisation, connect the cable screening
directly to ground potential on the power supply unit and the sensor. In
the connection box or T-distributor, the shielding of the short stub to the
sensor may not be connected to ground potential or to another cable
screening.
Connection
Singlechamberhousing
5
00
5
1
6
2
7
3
8
4
9
0
5
1
6
2
7
3
8
4
9
1
0
1
678
Bus
2
3
4
5
1
2
+
( )
(-)
1
Fig. 28: Electronics and connection compartment, single chamber housing
1 Voltage supply/Signal output
2 For display and adjustment module or interface adapter
3 Selection switch for bus address
4 For external display and adjustment unit
5 Ground terminal for connection of the cable screening
Connection,doublechamberhousing
Bus
5
1
2
+
( )
(-)
678
2
3
4
1
Fig. 29: Connection compartment, double chamber housing
1 Voltage supply, signal output
2 For display and adjustment module or interface adapter
3 For external display and adjustment unit
4 Ground terminal for connection of the cable screening
12
Electronics - Foundation Fieldbus
Process pressure
45078-EN-190225
10 Electronics-FoundationFieldbus
Congurationoftheelectronics
The plug-in electronics is mounted in the electronics compartment of the
instrument and can be exchanged by the user when servicing is required.
The electronics is completely encapsulated to protect against vibration
and moisture.
The terminals for voltage supply as well as the plug with I²C interface for
parameter adjustment are located on the upper side of the electronics. In
the double-chamber housing, these connection elements are located in
the separate connection compartment.
Voltage supply
Power supply via the H1 Fieldbus cable.
Specications of the voltage supply:
Operating voltage
9 … 32 V DC
max. number of sensors
32
Connectioncable
Connection is carried out with screened cable according to Fieldbus
specication.
Make sure that the entire installation is carried out according to the Field-
bus specication. In particular, make sure that the bus is terminated with
suitable terminating resistors.
Cablescreeningandgrounding
In systems with potential equalisation, connect the cable screening di-
rectly to ground potential at the power supply unit, in the connection box
and at the sensor. The screen in the sensor must be connected directly to
the internal ground terminal. The ground terminal outside on the housing
must be connected to the potential equalisation (low impedance).
In systems without potential equalisation, connect the cable screening
directly to ground potential on the power supply unit and the sensor. In
the connection box or T-distributor, the shielding of the short stub to the
sensor may not be connected to ground potential or to another cable
screening.
Connection
Singlechamberhousing
1
2
( )
(-)
1
5
0
1
0
1
+
678
Bus
2
3
4
5
Fig. 30: Electronics and connection compartment, single chamber housing
1 Voltage supply/Signal output
2 Contact pins for the display and adjustment module or interface adapter
3 Selection switch for bus address
4 For external display and adjustment unit
5 Ground terminal for connection of the cable screening
Connection,doublechamberhousing
Bus
5
1
2
+
( )
(-)
678
2
3
4
1
Fig. 31: Connection compartment, double chamber housing
1 Voltage supply, signal output
2 For display and adjustment module or interface adapter
3 For external display and adjustment unit
4 Ground terminal for connection of the cable screening
13
Electronics - Modbus, Levelmaster protocol
Process pressure
45078-EN-190225
11 Electronics-Modbus,Levelmasterprotocol
Congurationoftheelectronics
The plug-in electronics is mounted in the electronics compartment of the
instrument and can be exchanged by the user when servicing is required.
The electronics is completely encapsulated to protect against vibration
and moisture.
The contact pins with I²C interface for parameter adjustment are located
on the upper side of the electronics. The terminals for the power supply
are located in the separate connection compartment.
Voltage supply
Power supply via the Modbus host (RTU)
Operating voltage
8 … 30 V DC
max. number of sensors
32
Connectioncable
The instrument is connected with standard two-wire, twisted cable suit-
able for RS 485. If electromagnetic interference is expected which is
above the test values of EN 61326 for industrial areas, screened cable
should be used.
For power supply, a separate two-wire cable is required.
Make sure that the entire installation is carried out according to the Field-
bus specication. In particular, make sure that the bus is terminated with
suitable terminating resistors.
Cablescreeningandgrounding
In systems with potential equalisation, connect the cable screening di-
rectly to ground potential at the power supply unit, in the connection box
and at the sensor. The screen in the sensor must be connected directly to
the internal ground terminal. The ground terminal outside on the housing
must be connected to the potential equalisation (low impedance).
In systems without potential equalisation, connect the cable screening
directly to ground potential on the power supply unit and the sensor. In
the connection box or T-distributor, the shielding of the short stub to the
sensor may not be connected to ground potential or to another cable
screening.
Connection
Doublechamberhousing
+
+
power supply
MODBUS
D0
D1
IS GND
USB
1
2
4 3
1345
2off
on
( )
(
)
(-)
(-)
Fig. 32: Connection compartment
1 USB interface
2 Slide switch for integrated termination resistor (120 Ω)
3 Modbus signal
4 Voltage supply
14
Adjustment
Process pressure
45078-EN-190225
12 Adjustment
12.1 Adjustment directly at the measuring point
Via the display and adjustment module through keys
The plug-in display and adjustment module is used for measured value
indication, adjustment and diagnosis. It is equipped with an illuminated
full dot matrix as well as four keys for adjustment.
Fig. 33: Display and adjustment module with single chamber housing
Via the display and adjustment module through magnetic pen
With the Bluetooth version of the display and adjustment module, the
sensor can also be adjusted with the magnetic pen. This is done right
through the closed lid (with inspection window) of the sensor housing.
Fig. 34: Display and adjustment module - with adjustment via magnetic pen
Via a PC with PACTware/DTM
The interface converter VEGACONNECT is required for connection of
the PC. The converter is placed on the sensor instead of the display and
adjustment module and connected to the USB interface of the PC.
2
3
1
4
Fig. 35: Connection of the PC via VEGACONNECT and USB
1 VEGACONNECT
2 Sensor
3 USB cable to the PC
4 PC with PACTware/DTM
PACTware is an adjustment software for conguration, parameter adjust-
ment, documentation and diagnosis of eld devices. The corresponding
device drivers are called DTMs.
12.2 Operation in the measurement loop environ-
ment - wireless via Bluetooth
Viaasmartphone/tablet
The display and adjustment module with integrated Bluetooth functional-
ity allows wireless connection to smartphones/tablets with iOS or Android
operating system. The adjustment is carried out via the VEGA Tools app
from the Apple App Store or Google Play Store.
1
2
3
Fig. 36: Wireless connection to smartphones/tables
1 Display and adjustment module
2 Sensor
3 Smartphone/Tablet
Via a PC with PACTware/DTM
The wireless connection from the PC to the sensor is carried out via
the Bluetooth USB adapter and a display and adjustment module with
integrated Bluetooth function. The adjustment is carried out via the PC
with PACtware/DTM.
2
1
4
3
Fig. 37: Connection of the PC via Bluetooth USB adapter
1 Display and adjustment module
2 Sensor
3 Bluetooth USB adapter
4 PC with PACTware/DTM
12.3 Adjustment carried out at position remote from
the measuring point - wired
Via external display and adjustment units
For this, the external display and adjustment units VEGADIS 81 and 82
are available. The adjustment is carried out via the keys of the built-in
display and adjustment module.
The VEGADIS 81 is mounted at a distance of 50 m from the sensor and
directly to the sensor electronics. VEGADIS 82 is looped directly into the
signal cable at any point.
15
Adjustment
Process pressure
45078-EN-190225
4
1
3
2
5
4
Fig. 38: Connection of VEGADIS 81 to the sensor
1 Voltage supply/Signal output sensor
2 Sensor
3 Connection cable sensor - external display and adjustment unit
4 External display and adjustment unit
5 Display and adjustment module
4
5
3
1
2
Fig. 39: Connection of VEGADIS 82 to the sensor
1 Voltage supply/Signal output sensor
2 External display and adjustment unit
3 Display and adjustment module
4 4 … 20 mA/HART signal cable
5 Sensor
Via a PC with PACTware/DTM
The sensor adjustment is carried out via a PC with PACTware/DTM.
4
5
6
3
2
1
Fig. 40: Connection of VEGADIS 82 to the sensor, adjustment via PC with PACT-
ware
1 Voltage supply/Signal output sensor
2 External display and adjustment unit
3 VEGACONNECT
4 4 … 20 mA/HART signal cable
5 Sensor
6 PC with PACTware/DTM
12.4 Adjustment carried out at position remote from
themeasuringpoint-wirelessthroughmobile
network
As an option, the radio module PLICSMOBILE can be mounted into a
plics
®
sensor with double chamber housing. It is used for transmission of
measured values and for remote parameter adjustment of the sensor.
Fig. 41: Transmission of measured values and remote parameter adjustment of the
sensor via mobile phone network.
12.5 Alternative adjustment programs
DD adjustment programs
Device descriptions as Enhanced Device Description (EDD) are available
for DD adjustment programs such as, for example, AMS™ and PDM.
The les can be downloaded at www.vega.com/downloads under "Soft-
ware".
FieldCommunicator375,475
Device descriptions for the instruments are available as EDD for param-
eterisation with Field Communicator 375 or 475.
Integrating the EDD into the Field Communicator 375 or 475 requires the
"Easy Upgrade Utility" software, which is available from the manufacturer.
This software is updated via the Internet and new EDDs are automati-
cally accepted into the device catalogue of this software after they are
released by the manufacturer. They can then be transferred to a Field
Communicator.
16
Dimensions
Process pressure
45078-EN-190225
13 Dimensions
Plastic housing
~ 69 mm
(2.72")
ø 79 mm
(3.11")
112 mm
(4.41")
M20x1,5/
½ NPT
~ 84 mm
(3.31")
M16x1,5
112 mm
(4.41")
M20x1,5/
½ NPT
1
2
ø 79 mm
(3.11")
1 Single chamber housing
2 Double chamber housing
Aluminium housing
21
ø 86 mm
(3.39")
~ 116 mm
(4.57")
116 mm
(4.57")
M20x1,5
M20x1,5/
½ NPT
~ 87 mm
(3.43")
M16x1,5
ø 86 mm
(3.39")
120 mm
(4.72")
M20x1,5/
½ NPT
1 Single chamber housing
2 Double chamber housing
Stainless steel housing
~ 69 mm
(2.72")
ø 79 mm
(3.11")
117 mm
(4.61")
M20x1,5/
½ NPT
~ 59 mm
(2.32")
ø 80 mm
(3.15")
112 mm
(4.41")
M20x1,5/
½ NPT
~ 87 mm
(3.43")
ø 86 mm
(3.39")
120 mm
(4.72")
M20x1,5/
½ NPT
M16x1,5
321
1 Single chamber housing, electropolished
2 Single chamber housing, precision casting
2 Double chamber housing, precision casting
VEGABAR 81
1
2
113 mm
(4.45")
223 mm
(8.78")
1 Flange version up to +150 °C (+302 °F)
2 Flange version with cooling element +400 °C (+752 °F)
VEGABAR 82
2
3
1
20,8 mm
(0.82")
45 mm
(1.77")
SW 27 mm
(1.06")
G ½
ø 18,4 mm
(0.72")
ø 27 mm
(1.06")
G1 ½
50 mm
(1.97")
22 mm
(0.87")
ø 55 mm
(2.17")
SW 46 mm
(1.81")
50 mm
(1.97")
1 Threaded version G½, front-ush
2 Threaded version G1½
3 Flange version DN 50
VEGABAR 83
2
1
3
118 mm
(4.65")
47,5 mm
(1.87")
78 mm
(3.07")
ø 64 mm
(2.52")
ø 85 mm
(3.35")
23 mm
(0.91")
G ½
63 mm
(2.48")
3 mm
(0.12")
ø 3 mm
(0.12")
ø 6 mm
(0.24")
SW 27mm
(1.06")
1 Threaded version G½, manometer connection EN 837
2 Threaded version front-ush with screening sheet (-12 … +200 °C)
3 Clamp version 2"
The listed drawings represent only an excerpt of the available process
ttings. You can nd more drawings at www.vega.com/downloads under
"Drawings".
17
Notes
Process pressure
45078-EN-190225
18
Notes
Process pressure
45078-EN-190225
19
Notes
Process pressure
45078-EN-190225
VEGA Grieshaber KG
Am Hohenstein 113
77761 Schiltach
Germany
45078-EN-190225
All statements concerning scope of delivery, application, practical use and operating conditions of the sensors and processing systems correspond to the information
available at the time of printing.
Subject to change without prior notice
© VEGA Grieshaber KG, Schiltach/Germany 2019
Phone +49 7836 50-0
Fax +49 7836 50-201
www.vega.com
/