Page is loading ...

RotorkFairch ildPAX1LinearActuator
User’sManual
ProductOverview
ThePAX1isaflexiblelowvoltageDCpoweredlinear
actuatorfeaturinga25mmmaximumthrustrod
strokemovingatspeedsupto60mm/minanda
maximumthrustof2890Nallinaflameproof
enclosure.Theunitisinherentlylockinlastplaceas
thethrustrodmaintains
itspositionuponlossof
electricalpower.
Theactuatorcanbeactuatedopenloopusingtwo
opticallyisolatedswitchclosureinputs(UpandDown)
tomovetheactuatorsthrustrod.Theactuatorwill
continuetomovethethrustrodinresponsetothe
inputsuntileitheroftheadjustablestroke
limitsare
reached.
Theactuatorcanbecontrolledwithanisolated4‐20
mAanaloginputtoproportionallypositionthethrust
rodanywherewithinits25mmstroke.Thereisa1‐5
vdcnon‐isolatedcontrolinputaswell.Inanalog
controlmode,theunitisfailfreezeuponloss
of
eithercontrolsignals.
TheactuatorfeaturesUPandDOWNpushbuttonsunderthecovertofacilitatecommissioningandto
permitlocalcontroloftheactuator.Thereisan8mm(5/16”)femalehexmotordriveinterfaceunderthe
covertoallowmanualactuatormovement.
Theactuatorincludestwofullyadjustable
SPDTalarmrelays(oneHighandoneLow)providingalarm
functionwhentheactuator’sthrustrodreachescriticalpositionswithinitsstroke.Therelaysare
magneticallylatchedsothealarmswitchstatesaremaintainedwhenthepowerisdisconnected.This
allowsaccuratealarmfunctiononsystemsthatremovepowerfromthe
actuatorbetweenadjustmentsto
conservepowerasistypicallydoneinsolarpoweredinstallations.
ThePAX1offersanoptionalisolated4‐20mAfeedbackoutput.Thisfeedbackfeatureisfunctionalfor
boththepulsecontrolandanalogcontrolconfigurations.Theunitmustbepoweredtofacilitatethe
feedbackoutputfunction.

GeneralInformation
TheLinearElectricActuatordescribedinthisdocumenthasbeendesignedandmanufacturedwithstate
ofthearttechnology.Allcomponentsaresubjecttostringentqualityandenvironmentalrequirements
duringmanufacture.OurqualitysystemsarecertifiedISO9001.
Thisuser’smanualcontainsimportantinformationthatenablesacompetentusertoinstall,
operateand
maintainthislinearelectricactuator.Theinstallation,operationandmaintenanceofthisactuatorina
hazardousareamustbecarriedoutbyanappropriatelytrainedandqualifiedpersonandinaccordance
withallrelevantcodesofpracticefortheparticularHazardousAreaClassification.
Warning
Installationmustbecarriedoutbyqualifiedpersonnelinaccordancewithallnationalandlocal
codesandordinances.
ShockHazard.Multiplepowersourcespossible.Disconnectallpowersourcesbeforeservicing.
Seriousinjuryordeathcouldresult.
Readandunderstandallinstructionscarefullybeforestartinginstallation.Savethisdocument
for
futureuse.Failuretoreadandunderstandtheseinstructionscouldresultinimproperoperationof
thedeviceleadingtoequipmentdamag e,seriousinjury,ordeath.
HazardousAreaRatings(Flameproof)
FactoryMutual
ClassIDivisionIGroupsABCDT5/T6
ClassII,IIIDivisionI,GroupsEFGT5/T6
Class1,Zone1,AExdbIIC,T5/T6Gb
Zone21,AExtbIIICT85ºC/100ºCDb
T6[T85ºC]:Ta=‐40ºCto+65ºC,
T5[T100ºC]:Ta=‐40ºCto+70ºC
Type4X/6P,IP66/68
HazardousAreaCo nditions ofuse
HazardouslocationswiringmustcomplywithANSI/NFPA70(NEC®).
Wiringmustberated110
o
Corhigher.
Explosionproofcertifiedsealsarerequiredwithin18”forGroupsA,B,CandDinstallationsor
within2”forGroupIICinstallations.
Useadampclothwhencleaningtheenclosuretopreventthebuildupofelectrostaticcharge.
ThePAX1Actuatorincludesflamepathjoints.Consult
FairchildInc.ifrepairoftheflamepath
jointsarenecessary.
Suitablyratedconduitsealsmustbeusedfortheconditionsofusesuchasdusttightsealsfor
ClassII&III,GroupsE,F,Gorwaterproofsealstopreventwateringress.
TomaintainType4X
andIP66ratingwheninstallingthreadedconduit,usePTFEthreadsealant
tapeaccordingtoinstructions.

Installat ion
ThePAX1canbemountedinanypositionwithoutaffectingitsoperation.Itcanbemountedtoaflat
surfaceusingthemountingholesontheactuator.Fordetails,seeFigure1.“PAX1ExteriorDimensions”
above.
ConduitSeal:ThePAX1isratedforlimitedsubmergedoperationbuttheuserisresponsible
forensuring
watercannotenterthePAX1enclosurethroughtheconduitconnectionsandconduitport.Ensurethe
conduitinstallationiswatertightatelevationsthatmaybesubmergedbelowwater.Whereconduitis
pronetocollectinternalcondensation,appropriateconduittraps,drainsandsealsmustbeemployedto
preventcondensation
fromcollectinginsidethePAX1enclosure.
Wiring
ThePAX1canbecontrolledwiththreedifferentcontrolinterfaces.Thewiringdiagramsbelowshowthe
connectionsrequiredtooperatetheunitbasedonthecontroltypeaswellasconnectionstoother
featuressuchaspositionfeedbackandalarmswitches.
Theterminalblockscanaccommodatewiresizeupto1.5
mm(14ga.).Duetosafetyrequirements,wire
enteringTB2andTB3terminalblocks(alarmrelays)requireferrules(supplied)toprovideproper
insulationforthehighvoltageACconnections.
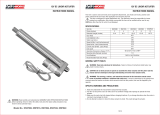
PowerSupplySizing
For12vdcoperation,therecommendedpowersupplyshouldhave2ampcapacity.
For24vdcoperation,
therecommendedpowersupplyshouldhave1ampcapacity.
0
2
4
6
8
10
12
14
16
0 10 20 30
Loop Supply Voltage (Volts)
Loop Supply Current (mA)
PAX1 Linear Actuator
Pulse Control Loop Supply Current
0
0.2
0.4
0.6
0.8
1.0
1.2
10 15 20 25 30
Supply Voltage (Volts)
Supply Current (Amp)
PAX1 Linear Actuator
Current Consumption Characteristics
Crimpferruleontowire,thenclampitintheterminalblock.

ElectricalConnections
Electrically isolated pulse input control using an external loop supply
Non isolated pulse input control using common power supply for pulse control loop power
+
DN
UP
-
Lp Rtn
MTR ENAB
DN
V -
mA +
V +
+
-
mA -
1
2
3
4
5
6
7
8
9
10
11
12
UP
PWR
LOOP SUPPLY
Figure 1.
SW2IsolationSwitch
setto“Isolate”
FEEDBACK
Switch set to
PULSE
-
+
Internal connection of
NO/ISOLATE switch.
Set to ISOLATE
+
DN
UP
-
Lp Pwr
MTR ENAB
DN
V -
mA +
V +
+
-
mA -
1
2
3
4
5
6
7
8
9
10
11
12
UP
PWR
SW2 Isolation Switch
set to “No”
Figure 2.
FEEDBACK
Switch set to
PULSE
Internal connection of
NO/ISOLATE switch.
Set to NO

4-20 mA analog control
1-5 vdc analog control
+
DN
UP
-
MTR ENAB
V -
mA +
V +
+
-
mA -
1
2
3
4
5
6
7
8
9
10
11
12
PWR
Figure 3.
FEEDBACK
4
-
20 mA
CONTROLLER
+
-
Set switch to
ANALOG
SW1
Set switch to 4-20 mA
Lp Pwr
+
DN
UP
-
MTR ENAB
V -
mA +
V +
+
-
mA -
1
2
3
4
5
6
7
8
9
10
11
12
PWR
Figure 4.
FEEDBACK
1
-
5vdc
CONTROLLER
+
-
Set switch to
ANALOG
SW1
Set switch to 1-5 vdc
Lp Pwr

Power and Feedback Connections
Power and Feedback Connections
+
DN
UP
-
MTR ENAB
V -
mA +
V +
+
-
mA -
1
2
3
4
5
6
7
8
9
10
11
12
PWR
Figure 5.
FEEDBACK
POWER SUPPLY
+
-
MILLIAMMETER
+
-
LOOP SUPPLY
Closed switch
disables motor
Lp Pwr
+
-
External loop supply for Isolated Feedback Loop
+
DN
UP
-
MTR ENAB
V -
mA +
V +
+
-
mA -
1
2
3
4
5
6
7
8
9
10
11
12
PWR
Figure 6.
FEEDBACK
POWER SUPPLY
+
-
MILLIAMMETER
+
-
Non Isolated Feedback using Power
Supply for feedback loop power
Lp Pwr

Alarm Switch Connections
UserInterface
SetupSwitch
EightpositionrotarySETUPswitch,
Configurationdipswitches,
SW1selectseither1‐5vdcor4‐20
mAforanalogcontrolinput
SW2,Isolate:ThePulsecontrol
inputsareisolatedfrom theDC
powersupplyproviding powertothe
unitandmustbepoweredfrom
a
separateexternalpowersource.
SW2,NO:ThePulsecontrolinput
circuitisconnectedtotheDCpower
supplyproviding powertotheunit.
Pushbuttonswitches,
UP;Movestheactuatorsthrustrodout
oftheunit.
DN;Movestheactuatorsthrustrodinto
theunit.
SET;Usedinconjunctionwith
therotary
SETUPswitchtosetendtravellimitsandalarmpointsandanalogfeedbackcalibration.
NO
NC
C
ALARM SW
LO
C
NO
NC
Alarm Indicator
Power Supply
NO
NO
NC
NC
Figure 7.
ALARM SW
HI
SETUPswitch
SW1
SW2
Figure8.

LEDIndicators
PWR:Green,Supplyvoltageisbetween11and30vdc.Red,Voltageislessthan11vdcorgreater
than28VDC.
LIMITHI:Green,Hilimitnotreached,thrustrodwillmoveinbothdirections.Red,HiLimitreached,
thrustrodwillmovedownonly.
LIMITLOGreen,Lolimit
notreached,thrustrodwillmoveinbothdirections.Red,LoLimitreached,
thrustrodwillmoveuponly.
ALARMHI:Green,HiAlarmnotreached,HiAlarmrelaynotenergized.Red,HiAlarmreache d,Hi
Alarmrelayisenergized.NOcontactareclosed.
ALARMLO:Green,LoAlarmnot
reached,LoAlarmrelaynotenergized.Red,LoAlarmreached,Lo
Alarmrelayisenergized,NOcontactareclosed.
Speedpotentiometer
20turn.Adjustsactuatorspeedfrom1.2mm/minto60mm/min
Dampingpotentiometer
1turn.Adjustsstartandstoprampspeedrate.
Commissioning
Warning
Note:multiplepowersourcespossible.Donotremovecoverinthefieldwithoutfirstremovingall
powerfromtheunit.
Commissioningmustbedoneinasafeareabeforeinstallinginahazardousarea.
Obtainspecialworkpermitbeforeremovingcoverandmakingpoweredadjustmentsinthefield.
1. Settingendtravellimits
1.1. DisconnectAnalogInputsfrom4‐20and1‐5vdcinputterminals.
1.2. Turnonpowertotheunit.
1.3. PositiontheSETUPSWITCHtotheTRAVELLIMITLOsetting.
1.4. UsingtheUPandDNbu ttonsunderthecover,positionthethrustrodto
thedesiredmost
retractedposition.
1.5. PresstheSETbuttonandwaitfortheLimitLoLEDtoturnfromGreenthenRedandbackto
Greentosetthelowtravel limit.
1.6. MovetheSETUPSWITCHtotheTRAVELLIMITHIsetting.
1.7. UsingtheUPandDN
buttonsunderthecover,positionthethrustrodto thedesiredmost
extendedposition.
1.8. PresstheSETbuttonandwaitfortheLimitHiLEDtoturnfromGreenthenRedandbackto
Greentosetthehightravellimit.
1.9. PositiontheSETUPswitchtotheOPERATE/PULSEor
OPERATE/ANALOGfornormaloperation.
1.10. WhenintheOPERATE/PULSEmode,theactuatorwillrespondtotheUpandDnexternalpulse
controlinputsandwillstopwhenthethrustrodreacheseitherendtravellimit.TheLIMITLO
andLIMITHILEDswillchangefromGreentoRedwhenthe
limitisreached.TheinternalUP
andDNpushbuttonswillrespondlikewise.
1.11. WhenintheTRAVELLIMIT/LOorHI,mode,theUpan dDnexternalpulsecontrolinputsare
disabled.TheinternalUPandDNpushbuttonswillbeactiveandwillignorethepreviousend

oftravellimitssothatnewlimitsmaybesetbeyondthepreviouslysetlimits.TheLIMITLOand
LIMITHILEDswillcontinuetooperatefromthepreviouslysetlimitsuntilnewlimitsareset.
2. SettingAnalogControlCurrent
2.1. Connecta4‐20mAsignalsourcetothe
mAinputterminals.
2.2. Turnonpowertotheunit.
2.3. SetSW1to4‐20mA.
2.4. PositionthePositiontheSETUPSWITCHtotheTRAVELLIMITLOsetting.
2.5. UsingtheUPandDNbu ttonsunderthecover,positionthethrustrodtothedesiredmost
retractedposition.
2.6. ApplythedesiredcontrolcurrenttothemAinputterminalsforthisthrustrodposition.
2.7. PresstheSETbuttonandwaitfortheLimitLoLEDtoturnfromGreenthenRedandbackto
Greentosetthelowtravel limitandcorrespondingcontrolcurrent.
2.8. Movethe
SETUPSWITCHtotheTRAVELLIMITHIsetting.
2.9. UsingtheUPandDNbu ttonsunderthecover,positionthethrustrodtothedesiredmost
extendedposition.
2.10. ApplythedesiredcontrolcurrenttothemAinputterminalsforthisthrustrodposition.
2.11. PresstheSETbuttonand
waitfortheLimitLoLEDtoturnfromGreenthenRedandbackto
Greentosetthehightravellimitandcorrespondingcontrolcurrent.
2.12. PositiontheSETUPswitchtotheOPERATE/AN ALOGtooperatetheactuatorfromthemAinput
terminals.
3. SettingAnalogControlVoltage
3.1. Connect
a1‐5vdcsignalsourcetotheVinputterminals.
3.2. Turnonpowertotheunit.
3.3. SetSW1to1‐5V.
3.4. PositionthePositiontheSETUPSWITCHtotheTRAVELLIMITLOsetting.
3.5. UsingtheUPandDNbu ttonsunderthecover,positionthethrust
rodtothedesiredmost
retractedposition.
3.6. ApplythedesiredcontrolvoltagetotheVinputterminalsforthisthrustrodposition.
3.7. PresstheSETbuttonandwaitfortheLimitLoLEDtoturnfromGreenthenRedandbackto
Greentosetthelowtravel
limitandcorrespondingcontrolcurrent.
3.8. MovetheSETUPSWITCHtotheTRAVELLIMITHIsetting.
3.9. UsingtheUPandDNbu ttonsunderthecover,positionthethrustrodtothedesiredmost
extendedposition.
3.10. ApplythedesiredcontrolvoltagetotheVinputterminalsforthisthrustrod
position.
3.11. PresstheSETbuttonandwaitfortheLimitLoLEDtoturnfromGreenthenRedandbackto
Greentosetthehightravellimitandcorrespondingcontrolcurrent.
3.12. PositiontheSETUPswitchtotheOPERATE/AN ALOGtooperatetheactuatorfromtheVinput
terminals.
4. AlarmSwitches
4.1. PositiontheSETUPSWITCHtotheALARMSWITCHLOsetting.
4.2. UsingtheUPandDNbu ttons,positionthethrustrodtothedesiredLOALARMposition.
4.3. PresstheSETbuttonandwaitfortheALARMLOLEDtoturnfromGreenthenRedandback
to
GreentosettheALARMSWITCHLOposition.
4.4. TurntheSETUPSWITCHtotheALARMSWITCHHIsetting.
4.5. UsingtheUPandDNbu ttons,positionthethrustrodtothedesiredHIALARMposition.
4.6. PresstheSETbuttonandwaitfortheALARMHILEDto
turnfromGreenthenRedandback to
GreentosetALARMSWITCHHIposition.

4.7. PositiontheSETUPSWITCHtotheOPERATEPULSEorANALOGmodefornormaloperation.
5. SettingFeedbackOutput
5.1. MovetheSETUPSWITCHtotheFEEDBACKLOsetting.
5.2. UsingtheUPandDNbu tton,andmonitoringtheAnalogFeedbackcurrentonthemilliammeter,
adjusttheoutputcurrentto
thedesiredvalue(4‐12mA)fortheLOLimitposition.
5.3. PresstheSETbuttonandwaitfortheFEEDBACKLOLEDtoturnfromGreenthenRedandback
toGreentosettheFEEDBACKLOoutputcurrent.
5.4. MovetheSETUPSWITCHtotheFEEDBACKHIsetting.
5.5.
UsingtheUPandDNbutton,andmonitoringtheAnalogFeedbackcurrentonth emilliammeter,
adjusttheoutputcurrenttothedesiredvalue(12‐20mA)fortheHILimitposition.
5.6. PresstheSETbuttonandwaitfortheFEEDBACKLOLEDtoturnfromGreenthenRedand
back
toGreentosettheFEEDBACKHIoutputcurrent.
5.7. PositiontheSETUPSWITCHtotheOPERATEPULSEorANALOGmodefornormaloperation.
6. Manualadjustment ofthr u st rodposition.
Warning
Manualadjustmentmustonlybedonewhenpowerisremovedfromtheunit.
Note:multiplepowersourcespossible.Donotremovecoverinthefieldwithoutfirstremovingall
powerfromtheunit.
6.1. Thethrustrodoftheactuatormaybemanuallyadjustedviaan8mm(5/16”)femalehex
interfacelocatedthroughthetopoftheunitwiththecoverremoved.
6.2. Turntheadjustmentclockwisetoextendthethrustrodoutoftheunitandcounterclockwiseto
retractthethrust
rodintotheunit.
6.3. Takecarewhenmanuallyadjustingtheactuatorasyoucandamagetheunitifyouforcethe
thrustrodintoitsmechanicalstops.
7. MotorEnable
7.1. Themotorenableinput(Terminal6ontheterminalblocks)isprovidedforadditionalcontrolof
theactuator.
Fornormaloperation,noconnectionisrequiredforthisinput.Groundingthis
inputdisablesthemotorandtheactuatorwillignoreanycommandtomoveth ethrustrod
includingcommandsfromtheinternalpushbuttons.

PAX1ActuatorInstallationDimensions
Figure9.

Maintenance
PeriodiclubricationofThrustRod
After20,000operatingcycles,re‐lubricatetheactuatorthrustrod.
Makesureitissafetodisabletheactuatorinthesystem.MovethesetupknobtotheOperatePulse
modeandusingtheUPandDNpushbuttons,positionthethrustrodtoa
positionthatremovesany
thrustonthethrustrod.Toexposethethrustrodremovethefourboltsthatattachestheactuator
housingtotheactuateddevice.RemovetheThrustRodCapexposingtheThrustRod.Withthesetup
knobtotheOperatePulsemodeandpressingtheJogUpbutton,
extendthethrustrodtoitsmost
extendedopposition.ApplyDowCorningG‐nlubricanttotheexposedthrustrodthread.UsingtheJog
Dnbutton,retractthethrustrodtoitsmostretractedposition.Re‐installthethrustrodcapandthe
PAX1actuatortotheactuateddevice.
Spec ifications
ElectricalSupply:
PowerSupplyVoltage 11‐30VDC
PowerConsumption 18wattsmax,<1wattstandby
ActuationElectrical,Analog
ActuationControl 4‐20mA,1500Vopticallyisolatedfrompowersupply,Switchforc ommonpower
supply.1‐5VDCnonisolated,50KΩimpedance
ActuationSupply 11‐30VDC(LoopSupply)
ActuationElectrical,Pulse
Actuation
Control SwitchClosureSinking,(1)increase,(1)decrease
ActuationCurrent 10mAsink,opticallyisolated1500V,Switchforcommonpowersupply
ActuationSupply 4VDCminimum,30VDCmaximum
Monitor
AlarmSwitches Customeruse,(2)SPDTeachswitch,1A250VAC,(Maglatchingrelay)
PositionFeedback Optional,Isolated4‐20mA,11‐30VDCloop
supply
ElectricalDesignLimits
SupplyVoltageLimits 11VDCmin,30VDCmax
AnaloginputLimits 3.5mAmin,21mAmax,100mAw/odamage
AnalogOutputLimits 3.5mAmin,21mAmax
Externalloopsupplylimits 4VDCmin,30VDCmax
AlarmSwitches 1A250VACSPDT
Customerinterface:
ElectricalConnections Screwterminalblockunder
cover,14‐30AWG
Actuatorspeed Multi‐turnpot,1.2–60mm/min*
Caution
Shuttingoffactuatoranddisconnectingassociatedequipmentcancausedangeroussystem
conditionstoexist.EnsuretheSystemisproperlypreparedformaintenancetobeperformedon
theactuator.

Limitadjustments Pushbuttonswitchtoacceptcurrentthrustrodpositionfor(2)EndofTravel
limit,&(2)AlarmSwitch,andAnalogFeedbackCalibration
SetupSwitch 8positionrotaryswitch.
Damping Single‐turnpot,8:1turndown
IsolationSwitch PulseControlLoop–Isolat ed/commontopowersupply
ActuatorPerformance:
Maximum
Stroke 25mm
MaximumForce 2890N(650lbf)
MaxLinearSpeed 60mm/min
Actuatorshaft M10x1.5mmscrewthd.
PowerUpInitialization AnalogControl:2.1sec.
Time PulseControl:0.9sec.
Feedbackoutput:0.9sec.
EnvironmentalRatings
Oper.Temp.Range‐40ºCto+80ºC,<50%DutyCycle,<10
mincycleperiod(MotorActuated)
‐40ºCto+70ºC,ContinuousDuty(MotorActuated)
IngressProtection IP66&IP68/NEMA4X
NEMA Type4X&6P
*Actuationspeedmayneedtobelimitedtoachieveratedthrustatlowersupplyvoltages.
OM‐100PAX1ARev_12/16
/