INSTRUCTION MANUAL
Galaxy Stabilizer Arm & Vest with HD-3000
Steadycam System
(GLXY-AV-HD-3 )
All rights reserved.
No part of this document may be reproduced, stored in a retrieval system, or transmied by any form or by any
means, electronic, mechanical, photocopying, recording, or otherwise, except as may be expressly permied
by the applicable copyright statutes or in wring by the publisher.

FLYCAM GALAXY ARM & VEST WITH HD-3000 STABILIZATION SYSTEM 2
BOX I : It contains the following :
HD-3000 Stabilizer
Galaxy Arm
Metal Quick Release
Table Clamp
IT IS IMPORTANT THAT YOU READ AND UNDERSTAND THIS GUIDE BEFORE ATTEMPTING TO
ASSEMBLE AND USE YOUR FLYCAM GALAXY ARM & VEST WITH HD-3000 STABILIZATION SYS-
TEM.
SHOULD YOU NEED ADDITIONAL INFORMATION, TECHNICAL ASSISTANCE IS AVAILABLE 'ON
LINE' BY CONTACTING YOUR SALES REPRESENTATIVE.
INTRODUCTION
This system is designed to allow you to capture hi and low angle, silky smooth gliding shots like a
Hollywood pro with the new adjustable spring and bearing mechanism.
Whether walking and talking across a busy intersecon, dancing, running up some steps at the
end of a jog, riding a vehicle, stumbling down a hallway or anything is made innitely easier and
cooler. It liberates you from the strain on your back and wrist and lets you concentrate on more
pressing maers. It enhances the eects of image and increases the arsc and professional ap-
peal of any footage.
This system requires pracce and understanding to achieve professional looking results. We are
sure that you will nd years of enjoyment with Flycam Galaxy Arm & Vest with HD-3000 Stabiliza-
on System.
WHAT’S IN THE BOX
Please inspect the contents of your shipped package to ensure you have received all that is pic-
tured and listed below. The grey foam shipping /storage containers have been especially de-
signed to protect your purchase while in transit and is a good place to keep your FLYCAM GALAXY
ARM VEST WITH HD-3000 STABILIZATION SYSTEM.
The Flycam Galaxy Vest is craed from durable fabric with an
ergonomic comfort design and a selectable posion front arm
mount sure to ease operator stress over lengthy shoot days.
Foam padded front and back, it's versality and light weight
makes for a very comfortable t.
GALAXY VEST
YOUR FLYCAM GALAXY ARM VEST WITH HD-3000 STABILIZATION KIT COMES IN TWO STORAGE
CONTAINERS
BOX II : It contains the Galaxy Vest

FLYCAM GALAXY ARM & VEST WITH HD-3000 STABILIZATION SYSTEM 3
GALAXY ARM
The stabilizing arm incorporates our advanced engi-
neering and precision machining making it light
weight, strong and the most sophiscated camera
stabilizer system in it's price range providing uid
moving shots and increased cinemac capability.
When the cameraman moves, the base of the stabi-
lizing arm moves as well. But the spring system in
the rest of the arm responds to the weight of the
sled. Instead of a sharp jolt, the camera shis its
posion smoothly. The camera will glide in low
mode video shots even in jerks.
HD-3000 STABILIZER
HD-3000 Stabilizer is designed for use with DSLR or DSLM’s as well
as medium sized camcorders, it's perfect for both professionals
and budding lmmakers
Sophiscated in design and engineering our HD series connues to
provide quality and long life service that FLYCAM has become fa-
mous. At a price point that rivals anything on today’s market, our
FLYCAM has to be considered a must have best buy.
NOTE: HD-3000 does not work under water, nor is it waterproof, so avoid direct exposure to rain
or water spray. Also the bearings are not sand proof; so avoid geng dirt or sand into them.
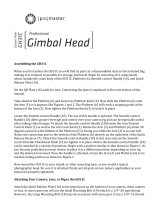
Head Assembly
Head Plate
Boom Plate
NOTE: These two individual pieces are shipped as one assembled
unit. You can easily detach the Head Plate from the boom plate by
simple push pull of ratchet knob as shown in the picture.
CENTRAL POST
For proper use, the HD-3000 Hand Held Stabilizer telescoping central
post with gimbal control is factory set prior to shipping.
NOTE: DO NOT aempt to ghten these parts as it will restrict free-
dom of movement.

FLYCAM GALAXY ARM & VEST WITH HD-3000 STABILIZATION SYSTEM 4
BASE PLATFORM
Provided the threaded stud located in the center of the base.
ATTACHING THE CENTRAL POST TO THE BASE PLATFORM
The boom of the central post has a threaded slot that matches the
pin located mid base on the plaorm. To aach the two, simply
thread them together and ghten to ensure a slip free connecon.
Alignment should end up with the central post being perpendicular to
the base plaorm as pictured. This will make camera balancing and
operaon much easier.
ATTACHING HEAD PLATE ASSEMBLY TO CENTRAL POST
Remove the Head plate from the 3-piece head assembly in preparaon to aach it to your
camera. You will note a number of mounng holes that can be used to adapt to various
cameras. Now Center the Head Plate on the camera and secure it properly. Do not over
ghten this adjustment as it can break the threaded insert.
Loosen the 2x allen bolts at boom of the camera plate and align the holes with the top of
the central post. Reghten the allen bolts securing the head to the stalk.

FLYCAM GALAXY ARM & VEST WITH HD-3000 STABILIZATION SYSTEM 5
Exclusive of Camera
YOUR FLYCAM HD-3000 VIDEO STABILIZER ALL DRESSED UP AND READY TO GO
A D D I N G W E I G H T S A N D P O S I T I O N I N G F O R P R O P E R B A L A N C E
Connuing the assembly and balance requirements to make your Flycam HD Stabilizer fully
funconal you will note that the base plaorm has a provision to mount the balance
weights via 2x BH bolts secured with knobs on both sides of the post.
The purpose of the counter weight system is to match the low end of the stabilizer to the
weight of the camera and accessories at the high/top end with the gimbaled handle as the
pivot point in between.
The heavier the camera and accessories, the more weights are required to achieve proper
balance. Generally as you add weight to one side of the central post, an equal amount has
to be added to the other side to maintain horizontal balance.
However if you are using an oset conguraon such as a ip out viewnder or o center
accessories, extra weights might be needed on the opposite side of the post to counter act
and maintain proper balance.

FLYCAM GALAXY ARM & VEST WITH HD-3000 STABILIZATION SYSTEM 6
V E R T I C A L S T A L K A D J U S T M E N T
The up and down (vercal) posion of the tele-
scopic central post is adjusted by loosening the
control located at the base, raising or lowering the
stalk to achieve desired locaon and then reght-
ening the vercal control.
Do not over-ghten this control.
B A L A N C I N G Y O U R F L Y C A M H D - 3 0 0 0 H A N D H E L D V I D E O S T A B I L I Z E R
Before beginning the balancing process check the following:
Camera is securely aached to head plate.
Lens cap has been removed and secured.
Telescoping clamp has been ghtened.
Weight discs are added successfully.
All the screws are ghtened securely.
Baery & all cables should be secured.
B A L A N C I N G T H E H O R I Z O N T A L A X I S
When your Flycam HD Hand held video stabilizer is properly assembled, you can start the test
and setup of the horizontal balance. Horizontal balance allows the camera to remain level
during operaon with the Central Post in a vercal posion unless o axis framing is desired.
When tesng for horizontal balance start from a at and level surface like a table. This will allow
Flycam HD Hand held video stabilizer to hang freely as you hold it. If your Flycam HD Handheld
video Stabilizer is correctly balanced on its horizontal axis, then it will be both level & upright,
with the Central Post in a perfect vercal posion.
Warning: If you do not have enough weight on the Base Plaorm the enre FLYCAM could ip
upside down. Should this movement start to happen be ready to catch the stalk before a
complete 180 degree occurs. This type of unwanted movement requires more weight to be
added to the base with addional weight discs.
Another way to accomplish horizontal balance is to move the center of gravity of the camera by
re-bolng the camera to a dierent area of the Head and Boom Plate, either front to back or
side to side.
Should Flycam HD Handheld video stabilizer be front heavy, loosen the screws on the sides of the
Head Plate and gently slide Head Plate back unl opmum balance is achieved.
Tilng to the back means the load is tail heavy requiring the plate to be adjusted forward on the
head.
Always secure the screws aer any adjustments.
If you cannot achieve front to back axis balance with this method, then try remounng your
camera to a dierent hole on Head Plate. Having achieved horizontal balance for the front to
back axis, ghten the screws on the Head Plate.

FLYCAM GALAXY ARM & VEST WITH HD-3000 STABILIZATION SYSTEM 7
If the Flycam HD Hand held video stabilizer leans to the right, then loosen screws on the boom
of Boom Plate and then gently slide the boom Plate to le. If it leans to the le from the
operator’s point of view, then adjust the boom Plate to the right. A bit at a me unl balance is
achieved.
Secure all screws aer adjustments are made.
It may be necessary to recongure front to back adjustments once correct side-to-side
ne-tuning has been accomplished.
Another opon to consider is moving the Counter Weight discs back & forth on the Base
Plaorm by sliding them either closer to or further away from the Center Post via the built in
base slots. Make sure to ghten the discs down should you move them.
S l i g h t l y b o t t o m h e a v y , i t w i l l b e b o t h s t a b l e a n d e a s i e r t o c o n t r o l .
C h e c k t h e v e r t i c a l b a l a n c e b y u s i n g t h i s d r o p t i m e t e s t .
B A L A N C I N G T H E V E R T I C A L A X I S
The sled should be ed up to the docking adapter of your stand or similar so that you can start
the fore & aer balancing adjustments by centering the camcorder over the central post. To do
this:
Loose side screws of head plate and boom screws of the boom plate.
Look at Flycam HD Handheld video stabilizer from the side. If the camcorder lens is pped up
or down, move the camcorder forward or backwards unl the center of balance is situat-
ed over the central post.
Then, look at the Flycam HD Handheld video stabilizer from the front. If the post is not ver-
cal, adjust boom plate unl the center post is vercal.
You can also adjust weight discs closer to & further away from the sled as per requirement
ll the post is not vercal.
The stability of the Flycam HD Stabilizer depends on it being slightly boom heavy. If it is top
heavy, it will lt more. If it is too boom heavy, it will be sluggish and hard to aim.

FLYCAM GALAXY ARM & VEST WITH HD-3000 STABILIZATION SYSTEM 8
A DROP TIME OF 2- 2.5 SECONDS IS PREFERRED.
Note: Recheck the balance by looking at the sled. If necessary, use the side screws and the boom
plate screws to make required adjustments.
CUSTOM FITTING YOUR GALAXY VEST
Having put your vest on, insert the hooks of the 26’’ long straps in-
to the appropriate aluminum buckle.
Make sure that everything is ght and posion yourself behind the stand.
Grasp the center post near the base and move the center post from vercal to horizontal.
Hold it there. Be sure that it will not hit the stand when you drop the center post and put
your free hand to catch the center post when it drops.
Count how many seconds it will take to fall to vercal. Try using a stopwatch.
If the drop me is less then 2 seconds, it is too boom heavy. You need to move the
boom mass closer to the post.
If the drop me is more than two seconds, it is top heavy.
Tighten both straps with Velcro for a comfortable t and lock both
with the aluminum buckles.
The length of the chest plate can be adjusted according to the
height of the person by using this adjusng screw.
Properly set up and custom t, your vest should look like the pro-
vided picture
Straps are mode of through nylon and industrial strength Velcro
and can be easily replaced or adjusted to suit individual needs.
Our GALAXY Vest can be used with all professionals arms incl.
Steadicam, Tin, Glide cam and Sachtler.

FLYCAM GALAXY ARM & VEST WITH HD-3000 STABILIZATION SYSTEM 9
ASSEMBLING OF GALAXY ARM
Loosen the knobs & insert the male part of the socket
aached to the GALAXY Arm into the female part of the sock-
et aached to the vest.
Once vercal and horizontal balance is achieved, mount the
Stabilizer on the gimbaled control unit of the arm.
ARM ADJUSTMENT : The arm tension is adjusted for the heaviest camcorder it can hold so it
does not boom out when you put the camcorder and sled on the arm for the rst me. Now
adjust the arm for the weight of your camcorder :
With the vest on, aach the arm & undock the rig.
Move the arm to the middle of its booming (up and down range) and let go. (If it stays where
it is, you are probably close to the right adjustment)
Keep making small adjustments unl the camcorder does not rise or fall when you let go of it in
the middle of its booming range.
Posion the arm :
Move the camcorder to your le so the arm crosses your body.
Adjust the arc of your arm so the rig feels comfortable to you.
Keep the camcorder close to your body.
YOUR FLYCAM GALAXY ARM VEST WITH HD-3000 STABILIZATION SYSTEM
IS READY TO GO.
With Oponal Accessories

FLYCAM GALAXY ARM & VEST WITH HD-3000 STABILIZATION SYSTEM 10
HANDLING OF HD-3000
When handling your HD-3000 you will use one hand to hold onto the
handle and the other hand to gently guide the Camera in the direc-
on you wish to shoot. We call the hand that holds the handle, the
“Holding Hand” and the hand that aims the Camera for lng, pan-
ning etc. as the “Guiding Hand.”
When holding the Handle of your HD-3000 you will need to:
1. Hold it rmly.
2. Hold it either in the middle or at the boom of the handle.
With Oponal Accessories
For normal shoong, hold the handle in the middle. For shots that
require aiming the Camera either up or down or sideways, hold the
handle rmly at the boom. This will allow the “yoke” part of the
gimbal to twist around without hing your hand or knuckles.
When you handle your HD-3000 you will want to use your “Stabilizer
Hand” to gently hold onto either, the point just below the yoke and
bearing assembly, or an area down by the Base. These two areas al-
low for easy control of the HD-3000 when in use.
MAINTENANCE
Bearing Maintenance – The Main Bearing on your HD-3000 is aached to the Central Post
about two inches down from the top. It is metal and parally enclosed by the Bearing Assem-
bly. The GALAXY Arm also contains the bearings. If aer some period of me your bearings
don’t turn smoothly as when new, you can oil it lightly with light lubricang oil. We recommend
that you use a minimum amount. Only a few drops are required, plus anything more than a
lile will end up dripping from the bearing and onto the rest of your Galaxy Arm & HD-3000 .
Light lubricang oil can also be used if needed on the Yoke and Handle Bearings. Be sure to
keep the oil away from your Camera, and clean up any over spill when done.
Cleaning– Do not use solvents or harsh cleaners of any kind on your Galaxy Arm, Galaxy Vest &
HD-3000 . If the unit becomes dirty, use only a cloth or sponge with water and a very mild de-
tergent to gently rub the unit clean. Rinse well.
Storage– If you are going to store your Flycam Galaxy Arm Vest with HD-3000 Stabilizaon Kit
for a long period of me then please store the unit up right in a dry or low to normal humidity
area whenever possible.
With Oponal Accessories
If you are unable to nd an environment like this, then we suggest you store the unit in an air-
ght plasc container or bag. Standing the unit upright helps to alleviate stress on the system.

FLYCAM GALAXY ARM & VEST WITH HD-3000 STABILIZATION SYSTEM 11
PRACTICE MAKES PERFECT SHOOTING TIPS
Walking the Line - This is an exercise designed to help you oper-
ate your HD-3000 more accurately and easily. Using masking
tape, or gaer’s tape, create a cross mark on a at and even
wall. This cross mark will be used for framing purposes. Now on
the oor leading up to the cross mark, tape a straight line,
about 10-20 feet long.
The purpose of this exercise is to walk the line that you have
taped on the oor, while keeping the cross mark centered in the
LCD monitor. Praccing this exercise will teach you how to
frame a shoot with precision.
BALANCING REVIEW
Proper system balance can only be achieved once your camera is set up with the appropriate
accessories ready for shoong. This means baeries, lenses, media cards, LCD viewnder/
monitor, quick release plate, on-cam lights, and all the gear you will use for your recording ses-
sion.
Remove the top plate of the Stabilizer and line up your camera so that its center of gravity
is as close to the center of the plate as possible (basically hold the camera in your hand un-
l it feels balanced both le and right as well as forward and back).
Find the hole in the plate that is as close to the threaded tripod mount on your camera as
possible (while you are sll holding your camera's center of gravity to the center of the
plate). Aach your camera (or quick release mounts if you have one). Tighten it down so it
won't accidentally rotate.
Re-aach the top plate to the Stabilizer . Center it, but don't worry about geng it abso-
lutely perfect yet.
Remove most of the weights from the Base Plaorm, but leave one on each side.
Insert the center post as far as it will go and ghten so it won't slide out.
Hold the handle normally and turn the Stabilizer so that it is horizontal to the ground. Let
go of the stalk while keeping a rm grip on the handle and count how long it takes to re-
turn to vercal again. You should be able to count a good, "One-one thousand, two-one
thousand", before it rights itself. With only two lile weights it might take considerably
longer.
Add one pair of weights at a me and repeat the "horizontal to vercal" test unl it falls at
the correct rate. It will probably not be perfect.
You'll get one that's too slow and then you'll add a pair and it will fall too fast. When that
happens, take o the last pair of weights that you added.
Tighten down the weights so they don't slide around.
To get the count perfect, slightly lower the center post that aaches the Base Plaorm
with the weights unl you get the "one-one thousand, two one thousand" count to the
vercal posion.
Fine-tune the le-right, forward-backward balance. You will have to go back and forth be-
tween the two direcons to get the balance just right. Loosen the screw sets that allow the
sled to move le and right. Adjust the top plate so that it is centered and ghten down the
screws like you would a re slowly and alternang side to side.
Repeat for "forward-backward" balancing.
Check to see if your camera is sing level. If not, repeat the necessary steps unl it does
Pracce walking/movements ensuring your body moon is not transmied to your hands
and then the Flycam Stabilizaon System and camera.

FLYCAM GALAXY ARM & VEST WITH HD-3000 STABILIZATION SYSTEM 12
WARRANTY
We oer a one year warranty for our products from the date of purchase.
We will repair or replace your product, free of charge, in the event of a defect in materials or
crasmanship obtained during normal use or handling based on the user manual. Please note
that we will not cover any shipping costs for returning the product to us. If any VAT or import
dues are applied to the return, we will also charge these costs to the customer.
The warranty does not include, by the way of example, damage caused by products that we do
not supply or from mishandling in transit, accident, misuse, neglect, lack of care of the product ,
or service by anyone other than our company.
We are not liable for incidental or consequenal damages resulng from the use of the unit or
occurring due to any breach of this warranty.
Replacement parts of the product will be provided at nominal cost (covering the cost price of the
replacement parts only) to the customers aer the Warranty Period has expired. We will cover
the complete cost of sending replacement parts within the warranty period. Aer that, Nominal
cost of the product & Actual shipping cost will be charged.
Do not send the unit to us without rst geng a response and geng the approval to send back
the item.
In case of any kind of dissasfacon, we urge you to Contact us immediately and we shall do our
Best to help you out. For any other assistance you can reach us via email.
For any other assistance you can reach us via email.
/