Page is loading ...

Operating Instructions - MULTIPLEX MULTIgyro 300DP
MULTIPLEX Modellsport GmbH & Co. KG • Westliche Gewerbestraße 1 • D-75015 Bretten (Gölshausen) • www.multiplex-rc.de Page 1/2
Instructions
-
MULTIgyro 300DP (08
-
0
2
-
22
/MIWA) •
Errors and omissi
ons excepted
!
•
MULTIPLEX
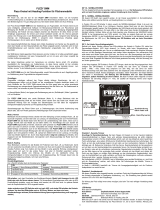
Connect receiver lead to
receiver (tail rotor servo
channel).
Lead: orange / red / brown
Tail rotor servo connector.
Keep correct pin assignment!
- orange or yellow (signal)
- red (+)
- brown or black (-)
Servo travel
100 %
Headlock
Standard
Gain
-
100
%
0
%
(
Centre
)
100 %
50 %
! These operating instructions are an
integral part of the product, and contain
important information and safety notes.
Please keep them in a safe place at all
times, and be sure to pass them on to
the new owner if you ever dispose of
the product.
1. S
PECIFICATION
MULTIgyro 300DP # 7 5503
Operating modes Dual Mode
Headlock & Standard
Size (L x W x H) 21.5 x 21.0 x 15.0 mm
Weight incl. leads approx. 10 g
Operating voltage 4.2 V … 7.0 V
Current drain approx. 33 mA
Working temperature -5°C … +60°C
Special characteristics
GAIN setting
(sensitivity)
From transmitter via
auxiliary channel. If no
aux. channel is
available: pot on gyro
Mode switch
Headlock & Standard
From transmitter via
auxiliary channel (like
GAIN). If no auxiliary
channel is available:
Headlock mode
Tail rotor servo,
according to heli-
copter type
Nano-S, Nano Pro
KARBONITE
®
, TITAN
digi 4
Piezo sensor element
REVERSE switch for reversing gyro effect
Temperature compensation, low drift
Tail rotor servo travel limit (ATV)
2. T
YPICAL
A
PPLICATIONS
Small, light, high-performance Dual-Mode gyro
for stabilising the tail (yaw axis) of electric-
powered model helicopters with rotor diameters
up to 1.30 metres. The gyro is designed exclu-
sively for modelling applications, and must not be
used in man-carrying or industrial equipment.
3. S
AFETY
N
OTES
! Read the instructions before use
! Use only for specified purposes (
2.)
4. F
IRST
U
SE
4.1 Installing the MULTIgyro 300 DP
Vibration may damage the gyro, and can have an
adverse effect on its stabilising effect. For this
reason it must be mounted in a location with as
little vibration as possible. The gyro itself must
also be protected from vibration. For this reason
fix the gyro in place using the two self-adhesive
pads supplied in the set.
1. The gyro should be mounted on a strong
surface at or close to the helicopter’s main
rotor shaft where vibration is as low as pos-
sible. The gyro must be installed in a well ven-
tilated position, well away from heat sources.
2. Ensure that the MULTIgyro 300DP is securely
fixed: the mating surfaces must be clean and
free of dust, grease and oil.
! Do not mount the gyro using just one large
adhesive pad which covers the whole under-
side of the device!
! Never use simple double-sided tape without a
foam layer; always use the adhesive pads
supplied in the set.
! The adhesive pads should be checked at
regular intervals, and must be replaced if they
no longer adhere strongly. Use 3 mm thick
foam adhesive pads.
4.2 Connecting the MULTIgyro 300DP
4.2.1 Connections for Single Mode Operation
In Single Mode operation the gyro always works
in Headlock mode. The gain (gyro sensitivity) is
adjusted on the pot (marked GAIN) on the gyro -
not via the transmitter.
Connections:
Connect the gyro between the tail rotor servo and
the receiver, as shown in the illustration.
4.2.2 Connections for Dual Mode Operation
In Dual Mode the gyro can be set to work in
Headlock or Standard mode. The mode (servo
travel direction) and the gyro gain (servo travel
adjustment) are switched using an auxiliary
transmitter channel.
!
!!
! Note
For some types of receiver you may have to
chamfer the plug housing (see illustration).
4.3. Transmitter Settings
1. Switch the transmitter ON.
2. If your transmitter features mixer functions,
switch off any which affect the tail rotor servo
(e.g. throttle / tail rotor mixer, torque compen-
sation, etc.). Set the tail rotor trim on the
transmitter to neutral. Do the same with sub-
trim (servo centre offset), if present.
3. If you are using a MULTIPLEX transmitter, set
servo travel to +/- 70% as a starting point.
4.4 Basic Settings on Gyro and Helicopter
1. Switch the receiver ON.
Do not touch the helicopter until the LED on
the gyro lights up (initialisation complete); this
process takes a few seconds.
2. Tail rotor trim settings:
Connect the pushrod to the servo output arm
(basic setting: servo arm length 10 - 15 mm).
With the servo at neutral, fit the output arm on
the output shaft at right-angles to the case.
Later, during test-flying, you may wish to vary
the output arm length in order to obtain your
preferred set-up in terms of response behav-
iour and rate of angular movement.
Check that the direction of rotation of the tail
rotor servos is correct. If the servo rotates the
wrong way, correct this using the “Servo Re-
verse” function at the transmitter.
3. Dual Mode only (not required if the gyro is
used in Single Mode, since Headlock Mode is
always set in this case):
Identify the switch or slider position on your
transmitter at which Standard and / or Head-
lock mode is active. Observe the behaviour of
the tail rotor servo when you apply full travel
in one direction, and then release the stick:
Chassis
Adhesive
pads
SET
GAIN
REVERSE
ATV
The yellow lead with socket is
not used for Single Mode (do
not connect to receiver
!)
Tail rotor servo connector.
Keep correct pin assignment!
- orange or yellow (signal)
- red (+)
- brown or black (-)
Connect plug on yellow lead
to receiver (gyro gain)
Connect receiver lead to
receiver (tail rotor servo
channel).
Lead
:
ora
n
ge
/
red
/
br
ow
n
File away hatched
areas if necessary

Operating Instructions - MULTIPLEX MULTIgyro 300DP
MULTIPLEX Modellsport GmbH & Co. KG • Westliche Gewerbestraße 1 • D-75015 Bretten (Gölshausen) • www.multiplex-rc.de Page 2/2
Instructions
-
MULTIgyro 300DP (08
-
0
2
-
22
/MIWA) •
Errors and omissi
ons excepted
!
•
MULTIPLEX
In Standard Mode the tail rotor servo will
quickly return to the neutral position when you
release the stick.
In Headlock Mode the tail rotor servo will tend
to stay at full deflection (if sufficient gain is
set; a good starting point is around 70% gain
(see
4.5, Point 2.).
4. Determining the direction of gyro effect using
the REVERSE <--> slide switch:
Check the direction of effect of the gyro by
abruptly swinging the helicopter around the
vertical axis. If the gyro responds in the wrong
direction, the position of the REVERSE slide
switch <--> is wrong, and should be changed,
e.g. using a screwdriver. The switch is located
on the right-hand side of the MULTIgyro
300DP case. Be sure to switch the RC system
off before you change the switch position!
!
!!
! Note
If the slide switch position is wrong, i.e. the
corrective action of the gyro is reversed, the
helicopter will suddenly carry out high-speed
pirouettes around the vertical axis when you
increase collective pitch, instead of counter-
acting this rotation. Take care!
5. Tail rotor servo travel limit (Limiter):
The pot marked ATV - <--> + is used to adjust
the maximum travel of the tail rotor servo (us-
ing a screwdriver), to ensure that the tail con-
trol bridge stops just short of the mechanics at
full travel. This prevents unnecessary stress
and wear on the tail rotor servo.
To reduce the maximum travel turn, the pot to
the left, in the direction of “-”; to increase the
maximum travel turn it to the right (“+”). Turn-
ing the pot to left or right adjusts the left and
right maximum travel simultaneously.
6. Now switch to Headlock Mode: the tail rotor
servo will slowly run in one direction.
Adjust the tail rotor servo trim - or (better) the
sub-trim function (centre offset) in such a way
that the tail rotor servo remains motionless, or
creeps as little as possible.
4.5 When you arrive at the flying site /
test-flying
1. If the temperature is significantly different at
the flying site, we recommend that you leave
the gyro and the receiver switched on for
about five minutes before you fly. After this
period switch if off, then on again. The system
is now ready, and you can fly the model.
2. Adjusting gyro gain:
a) Single Mode (yellow lead not connected to
receiver!)
The maximum possible gyro gain is set di-
rectly on the gyro (GAIN - <--> +) using a
small screwdriver.
b) Dual Mode
You can switch between Headlock and
Standard modes using the auxiliary
transmitter channel (servo travel direc-
tion), and also adjust the gain setting
(servo travel adjustment).
For first attempts we suggest that you set a
value of around 70% of the maximum possible
gyro gain.
Lift off, and establish a stationary hover. Care-
fully move the tail to left and right in turn.
If the tail starts to oscillate (swings to right and
left), reduce the gyro gain setting:
In Single Mode: turn the pot adjustor screw
slightly to the left (-).
In Dual Mode: reduce gyro gain at the trans-
mitter.
If the tail shows no tendency to oscillate, try
increasing gyro gain:
In Single Mode: turn the pot adjustor screw
slightly to the right (+).
In Dual Mode: increase gyro gain at the
transmitter.
The aim of these adjustments is to set the
maximum possible gyro gain at which the tail
is just short of oscillating when tail stabilisa-
tion is set to maximum.
3. Switch to Standard Mode, and cautiously
advance the throttle / collective pitch stick: the
tail may now swing away. Such offset effects
must be corrected mechanically at the tail ro-
tor linkage (pushrod length), unless your
transmitter features a separate trim memory
for the tail in Standard and Headlock modes
(e.g. Cockpit SX, ROYALevo, ROYALpro).
4. Once you have completed all the settings
correctly, you can switch between Standard
and Headlock modes in flight. In Headlock
mode the tail rotor compensation (Revo-Mix)
must be left switched off!
5. CE
C
ONFORMITY
D
ECLARATION
This device has been assessed and
approved in accordance with Euro-
pean harmonised directives.
This means that you possess a product whose
design and construction fulfil the protective aims
of the European Community designed to ensure
the safe operation of equipment.
If required, you can request MULTIPLEX
Modellsport GmbH & Co.KG to supply a copy of
the unit’s Conformity Declaration. Please contact
the company using the contact details at the foot
of the page.
6. G
UARANTEE
/
L
IABILITY
E
XCLUSION
The company MULTIPLEX Modellsport GmbH &
Co.KG accepts no liability of any kind for loss,
damage or costs which are due to the incorrect
use and operation of this product, or which are
connected with such operation in any way.
Unless the law expressly states otherwise, the
liability on the part of MULTIPLEX Modellsport
GmbH & Co.KG to pay damages, regardless of
the legal argument employed, is limited to the
invoice value of those products supplied by
MULTIPLEX Modellsport GmbH & Co.KG which
were directly involved in the event in which the
damage occurred. This does not apply if liability
is incurred according to statutory law on account
of intentional or gross negligence.
We guarantee our products in accordance with
the currently valid statutory regulations. If you
wish to make a claim under guarantee, your initial
course of action should always be to contact the
dealer from whom you purchased the equipment.
The guarantee does not cover faults and mal-
functions which are caused by the following:
- Incorrect or incompetent use
- Maintenance carried out incorrectly, belatedly
or not at all, or not carried out by an authorised
Service Centre
- Incorrect connections
- The use of accessories other than genuine
MULTIPLEX items
- Modifications or repairs which were not carried
out by MULTIPLEX or by an authorised
MULTIPLEX Service Centre
- Accidental or intentional damage
- Defects due to normal wear and tear
- Operation of the unit outside the limits stated in
the Specification
- Operation of the unit in conjunction with other
makes of equipment
7. D
ISPOSAL
N
OTES
Electrical equipment marked with the
cancelled waste bin symbol must not
be discarded in the standard house-
hold waste; instead it should be taken
to a suitable specialist disposal
system.
In the countries of the EU (European
Union) electrical equipment must not be dis-
carded via the normal domestic refuse system
(WEEE - Waste of Electrical and Electronic
Equipment, Directive 2002/96/EG). You can take
unwanted equipment to your nearest local au-
thority waste collection point or recycling centre.
There the equipment will be disposed of correctly
and at no cost to you.
By returning your unwanted equipment you can
make an important contribution to the protection
of the environment!
/