Page is loading ...

PanelMate
®
ePro PS Family
Users Guide
Operator Interface Business
811 Green Crest Drive
Westerville, OH 43081
Eaton Corporation

Preface
Information in this manual is subject to change without notice and
does not represent a commitment on the part of Eaton Electrical Inc.
Permission is granted to duplicate this material without modification
only for your use or the internal use of other members of your
company or your agents to assist you in the use and servicing of
products purchased from Eaton Electrical. No permission is granted
to modify this material or include this material in a compilation.
RESTRICTED RIGHTS LEGEND
Use, duplication, or disclosure by the Government is subject to
restrictions set forth in paragraph (b)(3)(B) of the Rights in Technical
Data and Computer Software clause of DAR 7-104.9(a).
Contractor/Manufacturer is Eaton Corporation, Operator Interface
Business, 811 Green Crest Drive, Westerville, OH 43081.
TRADEMARKS
PanelMate, Cutler-Hammer, Eaton and ePro Canvas are either
federally registered trademarks or trademarks of Eaton Corporation.
Commercial brand names (trademarks) of products of
manufacturers or developers, other than Eaton Corporation or its
affiliates, that appear in this manual may be registered or
unregistered trademarks of those respective manufacturers or
developers, which have expressed neither approval nor disapproval
of Cutler-Hammer
®
products and services.
©2005 Eaton Corporation. All rights reserved.
Printed in the United States of America.
P/N 01-00526-00

Support Services 3
Support Services
The goal of Eaton is to ensure your greatest possible satisfaction with the operation of
our products. We are dedicated to providing fast, friendly and accurate assistance. That
is why we offer you so many ways to get the support you need. Whether it's by phone,
fax or e-mail, you can access Eaton’s support information 24 hours a day, seven days a
week. Our wide range of services is listed below.
You should contact your local distributor for product pricing, availability, ordering,
expediting and repairs.
Website
Use the Eaton Electrical website to find product information. You can also find
information on local distributors or Eaton’s Cutler-Hammer sales offices.
Website Address
www.EatonElectrical.com
e-COM Support Center
Call the e-COM Support Center if you need assistance with placing an order, stock
availability or proof of shipment, expediting an existing order, emergency shipments,
product price information, returns other than warranty returns, and information on local
distributors or sales offices.
e-COM Support Center Voice: 800-356-1243 (8a.m.–6p.m. EST)
FAX: 800-752-8602
After-Hours Emergency: 800-543-7038
(6p.m.–8a.m. EST)
e-TRC Technical Resource Center
If you are in the US or Canada, and have OI or PLC questions, you can take advantage
of our toll-free line for technical assistance with hardware and software product
selection, system design and installation, and system debugging and diagnostics.
Technical support engineers are available for calls during regular business hours.
e-TRC
Technical Resource Center
(support for OI and PLC)
Voice:
• 800-809-2772 (8a.m.–5p.m. EST)
• 414-449-7100 (8a.m.–5p.m. EST)
FAX: 614-882-0417
e-mail: [email protected]
After-Hours Emergency (Plant Down Only):
• 800-809-2772 (5p.m.–8a.m. EST)
• 414-449-7100 (5p.m.–8a.m. EST)

4 PanelMate ePro PS Users Guide
European PanelMate Support Center
This center, located in Zurich, Switzerland, provides high-level quality support and
product repair services for your PanelMate products. You will receive real-time technical
and application support.
European PanelMate Support
Center
Voice: +41 1 806 64 44 (9a.m.–5p.m. CET)
e-mail:
Repair and Upgrade Service
Additional support is also available from our well-equipped Repair and Upgrade Service
department. If you have questions regarding the repair or upgrade of OI product, contact
your local distributor.
Repair and Upgrade Service
(support for OI)
Voice:
• 800-809-2772 (8a.m.–5p.m. EST)
• 414-449-7100 (8a.m.–5p.m. EST)
FAX: 614-882-3414
e-mail:

Table of Contents 5
Table of Contents
Preface ________________________________________________________ 2
Support Services ________________________________________________ 3
Website.................................................................................................................3
e-COM Support Center ......................................................................................... 3
e-TRC Technical Resource Center.......................................................................3
European PanelMate Support Center...................................................................4
Repair and Upgrade Service.................................................................................4
Chapter 1: Getting Started with the PanelMate ePro PS ________________ 8
Introduction............................................................................................................... 9
Unpacking................................................................................................................10
PanelMate ePro PS Models....................................................................................11
PanelMate ePro PS Classic Documentation References ....................................11
Protect Mode ........................................................................................................... 12
Windows XP Embedded (XPE)............................................................................... 12
Image Loads............................................................................................................ 12
Preloaded Software................................................................................................. 13
Connectors & Ports ................................................................................................ 14
Chapter 2: Preparing the ePro PS for Online Use ____________________ 17
Powering Up Your ePro PS Unit............................................................................18
Power and Ground Instructions........................................................................... 18
Steps to Preparing Your ePro PS Unit for Online Use......................................... 20
Communicating to a PLC or Controller ...............................................................20
Preparing Your ePro PS for File Transfers...........................................................22
Connecting to Your ePro PS Via the Ethernet .................................................... 22
Connecting Windows 98 PCs to an ePro PS......................................................25
C/D Partitions......................................................................................................27
Installing Software..................................................................................................27
Types of Software That Can Be Installed............................................................ 28
Installing New OPC Server and Drivers..............................................................29
Installing OPC Drivers.........................................................................................29
Downloading and Running a Canvas Configuration (.ucf File)............................30

6 PanelMate ePro PS Users Guide
Downloading and Running a PanelMate Power Pro Configuration (.pps
File)
.....................................................................................................................30
Uninstalling Software ..........................................................................................31
Managing Accounts and Changing Passwords...................................................31
Modifying an Account Name and Password .......................................................32
Using the Auto Logon Feature............................................................................32
Chapter 3: Software Tools, Utilities and Programs ___________________ 33
Introduction............................................................................................................. 34
Status Bar Icons...................................................................................................... 34
Screen Brightness and Backlight Auto-Dimming................................................35
Protect Mode Save Program..................................................................................36
Calibrating the Touchscreen.................................................................................. 37
Calibrating Display Models..................................................................................37
Calibrating Blind Node Models............................................................................38
Changing Screen Resolution.................................................................................39
Chapter 4: Hardware Installation __________________________________ 40
Safety Considerations............................................................................................ 41
Installation Best Practices ..................................................................................... 41
Enclosure Selection................................................................................................ 42
Enclosure Rating.................................................................................................42
Enclosure Construction.......................................................................................42
Enclosure Sizing and Unit Positioning ................................................................43
Serial and Ethernet Communication Cable Selection, Shielding,
Grounding, and Termination
..................................................................................46
RS232 Communications (COM1, COM2) ...........................................................46
RS422 Communications (COM1)........................................................................47
RS485 Multi-Drop Communications (COM1)...................................................... 49
Ethernet Communications...................................................................................50
Serial and Ethernet Cable Segregation and Placement ...................................... 51
Serial and Ethernet Cable Segregation...............................................................51
Cable Placement.................................................................................................51
Potential Problem Areas .....................................................................................52
Chapter 5: Troubleshooting ______________________________________ 53
Appendix A: Unit Dimensions ____________________________________ 55

Table of Contents 7
PanelMate ePro PS 8” Display Models Unit Dimensions .................................... 56
PanelMate ePro PS 10” Display Models Unit Dimensions .................................. 57
PanelMate ePro PS 12” Display Models Unit Dimensions .................................. 58
PanelMate ePro PS 15” Display Models Unit Dimensions .................................. 59
PanelMate ePro PS Blind Node Models Unit Dimensions...................................60
Appendix B: Specifications ______________________________________ 61
PanelMate ePro PS Specifications........................................................................62
Index _________________________________________________________ 65

8 PanelMate ePro PS Users Guide
Chapter 1: Getting Started with the PanelMate ePro PS
1
This chapter provides getting started information.
The following topics are discussed:
• Introduction
• Unpacking
• ePro PS models
• Windows XP Embedded (XPE)
• Protect Mode
• Connectors and Ports

Chapter 1: Getting Started with the PanelMate ePro PS 9
Introduction
The PanelMate ePro PS family is made up of high performance yet cost-effective
operator interface (OI) products. The ePro PS family carries on the PanelMate tradition
of performance in balance with ease of use. The ePro PS family sets the standard for
hybrid OI systems by combining the flexibility of Microsoft’s
®
Windows
®
XP Embedded
operating with the stability and reliability achieved through the solid-state hardware
design and exclusive Protect Mode™ that provides protection for the operating system
and software.
The ePro PS family provides the performance and flexibility of PC based operator
interfaces without the associated complexity of a PC on the plant floor. With integrated
high-speed Ethernet, serial ports, USB ports, removable CompactFlash
®
, PCMCIA and
an optional PCI expansion adapter, the ePro PS models can be adapted for a wide
variety of user requirements.
The ePro PS family of products are configured with the ePro Canvas
®
or ePro Canvas
Professional editing software. The ePro Canvas editor supports a modern suite of
graphical templates, called controls, for replacing hardwired panel devices such as
pushbuttons, indicator lights, bars, readouts, message displays, etc.
Whether replacing hard-wired pilot devices and pushbuttons or providing machine
control and even SCADA functions, the ePro PS family of products will fit from both a
form and functional standpoint.
The PanelMate ePro PS family of products includes:
• PanelMate ePro PS
• PanelMate ePro PS OD (Outdoor Series)
• PanelMate ePro PS EE (Enterprise Edition)
• PanelMate ePro PS Classic
A brief description of the OD, EE and Classic models is given below.
Throughout this manual, information provided about the PanelMate ePro PS family will
apply to all four PS models.
ePro PS OD
The PanelMate ePro PS OD (Outdoor Series) operator interface is designed for use in
outdoor applications. The OD models offer increased visibility in high ambient light,
increased temperature and shock specifications and UV resistance.
ePro PS EE
The PanelMate ePro PS EE (Enterprise Editions) operator interface is designed for end-
users that need more memory, faster processing or additional Windows XP Embedded
components and services to support large ePro Canvas applications or third-party
software.

10 PanelMate ePro PS Users Guide
ePro PS Classic
The PanelMate ePro PS Classic operator interface is designed for use by end-users that
are currently using the PanelMate Power Pro software and are ready for the new
PanelMate ePro PS hardware but are not quite ready to convert their PanelMate Power
Pro configurations to ePro Canvas applications. Since the PanelMate ePro PS Classic
OI supports the PanelMate Power Pro and PanelMate ePro PS Runtime software, the
user can utilize the PanelMate ePro PS Runtime software if and when they are ready.
The ePro PS Classic OI is based on the PanelMate ePro PS hardware models with the
addition of software and licenses that allow users to run the PanelMate Power Pro
Runtime software in addition to the three application kits (Document Viewer, Headline
Manager and Recipe Manager). The ePro PS Classic OI can be thought of as a
combination of the PanelMate ePro PS and the PanelMate ePro with the XE (without
Trending) and the OPC options. One difference is in the area of drivers: the ePro PS
Classic OI running PanelMate Power Pro configurations does not support native (non-
OPC) communication drivers but does support up to three OPC drivers simultaneously.
Unpacking
Carefully remove all equipment from the packing cartons and inspect all parts for
damage in shipment. Check packing cartons for all items shown on the packing list.
Keep the cartons and packing materials for future shipment.
If there is equipment damage due to shipment, report the damage to the carrier who
delivered the equipment.
Note: The Interstate Commerce Commission has a time limit on reporting concealed
damage.
Packing List
The PanelMate ePro PS units includes the following:
1. Qty 1 – PanelMate ePro PS unit
2. Qty 1 – Accessory kit which includes:
a) Qty 1 – Panel mounting hardware kit (Display models only)
b) Qty 1 – 3-pin power connector
c) Qty 1 – PanelMate ePro PS support CD
d) Qty 3 – Spare jumpers used to configure serial ports
e) Qty 1 – KEPServer_ePro CD-ROM (Classic models only)

Chapter 1: Getting Started with the PanelMate ePro PS 11
PanelMate ePro PS Models
PanelMate ePro PS display models include an integrated color display. A Blind Node (no
display) model is available for applications that use external displays. All display models
feature a resistive touchscreen for operator input.
The PanelMate ePro PS models include:
• 7685T-8 8” TFT display
• 7685T-12 12” TFT display
• 7685ST-12 12” TFT display, stainless steel
• 7685T-15 15” TFT display
• 7685ST-15 15” TFT display, stainless steel
• 7600 Blind Node
The PanelMate ePro PS OD (Outdoor Series) models include:
• 7685T-8OD 8” TFT display
• 7685T-12OD 12” TFT display
• 7685ST-12OD 12” TFT display, stainless steel
• 7685T-15OD 15” TFT display
• 7685ST-15OD 15” TFT display, stainless steel
The PanelMate ePro PS EE (Enterprise Edition) models include:
• 7685T-12E 12” TFT display
• 7685T-15E 15” TFT display
• 7600E Blind Node
The PanelMate ePro PS Classic models include:
• 7685T-8C 8” TFT display
• 7685T-10C 10” TFT display
• 7685ST-10C 10” TFT display, stainless steel
• 7600C Blind Node
PanelMate ePro PS Classic Documentation References
The following manuals provide additional information regarding the use of PanelMate
Power Pro Runtime software:
PanelMate PC Runtime Operation User’s Guide
• Describes how to use the PanelMate PC Pro Runtime software.
• Provided on the PMPROSW CD-ROM
PanelMate Document Viewer Users Guide
• Describes the Document Viewer and the Application Kit Selector. Important
information about the PMStart.cmd command file is included.
• Provided on the PMPROSW CD-ROM
PanelMate Headline Manager Users Guide
• Describes the Headline Manager and the Application Kit Selector. Important
information about the PMStart.cmd command file is included.
• Provided on the PMPROSW CD-ROM

12 PanelMate ePro PS Users Guide
PanelMate Recipe Manager Users Guide
• Describes the Recipe Manager and the Application Kit Selector. Important
information about the PMStart.cmd command file is included.
• Provided on the PMPROSW CD-ROM
Protect Mode
The PanelMate ePro PS family of products has a unique and exclusive Protect Mode
feature that safeguards the integrity of files stored on the C:\ partition of your operating
system. This feature ensures that data and operating system files cannot be modified by
anyone or corrupted by unexpected power disruptions. As a result, you can be confident
that the ePro PS meets your rigorous industrial environmental requirements and can be
protected against all unauthorized alterations.
The Protect Mode is always active on your ePro PS unit. As changes are made to data
and files they appear to be saved but in reality they are saved in volatile memory. This
means that when the ePro PS is restarted, all of the changes will be deleted from
memory and the last information saved in the C:\ partition will be used. With this in mind,
all changes made that are to be stored in the C:\ partition must be saved or committed
so that the next time the ePro PS is restarted the new data will be available. Types of
data stored on the C:\ partition include the ePro PS Runtime software, communications
drivers, OPC server, time/date data and touchscreen calibration data.
Notes:
• The D:\ partition is reserved for user data and is not protected by the Protect Mode
featured. Data and program files can be easily added, modified and deleted in this
storage area.
• If extensive changes are made to the C:\ partition without a subsequent reset or
execution of the Protect Mode Save, volatile memory may become full resulting in
system errors.
Refer to the
Protect Mode Save section for additional information about saving files to
the C:\ partition.
Windows XP Embedded (XPE)
PanelMate ePro PS uses Windows XPE, which is a subset of Windows XP Professional.
XPE enables PanelMate ePro PS unit’s operating system (OS) to be customized. As a
result, unneeded OS components have been eliminated resulting in a smaller,
streamlined, and efficient system. Because XPE allows us to protect the OS from
unwanted software changes, we can make your ePro PS unit reliable for industrial
applications, whereas an open XP operating system is susceptible to lockups from OS
file corruption.
Image Loads
Each PanelMate ePro PS model has an image load that is installed prior to shipment.
The image load contains the OS and other files dependent on the model type. If desired,
the image load can be restored to the current factory image load by using a Restore Kit
accessory. The image load for display models is different from the Blind Node models
due to a difference in touchscreen drivers and the ePro PS EE image load includes

Chapter 1: Getting Started with the PanelMate ePro PS 13
additional Windows XP components such as .NET Framework and IIS Server. When
restoring an image load it is important that the correct load is installed to maintain the
integrity of the hardware.
Restore Kits include the following:
76MLPSD Image Load for PanelMate ePro PS and ePro PS OD display models
76MLPSB Image Load for PanelMate ePro PS Blind Node models
76MLEED Image Load for PanelMate ePro PS EE display models
76MLEEB Image Load for PanelMate ePro PS EE Blind Node models
76MLPSCD Image Load for PanelMate ePro PS Classic display models
76MLPSCB Image Load for PanelMate ePro PS Classic Blind Node models
Preloaded Software
The ePro PS models all come with preloaded software.
All ePro PS models comes with the following:
• eProStart.cmd command file Pre-loaded No licensing required
• PanelMate ePro PS Runtime software Pre-licensed
• KEPServer_ePro OPC Server Pre-loaded Pre-licensed
• KEPServer_ePro OPC Drivers Pre-licensed
PanelMate ePro PS Classic
The ePro PS Classic includes additional files that support PanelMate Power Pro
applications. The ePro PS Classic models include the following:
• PanelMate Power Pro Runtime software Pre-loaded Pre-licensed
• Document Viewer Pre-loaded Pre-licensed
• Headline Manager Pre-loaded Pre-licensed
• Recipe Manager Pre-loaded Pre-licensed
• PMStart.cmd command file Pre-loaded No licensing required
Notes:
• The unit is shipped so that when powering up for the first time the PanelMate Power
Pro Document Viewer demo configuration (DVDemo.pps) will be launched via the
PMStart.cmd command file.
• The ePro PS Classic has been pre-configured so that the PanelMate Power Pro
Runtime software runs in 256 colors compatibility mode so that regardless of the
native color resolution of the unit, the PanelMate’s 256 color palette will still function
properly. If you decide to use the PanelMate ePro PS Classic hardware for
PanelMate ePro PS Runtime applications you will not have to change the color
resolution of the unit.

14 PanelMate ePro PS Users Guide
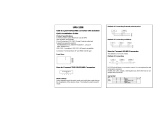
Connectors & Ports
The location of the connectors and ports is shown in Figures 1 and 2. The Ethernet port
supports 10/100 communications. Two of the USB ports are V1.1 compliant while the
other two ports are V2.0 compliant. Slow data rate devices such as keyboards and mice
should use the USB 1.1 ports.
Note: All installed peripherals (i.e. PCI Adapter, USB devices, PCMCIA devices, etc.)
on the ePro PS unit should not consume more than 5 additional watts on the 8” and 10
additional watts on the 10”,12”,15” and Blind Node. Consuming more than the this will
change the specified operating temperature of the ePro PS unit.
USB 1.1 (x2)
USB 2.0 (x2)
24 VDC – In
Socket (GND - +)
Video Out
COM2
–
RS232
COM1
–
RS232/422-485
LAN
(
Ethernet
)
Figure 1: Connector Locations
Caution: The USB ports are to be used for corrective maintenance only and not for
permanent use in Class I, Div 2 Groups A, B, C, D locations. If permanent use is
required in Class I, Div 2 Groups A, B, C, D hazardous locations then UL approval must
be obtained.

Chapter 1: Getting Started with the PanelMate ePro PS 15
PCI Adapter
PCMCIA Slot (x2)
CompactFlash Slot
Figure 2: Slot Locations
CompactFlash Slot
The CompactFlash slot is located on the side of the unit as shown above.
When installing the CompactFlash memory card into the PanelMate ePro PS unit ensure
that the guides are lined up carefully and the “lip” on the memory card is toward the back
of the unit.
Caution: Make sure to turn off and/or disconnect power to the PanelMate ePro PS unit
before removing or inserting the CompactFlash memory card, as the CompactFlash
memory card should not be hot-swapped. Failure to remove power before installing or
removing the CompactFlash memory card, can result in damage to the CompactFlash
and/or unit.
Note: SanDisk CompactFlash memory cards are recommended for use with the PS unit.
Contact technical support to obtain a complete list of authorized SanDisk memory cards.
PCMCIA Slots
The PCMCIA slots are located on the side of the unit as shown above.
The PCMCIA interface supports up to 2 Type II cards or 1 Type III card. When installing
the PCMCIA card into the PanelMate ePro PS unit ensure that the guides are lined up
carefully and the top on the card is toward the back of the unit.
Caution: Before hot-swapping PCMCIA cards, verify the card being used is specified to
support hot-swapping.
Note: Although most base functionality has been included in the ePro PS operating
system and many devices have been tested and authorized, not all device drivers have
been included. Contact technical support to obtain a complete list of authorized devices.

16 PanelMate ePro PS Users Guide
PCI Adapter
All models except the 8” displays also provide a slot on the back of the unit for use with
the optional PCI adapter (Cutler-Hammer Catalog Number 76PCI). Reference the
documentation included with the adapter for complete installation instructions.
Note: Although most base functionality has been included in the ePro PS operating
system and many devices have been tested and authorized, not all device drivers have
been included. Contact technical support to obtain a complete list of authorized devices.

Chapter 2: Preparing the ePro PS for Online Use 17
Chapter 2: Preparing the ePro PS for Online Use
2
This chapter describes how to get started with your ePro PS unit.
The following topics are discussed:
• Powering up your ePro PS unit
• Steps to preparing your ePro PS unit for online use
• Preparing your ePro PS for file transfers
• Installing software and downloading configurations
• Managing accounts and changing passwords

18 PanelMate ePro PS Users Guide
Powering Up Your ePro PS Unit
In order to power up your PanelMate ePro PS unit, you need to provide a 4.0 amp 24-
volt power source/supply. Your PanelMate ePro PS unit is designed to operate at
24VDC. A removable three-position DC power connector attaches to the unit's connector
receptacle. (Refer to the
PanelMate ePro PS Specifications section for additional
information).
Notes:
• Use #18 AWG (0.82mm
2
) copper wire for power and ground lead connections.
• Power conditioning may be required when the PanelMate ePro PS unit is installed in
areas of poor power quality.
• The ePro PS unit is designed to operate with a peak inrush current of 8 A, a
maximum current of 2.0 A, and a maximum power of 50 watts.
Power and Ground Instructions
The PanelMate ePro PS operator interface has been designed to withstand severe
environmental conditions typical in industrial installations. However, certain extreme
conditions, such as serious ground faults, have the potential to damage the PanelMate
ePro PS operator interface or cause other damage. In all cases, the end user must
ensure that the installation is protected from these extreme conditions and follows local
codes and electrical standards and regulations.
The following recommendations are intended to help protect the PanelMate ePro PS unit
from damage due to current swells, ground faults, or ground potential differentials that
can occur in electrical system installations.
• Use an isolated power supply
• Use single point grounding
• Install a power supply solely for the PanelMate ePro PS
• Use a current-limiting power supply
• Add circuit breakers

Chapter 2: Preparing the ePro PS for Online Use 19
Use an Isolated Power Supply
AC to DC power supplies are typically isolated while DC to DC power supplies are often
non-isolated. Check the power supply specifications to ensure that the power supply is
fully isolated. If used in a Class I, Div 2 environment, then the external power supply
must be appropriately rated.
Use Single Point Grounding
The external power supply and the PanelMate ePro PS unit should be grounded to the
same point. Single point grounding should be practiced even when the devices are
located in separate enclosures to help prevent ground loop issues.
Install a Power Supply Solely for the PanelMate ePro PS
If the current external power supply is used for multiple devices, add an external power
supply specifically for the PanelMate ePro PS unit. A separate external power supply will
better protect against system transients and ground potential issues. If used in a Class I,
Div 2 environment, the external power supply must be appropriately rated.
Use a Current-Limiting Power Supply
The external power supply should not be able to source more than five amps. If used in
a Class I, Div 2 environment, the external power supply must be appropriately rated.
Add Circuit Breakers
Install circuit breakers (Cutler-Hammer Catalog Number WMS2C04) on both the supply
and return paths between the PanelMate and the external power supply to protect
against current swells on the return path. The circuit breakers should be rated for ten
amps.

20 PanelMate ePro PS Users Guide
Steps to Preparing Your ePro PS Unit for Online Use
You may find it useful during the initial preparation of the ePro PS unit, to connect both a
USB keyboard and mouse to the unit. After powering up the ePro PS user interface, you
can connect to the ePro PS unit in order to do one or more of the following:
• Install the latest PanelMate ePro PS Runtime software (included on the ePro
Software Suite CD-ROM)
• Install an OPC driver (included on the KEPServer_ePro CD-ROM)
• Download an ePro Canvas configuration (created using ePro Canvas or ePro
Canvas Professional software). If your configuration uses the Data Archiving (76DA)
or Recipe Management (76RM) options, make sure these options have been
registered on your unit.
• Download a PanelMate Power Pro configuration (PanelMate ePro PS Classic users
only)
Refer to the
Preparing Your ePro PS for File Transfers and Installing Software
sections for additional information.
Note: PanelMate ePro PS models are pre-licensed to run with the Kepware OPC server
and drivers. The Kepware OPC server is preinstalled and configured for optimum
performance. For ePro Canvas applications to run correctly online, it is necessary that
the OPC server and drivers installed on the PS unit are the same as the server and
drivers installed on the ePro Canvas development PC. Refer to the
Installing New OPC
Server and Drivers section for additional information.
Communicating to a PLC or Controller
Your PanelMate ePro PS unit can communicate to a PLC or controller via:
• A serial connection
• An Ethernet connection (Refer to the Connecting to Your ePro PS for Data
Transfer/Software Downloads section for more information about setting up an
Ethernet connection)
• An optional interface card
/