DW 072321 User manual

Type
User manual

DW 072321: Unleash Your Vision with Superior Image Quality and Versatile Applications

Experience exceptional image quality with the DW 072321 camera, featuring a 1920x1080 resolution and a wide 100-degree diagonal view. Designed for above-water use, this camera excels in computer vision applications due to its smooth frame rate and low distortion. Connect it seamlessly to your computer via USB 2.0 and capture stunning images and videos with ease.

Product Manual
A complete guide for operating the HD USB Camera
HDcam
HDcam
Table of Contents
DeepWater Exploration 2exploredeepwater.com
Technical Drawings
Important Disclaimers
Revision History
Installation
Introduction
Hardware and Software
Camera Technical Drawing
Mount Technical Drawing
Connecting to a Windows OS Computer
Streaming Video via Linux
Multi-cam Connection Diagram
Mount Installation
Introduction, Technical Specifications, Contents
Operating Notes
Image Samples
3
4
5
7
8
10
11
12
6
07-07-21 - Document Released
07-08-21 - Added Operating Notes and support email on the last page
07-09-21 - Added contents section on page 3
07-23-21 - Name changed to HDCam and updated technical drawings
Introduction
Technical Specifications
Contents
Introduction, Specifications, Contents
DeepWater Exploration 3exploredeepwater.com
The HD USB Camera is the bare board of the exploreHD Camera but without the waterproof housing. This
camera provides the same excellent image quality as the exploreHD but uses a specialized lens designed
to be more suited for above water applications. The camera can output H.264, MPEG, and YUY2 at
reduced frame-rates. Due to its low distortion and smooth frame-rate, this camera is ideal for computer
vision applications.
Camera Specifications
Image Sensor: SONY IMX323 1/2.9
Resolution: 1920x1080
Frame-rate: 30 fps
Format: H.264/MJPEG
Connection: USB2.0 High Speed
Connector: USB Type A to JST 2.0
Voltage: 5V
Current: 250mA
1x HD USB Camera
1x Case for the Camera Board
1x Mount for the Camera Case
1x 1 Meter USB 2.0 Type A to JST2.0 Cable
4x M3x0.5 Screws for Mount
2x M3 Square Nuts
2x M3 Nut
Lens Specifications
Aperture: F2.8
Barrel Distortion: <2%
View Angle: 100 Degrees Diagonal
Focal Length: 2.7MM (19MM Equivalent on Full Frame)
HDcam
This diagram shows the back of the PCB and
temperature concentration based on color
70C
30C
50C
Operating Notes
DeepWater Exploration 4exploredeepwater.com
For long term operation, the camera may get hot (MAX Temp 70C). This is normal and not a cause for con-
cern. The processor has an auto thermal shut off if it does exceed normal operating temperatures. If you
are designing a custom mount, it can not be manufactured with Polylactic acid (PLA) plastic as the heat
from the camera will cause the plastic to weaken. Acrylonitrile butadiene styrene (ABS) is recommended
instead.
Temperature
The Sony IMX323 sensor used in this camera is chosen for its smaller footprint while still providing great
image quality. Typically, CMOS sensors contain a ceramic plate on the back to prevent incident light from
entering through the back of the sensor causing an X-ray effect. The IMX323 sensor does not have a
ceramic plate and is therefore susceptible to indent light from the back of the camera affecting image qual-
ity. This can easily be avoided by using our included camera holder or using black electrical tape to cover
the back of the camera PCB.
In order to ensure the sharpest image from your camera, the distance between the sensor and the lens
must be set correctly. Before the camera leaves our facility, the focus is set manually and a screw is placed
on the side of the lens holder to lock the distance. Sometimes, this screw can get loose over time and the
camera looses proper focus. You can adjust this manually by taking the screw off and twisting the lens
until the image is clear when viewing a far away distance on a computer.
Sensor Affected by Incident Light
Lens Focusing
PCB
Camera Sensor
Camera Sensor
Incident Light
PCB
Electrical Tape
Incident Light
Lens
Lens Holder
Focus Distance
Screw For
Adjusting
Focus
HDcam
Image Samples
DeepWater Exploration 5exploredeepwater.com
Color remains accurate even in low light situations
Below are image samples of tough dynamic range situations
Lens remain sharp on the edges, Camera outputs great dynamic range
HDcam
STEP 1
STEP 2
STEP 3
STEP 4
STEP 5
Mount Installation
DeepWater Exploration 6exploredeepwater.com
In order to enable the mounting of this camera, two screw holes are located on the base of the
camera holder bracket. These 20mm apart M3 counter-bores should allow for the attaching of
the camera to any surface, provided two M3 threads or nuts 20mm apart may be made or placed
on the surface.
To begin the process of installing the HD USB Camera, ensure you have the
parts detailed in the contents section of this manual as well as a 2mm hex
Allen wrench or screwdriver(not included).
Tap or drill a hole for where you want to mount the camera, and attach the
camera holder bracket to the surface using the longer M3 screws.
After the securing of the camera holder bracket, place the square nuts within
the square indentation located on the bottom of the camera holder, and align
the holes of the camera holder with the lateral holes of the camera bracket
holder.
Begin screwing in both remaining screws on each side of the camera bracket
holder, and properly position the camera to the point of view you require for
your uses, and finish screwing in the screws.
Connect the provided USB cable to the camera using the USB connector
located at the top of the camera holder.
HDcam
Connecting to a Windows OS
DeepWater Exploration 7exploredeepwater.com
This camera is plug and play for all operating systems. On Windows, simply plug the camera in
and you should see it under device manager.
For the best quality, make sure the camera
is set to 1080p 16:9 30fps. If you notice
flickering, you can change the frequency of
the flicker reduction
OBS allows you to finely adjust the camera
settings
You can use the camera with the built-in Windows app. The app provides a decent quality encoder and
will provide you a decent bit rate. The app automatically uses MPEG as the video format
If you plan on streaming with the camera or record with high bit rate, you can use Open Broadcaster
Software
HDcam
STEP 1
STEP 2
STEP 3
Please install gstreamer following this guide
https://gstreamer.freedesktop.org/documentation/installing/on-linux.html?gi-language=c
For Testing the Camera
To be able to use v4l2-ctl, run the command:
sudo apt-get install v4l-utils
List your video devices via the command:
Check which video device from the exploreHD USB Camera supports MJPG and YUYV
formats (In our case it was /dev/video0) with the following command:
To get more information about supported resolutions and fps, you can also run:
In our case the video device /dev/video0 is the one that supports MJPG and YUY2 so we will
be using that in the gstreamer commands that follow below.
MJPG Command
YUY2 Command
**NOTE: the width and height on the gstreamer commands can be changed as long as our camera
supports the resolution
v4l2-ctl --list-devices
v4l2-ctl -d /dev/video0 --list-formats
v4l2-ctl -d /dev/video0 --list-formats-ext
gst-launch-1.0 -v v4l2src device=/dev/video0 ! image/jpeg,width=1920,height=1080 ! jpegdec ! xvimagesink
gst-launch-1.0 -v v4l2src device=/dev/video0 ! video/x-raw,width=640,height=480 ! videoconvert ! autovideosink
Streaming Via Linux
DeepWater Exploration 8exploredeepwater.com
HDcam
We recommend using a low resolution like 640 by 480 to test if the camera works on the raspberry pi
*The IP 127.0.0.1 is used if you are testing to send and receive on the same device. Change it to the IP of
the device that will be receiving it if you want to stream from one device to another.
*Note that the port number does not have 5000, it can be whatever works for you
For Testing the Camera on a Pi
Setting up Controls
Testing Streaming Camera (use two different terminal tabs/windows)
To Send the Stream (same on Raspberry Pi):
To Receive the Stream (run this command first):
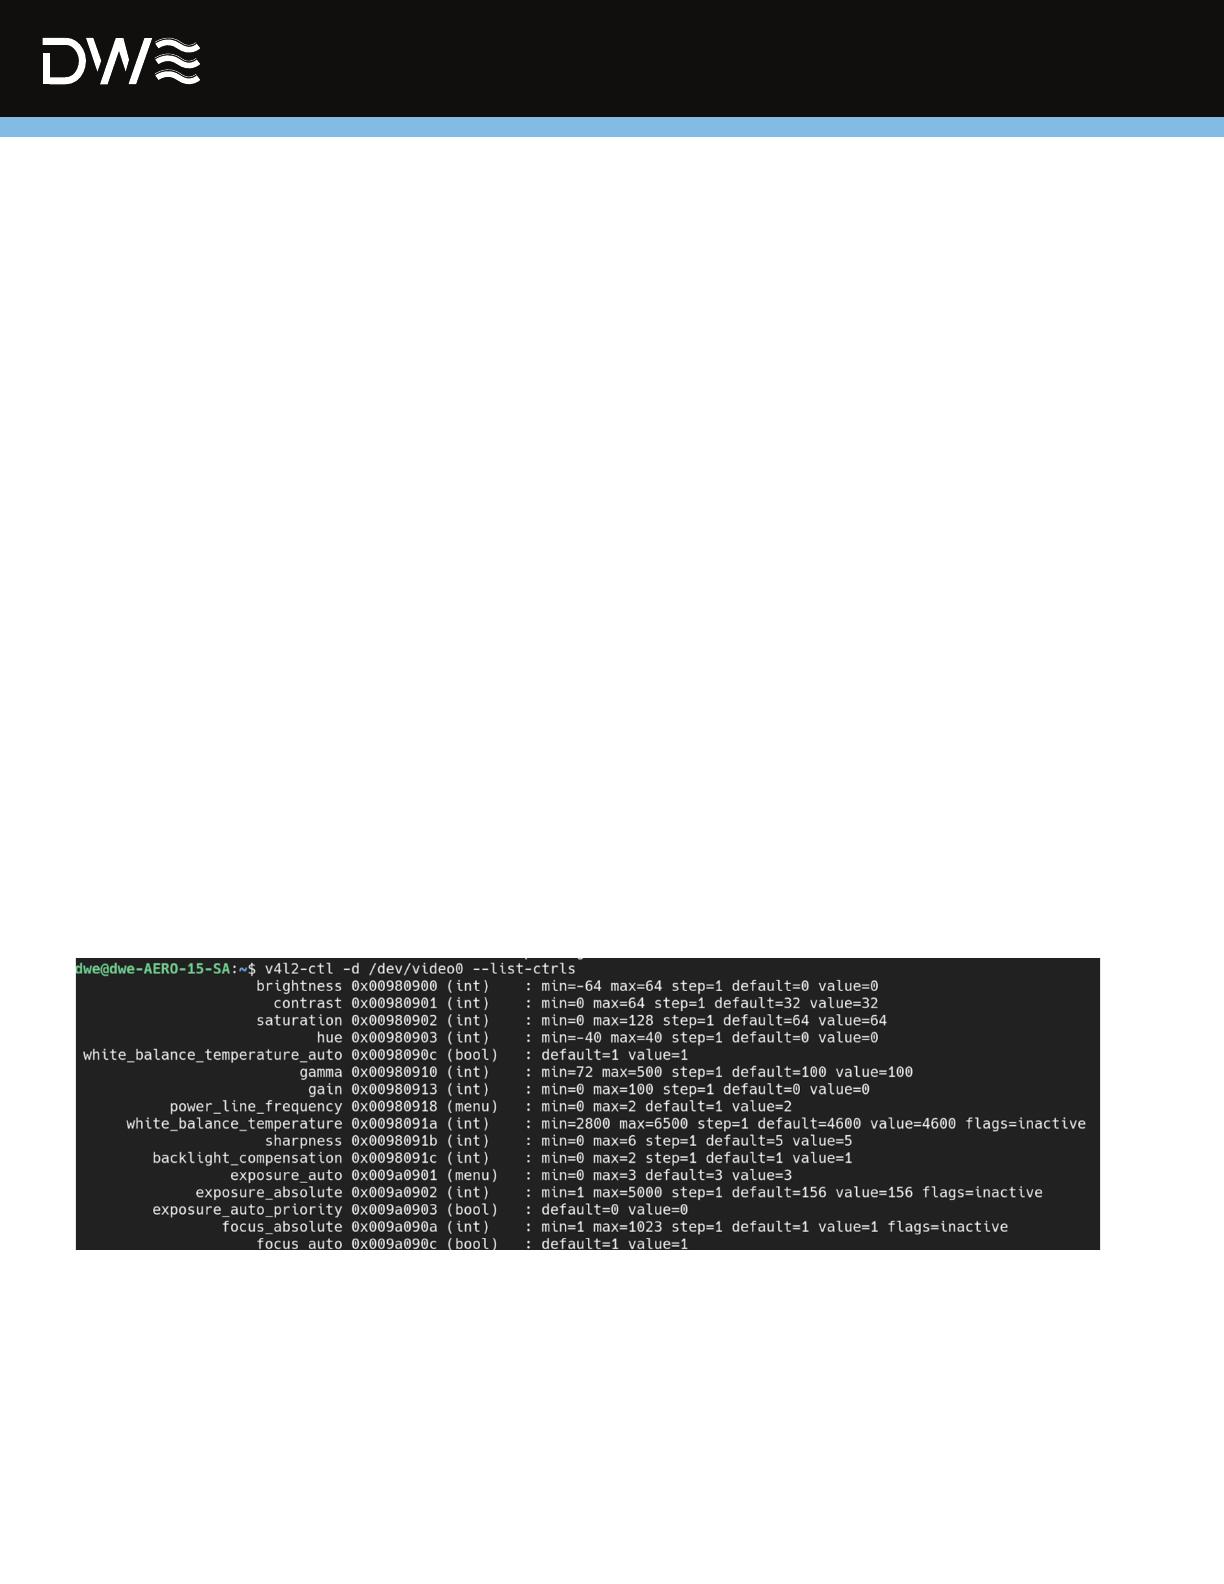
To list the controls of the video device
Refer to the link below for more information on Gstreamer, Setting Bit rate, and OpenCV:
[1] https://github.com/DeepwaterExploration/ExploreHD
[2] https://github.com/DeepwaterExploration/ExploreHD_experimental
Example Commands to set some Controls
For Raspberry Pi:
gst-launch-1.0 -v v4l2src device=/dev/video0 ! image/jpeg,width=1920,height=1080 ! jpegdec ! xvimagesink
gst-launch-1.0 -v v4l2src device=/dev/video0 ! image/jpeg,width=640,height=480 ! jpegdec ! videoconvert ! ximagesink
gst-launch-1.0 -v v4l2src device=/dev/video0 ! video/x-raw,width=640,height=480 ! videoconvert ! ximagesink
gst-launch-1.0 -v v4l2src device=/dev/video0 ! image/jpeg,width=1920,height=1080 ! rtpjpegpay ! udpsink
host=127.0.0.1 port=5000
gst-launch-1.0 -v udpsrc port=5000 ! application/x-rtp, media=video, clock-rate=90000, encoding-name=
JPEG, payload=26 ! rtpjpegdepay ! jpegdec ! xvimagesink sync=0
gst-launch-1.0 -v udpsrc port=5000 ! application/x-rtp, media=video, clock-rate=90000, encoding-name=
JPEG, payload=26 ! rtpjpegdepay ! jpegdec ! videoconvert ! ximagesink sync=0
v4l2-ctl -d /dev/video0 --set-ctrl brightness=30
v4l2-ctl -d /dev/video0 --set-ctrl contrast=32
v4l2-ctl -d /dev/video0 --set-ctrl saturation=32
v4l2-ctl -d /dev/video0 --list-ctrls
gst-launch-1.0 -v v4l2src device=/dev/video0 ! video/x-raw,width=640,height=480 ! videoconvert ! autovideosink
Streaming Via Linux
DeepWater Exploration 9exploredeepwater.com
HDcam
Multi-cam Connection Diagram
DeepWater Exploration
Raspberry Pi 4 is recommended for best performance
Compatible with
USB 2.0 Ports
Stream HD over Ethernet
10 exploredeepwater.com
Testing Streaming Camera (use two different terminal tabs/windows)
For guidance on how to program this multi-cam connection setup, visit:
https://github.com/DeepwaterExploration/ExploreHD
HDcam
Camera Technical Drawing
DeepWater Exploration 11 exploredeepwater.com
ALL DIMENSIONS ARE IN MILLIMETERS (ANGLES IN DEGREES)
2.1
2.1
34
25.6
2.1
4.5
2X Ø3.4
Ø34.0
9
Ø14.3
2.75
9
3.13
5.8
1.6
HDcam
Mount Technical Drawing
DeepWater Exploration 12 exploredeepwater.com
3
312
2X Ø7.0
2X Ø3.4
3
40
20
77
15
5.8 3.4
7.5
HDcam
ALL DIMENSIONS ARE IN MILLIMETERS (ANGLES IN DEGREES)
DEEPWATER EXPLORATION’S PRODUCTS ARE NOT AUTHORIZED FOR USE AS CRITICAL
APPLICATIONS IN LIFE SUPPORT DEVICES OR CRITICAL SYSTEMS.
Critical Systems include, without limitation, life support devices and systems, equipment or sys-
tems for the operation of nuclear facilities and weapons systems.
Information provided in this document is believed to be accurate and reliable. However, no respon-
sibility is assumed by DeepWater Exploration for any inaccuracies in this publication. DeepWater
Exploration reserves the right to make changes to any products, specifications, and product
descriptions at any time without notice. Testing and other quality controls are used to the extent
DeepWater Exploration deems necessary to support DeepWater Exploration’s product warranty.
Except where mandated by government requirements, testing of all parameters of each product is
not necessarily performed.
Specifications are subject to change without notice.
Technical/General Support
Sales & Marketing
© 2021 DeepWater Exploration, Incorporated
Important Disclaimers
DeepWater Exploration 13 exploredeepwater.com
HDcam
  • Page 1 1
  • Page 2 2
  • Page 3 3
  • Page 4 4
  • Page 5 5
  • Page 6 6
  • Page 7 7
  • Page 8 8
  • Page 9 9
  • Page 10 10
  • Page 11 11
  • Page 12 12
  • Page 13 13

DW 072321 User manual

Type
User manual

DW 072321: Unleash Your Vision with Superior Image Quality and Versatile Applications

Experience exceptional image quality with the DW 072321 camera, featuring a 1920x1080 resolution and a wide 100-degree diagonal view. Designed for above-water use, this camera excels in computer vision applications due to its smooth frame rate and low distortion. Connect it seamlessly to your computer via USB 2.0 and capture stunning images and videos with ease.

Ask a question and I''ll find the answer in the document

Finding information in a document is now easier with AI