Page is loading ...

READ AND SAVE THESE INSTRUCTIONS
SF-1536BK
36 inch Tower Fan

Read Completely for Safe Operation and Operating Instructions Before Using.
CAUTION
IMPORTANT SATETY INSTRUCTIONS
1. Do not leave the fan running unattended.
2. Keep electrical appliances out of reach from Children or infirm persons. Do not
let them use the appliances without supervision.
3.This appliance has a polarized plug (one blade is wider than the other). To
reduce the risk of electric shock, this plug is intended to fit in a polarized outlet
only one way. If the plug does not fit fully in the outlet, reverse the plug. If it
still does not fit, contact a qualified electrician. Do not attempt to bypass this
safety feature.
4. If the power cord is damaged, it must be replaced by manufacturer or its
Service agent or a similarly qualified person in order to avoid a hazard.
5. This appliance is not intended for use by persons (including children) with
reduced physical, sensory or mental capabilities, or lack of experience and
knowledge, unless they have been given supervision or instruction concerning
use of the appliance by a person responsible for their safety. Young children
should be supervised to ensure that they do not play with the appliance.
6. Do not attempt to disassemble the appliance! The rotor blade guard shall not
be taken off.
- Prior to cleaning, unplug the fan from the outlet.
- The rotor guard shall not be dissembled/opened to clean the rotor blades.
- If necessary, use a vacuum or compressor air to remove large dust particles
- Wipe the fan enclosure and rotor blade guard with a slightly damp cloth.
- Do not spray water or any other cleaner directly onto the unit.
7. WARNING—To reduce the risk of fire or electric shock, Do not use this fan
with any solid-state speed control device.
8. This product employs overload protection (fuse). A blown fuse indicates an
overload or short-circuit situation. If the fuse blows, unplug the product from
the outlet. Replace the fuse as per the user servicing instructions (follow
product marking for proper fuse rating) and check the product. If the
replacement fuse blows, a short-circuit may be present and the product should
be discarded or returned to an authorized service facility for examination
and/or repair.

1
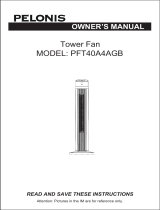
PART FIGURE
Note: All the pictures in this manual are for explanation purpose only. Any discrepancy between
the real object and the illustration in the drawing shall be subject to the real subject.
1. Body
2. Rear base
3. Front base
4. Plastic nut
5. Power cord
1
3
4
2
5

2
I. Remote Controller (Fig.4)
a. KEY INSTRUCTION
1. “ ” ON/OFF KEY
The “ON” key is for switching on the fan .The fan will be
started at breeze step.
Press the “OFF” key if the fan needs to switch off.
2. “ ” SPEED KEY
When the fan started, press this key repeated, the fan will
work with “1-2-3” circulatory.
3. “ ” MODE KEY
Press this key to select mode. The sequence is normal, natural, and sleep when this
key being touched repeatedly or continuously. The light indicate mode state.
4. “ ” OSC/LOUVER KEY
After the fan has started, press this key to select oscillation mode. The lights on the
display can indicate fan oscillation mode.
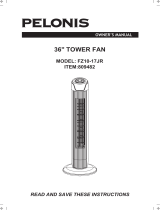
ASSEMBLY INSTRUCTIONS
Fig.4
OPERATION INSTRUCTION
The outlet through
Fig.1
Fig.2 Fig.3
1. Take out the fan body and the spare parts from the box. Put the front base onto
rear base and join them together. (See Fig. 1)
2. Unlock the plastic nut from the fan body.
3. Pass the power cord through the flute, then insert the fan body into the base.
(See Fig. 3)
4. Fix the fan body on the base with the plastic nut. (See Fig. 2)

5. “ ” TIMING KEY
Press this timer key repeatedly to set the time for air delivery. Increase in
increments up to "1-2-3-4-5-6-7" hours.
b. BATTERIES
(battery not included in the packaging)
(1) Slide the battery compartment Cover.
(2) Insert the batteries, and make sure that the
batteries are placed as shown in the Fig.5.
(3) Slide back the battery cover.
NOTES: Use manganese or alkaline batteries of
type "AAA". Do not use rechargeable batteries.
c. BATTERY WARNING AS BELOW
1. “Do not dispose of batteries in fire, batteries may
explode or leak.”
2. -Do not mix old and new batteries.
3. -Do not mix alkaline, standard (carbon-zinc) or
rechargeable (nickel-cadmium) batteries.
d. REMOTE CONTROLLER OPERATION
Point the remote controller at the receptor on body of the fan and press the desired
button. The remote controller will work at distances of up to roughly five meters and
the angle of 30 degree included between right and left from the receptor.
The batteries must be removed from the remote controller before it is scrapped and
that they are disposed of safely.
e. OVERHEAT PROTECTION OF THE MOTOR
The windings of the motor have a thermal-fuse that burns out and the fan switches
off and temperature of the motor is no longer going up so that plastic parts of the fan
don’t subject to deformation so far so to be burned by the overheat if the motor is
overheat for any unexpected reason.
II. Buttons on fan body / Panel indication (Fig.6)
The buttons on the body such as ON/OFF,SPEED, MODE,
TIMER, OSCILLATION have the same functions as those
of the corresponding keys on the remote controller.
3
Fig.6
Fig.5
AAA Battery, 1.5vAAA Battery, 1.5v

CLEANING
1. Be sure to unplug from the electrical supply source before cleaning.
2. Plastic parts should be cleaned with mild soap and a damp cloth or sponge.
Thoroughly to remove soap film with clean water.
3. Be sure not to make water or other liquid enter inside of motor.
a) Grasp plug and remove from the receptacle or
other outlet device. Do not unplug by pulling
on cord.
b) Open fuse cover. Slide open fuse access
cover on top of attachment plug towards blades.
c) Remove fuse carefully. Insert the tip of your tool
into fuse slot (close with the terminal), then prize
the fuse gradually and slowly, but not overexert. If you feel tight, you can try it at
several times and prize the fuse little by little. When one side of the fuse has
been prized, then you can get the fuse out entirely.
d) Risk of fire. Replace fuse only with 2.5 Amp, 125 Volt fuse.
e) Close fuse cover. Slide closed the fuse access cover on top of attachment plug.
f) Risk of fire. Do not replace attachment plug. Contains a safety device (fuse) that
should not be removed. Discard product if the attachment plug is damaged.
Notice:
1. When you replace the fuse, please don’t operate suddenly or overexert, or else
the product will be damage or cause accident.
2. When you feel it hard to be operated, please make sure you have got the right
way.
USER SERVICING INSTRUCTIONS
4

5
/