Page is loading ...


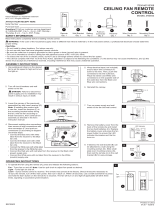
Black (hot/power)
Push-in Connector
Wire Connector
White (neutral)
Bare/Green
(ground)
White
White
Black
Blue
Blue
Black
Green
Green
Receiver
Black
White
1. Use existing pull chains on the desired
fan to set fan speed to HIGH and to turn
the light ON.
2. Turn o circuit breakers and wall
switch to the fan. DANGER: Failure
to disconnect power supply prior to
installation may result in serious injury
or death.
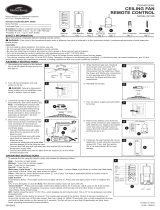
3. Lower the canopy of the previously
assembled fan and insert receiver into
the mounting bracket with antenna end
rst and the at side facing the ceiling.
Note: If installing this product with
a new fan, insert the receiver in the
mounting bracket before wiring the
fan; wire the fan according to these
instructions, then continue fan assembly
as directed in the fan’s instruction
manual.
UNIVERSAL
WALL REMOTE
Model #42465, 51658
4. Disconnect existing wire connections
(if applicable), then secure all wire
connections with wire connectors
according to diagram and these steps:
• Connect the Green wires from the
downrod and the mounting bracket to
the Bare/Green (ground) supply wire.
• Connect the Blue wire (FOR LIGHT) from
the receiver to the Blue fan wire.
• Connect the Black wire (TO MOTOR L)
from the receiver to the Black fan wire.
• Connect the White wire (TO MOTOR N)
from the receiver to the White fan wire.
• Push the Black (Hot/Power) supply wire
into the empty wire hole in push-in wire
connector preassembled to the Black
wire (AC IN L).
• Push the White (neutral) supply wire
into the empty wire hole in push-in wire
connector preassembled to the White
wire (AC IN N).
Fan Pull
Chain
Light Pull
Chain
Canopy
Receiver
Wall
Bracket
Mounting
Screw
5. Wrap electrical tape (not included)
around each wire connector down to
the wire. Then, push wire connections
into the outlet box. Place the White wire
connections on the opposite side of the
outlet box from the Black and Blue wire
connections.
6. Reinstall the canopy.
7. Turn on power supply and wall switch
to the fan.
8. Remove the battery door from the
back of the remote using a at-head
screwdriver (not included). Insert the
two CR2032 batteries into the remote;
ensure the positive pole of the batteries
face up (as pictured) and then replace
the battery door. Press the HIGH SPEED
button to ensure the LED indicator
illuminates and the fan turns on.
9. If desired, the wall bracket can be
attached to a wall using the mounting
screws.
Questions? Call our customer service department at
1-877-706-3267, 8 a.m. - 5 p.m. Central Time, Monday - Friday.
Remote
Qty. 1
Wall Bracket
Qty. 1
Battery
Qty. 2
Receiver
Qty. 1
Push-in
Connector
Qty. 2
Wire Connector
Qty. 3
Mounting Screw
Qty. 2
Owner’s Manual
Qty. 1
Read instructions completely before installing the remote.
WARNING: If the color of the household supply wires is different than what is referred to in the instructions below, a professional electrician should determine proper wiring.
CAUTION:
• Do not install in damp locations. For indoor use only.
• Do not use with fans that have integrated remote controls.
• Do not use with hugger-style fans.
• Be sure the outlet box is properly grounded or that a green or bare (ground) wire is present.
• This unit is intended to control a ceiling fan with electrical source of AC 110/120V, 60Hz.
• To reduce the risk of re or electric shock, do NOT use a full-range dimmer switch to control the fan speed.
• CAN ICES-005 (B)/NMB-005 (B)
• This device complies with Industry Canada license-exempt RSS standard(s). Operation is subject to the following two conditions: (1) this device may not cause interference, and (2) this
device must accept any interference, including interference that may cause undesired operation of the device.
• This device complies with Part 15 of the FCC Rules. Operation is subject to the following two conditions: (1) this device may not cause interference, and (2) this device must accept any
interference received, including interference that may cause undesired operation. FCC ID: 2AQZU-18007.
This equipment has been tested and found to comply with the limits for a Class B digital device, pursuant to Part 15 of the FCC Rules. These limits are designed to provide reasonable
protection against harmful interference in a residential installation. This equipment generates, uses and can radiate radio frequency energy and, if not installed and used in accordance
with the instructions, may cause harmful interference to radio communications. However, there is no guarantee that interference will not occur in a particular installation. If this equipment
does cause harmful interference to radio or television reception, which can be determined by turning the equipment o and on, the user is encouraged to try to correct the interference by
one or more of the following measures:
--Reorient or relocate the receiving antenna.
--Increase the separation between the equipment and receiver.
--Connect the equipment into an outlet on a circuit dierent from that to which the receiver is connected.
--Consult the dealer or an experienced radio/TV technician for help. Any changes or modications not expressly approved by the grantee of this device could void the user’s authority to
operate the equipment.
HKC-US, 3350 Players Club Pkwy. #225, Memphis, TN 38125, 1 (877) 706-3267
Owner’s
Manual
SAFETY INSTRUCTIONS
ASSEMBLY INSTRUCTIONS
15
26
37
4
8
9
Canopy
Note: There is an adhesive sticker
on one of the antennas connected to
the receiver. For best results, stick the
antenna to the ceiling or use wood
screw (not included).

9692 • 061821 Printed in China
OPERATING INSTRUCTIONS
TROUBLESHOOTING
1-YEAR LIMITED WARRANTY
If you have diculty operating your remote, or have diculty with installation, please contact Customer Service : 1-877-706-3267, 8 a.m. - 5 p.m. Central Time.
WARNING: Ensure the power is turned o to the fan/remote before performing any maintenance.
LED indicator on the remote illuminates, but the remote won’t control the fan. The remote may need to be re-synced.
The remote is synced to the receiver at the factory. Occasionally, power surges can cause the remote to become un-synced. Whenever necessary, follow the syncing instructions
below.
SYNCING INSTRUCTIONS: Switch the power to the fan o and back on again. Within 30 seconds, press and hold the HIGH SPEED and LOW SPEED buttons (or the “LEARN” button,
located in the battery compartment) for 5 seconds. Fan will turn on at low speed and light o. This conrms the syncing process is successful.
Power surge may have cleared memory and remote and re-syncing did not resolve the issue.
FACTORY RESET OF REMOTE: Turn the power to the fan o for 3 seconds, then turn the power back on for 3 seconds. Repeat this 5 times. The light will blink to conrm the reset was
successful.
The LED indicator on the remote does not illuminate.
The batteries most likely needs to be replaced or are not oriented correctly in the battery compartment. If batteries are depleted rapidly, ensure one of buttons is not stuck in the
down position.
The LED indicator stays on.
Ensure one of buttons is not stuck in the down position.
Remote controls more than one fan.
Turn o the power to the fans you don’t want synced. Follow the syncing instructions listed above. Then, turn on the power to the other fans.
Dimming feature does not function.
Ensure the bulbs are incandescent or other dimmable bulbs.
Fan will not run at high speed. If your fan has manual pull chains to operate the fan speed, be sure the pull chain is manually set to HIGH SPEED. If your pull chain is set to LOW
or MEDIUM SPEED, the remote will not override the manual pull chain setting.
Light will not turn on. If your fan has manual pull chains, be sure the light pull chain is set to ON. The remote will not override the manual pull chain setting.
To obtain service, please contact Customer Service: 1-877-706-3267, 8 a.m. - 5 p.m. Central Time, Monday - Friday.
The manufacturer warrants all of its lighting xtures against defects in materials and workmanship for one (1) year from the date of purchase. If within this period the product
is found to be defective, take a copy of the bill of sale as a proof of purchase and the product in its original carton to the place of purchase. The manufacturer will, at its option,
repair, replace or refund the purchase price to the consumer. All costs of installation and removal of the xture is the responsibility of the consumer. This warranty does not cover
xtures becoming defective due to misuse, accidental damage or improper handling and/or installation and specically excludes liability for direct, incidental or consequential
damages. As some states do not allow exclusions of limitations on an implied warranty, the above exclusion and limitation may not apply. This warranty gives you specic rights
and you may also have other rights which may vary from state to state.
Front Back
LED Indicator
High Speed
Medium Speed
Low Speed
Fan O
Light On/O
Light Delay
LEARN Button
Variable Breeze
Home Shield™
1. To operate the fan using the remote, make sure fan pull chain is
on high and light is turned on. Then press and release the following
buttons:
Fan O - Turns the power to fan o.
Light On/O - Turns the light on and o. Press and hold to dim or
brighten lights (for dimmable bulbs only).
High Speed - Turns on fan at high speed.
Light Delay - Light stays on for 60 seconds to allow for safe exit from
room. Note: Tap Light Delay once to activate. Fan light blinks once to
conrm Light Delay is active. Press any button to cancel.
Medium Speed - Turns on fan at medium speed.
Variable Breeze - Simulates a breeze in nature. Press and hold button
to activate. Press any fan speed button to cancel.
Low Speed - Turns on fan at low speed.
Home Shield™ - Simulates occupancy while away from home. Fan
remains o and the light randomly turns on for a minimum of ve
times and a maximum of 20 minutes. The light remains o for 60
minutes between events. Press and hold button to activate. Light
will blink twice to conrm Home Sheild is active. Press any button to
cancel.
LED indicator should illuminate when any remote button is pressed.
If not, replace the DC3V, CR2032 batteries.
LEARN button - Syncs remote to receiver (see TROUBLESHOOTING
for instructions). Note: To access LEARN button, remove battery door
from back of the remote using a at-head screwdriver.
2. To control the fan via WiFi remote, download the Fansio® app to
your smartphone. Load the app and follow the in-app instructions to
sync with the remote. You will need your personal WiFi network name
and password.
Note: The remote receiver is compatible with 2.4 gHz only and will not
work with 5.0 gHz routers.
1
2
/