Page is loading ...

PoolManager
User Manual
for the Measuring, Control, and Dosing System for Swimming Pools
PoolManager
®
Version 2.5
for the Measuring, Control, and Dosing System for Swimming Pools
PoolManager
®
Chlorine
PoolManager
®
Bromine
PoolManager
®
Oxygen
PoolManager
®
PRO
GB
for the Measuring, Control, and Dosing System for Swimming Pools
Chlorine
Bromine
Oxygen
PRO


Content
Content
Part A: Overview .............................................................................. 7
1
Identification of safety information ..................................... 7
1.1
Safety information ................................................................ 7
1.2
Miscellaneous markings ....................................................... 7
2
General safety information................................................... 7
3
New Functions ....................................................................... 8
4
User qualification .................................................................. 8
5
Term definitions .................................................................... 9
6
Standard access codes ........................................................ 9
7
Overview ................................................................................ 9
7.1
PoolManager
®
...................................................................... 9
7.2
PoolManager
®
maintenance programs ................................ 9
7.3
Overview of features .......................................................... 10
7.3.1
Display and operation 10
7.3.2
Measuring and control 10
7.3.3
Safety functions 10
7.3.4
Add-on functions 11
7.3.5
Remote access from the local network or the Internet 11
7.3.6
Interfaces 12
Part B: Function description ........................................................ 13
8
Remote access .................................................................... 13
8.1
Prerequisites ...................................................................... 13
8.2
Remote access to the local network .................................. 13
8.2.1
Step by step 13
8.3
Remote access from the Internet ....................................... 13
8.3.1
Step by step 13
8.4
User login in remote access............................................... 13
8.5
Quick info ........................................................................... 13
8.5.1
Calling up quick info 14
9
Display and operation - Graphical user interface ............ 14
9.1
Important menus ................................................................ 14
9.1.1
Home view 14
9.1.2
Main menu (icon menu) 15
9.1.3
Add-on functions menu (icon menu) 16
9.1.4 16
9.1.5
Mode menu 17
9.2
Further menus (standard menus) ...................................... 17
9.2.1
Basic concepts 17
9.2.2
Numerical parameters 17
9.2.3
Selection parameters 18
9.2.4
Text parameter 19
9.2.5
Time parameters 19
9.2.6
Date parameter 20
9.2.7
Access code 20
9.2.8
Network (IP) addresses 21
9.2.9
Messages 21
9.2.10
Menu functions 22
9.2.11
Menu sequences 22
9.3
Help .................................................................................... 22
9.4
Informational text ................................................................ 23
9.5
Individualisation .................................................................. 23
9.5.1
Menu style 23
9.5.2
Background image 24
9.5.3
Icon style 24
10
Measurement graph ............................................................. 24
10.1
Overview ............................................................................. 24
10.2
Notes on measurement graph: ........................................... 25
10.3
Configuration ...................................................................... 26
10.4
Measurement graph export ................................................ 26
11
Water maintenance .............................................................. 26
11.1
pH value .............................................................................. 26
11.2
Disinfection ......................................................................... 27
11.2.1
PoolManager
®
PRO 27
11.2.2
Redox value (Disinfection with chlorine or bromine) 27
11.2.3
Correlation pH value and disinfection 27
11.2.4
Active oxygen (Bayrosoft
®
) 28
12
Measurement, control, dosing (pH value, redox value,
chlorine / bromine) .............................................................. 28
12.1
Function .............................................................................. 28
12.2
Dosing rate ......................................................................... 28
12.3
Show in home view ............................................................. 29
12.4
Configuration parameters ................................................... 29
12.4.1
Setpoint 29
12.4.2
Lower alarm threshold 29
12.4.3
Upper alarm threshold 29
12.4.4
Proportional range 29
12.4.5
Minimum dosing rate 30
12.4.6
Intelligent dosing monitoring 31
12.4.7
Deadzone 31
12.4.8
Dosing cycle 31
12.4.9
Dosing direction 31
12.4.10
Recommended settings (PoolManager
®
Cl / Br / O2) 32
12.4.11
Recommended settings (PoolManager
®
PRO) 32
12.5
Configuration Wizard .......................................................... 32
12.5.1
Basics 32
12.5.2
Configuration Wizard 33
13
Calibration (basic measurement adjustment) ................... 33
13.1
When is calibration necessary? .......................................... 33

Content
13.2
Calibration pH .................................................................... 33
13.2.1
Calibration procedure 33
13.2.2
Calibration errors 34
13.3
Calibration chlorine (Cl) / bromine (Br)) ............................. 35
13.3.1
Calibration procedure 35
13.3.2
Calibration errors 35
13.4
Calibration redox (mV) ....................................................... 36
13.4.1
Calibration procedure 36
13.4.2
Calibration errors 36
13.5
Determining the redox (mV) setpoint ................................. 36
13.5.1
Step by step 37
14
Automatic dosing O2 (Bayrosoft
®
) .................................... 37
14.1
Basic concept ..................................................................... 37
14.1.1
Main dosing 37
14.1.2
Refresh dosing 37
14.1.3
Progression of effective Bayrosoft
®
concentration 38
14.2
Show in Home view ........................................................... 39
14.3
Main Menu O2 (Bayrosoft
®
) ............................................... 39
14.4
Configuration O2 (Bayrosoft
®
) ........................................... 39
14.5
Additional dosings .............................................................. 40
15
Temperature measurement ................................................ 40
15.1
Overview ............................................................................ 40
15.2
Measuring water temperature ............................................ 40
15.3
Measured temperatures ..................................................... 40
15.4
Sensor types ...................................................................... 40
15.5
Show in the home view ...................................................... 41
15.6
Configuration temperature ................................................. 41
15.7
Calibration .......................................................................... 41
16
Manual dosing ..................................................................... 41
16.1
Overview ............................................................................ 41
16.2
Menu manual dosing .......................................................... 41
16.3
Blocking via alarms ............................................................ 42
16.4
Special case, shock chlorination ........................................ 42
16.5
Special case, pump test (pH / Cl / Br / mV / O2) ............... 42
17
Safety functions and alarms .............................................. 43
17.1
Overview ............................................................................ 43
17.2
Flow monitoring .................................................................. 43
17.2.1
Input terminal blocks for flow monitoring 43
17.2.2
Automatic / manual acknowledgement 43
17.3
Start delay .......................................................................... 44
17.4
Alarm signalisation ............................................................. 44
17.4.1
Alarm display in the Home view 44
17.5
Blocking of dosing via alarms ............................................ 44
17.6
Table overview ................................................................... 45
17.7
Alarm settings .................................................................... 45
17.7.1
Acoustic alarms 45
17.7.2
Flow alarm settings 45
17.7.3
Level alarm settings 45
17.7.4
Use alarm relay 45
17.8
Alarm relay .......................................................................... 45
17.8.1
Electrical connection 45
18
Service messages ................................................................ 46
18.1
Signalising due Service Messages ..................................... 47
18.2
Re-scheduling service messages ....................................... 47
19
Eventlog ................................................................................ 47
19.1
Events ................................................................................. 47
19.2
Information displayed ......................................................... 47
19.2.1
Event display 47
19.2.2
Example, O2 (Bayrosoft
®
) dosing 48
20
Controller settings ............................................................... 48
20.1
Date & Time ........................................................................ 48
21
Service functions ................................................................. 49
21.1
Management of system configurations ............................... 49
22
User management ................................................................ 49
22.1
Menu User Management .................................................... 49
22.2
Users .................................................................................. 50
22.2.1
Standard users 50
22.2.2
Individual users 50
22.3
Overview of user rights ....................................................... 51
22.4
Enable remote access for various functions ....................... 51
22.5
Adjust user levels for various functions .............................. 51
22.6
User login with access code ............................................... 52
22.6.1
User selection 52
23
Communication & Interfaces .............................................. 53
23.1
Data import and export ....................................................... 53
23.2
E-mail functions .................................................................. 54
24
Add-on functions ................................................................. 54
25
Universal switch outputs (4x) ............................................. 54
25.1
Safety information ............................................................... 54
25.2
Overview ............................................................................. 54
25.3
Configuration menu ............................................................ 55
25.3.1
Programmable timer 55
25.3.2
Basic configuration 55
25.3.3
Safety settings 56
25.4
Electrical connection ........................................................... 56
25.4.1
Connection options 57
25.4.2
Lifespan of relay switching contacts 58
26
Filter pump control .............................................................. 58
26.1
Safety information ............................................................... 58
26.2
Overview ............................................................................. 58
26.3
Menu Filter pump ................................................................ 59
26.3.1
Programmable timer 59
26.3.2
Basic configuration 59
26.3.3
Safety settings 60

Content
26.4
Electrical connection .......................................................... 61
27
Flockmatic pump ................................................................. 61
27.1
Safety information .............................................................. 61
27.2
Overview ............................................................................ 61
27.3
Menu Flockmatic pump ...................................................... 61
27.3.1
Programmable timer 62
27.3.2
Basic configuration 62
27.4
Electrical connection .......................................................... 62
28
Heating ................................................................................. 62
28.1
Overview ............................................................................ 62
28.2
Temperature measurement ............................................... 62
28.3
Function ............................................................................. 63
28.4
Show in home view ............................................................ 63
28.5
Menu Heating ..................................................................... 63
28.5.1
Basic configuration 63
28.5.2
Safety settings 64
28.6
Electrical connection .......................................................... 64
29
Solar heating ....................................................................... 64
29.1
Overview ............................................................................ 64
29.2
Temperature measurement ............................................... 64
29.3
Function ............................................................................. 64
29.4
Show in home view ............................................................ 64
29.5
Menu Solar heating ............................................................ 65
29.5.1
Basic configuration 65
29.5.2
Safety settings 65
29.6
Electrical connection .......................................................... 65
30
Salt electrolysis ................................................................... 65
30.1
Menu Salt electrolysis ........................................................ 66
30.1.1
Basic configuration 66
30.2
Electrical connection .......................................................... 66
31
Eco mode (energy saving mode) ....................................... 67
31.1
Menu Eco mode ................................................................. 67
31.1.1
Programmable timer 67
31.1.2
Basic configuration 67
31.1.3
Safety settings 68
31.2
Electrical connection .......................................................... 68
32
Universal switch inputs IN 1 ... IN 4 ................................... 68
33
Hardware resources (inputs and outputs) ........................ 69
Part C: Installation, start-up, maintenance ................................. 70
34
Safety information for performing installation, start-up, and
maintenance work ............................................................... 70
35
Wall mounting ..................................................................... 70
35.1
Selecting the installation location ....................................... 70
35.2
Installation .......................................................................... 70
36
Electrical connection .......................................................... 70
36.1
Measurement grounding .................................................... 70
36.2
Blocking via the circulation pump ...................................... 70
37
Installation into the circulation system ............................. 71
37.1
PoolManager
®
Chlorine installation diagram ...................... 71
37.2
PoolManager
®
Oxygen installation diagram ....................... 71
37.3
PoolManager
®
Bromine installation diagram ...................... 71
37.4
PoolManager
®
PRO installation diagram ............................ 71
37.5
PoolManager
®
installation .................................................. 71
37.5.1
Connection with the circulation system 72
37.5.2
Measurement system 72
38
Maintenance ......................................................................... 73
38.1
Monthly maintenance ......................................................... 73
38.2
Quarterly maintenance ....................................................... 73
38.3
Annual maintenance ........................................................... 73
38.4
Cleaning .............................................................................. 73
38.5
Dosing pump hose replacement ......................................... 73
39
Winter breaks ....................................................................... 74
40
Decommissioning ................................................................ 74
41
Commissioning .................................................................... 75
42
Dosing pumps ...................................................................... 76
42.1
Peristaltic pumps ................................................................ 76
42.1.1
Electrical connection 76
42.1.2
Configuration 77
42.2
Membrane dosing pumps ................................................... 77
42.2.1
Suitable membrane dosing pumps 77
42.2.2
Electrical connection 77
42.2.3
Configuration 78
43
Changing the care method ................................................. 78
44
Software update ................................................................... 78
44.1
Step by step ........................................................................ 78
45
Network connection ............................................................ 79
45.1
Step by step ........................................................................ 79
45.2
Options ............................................................................... 80
45.2.1
Wireless network (WLAN / WiFi) 80
45.2.2
PowerLAN (dLAN) 81
46
Remote access to the local network .................................. 81
46.1
Overview ............................................................................. 81
46.2
Local network (IP) address ................................................. 81
46.3
Menu Network (IP) configuration ........................................ 82
47
Remote access from the Internet ....................................... 82
47.1
Dynamic IP address resolution ........................................... 83
47.2
Step by step ........................................................................ 83
47.2.1
DynDNS account set-up 83
47.2.2
DynDNS configuration on a network router 83
47.2.3
Port forwarding on the network router 84
47.3
Prerequisites and potential problems ................................. 84
47.4
Multiple PoolManagers
®
on one network ............................ 84
48
Security for remote access ................................................. 84
49
Hardware description .......................................................... 85

Content
49.1
System printed circuit board .............................................. 85
49.2
CPU printed circuit board ................................................... 85
49.3
Connection terminals with spring contacts ........................ 85
49.3.1
Technical information 85
49.4
Electrical connections ........................................................ 86
49.4.1
External connections 86
49.4.2
Connection terminals 87
49.5
Power supply 230V~ .......................................................... 88
49.6
Standard wiring (Without add-on functions) ....................... 88
49.6.1
Connecting a temperature sensor 88
49.6.2
Connecting the flow switch 89
49.6.3
Connection of chlorine measuring cell 89
50
Service measures on the unit ............................................ 89
50.1
Opening the casing ............................................................ 89
50.2
Opening the terminal box ................................................... 89
50.3
Fuses ................................................................................. 90
50.3.1
Fuse replacement 90
50.4
Replacing a relay ............................................................... 90
50.5
Replacing the buffer battery ............................................... 90
50.6
Replacing the configuration module .................................. 91
51
Installation of optional supplemental modules ................ 91
51.1
4x power outputs 4...20mA: PM5-SA4 CONVERTER 4-20MA
(Art. no. 127011) ................................................................ 91
52
Troubleshooting .................................................................. 91
53
Technical data ..................................................................... 93
54
EC Declaration of Conformity ............................................ 94

1 Identification of safety information
7
Part A: Overview
1 Identification of safety information
1.1 Safety information
HAZARD!
Hazard identification
Hazard description
Description of (potential) consequences
Measure to be undertaken in order to avoid this hazard.
HAZARD DUE TO VOLTAGE!
Hazard identification
Hazard description
Description of (potential) consequences
Measure to be undertaken in order to avoid this hazard.
Required user qualification:
USER QUALIFICATION (description)
Explanatory text...
1.2 Miscellaneous markings
IMPORTANT NOTICE!
Brief description
Informational text...
INFO
Brief description
Information…
INFO
The corresponding section applies only for the
PoolManager
®
version(s) indicated
TIP
Brief description
Tip...
• Chapter name (printed in italics) indicates a chapter within this
document
• Menu name (printed in italics) indicates a menu in PoolManager
®
• Parameter name (printed in italics) indicates a parameter in
PoolManager
®
• [n] (designation) indicates the number of a terminal block (in
squared brackets) and its designation (printed in italics in round
brackets)
• [Unit] indicates a physical unit, e.g. [°C] or [mg/l]
2 General safety information
This user manual has basic information that should be observed
during assembly, start-up, operation, and maintenance. Therefore, this
user manual absolutely must be read by installers and operators prior
to assembly and start/up, and must be accessible to every user of this
device. Additionally, all further safety information in this document
absolutely must be observed.
Read and follow all instructions.
In order to minimise the danger of injury, do not allow children to use
this product.
Hazards from non-compliance with safety information
Non-compliance with safety information can result in hazards to
persons, the environment, and the equipment.
Non-compliance with safety information will result in a forfeit of any
potential right to damage compensation.
HAZARD!
Unexpected start
PoolManager
®
starts operation
as soon as there is
voltage on the incoming power line. It is possible that
dosing pumps start or that add-on functions
are turned
on or switched.
Potential consequence: Death or the gravest degree
of injury, heavy material damage.
• Be sure that PoolManager
®
is secured against
unauthorised access.
• Do not supply PoolManager
®
with power until all
preparations for a safe start and safe operation
have been completed.
HAZARD!
Potential overdosing of maintenance products
Despite PoolManager’s
®
comprehensive safety
functions, it's possible that a sensor failure and other
errors could lead to an overdosing
of maintenance
products.
Potential consequence: Death or the gravest degree
of injury, heavy material damage.
• Design your installation
such that uncontrolled
dosage is not possible in the event of a sensor
failure or other errors, and/or such that uncontrolled
dosage is recogni
sed and halted before damage is
incurred.
HAZARD!
Gaseous chlorine produced from dosing in
standing water if dosing outputs are not locked via
the filter pump
If the flow switch is stuck or experiences another error
,
there is a risk of dosing into stand
ing water. Poisonous
chlorine gas can be yielded when sodium hypochlorite
and pH minus come together.
Potential consequence: Death or the gravest degree
of injury, heavy material damage.

3 New Functions
8
• Only run power to input L
D
[35] / N
D
[36]
for the
dosing outputs if circulation is running (
dosing
outputs must be locked via the filter pump).
• Connect power input L
D
[35] / N
D
[36]
to the timer
that controls the filter pump, or use the
corresponding outlet on the filter pump.
• If PoolManager
®
is controlling the filter pump
directly, then locking automatically occurs
internally.
• Please also refer to the Section
230V~ Power
Supply.
HAZARD!
Compliance with safety class
If the housing or individual cable gland
s have not been
properly closed after working on the PoolManager
®
such that a reliable seal has been secured, then it will
be possible for moisture to penetrate into the device.
Potential consequence: Damage or destruction to
PoolManager
®
, malfunctions.
•
Be sure the unit is safely sealed again after
performing any kind of work.
3 New Functions
The internal software (firmware) of the PoolManager
®
is continued to
be developed. New software versions may provide new, extended or
improved functions, which are not described in this version of the user
manual.
HAZARD!
Use of new functions
Because of the continued development, a
PoolManager
®
controller may contain functions, which
are not or not completely described in this version of
the user manual.
The use of such new or extended functions without a
profound and secure under
standing by the operator
may result in malfunctions and severe problems.
Potential consequence: Death or the gravest
degree of injury, heavy material damage.
• Make sure to get a profound and secure
understanding of a function and relevant boundary
conditions, before you start to use it.
•
Check for an updated version of the user manual or
additional documentation available for the relevant
functions.
• Make use of the integrated help function of the
PoolManager
®
to get detailed information on
functions and their parameter settings.
• In case it should not be possible to get a profound
and secure understanding of a function based on
the available documentation, do not use this
function.
4 User qualification
HAZARD!
Insufficient personnel qualification
Hazards in
the event of insufficiently qualified
personnel
Potential consequence: Death or the gravest
degree of injury, heavy material damage.
•
The system operator must ensure compliance with
the required qualification level.
• Any and all work may only be performed b
y
correspondingly qualified personnel.
• Access to the system must be prevented
for
insufficiently qualified persons, e.g. via access
codes and passwords.
Designation Definition
Instructed person An instructed person is someone who has been
informed of and, as necessary, trained in the
assigned tasks and the potentially associated
hazards, and has been notified of the required safety
equipment and measures.
Trained user A trained user is someone who meets the
requirements for an instructed person and has
additionally received training specific to the system.
Trained specialist A trained specialist is someone who meets the
requirements of a trained user and additionally can
assess assigned work tasks and recognise potential
hazards based on training, knowledge, and
experience as well as on familiarity with relevant
norms and provisions. Multiple years of work
experience in the respective field may also be
assessed as specialised training.
Electrical specialist An electrical specialist is someone who is capable of
performing work on electrical systems and
independently recognising and avoiding potential
hazards based on specialist training, knowledge, and
experience as well as familiarity with the relevant
norms and provisions. An electrical specialist must
meet the provisions in the applicable legal
stipulations regarding accident prevention.
IT specialist An IT specialist (IT = information technology) is
someone who is capable of performing work on
computer systems, networks, and network
components and independently recognising and
avoiding potential hazards based on professional
training, knowledge, and experience as well as on
familiarity with the relevant norms and provisions.
IMPORTANT NOTICE!
The system operator must ensure compliance with the
relevant accident prevention conditions
, with all legal
regulations, and with the generally recognised technical
safety principles!

5 Term definitions
9
5 Term definitions
• Bromine (Br)
Active bromine (free bromine) in pools for disinfection,
measured in [mg/l]
• Chlorine (Cl)
Active chlorine (free chlorine) in pools for disinfection,
measured in [mg/l]
• Default value
Standard setting
• Dosing pumps
Used in the sense of "dosing pumps and other dosing equipment"
• Ethernet
Cable-connected standard TCP/IP network.
• Flow
Measured water's flow through the measuring chamber
• IP address
Device address within a TCP/IP network, e.g. in the World Wide
Web (IP = Internet Protocol). An IP address consists of four
blocks of digits separated by dots, e.g. 192.168.10.1
• Network
Computer network that uses TCP/IP protocol The Internet is also
a TCP/IP network. PoolManager
®
is integrated into a TCP/IP
network.
• Oxygen (O2)
Disinfection with active oxygen (Bayrosoft
®
)
• Redox potential (mV)
Indirect measured variable for disinfection in pools, measured in
[mV] (also redox voltage or oxidation reduction potential (ORP))
• TCP/IP
Standard protocol used on computer networks and on the Internet
(TCP = Transmission Control Protocol,
IP = Internet Protocol).
• URL
Uniform Resource Locator = Web address, internet address,
e.g. www.myPoolManager.com
• Web
World Wide Web (Internet, www)
• Web browser
Standard program for viewing websites (e.g. on a PC or on a
mobile device), also used for remote access to PoolManager
®
.
• WebGUI
Web-(Internet)-based graphical user interface
(GUI = Graphical User Interface)
• Web server
Program that transmits webpages to a browser.
PoolManager
®
has an integrated web server accessible to
browsers.
• WLAN or WiFi
Wireless TCP/IP network / radio network
(WLAN = Wireless Local Area Network).
6 Standard access codes
The following table indicates the standard default access codes.
HAZARD!
Unauthorised access possible from using known
access codes
Access codes facilitate access to critical areas on the
system. Unauthorised access can lead to dangerous
configurations.
Potential consequence: Death or the gravest
degree of injury, heavy material damage.
•
Configure individualised access codes. Under no
circumstances should the preconfigured standard
access codes be used.
• Keep access codes strictly confidential.
Users Default access code
(must be changed!)
Customer (level 1) 1234
Customer (level 2) 5678
Service (level 3) 8642
7 Overview
7.1 PoolManager
®
PoolManager
®
is a highly advanced measuring, control, and dosing
system for swimming pools.
7.2 PoolManager
®
maintenance programs
You can select from among various maintenance programs in the
PoolManager
®
family for your swimming pool:
• PoolManager
®
Chlorine (Cl)
(disinfection with active chlorine,
measurement and control of redox potential)
• PoolManager
®
Bromine (Br)
(disinfection with active bromine,
measurement and control of redox potential)
• PoolManager
®
Oxygen (O2)
(disinfection with active oxygen (Bayrosoft
®
),
automatic dosing system with temperature compensation)
• PoolManager
®
PRO
(Disinfection with active chlorine or bromine,
direct measurement and control of free chlorine or bromine)

7 Overview
10
7.3 Overview of features
7.3.1 Display and operation
Great emphasis was placed on easy-to-follow, simple, and intuitive
operation while developing PoolManager
®
. The screen design is also
presented in a modern and attractive manner.
The following is an overview of the significant features and concepts in
the graphic interface.
•
Large, high-
resolution 7" (18cm) colour TFT
graphics display
• Attractive 16:10 wide format
• Wide VGA resolution (800x400)
• 65536 colours
• Energy-saving LED backlight
Simple, intuitive touchscreen operation
• Robust touchscreen with additional full
design foil overlay
• Every touch is confirmed with a signal tone
Icon menu
• Up to 20 high quality icons
• Faster and easier access to all functions
and parameters
• Additional text for each icon in order to
ensure clarity
Standard menu
• Uniform concept for all standard menus
• Uniform operation throughout
Hotkeys
• 5 hotkeys for menu navigation and for
important basic functions that are regularly
needed (e.g. help function)
Measurement graph
• Max record length of 1 year
• Max resolution 1 min
• Display of 1 or 2 measured variables
• Display of all important alarm statuses
Mode menu
• Called up using special Mode hotkey
• Various system functions can be turned on
and off quickly and easily
Numerous menu languages available
• Extensive support for special international
characters and complete character sets
(e.g. Cyrillic and Greek)
Individualisation
• Selectable menu style
• Selectable background image
• Selectable icon style
7.3.2 Measuring and control
• pH and redox measurement via single-rod measuring cells
(glass electrodes)
• free chlorine / bromine measurement via open potentiostatic
measurement (3-electrode system)
• Temperature measurement in the measuring chamber (PT1000
sensor)
• 2 additional temperature inputs for additional functions (PT1000,
KTY83, or KTY16-6 sensors)
• Proportional control for all control modules
• Minimum dosing rate provides for additional I-(integral)
contribution, i.e. for reliable attainment of the setpoint.
• All important control parameters are individually programmable for
each control module (setpoint, alarm thresholds, proportional
range, dead zone (pH), dosing cycle time, minimum dosing rate,
dosing monitoring)
• Continuous display of current dosing rate
• Conversion of all measured variables via high resolution 10-bit
A/D converter.
• 1- or 2-point calibration for pH
• Simple and precise 1-point calibration for chlorine / bromine
(PoolManager
®
PRO only)
• 1-point calibration for redox (mV) and temperature
7.3.3 Safety functions
Extensive monitoring and alarm functions
• Upper and lower measured value alarms
• Flow monitoring
• Level warnings and level alarms (canister level)
• Dosing monitoring
(monitoring of the attainment towards the setpoint)
• Battery alarm (buffer battery for the real-time clock)
• Start delay after turning on PoolManager
®
or after turning
circulation back on
• Automatic blocking of dosing in critical alarm states and during
start delay
• Alarm signalisation via
• Screen display
• Acoustic alarm (can be deactivated)
• Alarm relay
• Continuous monitoring of correct program operation and
automatic reset in the event of an error.

7 Overview
11
7.3.4 Add-on functions
Extensive add-on functions
• 4 universal switching outputs
Flexible control of water attractions and other applications:
• Free name selection
• Freely programmable timers
• Optional link with other inputs and outputs
•
Optional link with external switches or push-buttons
• Filter pump
Flexible control of the filter pump:
• Up to 3 operating modes for variable filter pumps (eco mode,
normal mode, increased mode)
• Freely programmable timers
• Flexibly configurable blocking of dosing
• Optional link with external switches
•
Interface via relay switching outputs or
4-20mA current loop (optional)
• Flockmatic pump
Flockmatic pump control:
• Freely programmable timers
•
Configurable dosing rate
• Heating
Flexible control of a pool heating:
• Optional link with external switch
• Optional combination with solar heating (solar priority)
•
Optional block via an input
• Solar heating
Flexible control of a solar heating:
• Optional link with external switch
• Optional combination with pool heating (solar priority)
•
Optional block via an input
• Salt electrolysis
Flexible control of a suitable salt electrolysis system:
• The current dosing rate for chlorine is converted into a control
signal for a salt electrolysis system
• Interface via a relay switching output (pulse frequency
modulation) or 4-20mA current loop (option)
• Eco mode
Flexible control of switching between a normal operation mode of
the pool and an energy-saving eco mode (e.g. circulation via
overflow in normal mode, or via floor drain in eco mode):
• Freely programmable timers
• Interface via relay switching output
• Optional link with external switches or push-buttons
IMPORTANT NOTICE!
Limited number of inputs and outputs
The number of outputs and inputs available in the
PoolManager
®
controller
is limited due to space
limitations.
Therefore, only a limited number of add-
on functions
can be used at the same time. The number of
available
outputs and inputs can be increased by the use of
external extension
boxes (“feature boxes”). This allows
for the use of more add-on functions.
With feature
boxes, it is also possible to use all add-
on functions at
the same time, if necessary.
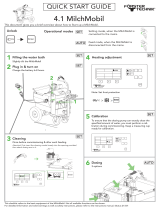
7.3.5 Remote access from the local network or the
Internet
PoolManager
®
graphical user interface is based entirely on the most
recent standard Internet (Web) technologies.
For that reason, it is also called a WebGUI:
• Web stands for Internet technologies
• GUI stands for graphical user interface
1 Web browser
The user interface is displayed by
a Web browser. There is a
browser running locally on the
PoolManager
®
unit, while
simultaneously additional brow-
sers my be
running on the widest
variety of devices on the
local
network or on the Internet that
may access PoolManager
®
.
2 Web server
The Web server delivers
requested menu pages to all
connected Web browsers.
3 Data server
The data server manages and
stores all PoolManager
®
data
(measured values, system status,
configuration parameters) and
makes it available to the Web
server.
PoolManager
®
WebGUI facilitates complete and entirely transparent
remote access from a local network (TCP/IP, Ethernet) or from the
Internet. Transparent remote access means that the user interface
looks exactly like it does locally on the PoolManager
®
unit and is
operated identically.
Certain restrictions in remote access are required only for security
reasons.
Remote access can be realised with any mobile or stationary device
that is connected to PoolManager
®
via a network or the Internet and
that runs a standard Web browser. This prerequisite is fulfilled from
the start by an ever-growing number of modern systems.
Suitable devices and systems for remote access
All types of PCs, such as:
• Desktop PCs, notebooks, netbooks
• Home / media centre PCs
• PCs with a Microsoft Windows
®
operating system
• Apple iMac
®
or MacBook
®
PCs
• PCs with a Linux operating system

7 Overview
12
Smartphones, such as:
• Apple iPhone
®
• Smartphones with a Google Android
®
operating system
• Smartphones with a Windows
®
operating system
• BlackBerry
®
smartphones
Tablet PCs, such as:
• Apple iPad
®
• Tablet PCs with a Google Android
®
operating system
(e.g. Samsung Galaxy Tab
®
)
Web-compatible TV devices
(or TV devices that are used as a PC screen)
Building management systems
Building management systems (BMS) and touch panels for living
areas can be used for remote access to PoolManager
®
if they have a
modern standard Web browser.
7.3.6 Interfaces
Measurement inputs:
• pH (BNC connector)
• 3x temperature (PT1000 or KTY83 sensor)
Depending on the controller model:
• CI / Br (potentiostatic 3-electrode system)
• Redox potential (BNC connector)
Switching inputs:
• Flow switch (measuring water circuit),
optional pressure switch (main circulation circuit)
• 2 level inputs for pH and disinfection (canister level)
• 4 additional switching inputs for additional functions
Relay outputs:
• 3 dosage relays (pH minus, pH plus, disinfection). Unused dosing
relays may be used for add-on functions, alternatively.
• Alarm relay (may be used for add-on functions, alternatively)
• 4 relays (OUT1...OUT4) for add-on functions
Every single relay output can be individually configured as a 230VAC
output or volt-free switch.
Communication interfaces:
• Ethernet LAN (RJ45 connector)
• Internal USB interface for memory sticks
(also used for software updates)
• CAN bus for external feature boxes
Optional plug-in modules (up to 3)
• 4x power output 4-20mA
• Additional plug-in modules may be available in the future
as required

8 Remote access
13
Part B: Function description
Required user qualification:
TRAINED USER
All activities described in Part B may only be performed
by trained users as defined in the Chapter
User
Qualification.
8 Remote access
PoolManager
®
offers comprehensive and comfortable opportunities for
remote access from a local network or from the Internet.
8.1 Prerequisites
In order to make use of these opportunities, PoolManager
®
first has to
be connected with a network. Then remote access has to be
configured.
The required steps are described in Part C and have to be performed
by an IT specialist.
There you will find all required information for remote access to
PoolManager
®
.
Additionally, remote access has to be released for one or multiple
users in user management. Username and password must be
assigned to the corresponding users to enable remote access.
See User Management.
8.2 Remote access to the local network
For remote access from the local network, you generally require the
local network (IP) address of your PoolManager
®
. That could be, for
example, 192.168.1.99.
8.2.1 Step by step
1. For remote access from the local network, first start the Web
browser on a PC or on another mobile or stationary device on
the same network as PoolManager
®
.
2. Enter your PoolManager’s
®
IP address into the browser's
address bar. For some browsers, you'll have to enter http:// at
the beginning. Other browsers supplement it automatically:
http://192.168.1.99 (for example)
8.3 Remote access from the Internet
For remote access from the Internet, you generally need a URL
(uniform resource locator = “Web address”). That could be, for
example, http://myPoolManager.dtdns.net.
8.3.1 Step by step
1. For remote access from the Internet, first start the browser on a
PC or on another mobile or stationary device that is connected
to the Internet..
2. Enter PoolManager
®
URL into the browser's address bar. For
some browsers, you'll have to enter http:// at the beginning.
Other browsers supplement it automatically:
http://myPoolManager.dtdns.net (for example)
TIP
Setting up a favourite
In order to simplify access to PoolManager
®
, you can
set the corresponding IP address or URL as a favourite
in your Web browser and give it an appropriate name.
This makes remote access to PoolManager
®
quick and
easy via the browser's favourites list.
For a detailed description, please refer to the
documentation of the corresponding browser.
Info
HTML 5 support
In order to use the full scope of functions f
or remote
access to PoolManager
®
,
the browser being used has
to support the current HTML 5 standard.
Info
JavaScript
For remote access to PoolManager
®
, JavaScript
has to
be activated in the Web browser being used.
This usually is
the case in the standard configuration of
all popular Web browsers.
8.4 User login in remote access
When connecting to PoolManager
®
via remote access, a login window
first appears in which you have to authenticate yourself by entering a
valid username and the correct password for the username entered.
1 Enter the username for remote access
2 Enter the password for the username entered
3 OK will confirm the entries and, after successful
authentication, start PoolManager
®
user interface.
INFO
Entry via remote device’s keyboard
In this login window, the acce
ssing device's keyboard
(e.g. PC keyboard or standard
screen keyboard on a
smartphone) is used to enter username and
password,
not the PoolManager
®
screen keyboard.
8.5 Quick info
PoolManager
®
provides a compact info field (Quick info) with the most
important information:
The following information is shown:
• PoolManager
®
device name
• Current measured value
• Text colour on measured values:
green Everything OK
red There is at least one alarm pending
Pressing (or clicking) on the quick info field starts full remote access to
the corresponding PoolManager
®
controller.

9 Display and operation - Graphical user interface
14
8.5.1 Calling up quick info
To call up quick info, the normal address for remote access (IP
address or URL) is attached along with the following suffix:
/cgi-bin/webgui.fcgi?infoframe=0
Thus, a complete URL would be, for example
http://myPoolManager.dtdns.net/cgi-bin/webgui.fcgi?infoframe=0
This URL is relatively complicated, but it can easily be stored in the
browser as a favourite.
TIP
Multiple devices at a glance
If you are a specialist in charge of
multiple
PoolManager
®
units, you can have the quick info of all
relevant devices displayed jointly on one webpage.
To
do so, you could e.g. design a simple HTML webpage
(frame page) locally on your PC
which shows clearly
arranged the quick infos of all relevant controllers.
This means you'll have the most important information
from all controllers in one place.
If, for example, there is a controller
showing an alarm
(red text), then you can directly access that controller
with one click.
9 Display and operation - Graphical user
interface
Display and operation are realised on a large TFT colour display with
touchscreen. The function shown can be executed with the simple tap
of a finger on the corresponding area on the screen. Each tap on the
touchscreen is confirmed with a signal tone.
To the right of the display, there are 5 "hotkeys" for important standard
functions. The hotkey functions are also selected with a simple finger
tap and confirmed with a signal tone.
Menu (main menu)
Direct jump to main menu (icon menu)
Esc (escape)
Back to previous menu level
Home (home view)
Direct jump to home view
Help
Display help text for the current menu
Mode (mode menu)
Direct jump into mode menu for turning on or off
various functions quickly and easily. When main-menu is
entered pressing the menu-hotkey for a second time
activates/deactivates the background image in transparent
style.
9.1 Important menus
9.1.1 Home view
Home view is the standard view that can usually be seen on the
screen and provides an overview of all important data and operating
statuses. Home view can be called up at any time using the Home
hotkey.
1 Measured value display with additional
graphic measured value scale
2 Operating status and dosage status
3 Alarms
4 Add-on functions
The areas 1, 2, and 3 in one column mutually relate to a measurement
or control module, such as pH, redox, chlorine, or temperature.
1 Measured value display with graphic measured value scale
Colour of measured value display:
green Normal operation, everything OK
yellow Dosage blocked (missing flow signal
and/or start delay)
red Alarm, dosage blocked!
1 Current measured value (arrow)
2 Setpoint (numeral value and mark)
3 Lower alarm threshold
4 Upper alarm threshold
2 Operating status and dosage status
1 Operating mode or operating status
2 LED indicates whether the dosing pump
is currently running
3 Dosing direction
D- Decrease the measured value
D+ Increase the measured value
4 Current dosing rate as %
Example: 10% means that the dosing
pump is turned on for 10% of the
available time. It will then run, for
example, for 6s if the dosing cycle is set
to 60s.
5 Fill level in the corresponding canister:
Sufficient volume available
Limited residual volume available
The canister is empty and has to
be replaced

9 Display and operation -
Graphical user interface
Operating mode / operating status
Auto Measuring, control, and dosing
run
in automatic mode
Manual Manual dosage is running
Off Control is turned off
Alarm Dosing is blocked by an alarm
Flow Dosing
is blocked because there is no flow signal present
Level Dosing
is blocked by a level alarm
Delay Dosing
is blocked because start delay is running
Dosage PoolManager
®
O2 (Bayrosoft
®
) only:
Automatic dosage is running
The corresponding field for temperature measurement shows the
operating state for heating and/or solar heating if these
functions are being used
3 Alarms
Active alarms for the corresponding module
are
there are no alarms pending.
4 Add-on functions
In the add-on
functions area in the home view, the most important
information for all current active add-
on function
content of this area is adjusted automatically such that all active
on functions can be seen (max. of 8).
1 Symbol for current operating mode
Timer operation
Function turned off
Function turned on
2 LED displays whether the add-on function
3 Name of the add-on function
and, if applicab
on current operating status
NOTE
No touch operation in home view
In order to avoid accidental erroneous commands,
home view does not react to taps on the touchscreen.
To configure settings or to move to other menus, first
use the
hotkey to call up the main menu.
Graphical user interface
run
is blocked because there is no flow signal present
is blocked by a level alarm
is blocked because start delay is running
) only:
The corresponding field for temperature measurement shows the
operating state for heating and/or solar heating if these
add-on
are
displayed or 'OK' if
functions area in the home view, the most important
on function
s is shown. The
content of this area is adjusted automatically such that all active
add-
is currently turned on
and, if applicab
le, further information
No touch operation in home view
In order to avoid accidental erroneous commands,
home view does not react to taps on the touchscreen.
To configure settings or to move to other menus, first
hotkey to call up the main menu.
9.1.2
Main menu (icon menu)
The main menu can be called up at any time using the
facilitates direct access to all important system functions.
Every function is represented by an icon with supplemental text
(The set of
icons shown depend on the
Measurement G
Display of graphic measurement progression
Alarm O
verview
Display and acknowledgement of alarms
Alarm Settings
Settings for alarms and their signalisation
Service Messa
ges
Display and acknowledgement of service information
(e.g. notification when electrode replacement
needed)
Eventlog
Display of important events and incidents
Configuration
pH
Settings for pH measurement and control
Configuration redox (mV)
Set
tings for redox (mV) measurement and control
Configuration Cl (chlorine) / Br (bromine)
Settings for chlorine
measurement and control
Configuration O2 (
Settings for
O2 (
Configuration
Temperature
Settings for temperature measurement
Calibration pH
pH measurement calibration
Calibration
redox (mV)
redox (mV)
measurement calibration
Calibration
Cl (chlorine) / Br (bromine)
Chlorine / bromine
Calibration
Tempera
Temperature measurement base calibration
M
anual dosage
Manually controlled addition of pH minus (or pH plus)
Manual Dos
age
Manually controlled addition of chlorine / bromine
Manual Dosage
Manually
controlled addition of chlorine / bromine
Manual Dosage
Manually controlled addition of O2
15
Main menu (icon menu)
The main menu can be called up at any time using the
Menu hotkey. It
facilitates direct access to all important system functions.
Every function is represented by an icon with supplemental text
icons shown depend on the
controller model).
Measurement G
raph
Display of graphic measurement progression
verview
Display and acknowledgement of alarms
Settings for alarms and their signalisation
ges
Display and acknowledgement of service information
(e.g. notification when electrode replacement
Display of important events and incidents
pH
Settings for pH measurement and control
Configuration redox (mV)
tings for redox (mV) measurement and control
Configuration Cl (chlorine) / Br (bromine)
Settings for chlorine
/ bromine
measurement and control
Configuration O2 (
Bayrosoft
®
)
O2 (
Bayrosoft
®
) automatic dosing
Temperature
Settings for temperature measurement
pH measurement calibration
redox (mV)
measurement calibration
Cl (chlorine) / Br (bromine)
Chlorine / bromine
measurement calibration
Tempera
ture
Temperature measurement base calibration
anual dosage
pH
Manually controlled addition of pH minus (or pH plus)
age
redox (mV)
Manually controlled addition of chlorine / bromine
Manual Dosage
Cl (chlorine) / Br (bromine)
controlled addition of chlorine / bromine
Manual Dosage
O2 (Bayrosoft
®
)
Manually controlled addition of O2
(Bayrosoft
®
)

9 Display and operation -
Graphical user interface
16
Device Settings
• Basic controller settings
• Menu language
• I
ndividualisation of user interface
• Controller name
• Date & time
•
Powerdown mode
Service Functions
Special functions (trained specialists only):
• Pool volume
• Configuration of dosing
pumps
• Reset to defaults
• Software update
(from USB stick)
• Commissioning step-by-
step
•
Controller model and care method
•
Trade show settings
User Management
Configuration of all user data, access data, and
access rights for
local operation at the unit
remote access
Communication & I
nterfaces
• Data import and export
(measurement graph
, etc.)
•
Network (IP) configuration
• E-mail configuration
•
Co
nfiguration of all further interfaces
Add-on functions
Call-up icon menu for add-
on function
9.1.3 Add-on function
s menu (icon menu)
The add-on functions menu is called
up from the main menu. It
facilitates access to all add-on functions.
Each add-on function
is represented by an icon with supplemental
text.
Switch output 1, 2, 3, 4
•
Flexible control of water attractions and other
applications:
• Free name selection
• Freely programmable timers
• Optional
link with other inputs and outputs
•
Optional link with external
switches or push-buttons
Filter pump
Flexible control of the filter pump:
•
3 potential operating modes for variable filter pumps
(
eco mode, normal mode, increased mode
• Freely programmable timers
Graphical user interface
ndividualisation of user interface
Special functions (trained specialists only):
pumps
(from USB stick)
step
Controller model and care method
Configuration of all user data, access data, and
local operation at the unit
and for
nterfaces
, etc.)
Network (IP) configuration
nfiguration of all further interfaces
on function
s
s menu (icon menu)
up from the main menu. It
is represented by an icon with supplemental
Flexible control of water attractions and other
link with other inputs and outputs
3 potential operating modes for variable filter pumps
eco mode, normal mode, increased mode
)
• Flexib
ly configurable
• Optional
link with external switches
•
Interface
via relay switching outputs or
4-
20mA current loop (optional)
Flockmatic pump
Flockmatic pump control:
•
Freely programmable timers
•
Configurable dos
ing rate
Heating
Flexible control of pool heating:
• Optional
link with external switch
• Optional
combination with solar heating (solar priority)
•
Optional
block via
Solar heating
Flexible control of solar seating:
• Optional
link with external switch
• Optional
combination with pool heating (solar pr
•
Optional
block via an input
Salt electrolysis
Flexible control of a suitable salt electrolysis system:
•
The current dosing rate for chlorine is converted into a
control signal for a salt electrolysis system
•
Interface via a relay switching output
modulation) or 4-
20mA current loop (option)
Eco Mode
Flexible control of switching between a normal operation
mode of the pool and an energy
circulation via overflow in normal mode, or via floor drain
in eco mode):
•
Freely programmable timers
•
Interface via relay switching output
•
Optional link with external switches or push
ly configurable
blocking of dosing
link with external switches
via relay switching outputs or
20mA current loop (optional)
Flockmatic pump control:
Freely programmable timers
ing rate
Flexible control of pool heating:
link with external switch
combination with solar heating (solar priority)
block via
an input
Flexible control of solar seating:
link with external switch
combination with pool heating (solar pr
iority)
block via an input
Flexible control of a suitable salt electrolysis system:
The current dosing rate for chlorine is converted into a
control signal for a salt electrolysis system
Interface via a relay switching output
(pulse frequency
20mA current loop (option)
Flexible control of switching between a normal operation
mode of the pool and an energy
-saving eco mode (e.g.
circulation via overflow in normal mode, or via floor drain
Freely programmable timers
Interface via relay switching output
Optional link with external switches or push
-buttons

9 Display and operation - Graphical user interface
17
9.1.4 Mode menu
The mode menu can be called up at any time using the Mode hotkey.
It makes it possible to turn most system functions on and off and to set
the operating mode quickly and easily. Each function is shown on one
line within the mode menu.
1 Description of the function
2 Configured operating mode (operating modes depend upon
the corresponding function). The operating mode can also
be changed here.
3 Buttons for turning a function on and off quickly
Green button The function is turned on.
Touching the button turns the function off.
Grey button The function is turned off.
Touching the button turns the function on.
4 Joint button for turning off ALL functions shown in the mode
menu (emergency stop).
Button function
Button
off
The function is definitely turned off (regardless of the
operating mode set)
Button
on
The function is automatically turned on and off
depending on the operating mode set (e.g. time
controlled). 'Button on' does NOT necessarily lead to
the function being turned on immediately.
Info
Return to time-controlled operation
If the buttons in the Mode menu are used to turn a
function on or off, while this func
tion is in the “Time
switch” operating mode, the function automatically
returns to time-
controlled operation at the next
programmed switching point.
TIP
Use buttons for turning on and off directly
In order to use the buttons for turning functions on an
d
off directly, set the function's operating mode to 'on.'
In
this configuration, the buttons in the mode menu switch
directly between ‘on’ and ‘off’.
9.2 Further menus (standard menus)
Most menus, by far, consist of multiple recurring standard elements,
which can be combined with each other in a menu as desired. That is
why this menu type is referred to as standard menu.
9.2.1 Basic concepts
Max. 8 lines
Each menu consists of a max. of 8 lines
(Menu title and max. 7 standard elements).
Menu title
The first line always contains the menu title.
Buttons and text fields
In general, there are buttons and text fields in all menus. Buttons are
shown with a subtle 3D effect. Text fields do not have the 3D effect.
You can actuate buttons by lightly tapping on the touchscreen, thereby
triggering the underlying function. Text fields, however, only display
information and cannot be actuated.
Help function
Tapping on a parameter name will make a help text for that parameter
appear.
Parameter configuration
Tapping on a parameter value will open an entry screen and the
respective parameter can be configured.
The various standard elements are described in the following sections.
9.2.2 Numerical parameters
A numerical parameter is a numerical value. A numerical parameter
can be changed by the operator, in case it is a configuration
parameter. However, there are also numerical parameters that are
displayed only and cannot be changed, e.g. measured values.
1 2 3
1 Parameter name (button)
Calls up the parameter's help text
2 Parameter value (button or text field)
If the parameter is configurable, then the parameter value will
be shown as a button. That will call up an entry screen in
which the value can be configured.
3 Physical unit (text field)

9 Display and operation - Graphical user interface
18
9.2.2.1 Entry screen
There is one uniform entry screen for all numerical parameters, in
which values can be configured.
1 Parameter name
2 Display of current setting (or current input)
3 Number block for entering the value
4 Minimum potential setting
5 Maximum potential setting
6 Button for resetting to the default value
7 Cancel will close the entry screen.
The value will remain unchanged.
8 OK will apply the configured value and save it
permanently.
Incremental increase or decrease of the configured value.
A sensible step size is automatically set for each
parameter.
Delete the last character
Delete the entire value
9.2.3 Selection parameters
For selection parameters, one of multiple settings can be selected,
e.g. ‘active’ or ‘inactive’. The selection usually can be configured by
the user. However, there are also selection parameters that are only
displayed, but cannot be configured, such as system status.
1 2
1 Parameter name (button)
Calls up the parameter's help text
2 Parameter value (button or text field)
If the parameter is configurable, then the parameter value will
be shown as a button. That will call up an entry screen in
which the value can be configured.
9.2.3.1 Entry screen
There is one uniform entry screen for all selection parameters which is
used to change selection parameter settings.
1 Display of all selection options.
Tap on the desired option to activate it.
2 Button for resetting to the default value
3 Cancel will close the entry screen.
The value will remain unchanged.
4 OK will apply the configured setting and save it
permanently.
There are also selection parameters for which multiple selections are
possible; such as multiple weekdays on which a certain process
should be launched.
In this case, each selection option can be activated and deactivated by
tapping on it.
For several selection parameters, a symbol is shown for each
selection option in addition to the text, such as a flag to select the
menu language.

9 Display and operation - Graphical user interface
19
9.2.4 Text parameter
A text parameter represents a text that you can enter, e.g. a name for
the controller or for a function.
1 2
1 Parameter name (button)
Calls up the parameter's help text
2 Text (button)
Calls up an entry screen in which the text can be entered.
9.2.4.1 Entry screen
There is a uniform entry screen with a screen keyboard for all text
parameters in which the desired text can be entered.
INFO
Deleting the current text
Once you start entering a text, the current text will be
automatically deleted.
1 Display of current text (or current input)
2 Keyboard area for text input
3 Cancel will close the entry screen.
The text will remain unchanged.
4 OK will apply the text entered and save it
permanently.
Delete the last character
There are a total of four different keyboard layouts available that can
be switched using the keys and as follows:
Standard keyboard layout 1:
Lower case letters and numbers
Standard keyboard layout 2:
Upper case letters and standard special characters
Alternative keyboard layout 1:
International special characters (lower case letters)
and numbers
Alternative keyboard layout 2:
International special characters (upper case letters)
and numbers
INFO
International keyboard layouts
If you set the language menu to Russian or Greek, then
the characters available on the scre
en keyboard will be
automatically adjusted accordingly.
9.2.5 Time parameters
Time parameters are used to enter and display a time, e.g. the current
clock time or a specific time for a waterfall feature to run.
1 2
1 Parameter name (button)
Calls up the parameter's help text
2 Time (button)
Calls up the entry screen for time.
9.2.5.1 Entry screen
There is one uniform entry screen for all time parameters in which a
time can be set.
1 Display of current setting (or current input)
2 Incremental increase or decrease in hours
3 Incremental increase or decrease in minutes
4 Incremental increase or decrease in seconds
5 Cancel will close the entry screen.
The value will remain unchanged.
6
OK will apply the time set and save it permanently.
Delete the last number
Delete the entire time
INFO
Setting the system time
When setting the system time, the internal real-
time
clock is set to the configured time by pressing the OK
button.

9 Display and operation - Graphical user interface
20
9.2.6 Date parameter
Date parameters are used to enter and display a date.
1 2
1 Parameter name (button)
Calls up the parameter's help text
2 Date (button)
Calls up the entry screen for date.
9.2.6.1 Entry screen
There is one uniform entry screen for all date parameters, in which a
date can be set.
1 Display of current setting (or current input)
2 Incremental increase or decrease by day
3 Incremental increase or decrease by month
4 Incremental increase or decrease by year
5 Cancel will close the entry screen.
The value will remain unchanged.
6
OK will apply the date set and save it permanently.
Delete the last number
Delete the entire date
9.2.7 Access code
There are various access codes for menu access.
1 2
1 Parameter name (button)
Calls up the parameter's help text
2 Access code (button)
Calls up the entry screen for the access code.
HAZARD!
Unauthorised access possible from using known
access codes
Access codes facilitate access to critical areas on the
system. Unauthorised access can lead to dangerous
configurations.
Potential consequence: Death or the gravest
degree of injury, heavy material damage.
•
Configure individualised access codes. Under no
circumstances should the preconfigured standard
access codes be used.
• Keep access codes strictly confidential.
IMPORTANT NOTICE!
Availability of access codes
En
sure that all access codes are known and available
as needed, even after longer periods of time. The
access codes are absolutely necessary for numerous
functions and settings!
INFO
Screen display
In order to protect the confidentiality of an access cod
e,
the configured value is masked.
/