Page is loading ...

Bamboo Flooring Rugs Placemats Shades
USGBC, NWFA, and WFCA Member
P.O. Box 2704 26300 SW 95
th
Avenue, Suite 103, Wilsonville, OR 97070 USA Telephone (866) 582-0848 Facsimile (503) 582-8402
Wellmade® Pebble Tiles
Installation Guideline
Thank you for choosing Wellmade Pebble Tiles! Pebble Tiles are a naturally beautiful and unique surface covering that
will provide years of natural beauty both inside and outside your home. There are virtually endless decorating possibilities
that include: flooring, countertops, backsplashes, & walls. Indoor applications may be kitchens, bathrooms, entry ways,
showers, fireplaces, and wherever you imagination takes you. Pebble tiles can be used as accents for tile, stone, wood,
and many other surface coverings. Outdoor uses may include BBQ areas, walkways, decks, patios, water fountains,
pools & pool decks, exterior walls, and used for creating unique landscaping features. Pebble Tiles are approximately 12”
x 12” (305 mm x 305 mm) that are interlocking, and have a flexible backing that will allow the tiles to be used on curved
surface such as poles or columns, as well as around the corner of a wall.
PLEASE NOTE
Pebble Tiles are created by Mother Nature, therefore no two pebbles will be the same. They will vary in shading,
and will have natural imperfections. Because each Pebble Tile is assembled by hand, there may be occasional
“glue strings” on the surface of the pebbles. These can be easily removed by cleaning the surface with a solvent
prior to color/shine enhancers and sealers. This Installation Guideline cannot provide all the information that
may be necessary to install in all the various applications, and is therefore only a brief guideline. Wellmade
strongly recommends using a professional tile setter, especially if you are installing in areas that are subject to
large amounts of water, such as tub and shower enclosures. The possibility of water damage in these areas
justifies the expense of installing professionally. Wellmade cannot be responsible in any way for installation
related issues. In addition to this guideline, there are many resources available for each installation application.
DIY books and videos can be found both online and print. Also, some home improvement stores and tile
retailers offer free installation classes. These retailers will also have all the necessary tools and installation
supplies required for the various types of applications. Selecting adhesives, grouts, sealers, and color
enhancers from the same manufacturer will help ensure that they are compatible with one another. Always be
sure to follow their instructions and suggestions carefully.
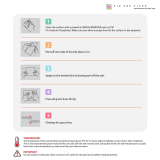
Basic installation tools needed:
Level: Used on vertical surfaces.
Tape Measure: Use for accurate measurements.
Chalk Line: Used to establish a strait working line.
Buckets: For grout & adhesive.
Scrub Pad: Grout cleaning tool.
Grout Float: Used to apply grout.
Stiff Bristle Brush: Used to clean or remove excess grout.
Firm Round Edge Sponge: Used for final cleaning of grout, and to apply sealers, etc.
Rubber Gloves: To protect your hands when working with cement based products.
Mixer Bar: Used to mix mortar/thinset with a drill.
Notched Trowel: Used to spread mortar/thinset or adhesive.
Rubber hammer: Used to gently seat tiles into adhesive.
Surface preparation:
All substrates should be firm (not subject to movement), flat, clean, dry, and free from contaminates. Concrete substrates
must be fully cured (minimum 30 days). Cracks in the concrete should be repaired using appropriate methods. Wood or

Bamboo Flooring Rugs Placemats Shades
USGBC, NWFA, and WFCA Member
P.O. Box 2704 26300 SW 95
th
Avenue, Suite 103, Wilsonville, OR 97070 USA Telephone (866) 582-0848 Facsimile (503) 582-8402
other floor substrates will often require a tile backer board or membrane available from home centers and tile retailers.
Painted surfaces should be roughened with sand paper or a wire brush. Water based paints are not suitable for tile
installation, but can be prepared for use (consult your local paint retailer for appropriate primers). When installing in wet
areas, it is highly recommended that a professional tile setter be used to prevent potential water damage. Flooring
substrates that will be subjected to larger quantities of water should provide adequate drainage. If you are installing over
another tile, the tile should be firmly adhered, acid etched, and roughened before installing Pebble Tiles over the surface.
If you have loose or missing pebbles, they can be easily replaced and glued to the mesh with an adhesive such as Liquid
Nails. Apply a small amount to the back of the pebble, place in the mesh, and allow to dry completely.
NOTE: Control (expansion) joints are necessary when covering large areas, and you will likely need to consult
with a professional for proper placement and guidance.
Adhesives:
Use only high quality mortars/thinset and mastics from a reputable manufacturer. These manufacturers will have a wide
range of products that are appropriate for different substrates and potential substrate movement. Cement substrates will
generally require a cement based mortar/thinset, when movement of the substrate is not anticipated. On wood or other
substrates, it is best to use a modified cement adhesive, usually 2-part and using a latex additive. Walls and other
substrates will often require a mastic type adhesive. Carefully follow the adhesive manufacturer’s recommendations when
mixing, and use their recommended trowel size.
Spread no more adhesive than can be covered before it begins to dry (usually about 3 - 4 feet square). If the adhesive
begins to dry, remove and replace with fresh adhesive. Place the tile into the adhesive and gently press on the surface of
the tile until it is sufficiently seated in the adhesive. This can either be done with a tile float or a small piece of wood and a
rubber hammer. The adhesive should ooze through the mesh backing and make contact with the back side of the
pebbles. Be sure the pebbles are firmly embedded in the adhesive, but not too deep. Place the interlocking tiles close
together, so that they will not have an obvious gap between the tiles.
When fitting along curved or straight areas, the tiles may be cut to fit with a razor knife or scissors. Any voids can be filled
with the appropriate size pebble from the scrap or extra tiles. If you are fitting on a pole, column, or around a corner, you
may need to remove some larger pebbles and replace with smaller pebbles. After setting the Pebble Tiles, use the damp
sponge to remove any mortar/thinset from the surface of the pebbles, as once it dries, it will be difficult to remove. Mastic
will need to be removed with the manufacturer’s recommended adhesive remover.
NOTE: Follow the adhesive manufacturer’s recommendations to allow the adhesive to dry before applying grout.
Usually, this is at least 24 hours.
Color Enhancers:
You can enhance the color and shine of Pebble Tiles by applying a compatible color and/or shine enhancer that is
preferably from the same manufacturer as the sealer. It is best to apply the color/shine enhancer before using a sealer.
Application can either be done before setting the tiles, or after the tiles have been set.
Sealing and Grouting:
Apply a high quality penetrating sealer to the tiles before grouting, and allow to dry. This will help when cleaning excess
grout from the tiles. Usually, sealers will not change or alter the colors of the pebbles. You should test on a scrap piece
or extra tile to ensure that it will meet your expectations. The sealer can be applied either before, or after setting the tiles.
Generally grouts use a water mix, but if there is any chance of substrate movement, it will be much better to use a latex
additive to provide some flexibility. Choose a grout that is appropriate to the circumstances for indoor or outdoor
application. Usually a sanded grout will be used on the floor, but you can use a non-sanded grout for walls and
countertops. Most grout manufacturers also offer matching caulks to compliment their grouts. Note: By using different
color grouts, you can alter the overall appearance of your Pebble Tiles. You might want to practice on extra tiles with

Bamboo Flooring Rugs Placemats Shades
USGBC, NWFA, and WFCA Member
P.O. Box 2704 26300 SW 95
th
Avenue, Suite 103, Wilsonville, OR 97070 USA Telephone (866) 582-0848 Facsimile (503) 582-8402
different colors, so you can achieve a look that you will find most pleasing. Grout is generally applied so that finally, about
¼ to ½ the pebble is above the grout. Grout an area of about 2 x 2 feet square at a time and cover the pebbles
completely. When the grout becomes firm, you can remove excess grout with a brush or damp sponge, based on how
much of the pebbles you wish to expose. Use a damp sponge for cleaning and removal of the haze of the grout. This
may need to be done several times to completely remove all residue, and then buff off any remaining grout with a soft dry
cloth. Once the grout is completely dry and clean (usually 24 hours), we recommend that you apply another coating of
sealer. Reapply sealers as recommended by their manufacturer for maximum results.
Cleaning:
Wellmade Pebble Tiles can be cleaned with neutral mild detergents, a vinegar solution, or a 10% hydrochloric acid
solution mixed with water. Apply with a stiff bristled brush and then rinse with clean water.
!CAUTION: Rubber gloves should always be worn when working with cement based products.
Please keep Pebble Tiles out of reach of children and pets, as they may present
a choking hazard.
Congratulations! You have just finished a natural, beautiful, and unique Wellmade Pebble Tile installation. We are
confident this will bring you pleasure for many years to come!
Related products available from Wellmade®: Pebble Border, Loose Pebbles, Pebble Table Runners & Placemats, &
Pebble Stone Door Mats and More.
Customer service 1-866-582-0848 in USA.
WARRANTY
Wellmade Pebble Tiles are a natural product and will therefore have imperfections in their structure, coloring,
and polishing. Should you receive cartons that contain many broken or unattached pebbles, or if there are
excessive amounts of adhesive in the surface, please return to your dealer for replacement. It is considered
normal for occasional pebbles to become dislodged from the mesh backing. They can be easily replaced by
adding some construction adhesive to the bottom of the pebble, and replaced on the mesh backing. Pebble Tiles
must be inspected before installing, as Wellmade will not accept responsibility for installed Pebble Tiles. In
addition, Wellmade cannot be responsible for the installation or related issues under any circumstances.
This writing is the complete and exclusive statement of the Warranty, and is in lieu of all other expressed,
implied, and/or statutory warranties. We assume no liability for incidental or consequential damages. The sole
remedy provided herein, is the replacement or refund for defective products. Some states do not allow the
exclusion or limitation of incidental or consequential damages, so the above limitations may not apply to you.
/