Page is loading ...


P
R
K
L
V1
Z
W
J
B
X
E
D
A
O
G
F
C
U
M1
T
P
R
K
L
Z
B
E
O
F
C
U
M1
N
T
SS
N
I
I
Ø
D
R
R
G
V1
W
X
Q
Q
J
A
M2
M2

R
K
L
Q
Y
W
B
X
A
O
G
F
C
U
M1
S
N
T
I
R
K
L
Q
Y
W
J
B
X
O
G
F
C
U
M1
I
S
D
Ø
R
R
V2
V2
J
T
A
M2
M2
D
P
P
N

Table of Contents
Safeguard Instructions E1
Introduction E2
Advanced Features E3
Criteria for Filter Selection/Flow Rates E4
Installation Instructions E5-E7
Maintenaince E8
Fluval Media Selection E9-E12
Replacement Parts E12
Table des matières
Mesures de sécurité à observer F2
Introduction F3
Conception d'avant-garde/Débits F4-F5
Critères pour le choix du modèle de filtre F5
Instructions pour l'installation F6-F8
Entretien F9-11
Masses filtrantes Fluval F11-14
Pièces de rechange F14
Inhaltsverzeichnis
Wichtige Sicherheitshinweise G1-G2
Einleitung G3
Fortschrittliches Filterdesign G4-G5
Kriterien für die Filterauswahl G5-G6
Montage-Anleitungen G6-G9
Wartungsvorschriften G10-G11
Wahl der Fluval Filtermedien G11-G14
Fluval Ersatzteile G14
Tabla de Materias
Importantes medidas de seguridad S1-S2
Intoducción S3
Un diseño de filtro avanzado S4-S5
Criterios para elegir el filtro S5-S6
Instrucciones para la instalación S6-S8
Mantenimiento S9-S11
Selección de los medios filtrantes Fluval S11-S14
Repuestos Fluval S14

Instructions
Read Thoroughly prior to installation and operation
IMPORTANT SAFEGUARDS
To guard against injury, basic safety precautions should be observed when handling the Fluval Canister Filter, including
the following:
1. For the complete enjoyment, use and understanding of this product,
READ AND FOLLOW ALL SAFETY INSTRUCTIONS
and all important notices on the appliance before using. Failure to do so may result in damage to the unit.
2.
DANGER – To avoid possible electrical shock, special care should be taken since water is employed in the use of
this equipment. For each of the following situations, do not attempt repairs yourself; return the appliance to an
authorized service facility for service or discard the appliance.
A. If the Fluval Motor Unit falls into the water, DON’T reach for it! First unplug it and then retrieve it. Disconnect
the plug from all appliances inside the aquarium before putting hands in the water. If the electrical components
of the appliance get wet, unplug the appliance immediately.
B. Carefully examine the appliance after installation. It should not be plugged in if there is water on parts not
intended to be wet.
C. Do not operate any appliance if it has a damaged cord or plug, or if it is malfunctioning or if it is dropped or
damaged in any manner.
The power cord of this appliance cannot be replaced; if the
cord is damaged, the appliance should be
discarded. Never cut the cord.
D. To avoid the possibility of the appliance plug or receptacle
getting wet, position the unit to one side of a wall mounted
receptacle to prevent water from dripping onto the receptacle
or plug. A “drip loop”(see illustration) should be arranged to
the receptacle. The “drip loop” is that part of the cord below
the level of the receptacle or the connector if an extension
cord is used, to prevent water traveling along the cord and
coming into contact with the receptacle.
If the plug or receptacle does get wet, DON’T unplug the cord. Disconnect the fuse or circuit breaker that
supplies power to the appliance. Then unplug and examine for presence of water in the receptacle.
3. Close supervision is necessary when any appliance is used by or near children.
4.
To avoid injury, do not contact moving parts or hot parts such as heaters,
reflectors, lamp bulbs, etc.
5. Always unplug an appliance from an outlet when not in use, before putting on or
taking off parts, and before cleaning. Never yank cord to pull plug from outlet.
Grasp the plug and pull to disconnect.
6. Do not use an appliance for other than intended use (i.e. don’t use on swimming pools, garden ponds,
bathrooms, etc.). The use of attachments not recommended or sold by the appliance manufacturer may cause an
unsafe condition.
7. Do not install or store the appliance where it will be exposed to the weather or to temperatures below freezing.
8. Make sure an appliance is securely installed before operating it.
9. Read and observe all the important notices on the appliance.
10. If an extension cord is necessary, a cord with a proper rating should be used.
A cord rated for less amperes or watts than the appliance rating may overheat. Care should be taken to arrange
the cord so that it will not be tripped over or pulled.
11. The pump must not run dry.
12.
SAVE THESE INSTRUCTIONS
For the complete use and understanding of this power filter it is recommended that this manual is
thoroughly read and understood. Failure to do so may result in damage to this pump.
E1

Introduction
For the complete enjoyment, use and understanding of this Canister Power Filter, it is
recommended that this manual be thoroughly followed. Failure to do so may result in loss of
fish life and/or damage to this filter. Save this manual for future reference.
This Fluval Canister Filter system incorporates the most advanced pump and media handling
technology presently available. It has numerous user features that permit greater control of
both the filter’s interaction with the aquatic environment and the aquarist’s desire to control
water characteristics. Now, more than ever, Fluval Canister filters provide a greater amount
of filter media and media configurations than any other comparable filter. A minimum of 4
and up to a maximum of 8 media types may be used in separate compartments, depending
on the filter chosen.
The space may be used according to the needs of each individual situation. Fluval
filters allow great flexibility to satisfy the many requirements of novice and advanced
enthusiasts alike.
Fluval Canister filters improve the way filter media is employed while at the same time
dramatically increasing filtration area. Water must pass through all media before it returns
to the aquarium. Instead of travelling in a direct path through the media, the water current
in the 4
th
generation Fluval system is actually directed in a complex flow path. This increases
the time that water is in contact with Fluval's many filtration media modules. The squared
design of the 4
th
generation Fluvals provides 35% to 55% increased volume over traditional
round containers while improving the water flow characteristics.
Fluval filters support a greater mass of filter material. This increases the life and efficiency
of the filter system. Maintenance requirements are reduced. General water purity
remains constant.
Conventional filters clog more rapidly and do not function as efficiently as Fluval. Fluval's
multi-leveled media design forces water into many channels and pathways which increases
contact time and thoroughly purifies water. Other filters cannot achieve the same level of
water purity. They cannot successfully increase the flow rate to the levels required to
compensate for the lack of filter media volume and contact time.
Canister filters are placed below the aquarium, to the side or back of the installation. They
do not detract from the beauty of the fish and their surroundings. Fluval filters are ideal for
custom situations where remote access to the filtration unit is required.
E2

Fluval 4th Generation: Advanced
Filter Design
Fluval Power Filters are designed to provide optimum aquarium filtration using a versatile combination of
mechanical, biological and chemical capabilities. This results in healthier fish and thriving aquatic plants.
Fluval filters are equipped with basic filter media. Additional filter chambers are available for many different
filter materials of your own choice. (See section on “Fluval Media Selection” for a complete listing of Fluval
Filter Media).
Motor Unit
Fluval’s motor is hermetically sealed with epoxy to ensure that it will continue to operate without difficulty in
adverse conditions. It does not require liquid or air coolant and can be placed in a closed cabinet with
restricted air flow without affecting the life or performance of the filter. Fluval filters are the leaders in energy
efficiency, moving more water per watt of consumption than other comparable filters. Fluval canister filters
require no motor maintenance. The motor has no moving parts except for the impeller.
Impeller and Ceramic Impeller Shaft Insert
Fluval increases efficiency and long-term durability by providing a removable Ceramic Impeller
Shaft Insert. It provides quiet operation and increases motor life and efficiency.
Self-Cleaning Impeller Well
The Magnetic Impeller Shaft Insert incorporates a self-flushing channel to keep the unit clean and debris-free
during operation. It backwashes fine silt and debris from the impeller well, reducing maintenance to a simple
flush during filter media changes.
Mechanical Filtration Area - Foam Screen Frame
The foam is contained in a convenient, accessible frame. The screen captures large particulate
waste to prevent it from clogging the Biological Filtration Area. The foam's placement ensures
efficient mechanical removal of waste. The massive foam surface captures and lodges large
waste. As water flows through the unit, the waste is broken down into smaller particles.
Biological/Chemical Filtration Area - Stackable
Filter Media Baskets
The media baskets permit full access to all media. This allows for partial or full filter media
changes, based on the user's requirements. Filter media expires at various times. In the case of
biological media, it is recommended to make only partial media changes, so as not to disturb the
biological balance of the aquarium. Fluval's Filter Media Baskets provide a convenient way to
access the various media types to perform full or partial media changes.
Output Nozzle
The Fluval 4
th
generation Output Nozzle has been designed to provide strong currents within the
aquarium, rotating horizontal flow direction and the ability to be installed above, at level, or
below the water surface, depending on the aquarist’s choice. An important characteristic of any
filter is the way it promotes oxygen replacement in the aquarium. The Fluval Output Nozzle provides excellent
surface agitation for this purpose.
Priming System
A simple pumping motion of the Self-Primer initiates water flow through the check ball that is
incorporated in the intake strainer.
Aqua-Stop
The Aqua-Stop makes maintenance easy by stopping the water flow, permitting you to separate the hose
assembly from the filter in one convenient step. It can be safely used to regulate water flow, without harming
the motor or its components.
E3

Lift-Lock Clamps
Two prominent clamps expedite the removal of the motor from the filter unit. By simply lowering
the clamps, the motor unit is separated from the filter.
Hose Lock Nuts
Safety connectors ensure a tight, leak-proof seal for all hose connections.
Criteria for Filter Selection
Flow Rates
Fluval Filters are available in four models to handle all aquarium requirements, from the smallest to large
commercial aquariums. Flow rates start at 480 liters per hour up to 1300 liters of hourly turnover
(Pump Output) depending on the model. Important factors in the choice of any filter are the filtration volume
and flow rate. The combination provides the essence of good filtration.
Water circulation is required to maintain oxygenation of the aquarium to sustain bacteria and biological
filtration. The more water filtered per hour, the cleaner the aquarium will remain.
Fluval's combination of contact time and flow provide the ideal filter function.
*NOTE: Flow rates were measured with Intake and Output hoses that were the same length.
Filter Area
The Fluval 4 series maximizes canister volume in all four models to provide more places for specific media
as well as increase the actual contact path through the canister. The filter chamber has been redesigned to
provide greater volume in its modern, aesthetic design. The more filter media volume, the greater the
mechanical efficiency and biological activity for the filtering process. Fluval meets this criteria.
Fluval Operating Characteristics
The intake stem can be placed anywhere in the aquarium; ideally in a location that can be easily disguised
by decoration. The most usual placement is on the back wall of the aquarium. The intake stem draws water
and suspended debris near the aquarium’s bottom into the filter unit by siphoning.
Water flows through the input assembly and into the unit. It passes through the Foam Screen Frame which
strips most particulate matter from the passing flow and holds it. It then must flow down under the first media
basket and start its journey up through the grid into the rest of the media. The pump draws the water
upward through the media baskets where it must come into contact with each stage of filtration. Tremendous
versatility of media choice is allowed by this arrangement of media baskets. The traditional ease of access to
all media baskets without disturbing the rest of the media is maintained and enhanced by this new
configuration. Filter media removes particles and liquid impurities and can also be used to actively change
the chemical characteristics of the water, depending on the aquarist’s needs. As the water flows, it brings
oxygen into the filter, feeding the needs of the beneficial bacteria breaking down nitrogenous wastes.
After passing through each discrete chamber, purified water enters the impeller well to be pumped back
to the aquarium.
FLUVAL 104 204 304 404
Aquarium Capacity
100 l/25 U.S. Gal. 200 l/40 U.S. Gal. 300 l/70 U.S. Gal. 400 l/100 U.S. Gal
.
Pump Output 480
l
/h-125 U.S. g/h 680
l
/h-180 U.S. g/h 1000
l
/h-260 U.S. g/h 1300
l
/h-340 U.S. g/h
Mechanical Area 36,800 mm
2
56,000 mm
2
56,000 mm
2
76,300 mm
2
Biological Volume 1,37
l
2,0
l
3,1
l
4,2
l
Filtration Volume 3,2
l
4,6
l
6,6
l
8,5
l
Filter Circulation* 330
l
/h-85 U.S. g/h 420
l
/h-110 U.S. g/h 710
l
/h-185 U.S. g/h 850
l
/h-225 U.S. g/h
Water Column Height (max.) 1,35 m / 4.4 ft 1,35 m / 4.4 ft 1,60 m
/ 5.2 ft 2,05 m / 6.7 ft
E4

Installation Instructions
*NOTE: READ ALL INSTRUCTIONS BEFORE
ATTEMPTING TO INSTALL FILTER
There are no tools required to install, maintain or operate the Fluval system.
DO NOT PLUG IN FILTER UNTIL UNIT IS FILLED WITH WATER (see step 28).
Recommendation: Top up water in aquarium before commencing.
Assembly
(*All letter references apply to front cover drawings)
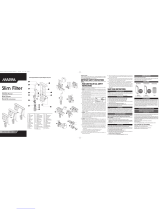
1) Verify that all components are present. (Refer to front cover).
2) Install feet. Press one foot (A) into each of the four
corners at the bottom of Filter Case (U).
PREPARING THE FILTER
3 Remove Motor Housing (B) from Filter Case (U)
by lowering the clamps on the sides of unit. Gently
push down clamps to disengage the motor unit.
4) Remove Foam Screen Frame (C). Remove Media
Basket Cover (F), and then Media Baskets (D) from
Filter Case (U).
5) Fill provided media in appropriate media baskets (see inside front
cover for recommended placement). Remove plastic bags from filter
media before placing them (do not remove carbon from porous bags).
NOTE: The media placement indicated on the front cover of the booklet
is only a recommendation. For optimum media efficiency, read “Filter
Media” section.
6 Rinse all media under tap water to remove any dust or debris before
initial use.
7) Replace Media Baskets (D) in Filter Case (U) and replace Media
Basket Cover (F). Ensure that the Media Baskets are properly filled and
stacked to avoid any problem with Motor Housing closing.
8 Rinse both sides of the Foam Screen Frame (C) under tap water to
remove any possible contaminants before initial use.
9 Replace Foam Screen Frame (C) in Filter Case (U). Refer to drawing
for proper placement.
Hint: Make sure it is not upside down.
10 Remove Seal Ring (G) from plastic bag. To ensure proper closure of
unit, make sure Seal Ring is wet before placing it in channel around
base of Motor Housing (B).
11 Install Impeller Cover (X) on underside of Motor Housing (B) on top of Impeller. Push down all
around the edges of the Impeller Cover (X), and then push the tabs outward to lock in place with a
slight “click”.
NOTE: Do not fill the canister with water prior to replacing the motor housing onto the filter case.
The Fluval incorporates a self-priming system that will allow water to be siphoned into the canister
(See #28).
12 Replace Motor Housing (B) onto Filter Case (U). Unhook the clamps by lowering them and
align the Motor Housing with the Filter Case.
Make sure that the power cord is properly
aligned with the indentation of the Filter Case
and that the text “MSF” in the front is
complete.
Then lock in place by lifting the upper
levers of the clamps until they “click”, making sure
that the clips located in the lower section of the
clamps correctly engage the Filter Case grip points.
INSTALLING THE FILTER
FILTER MUST NEVER BE INSTALLED ABOVE WATER LEVEL.
13) Location – Place the unit in its final
position before attaching hosing. The filter is
best located beneath the aquarium. Since the filter
uses gravity-feed, ensure the filter is stationed below the water level of the aquarium.
NOTE: The distance between the bottom of
the filter and the maximum water level must not exceed 4.5 ft (1.40 meters).
14 Insert the Aqua Stop (I) into Motor Housing (B) and push down the blue lever to lock the Aqua Stop in place. Open the valves by pushing
down the grey lever in order to let water flow to and from the canister. Be sure that the valves are fully open before operating the unit.
8
9
6
FLUVAL
10
FLUVAL
12a
IMPORTANT: Refer to front
cover for component
identification.
click!
click!
11
FLUVAL
12b
14a
14b
14c
FLUVAL
click!
3
12c
E5

15 Place both Hosing Brackets on the back side of the aquarium in desired positions.
Canopy may dictate these positions.
NOTE: The Hosing Bracket’s clip fits over the top of the aquarium rim with the longer section of the
Hosing Bracket remaining on the outside of the aquarium.
16 Attach Suction Cup Clip (L) and Intake Strainer (J) onto the Intake Stem (K) and affix to
inside of aquarium, approximately 1 cm under the Hosing Bracket (M1). To prevent blockage, the
Intake Strainer (J) should not be touching the gravel. If too long, cut straight across
the Intake Tube with a sharp knife.
17 Insert one end of Ribbed Hosing (P) on Intake Side
of Aqua Stop (I).
18 To secure hose, turn Lock Nut (Q) upwards until it
tightens on the hose’s permanent Rubber Adapter. Ensure
that the hose is securely locked on unit before proceeding
to the next step.
19 From the Fluval filter, pull Ribbed Hosing (P) up to
aquarium rim, then around the top of the hosing bracket
to where the top of the Intake Stem (K) is positioned, cut
hose where it meets the top of the intake stem.
(LEAVE SOME SLACK)
IMPORTANT: Ribbed Hosing (P) should
not be cut within 1.5” (4 cm) of Fluval
wording (cut ribbed area ONLY).
20 Push the Rubber Adapter (R)
onto the Intake Stem (K) and then
push the cut end of the Ribbed
Hosing (P) into the rubber adapter at
least 1” (2.5 cm) without twisting it.
21 Remove the Hosing Bracket
(M1) from the aquarium. Affix
suction cups to the Hosing Bracket
(M1). Affix ribbed Hosing (P) to
Hosing Bracket (M1) using the 4
Retaining Rings (M2). If the
application suggests, the Hose
Elbows (S) can be used instead of the 2 Retaining Rings of the hook
area. Place the Hosing Bracket (M1) back to the aquarium in the
previously located position. Gently press the suction cups to adhere
them to the tank.
NOTE: For larger rimmed aquariums use Hose Elbows (S) Option B.
22 Attach the permanent Rubber
adapter from the remaining piece of
Ribbed Hosing (P) to the Output Side
of the Aqua Stop (I).
23) Hand-tighten Hose Lock Nuts (Q).
24 From the Fluval filter, pull
Ribbed hosing (P) up to aquarium
rim, where the second Hosing
Bracket (M1) is positioned, and cut
approximately 5” (13 cm) above the rim with a
sharp knife.
(LEAVE SOME SLACK) IMPORTANT: Ribbed
Hosing (P) should not be cut within 1.5” (4 cm) of
Fluval wording (cut ribbed area ONLY).
25 Push the Rubber Adapter (R) onto Output
Nozzle (O) and then push the cut end of the
Ribbed Hosing (P) into the rubber adapter at
least 1” (2.5 cm) without twisting it.
26 Remove the second Hosing Bracket (M1)
from the aquarium. Affix suction cups to Hosing
Bracket (M1). Affix Ribbed Hosing (P) to Hosing
21
27
19a
4 cm
19b
25
2
27
AQUASTOP
system
OUT
T
22
20
2
21
IN
AQUASTOP
syste
m
OUT
S
T
TA
R
17
18
15
16
OPTION B
5"
24
2
E6
21
26
1

Bracket (M1) using the 4 Retaining Rings (M2). If the application suggests, the Hose Elbows (S) can be used instead of the
2 Retaining Rings of the hook area. NOTE: Position the Output Nozzle in front of the hosing bracket at the
desired depth. It is recommended to place it at or slightly below the water surface. It can be rotated
horizontally to ensure the output is pointed where current is required.
27 Place the Hosing Bracket (M1) back to the aquarium in the previously located position. Gently press the
suction cups to adhere them to the tank.
NOTE: For larger rimmed aquariums use Hose Elbows (S) Option B.
Option B: For larger rimmed aquariums the Hosing Bracket can be rotated 90° and will be positioned on the
outside of the aquarium.
STARTING THE FILTER
NOTE: An empty bucket or container should be handy in case
it is needed for inadvertent leaks while working with the filter.
28 In order to start the water flow, ensure that the
Output Nozzle (O) is above the water surface.
Make sure that the valves are open - the grey lever on the
Aqua Stop should be in the ‘down’ position.
Pump the Self-Primer (T) several times vigorously (use a fully
extended ‘UP’ and ‘DOWN’ motion). Keep pumping the Self-
Primer until you hear the water being drawn into the unit and filling it. By pumping
the Self-Primer, water is pulled into the unit through the Intake Stem. As the unit fills
with water, the pressure forces the air out of the unit through the output hosing.
Return the Self-Primer to the ‘DOWN’ position. Once the unit has filled, you can
plug it into a power source. Water should then flow in a steady stream from the
Output Nozzle. If it doesn’t, check that there are no kinks or loops in the hosing.
Then continue to pump the primer until unit starts to run on its own. Once the unit is
operating normally, the grey lever on the Aqua Stop can be used to regulate water
flow, without harming the motor. CAUTION: Do not operate the filter with the grey
lever on the Aqua Stop closed more than half way.
Never plug in unit until it is completely full. The Fluval unit
should never be allowed to run dry. Premature operation may
result in damage to the motor.
NOTE: Some air will inevitably be trapped within the unit as it fills, also, new media
may release trapped air into the Filter Case. This may result in some noise as the
unit starts working. The configuration of the filter will eventually expel all air pockets
in the filter over time. If the Filter Case continues to trap and expel air over an
extended time, carefully examine the Input/Output Sides for air leaks. Ensure there
is no air source (such as an airstone or aeration device) entering the Intake Side of the filter.
MAX
4.5 FT
1.40 meters
A Note About Media
Efficiency is directly affected by the filter materials used. In any canister unit it is critical that proper procedures be
carefully followed. Otherwise, the mechanical or biological efficacy may be impaired. In many cases the location of
the media in the baskets will determine its main purpose. For instance, depending on media basket positions,
carbon can act as a primary dirt screen or a major area of bacterial population. To ensure the maximum utility of
the filter, there are a few basic rules of thumb that should be followed.
Properly prepare all filter materials before use.
Porous material, such as carbon, has a tremendous open area within the matrix and requires a bit of time to expel
atmospheric gasses. It should be soaked for several minutes before being added to the media basket. There are other
materials that require more extensive rinsing. Ammonia Remover and peat fibers may require a thorough rinsing to
ensure they do not add extra particles that may prematurely clog other modules or discharge into the aquarium.
Mechanical filtration should be used during the first stages of filtration.
Create a coarse to fine screen with the media chosen. The Foam Screen is an effective mechanical sieve that will
remove coarse and medium debris. A finer screen can be placed in the lowest Media Basket to ensure the purest
stream possible before it enters the biological [and possibly chemical] filtration that relies on debris-free water for
maximum efficiency.
Incorporate Biological areas after mechanical filtration. Protect from debris as much as possible.
There are a number of media that become highly biological in nature as they mature. This is due to the fact that
these substrates provide clean, hard attachment points for the beneficial bacteria to colonize. For nitrifying bacteria
to be most effective, they must receive a constant stream of waste-free water that carries ammonia, nitrite and
oxygen in the solution.
28b
28
E7
OPTION B

Maintenance Procedures
NOTE: It is recommended to periodically lubricate all rubber parts
(ex. motor head seal ring, primer stem and Aqua Stop seal ring)
with Fluval Silicone Lubricant (A-325).
Media Maintenance
Filter materials must be periodically replaced or cleaned. The various
Fluval media have instructions for use on the individual packaging.
Actual lifespan of any type of media varies according to usage and
the individual characteristics of an aquarium.
Close the valves by fully lifting the grey lever. Unplug the filter. Then
gently lift the large blue center handle to release the Aqua-Stop
●●
. The filter should be
transported in an upright position to eliminate the possibility of water splash.
***NOTE: Grip the filter canister body
●
, not the Lift-Lock Handles when transporting the unit
from installation to maintenance area.
It is not necessary to remove the hose system from the aquarium unless the hoses or the Aqua-Stop
require cleaning. Periodic cleaning is recommended to ensure an optimal flow rate. In order to
clean the Aqua-Stop or hosing, rinse under water and, if necessary, use an appropriate Fluval
Cleaning Brush or tool.
Once the filter is in a waterproof place such as a sink, lower and gently push the clamps on the
side of unit down to free the motor housing from the filter case
●
See the section “Preparing the
Filter” for detailed instruction on Media Baskets.
IMPORTANT: Empty water from filter case before proceeding. Tilt the unit over a sink while holding
the media baskets in place in order to empty water from the filter.
Rinse or replace media as required. The filter case should be rinsed whenever the media is
cleaned or changed. NEVER use soap or detergents when
cleaning. Any remaining traces may result in damage to
sensitive fish tissues.
Replace Media Baskets in the filter case and slide in the
Foam Screen Frame. To perform any required Impeller
care, see "Impeller Maintenance"section. Set the Motor
Housing back in place. There is only one way in which the
unit can be properly assembled.
Make sure the power
cord is properly aligned with the indentation on the
filter case and that the text “MSF” is complete
●
.
Then lock in place by lifting the upper levers of the Lift Lock Clamps until they “click”, making sure that the clips
located in the lower section of the clamps correctly engage the filter case grip points
●
. Return the filter to its
original position. Insert the Aqua-Stop (I) into the Motor Housing (B) and push down the blue lever to lock the
Aqua-Stop in place. Open the valves by pushing down the grey lever in order to let water flow to and from the
canister. IMPORTANT: Water should start flowing immediately, otherwise, pump the Self
Primer to start
●
.
Allow the filter case to completely fill before plugging the unit into power.
The Fluval unit should never be allowed to run dry. Plugging the unit in
before the filter case is full may prevent the self-priming feature from
working properly.
f.1
f.3
f.2
f.1 f.2
f.3
f.7
f.4
f.5
f.6
f.7
f.4
FLUVAL
FLUVAL
f.5
f.6
E8

Alternate new media introduction
Filter media should be changed at the regular recommended intervals. However, not all media should be replaced at one
time. Stagger filter media changes so there is always old filter media in the filter. This enhances replacement of important
bacterial colonies lost with discarded media. It promotes rapid seeding for continued bacterial action within the filter.
To further heighten the bacterial filter, use Nutrafin Cycle Biological Aquarium Supplement once a week to institute,
supplement and promote the correct beneficial bacteria and to encourage them to become the dominant strains within
the bacterial filter.
WARNING
The power supply cord of this appliance cannot be replaced; if the cord is damaged, the appliance
should be discarded. Disconnect the plug from all appliances inside the aquarium before putting hands
in the water. The pump must never be allowed to run dry.
Impeller Maintenance
Important: these motor units contain an Impeller Fan with Ceramic Shaft. This kind of
shaft is more resistant to wear and tear but it is fragile. Special care is recommended
during maintenance.
The impeller well has an effective self-cleaning feature. Regular monitoring for dirt
build-up can help lengthen the life of the impeller and motor unit.
To access the impeller, remove the impeller cover by squeezing the two tabs.
The Magnetic Impeller should be cleaned when necessary. To remove it, gently grasp the
impeller fan and withdraw it from the well and rinse off under clean water. Check that the Impeller Well is clean.
If necessary, use a Fluval Cleaning Brush to clean it out. Then reinsert Impeller.
When maintenance is complete, place the Impeller Cover (X) into its seat again and lock it in place by pushing down all
around the edges and then pushing the tabs outward until a slight "click" is heard (make sure that the Impeller Shaft is
properly reinserted into the shaft support ring of the Impeller Cover).
Warning (models 104 & 204): These
motor units incorporate a ceramic
impeller shaft. This shaft is
permanently attached to its plastic
holder for safe handling. The shaft is
brittle to lateral pressure. Take
extreme care when handling.
Do not try to bend the shaft.
Specific notes concerning Fluval 104 and 204
The Fluval 104 and 204 models come with a ceramic shaft, which is attached to its yellow plastic support (Ceramic Shaft
Assembly). It is not recommended to remove the Ceramic Shaft Assembly unless it breaks. To remove the yellow Ceramic
Shaft Assembly from the Impeller Well use the provided Ceramic Shaft tool (Z) and .
To reinsert the Ceramic Shaft Assembly: place the Magnetic Impeller (W) on the Ceramic Shaft Assembly and reinsert
them into the Impeller Well by pushing gently on the Impeller Fan to lock them in place.
Specific notes concerning Fluval 304 and 404
The Fluval 304 and 404 models come with a Ceramic Shaft fixed on the bottom of the Impeller Well by a Rubber
Support. The Ceramic Shaft can be easily extracted and reinserted by hand,
paying close attention to the Rubber
Support to ensure that it has not come out of its seat
. Note: Be sure to reinsert the impeller cover to ensure
proper alignment.
The Impeller will wear over a longer period of time. Replacement parts may be ordered from your local pet dealer
(see ”Fluval Spare Parts” list).
Fluval Media Selection
Types of Filtration
Mechanical – Removal of waste particles and solid debris through mechanical strainers.
Biological – Breakdown and elimination of organic toxins - ammonia and nitrite - through bacterial action.
Chemical – Active change of water characteristics through the use of chemical compounds.
click!
click!
f.8
f.9
f.10
(Models 104 and 204 only)
f.11
(Models 304
and 404 only)
f.8
f.9 f.10
f.11
E9

Fluval Filtration Area
Section 1 – The Foam Screen Frame
Fluval offers a wide variety of filter materials, some capable of performing more than one job. Fluval 4
th
generation filters
provide automatic mechanical particle removal with the Foam Screen Frame. It is extremely important to remove wastes
before they enter the more delicate media in the Media Baskets.
Section 2 – The Stack of Media Baskets
The true power of the Fluval System resides in the versatility of the media choices available for the Stack of Media Baskets.
This section is meant as more of a guide than a definitive manual. Versatility and aquarist choice of media should be the
main criteria. However, it is best to follow some or all of the following guidelines. The choice of media should follow a
number of criteria.
Bottom Media Basket
Media that continues the mechanical capture of waste should be in the lowest media basket, purifying and removing
particles before they can clog delicate pores of biological or chemical substrates. Fluval Media such as “Pre-Filter”,
“Carbon” and “Zeo-Carb” can be used to further screen small particles from the water. Pre-Filter is inert, acting solely to
create a screen. Carbon removes dyes, medications and solubilized wastes that a simple screen cannot. “Zeo-Carb”
removes ammonia from the water. This is often used in beginning set-ups to keep initial spikes lower than would
occur naturally.
Middle Media Basket
The middle media basket is useful for chemical modifications of the water. “Peat Fibre” and “Peat Granular” are an
example of this. An important consideration for media placement is the type. Peat Fibre consists of strands which can rise
up and wrap around an impeller. For this reason, any media that is string-like in nature should be kept below other filter
media. The middle chamber can begin the biological reduction process as well. Many media types will serve as both
mechanical and biological, offering an excellent place for beneficial bacteria to populate. Even many chemical compounds
will support colonies of bacteria. With the main mechanical purification of the water stream occurring in the Foam Screen
Frame and below the second media basket, it is normal to load additional biological media into the middle media basket.
“BioMax”, extra “Carbon” or “Ammonia Remover” are quite commonly used in the mid-media basket. This is also the
area where more exotic media chosen for a specific application can occur.
Top Media Basket
The highest basket receives the purest water stream, making this the proper place for dedicated biological media.
“BioMax” provides optimal biological power in a very compact ring. With the multitude of pores perforating the surface
and internal matrix, “BioMax” is an ideal substrate for the top media basket. It also provides a trap to capture any loose
strands that might affect the operation of the impeller.
FLUVAL
FS
H
M
L
Foam - FS
Fluval Foam Screen Insert – 2 Pack A-220, A-222, A-226
The construction of the Foam inserts allows large waste capture in the Foam Screen Frame, to eliminate
most solid wastes before they can clog biological and fine mechanical media. The numerous pathways
that the water is forced to travel through as it flows through the foam also increase the filtering efficiency.
Although not permanent, the foam inserts can be rinsed and reused a number of times before
replacement.
FILTER
MEDIA
E10

Fluval Peat Fiber A-1460 (70 g)
Fluval Peat Fiber is a select fibrous peat ideal for use in freshwater aquariums. This safe, natural filter media
provides optimal water conditions for many species of fish originating from specific tropical environments. Many
species of fish can benefit from the compounds found in Fluval Peat Fiber. Examples include species of South
American Cichlids (Angelfish, Discus, Apistogramma etc.), Corydoras Catfish, Tetras, Gouramis and Barbs.
Fluval Peat Fiber will gradually release beneficial elements and will contribute to vibrant colors, enhance
breeding success, and give superior conditions for a variety of fish species that thrive in soft acidic water.
It is recommended to verify the desired pH and KH levels by testing with Nutrafin pH and KH test kits on a
regular basis. Fluval Peat Fiber will gradually reduce pH and KH levels. The recommended KH range is 50 to
120 mg/L (approx. 3 to 7 dKH to support safe, stable pH levels) for proper maintenance of certain species of
fish. Use Nutrafin pH Stabilizer for superior results in maintaining an optimal KH value. The replacement of
Fluval Peat Fiber media is determined by testing and the diminishing effect it has on pH and KH levels.
Fluval Peat Fiber should be placed in the middle media basket of canister filter systems to avoid strands from
entering the impeller chamber.
Fluval Peat Granular A-1465 (500 g)
Fluval Peat Granular is a select granular peat ideal for use in freshwater aquariums. This concentrated, safe,
natural filter media provides optimal water conditions for many species of fish originating from specific tropical
environments. Many species of fish can benefit from the compounds found in Fluval Peat Granular. Examples
include species of South American Cichlids (Angelfish, Discus, Apistogramma etc.), Corydoras Catfish, Tetras,
Gouramis and Barbs.
Fluval Peat Granular releases beneficial elements and will contribute to vibrant colors, enhanced breeding
success, and superior conditions for a variety of fish species that thrive in soft acidic water.
It is recommended to verify the desired pH and KH levels by testing with Nutrafin pH and KH test kits on a
regular basis. Fluval Peat Granular is a concentrated filter media and will initially reduce pH and KH levels at
a quicker rate than fibrous peat. The recommended KH range is 50 to 120 mg/L (approx. 3 to 7 dKH to
support safe, stable pH levels) for proper maintenance of certain species of fish. Use Nutrafin pH Stabilizer for
superior results in maintaining an optimal KH value. The replacement of Fluval Peat Granular media is
determined by testing and the diminishing effect it has on pH and KH levels.
PolyWool – L, M
“PolyWool” is a common filter material that can be used to provide an inexpensive mechanical screen in the
lower media baskets. This will remove fine particles and keep biological materials from being clogged
prematurely. It will polish aquarium water to a crystal clear finish. Do not place in top of media
basket.
Carbon – L, M A-1440 (3x100 g), A-1445 (375 g)
Fluval Activated Carbon provides many benefits in both fresh and marine water. The high quality carbon
provides a large porous area to trap minute particles. Besides providing a small sieve for mechanical trapping
of organic wastes, carbon also removes liquid wastes from water. These include urine, dyes or impurities in
solution. This action provides sparkling clear water in the aquarium. The large internal surface area also
provides numerous points for important bacterial colonies to form and thrive. Carbon should always be
removed during medication. It has also been recently noted that carbon will adsorb a large percentage of
many of the nutrients in plant fertilizer products. As such, it should be used carefully when keeping live plants.
Carbon loses its activity without outward sign. In general, carbon should be replaced on a monthly basis to
ensure that active adsorption is maintained.
BioMax – M, H A-1455
Fluval BioMax is suitable for both fresh and marine aquariums. When used in a center or top media basket,
Fluval BioMax is the ideal host material for large populations of beneficial bacteria. The ring size and shape
provide an excellent strainer for medium and large particulate wastes when used in the middle media basket.
The biological activity is still noticeable when used in lower levels, but the rings will clog much more rapidly
than when they are used higher in the filter. Bacterial activity and growth will gradually clog the internal pores
that make it such a fantastic biological substrate. BioMax should be replaced every six months, but only half
should be replenished at one time to allow proper seeding from older media to new.
Ammonia Remover – M, H A-1480 (3x180 g), A-1485 (700 g)
Ammonia Remover removes ammonia before it can harm fish. An effective addition to normal filter media, it
reduces unacceptable levels of ammonia. In chloramine treated water, it helps remove excess ammonia
created when the chloramine bond is broken to release free ammonia. Ammonia Remover should be used
exclusively in freshwater as its ionic functions release captured ammonia in brackish and saltwater. Ammonia
Remover does not show any physical change as it loses its activity, which is determined by the amounts of
ammonia it contacts. Ammonia Remover should not be left in the filter longer than a month.
E11

Type Fluval 104 Fluval 204 Fluval 304 Fluval 404
Item Number
A-200 A-205 A-210 A-215
Filter Volume Liters 3.2
l
4.6
l
6.6
l
8.5
l
Filter Baskets Number 2 3 3 4
Pump Output
l
/h 480 680 1000 1300
Pump Output US g/h 125 180 260 340
Technical Specifications
Spare Parts
Pre-Filter – L A-1470 (750 g)
Fluval Pre-Filter consists of inert, solid ceramic rings used to trap large and medium solid particles before they
clog the finer sieves of the media baskets above. The media forces water into many complex paths as it
moves through this layer. This further increases its mechanical and biological activity and expands the actual
contacted filter area. An additional benefit, it supports large populations of bacteria for proper biological
action on ammonia and nitrite.
This reduces the need for frequent changes of the active filter media. Pre-Filter is permanent, and requires
only occasional rinsing. This media can be used in fresh and marine environments without difficulty.
Zeo-Carb – L, M, H A-1490 (3x150 g), A-1495 (600 g)
Zeo-Carb combines UltraGrade Carbon with Ammonia Remover to protect the aquarium from build-ups of
both ammonia and liquified wastes, dyes and medications. The ammonia remover will also help remove the
ammonia released when the chloramine bond in some municipal water supplies must be broken. The purity
of the carbon prolongs active life and releases no phosphates into the water. Zeo-Carb should be replaced
at least every month, more often if the aquarium is heavily loaded to ensure that the medias remain active
and useful.
Parts Fluval 104 Fluval 204 Fluval 304 Fluval 404
A Rubber Feet A-20121 A-20121 A-20121 A-20121
B MSF Motor Housing A-20180 A-20185 A-20190 A-20195
C Foam Screen Frame A-20117 A-20137 A-20137 A-20177
D Media Basket A-20045 A-20045 A-20070 A-20070
E Media Basket Tray A-20047 A-20047
F Media Basket Cover A-20042 A-20042 A-20067 A-20067
G Motor Seal Ring A-20038 A-20038 A-20063 A-20063
I Aqua-Stop A-20060 A-20060 A-20060 A-20060
J Intake Strainer with check ball A-20007 A-20007 A-20007 A-20007
K Intake Stem A-20005 A-20005 A-20005 A-20005
L Suction Cup (40 mm) with clip A-15520 A-15520 A-15520 A-15520
M1 Hosing Bracket A-20026 A-20026 A-20026 A-20026
M2
Retaining Ring (Hosing Bracket)
A-20028 A-20028 A-20028 A-20028
N 30 mm Suction Cup A-15041 A-15041 A-15041 A-15041
O Output Nozzle A-20001 A-20001 A-20001 A-20001
P Ribbed Hosing A-20014 A-20014 A-20015 A-20015
Q Hose-Lock Nuts A-20058 A-20058 A-20058 A-20058
R Rubber Adapter A-20016 A-20016 A-20017 A-20017
S Hose Elbow A-20018 A-20018 A-20019 A-20019
T Self-Primer Assembly A-20020 A-20020 A-20020 A-20020
U MSF Filter Case A-20182 A-20187 A-20192 A-20197
V1 Ceramic Shaft Assembly A-20041 A-20041
V2
Ceramic Shaft + Rubber Support
A-20066 A-20066
W Magnetic Impeller A-20111 A-20111 A-20152 A-20172
X Impeller Cover A-20116 A-20136 A-20156 A-20156
Y
Impeller Well Insert A-20174 A-20174
Z Ceramic Shaft Tool A-17015 A-17015
E12

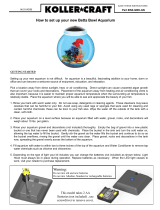
Notice d’utilisation
Avant d’installer ou de faire fonctionner cet appareil, lire attentivement cette notice.
MESURES DE SÉCURITÉ
Pour éviter tout accident, il est important de suivre les précautions suivantes:
1. Pour bien comprendre le fonctionnement de l’appareil et en obtenir un rendement
optimal, il est important de
LIRE ET SUIVRE TOUTES LES MESURES DE
SÉCURITÉ
ainsi que toutes les instructions notées sur l’appareil
:
2.
DANGER – Du fait de l’utilisation de l’eau et d’un appareil électrique, une
grande prudence est de rigueur. Dans chacune des situations suivantes, ne pas
essayer de réparer l’appareil soi-même ; l’envoyer pour réparation à un service
autorisé ou le jeter.
A. Si le bloc-moteur du filtre Fluval tombe à l’eau, NE PAS le ramasser !
LE DÉBRANCHER D’ABORD, et ensuite le sortir de l’eau. Débrancher tous les
appareils qui se trouvent à l’intérieur de l’aquarium avant de mettre les mains
dans l’eau. Si par mégarde les composants électriques sont mouillés, débrancher
immédiatement l’appareil.
B. Vérifier l’appareil après son installation.
C. Ne pas faire fonctionner un filtre défectueux, tombé ou endommagé. Idem si
la fiche ou le cordon sont endommagés. Le cordon d’alimentation de cet
appareil ne peut être remplacé. S’il est endommagé, l’appareil
doit être jeté. Ne jamais couper le cordon.
D. Afin d’éviter que l’appareil ou la prise de courant soient mouillés, installer
l’appareil d’un côté ou l’autre du bac et faire un col de cygne. Le col de cygne
est la partie du fil qui se trouve entre la prise de courant et le corps de l’appareil
(voir illustration) ou sous la prise de courant et le connecteur si une rallonge est
utilisée. L’eau ne coule pas ainsi le long du fil et n’entre pas en contact avec la
prise de courant.
Si la fiche ou la prise de courant sont mouillées, NE PAS débrancher le
cordon. Débrancher dans un premier temps le fusible ou disjoncteur qui fournit
l’électricité à l’appareil, et ensuite débrancher l’appareil en vérifiant qu’il n’y ait
pas d’eau dans la prise.
F1

Notice d’utilisation (suite)
3. Il est recommandé de surveiller étroitement les enfants qui utilisent cet appareil ou
qui s’en trouvent à proximité.
4.
Pour éviter les accidents, ne pas toucher aux pièces mobiles
ou chaudes comme les chauffe-eau, les réflecteurs, les
ampoules, etc.
5. Toujours débrancher l’appareil quand il n’est pas utilisé,
quand des pièces sont enlevées ou remplacées et avant
l’entretien. Ne jamais tirer sur le fil pour débrancher
l’appareil; prendre la fiche et débrancher l’appareil.
6. Ne pas utiliser cet appareil pour un autre emploi que celui pour lequel il a été
fabriqué (ne pas l’utiliser dans une piscine, un bassin de jardin, une baignoire,
etc.). Les pièces non vendues ou non recommandées par le fabricant pourraient
compromettre la sécurité de l’appareil.
7. Ne pas exposer cet appareil aux intempéries ou à une température en-dessous
de 0 °C.
8. Vous assurer que l’appareil est bien installé avant de le faire fonctionner.
9. Lire et suivre toutes les instructions concernant cet appareil.
10. Si une rallonge électrique est nécessaire, vous assurer qu’elle est d’un calibre
suffisant. Un cordon de calibre inférieur ou de moins d’ampères ou de watts que
l’appareil peut surchauffer. Le cordon doit être placé de façon à éviter que
quelqu’un ne trébuche.
11.Ce filtre ne doit pas fonctionner à sec.
12.
CONSERVER CES INSTRUCTIONS. Pour une compréhension
complète de ce filtre à moteur, il est recommandé de lire soigneusement ce
manuel. Manquer à cette recommandation peut entraîner des dommages
à l’appareil.
F2

Introduction
Pour une compréhension complète du fonctionnement de ce filtre extérieur, et pour en profiter
pleinement, il est recommandé de lire soigneusement ce manuel. Manquer à cette
recommandation peut entraîner des dommages au filtre. Conserver ces instructions.
Le filtre extérieur Fluval combine pompe d’avant-garde et grande variété de masses filtrantes.
Il est simple à utiliser et permet de plus facilement prévoir son action sur l’environnement
aqueux et sur les caractéristiques de l’eau. Plus que jamais, le filtre Fluval peut contenir une
plus grande quantité de masses filtrantes qui peuvent être utilisées dans un nombre de
combinaisons impensable dans un autre filtre. Selon le modèle, un minimum de 4 masses et
un maximum de 8 masses peuvent être utilisées et placées dans des compartiments séparés.
L’espace de filtration peut être utilisé selon les besoins propres à chaque situation. Les filtres
Fluval permettent une plus grande flexibilité d’emploi et ils répondent aux besoins autant des
aquariophiles débutants que chevronnés.
Dans le filtre extérieur Fluval, le rendement et la surface des masses filtrantes sont supérieurs.
L’eau doit passer à travers toutes les masses filtrantes avant de retourner dans l’aquarium. Au
lieu de suivre un parcours direct à travers les masses, le courant d’eau dans le système Fluval
– 4
e
génération doit emprunter un chemin constamment détourné. Ceci accroît le temps qu’il
faut à l’eau pour traverser tous les modules de filtration. La forme carrée du filtre Fluval - 4
e
génération accroît de 35 à 55 % le volume de filtration comparativement à ce que l’on peut
s’attendre des contenants cylindriques habituels, et elle permet une meilleure circulation de l’eau.
Le filtre Fluval peut contenir un plus grand volume de masses filtrantes. Ceci augmente la
durée et l’efficacité du système de filtration, en réduit l’entretien et favorise une eau d’une
pureté générale constante.
Les filtres ordinaires s’obstruent plus rapidement et ils ne sont pas aussi efficaces que les filtres
Fluval. Le design à multiples niveaux de la chambre de filtration du filtre Fluval force l’eau à
emprunter un chemin constamment détourné, ce qui augmente le temps de contact eau-masse
et purifie complètement l’eau. Les autres filtres sont incapables d’atteindre un même niveau de
purification. En effet, il est impossible dans ces filtres d’augmenter le courant d’eau au niveau
nécessaire pour compenser le manque de volume de filtration et de temps de contact eau-
masse filtrante.
Les filtres extérieurs sont placés sous l’aquarium, sur le côté ou à l’arrière. Ils n’altèrent en rien
la beauté des poissons et du milieu. Le filtre Fluval est idéal dans des situations où il doit être
installé à distance de l’aquarium.
F3
/