Page is loading ...

USER MANUAL
GUIDE DE L’ UTILISATEUR
MANUAL DE INSTRUCCIONES
GEBRUIKERSHANDLEIDING

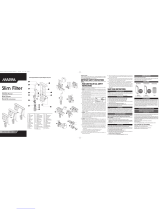
PRODUCT PARTS
1 Hosing
2 Rim connectors (2)
3 Rim connector clips (6)
4 Small suction cups (8)
5 Intake assembly
6 Output assembly
7 Metal clamps (2)
8 AquaStop valves (2)
9 Filter lid / O-ring
10 Lid fasteners (8)
11 Filter canister
12 Purge valve
13 Drain cap
14 Pump unit & power cord
15 Purge valve hosing
Filter baskets with foam inserts
a Foam (6)
b T handles (2)
c Media baskets (3)
d Bio-Foam (2)
e Ceramic Rings (BioMax)
f Carbon Pad
g Media bags (2)
Table of Contents
Safeguard Instructions EN-2
Introduction EN-4
State-of-the-Art Technology EN-5
Installation & Use EN-7
Fluval Advanced Filtration EN-15
Fluval Filter Media EN-16
Fluval Lab Series Media EN-17
Maintenance
Canister Draining
Purge Valve Draining EN-18
Filter Pump Draining EN-19
Media Care EN-20
Pump Care EN-22
Changing Aquarium Water EN-24
Replacement Parts EN-26
EN-1

IMPORTANT SAFETY INSTRUCTIONS
WARNING - To guard against injury, basic safety precautions should be observed including the following:
READ AND FOLLOW ALL SAFETY INSTRUCTIONS
To guard against injury, basic safety precautions should be observed when handling the Fluval Canister
Filter, including the following:
1. READ & FOLLOW ALL SAFETY INSTRUCTIONS and all the
important notices on the appliance before using. Failure to
do so may result in the loss of fish life and/or damage to
the appliance.
2. DANGER – To avoid possible electric shock, special
care should be taken since water is employed in the
use of aquarium equipment. For each of the following
situations, do not attempt repairs yourself, return the
appliance to an authorized service facility for service or
discard the appliance.
A. If the appliance falls into the water, DON’T reach
for it! First unplug it and then retrieve it. If electrical
components of the appliance get wet, unplug the
appliance immediately.
B. If the applicance shows any sign of abnormal water
leakage or if RCD (or GFCI – Ground Fault Current
Interrupter) switches off disconnect the power supply
cord from the mains and remove pump from water.
C. Carefully examine the appliance after installation. It
should not be plugged if there is water on parts not
intended to be wet.
D. Do not operate any appliance if it has a damaged
cord or plug, or if it is malfunctioning or it is dropped
or damaged in any manner. The power cord of this
appliance cannot be replaced. If the cord is damaged,
the appliance should be discarded. Never cut the cord.
E. To avoid the possibility of the appliance plug or
receptacle getting wet, position the appliance to one
side of a wall mounted receptacle. To prevent water
from dripping onto the receptacle or plug, a “drip loop”
(see photo) should be arranged by the user in the cord
connecting appliance to a receptacle. The “drip loop” is
that part of the cord below the level of the receptacle or
the connector, to prevent water travelling along the cord
and coming in contact
with the receptacle. If the
plug or receptacle does
get wet, DON’T unplug
the cord. Disconnect the
fuse or circuit breaker
that supplies power to the
appliance. Then unplug
and examine for presence
of water in receptacle.
3. WARNING – Close supervision is necessary when any
appliance is used by or near children. This appliance is not
intended for use by persons (including children) with reduced
physical, sensory or mental capabilities, or lack of experience
and knowledge, unless they have been given supervision or
instruction concerning use of the appliance by a person
responsible for their safety. Children should be supervised to
ensure that they do not play with the appliance.
4. To avoid injury, do not touch moving parts or hot parts.
5. CAUTION – Always unplug or disconnect all appliances
in the aquarium from electricity supply before placing
hands in water, before putting on or taking off parts and
while the equipment is being installed, maintained or
handled. Grasp the plug and pull to disconnect. Never
yank cord to pull plug from outlet. Always unplug an
appliance from an outlet when not in use.
6. This appliance is not a submersible aquarium filter-pump.
It is intended for use in ornamental household aquariums.
It may be used with fresh or salt water. Maximum water
temperature 35°C. Do not use this appliance for other than
intended use (i.e.: do not use in swimming pools, bathrooms,
etc.). The use of attachments not recommended or sold by
the appliance manufacturer may cause an unsafe condition
and will invalidate your warranty. Do not use this appliance:
a. In swimming pools or other situations where people are
immersed;
b. With inflammable or drinkable liquids.
7. This is a HOUSEHOLD APPLIANCE INTENDED FOR
DOMESTIC USE and it is suitable for INDOOR use only. Do
not install or store this appliance where it will be exposed to
the weather or temperatures below freezing.
8. Make sure that this appliance is securely installed before
operating it and that the electrical connection is in
accordance with the data on the rating label. Do not allow
filter pump to run dry.
9. If an extension cord is necessary, a cord with proper rating
should be used. A cord rated for less amperes or watts than
the appliance rating may overheat. Care should be taken to
arrange the cord so that it will not be tripped over or pulled.
The connection should be carried out by a qualified electrical
installer.
10.
SAVE THESE INSTRUCTIONS
for future reference.
EN-2

IMPORTANT
To ensure optimal and proper functioning of your Fluval
FX6 External Filter, regular maintenance is required. Failure
to do so may result in the failure of the filter and will
invalidate your warranty. Additionally, regular cleaning
and maintenance will greatly reduce or completely prevent
faults and reduction in performance. Please refer to the
maintenance schedule below.
MAINTENANCE FREQUENCY CHART
COMPONENTS MONTHLY EVERY 3
MONTHS
EVERY 6
MONTHS
YEARLY
Magnetic impeller Check & Clean Replace
Intake Stem/Strainer/Hosing Check & Clean
Ribbed Hosing Check & Clean
Mechanical Foam Check & Clean Replace half
quantity
Bio-Foam Check & Clean Replace half
quantity
BIOMAX Rinse Replace half
quantity
Carbon Pad Replace
EN-3

The Fluval Canister Filter offers unparalleled
filtration power, maximum versatility and incredible
control in fine tuning water characteristics. Our
multistage system allows you to stack filtration
media in the precise combination of layers that will
work best for your aquarium. Thus providing you
infinite flexibility in creating and maintaining the
ideal environment for your fish.
Its massive capacity and powerful integrated motor
processes and re-circulates fully 563 US gallons
(2130 liters) of water every hour, enabling you to
precisely manage water conditions for aquariums as
large as 400 US gallons (1500 liters) with a very low
power consumption. Thanks to the extendable intake
tube, the filter can be adjusted to fit most aquariums
on the market. It will hold up to 1.5 gallons (5.9
liters) of media, yet it’s compact enough to fit under
almost any aquarium cabinet. With Fluval’s unique
Smart Pump technology, this self-priming system
offers plug-in-and-start convenience. Upon start-
up the canister fills with water, pauses to evacuate
air, immediately begins the filtering process, and
continues filtering until it is unplugged. Once every
12 hours, the filter will pause again to evacuate
any air that has become trapped in the system–to
maintain the total vacuum necessary for maximum
efficiency.
The FX6 filter offers a versatile combination of
mechanical, biological and chemical filtering
capabilities. This versatility enables you to customize
your aquarium environment to meet the specialized
needs of your unique collection of fish and aquatic
plants. Your filter is completed with pre-packed
filter media that will work with best performance
in most basic aquariums. However, you have the
option of selecting different media, or alternative
configurations of media, if you wish.
The FX6 Filter also offers incomparable ease-of-
use features: click-fit connections you just push
on; AquaStop valves so you can handle routine
maintenance without breaking the system’s
vacuum, no need to disassemble hosing; innovative
handles that let you lift the entire stack of baskets
out to change or clean media; and a purge valve and
hosing so you can empty the canister easily, no need
to move or lift a heavy, water-laden tank.
This filter’s superior performance and capability are
backed by Fluval’s well earned reputation for the
best in fish and aquarium care. HARS (Hagen Aquatic
Research Station) certification is your assurance of
the most up-to-date and reliable research in aqua-
care science. For complete understanding of your
Fluval Multi-Stage Canister Filter, and enjoyment
of all its capabilities, please read and follow these
instructions for proper installation, maintenance,
and use. Failure to do so may result in loss of
fish life and/or damage to the filter. Save these
instructions for future reference.
HIGH PERFORMANCE CANISTER FILTER
SYSTEM OVERVIEW
The FX6 Filter siphons water and suspended debris
in through its clog-proof intake strainer, then sends
it through three levels of foam, which traps most
particulate matter. The powerful pump then sends it
through the multiple levels of media, which is pre-
packed into the filter baskets at the factory in the
recommended positions for basic filtration in order
to save you time and eliminate guesswork.
As water flows back into the aquarium, the flared
design of the adjustable output nozzle disperses it in
multiple directions, agitating the water and creating
currents that help break down wastes, and prevent
them from settling. All for a continuous flow of pure,
precisely treated water.
EN-4

FLUVAL STATE-OF-THE-ART TECHNOLOGY
AquaStop Valves
The AquaStop valve makes maintenance easy by allowing you to stop
the water flow with an easy 90-degree turn of the valve lever. This
means you can separate the hosing from the filter in one step. The
valve lever can also be used to regulate water flow with no harm to
the motor or its components. Two valves are provided: one for the
intake, one for the output.
&OLFNÀW&RQQHFWRUV
Click-fit connectors are designed for quick set-up and leak-proof
maintenance. You just push the intake and output assemblies
(Aquastop valves and attached hosing) down. Once you hear the
“click,” you know the connection is secure and watertight.
Lift-Out Stack of Media Baskets
The lift-out stack of media baskets is at the heart of Fluval multi-stage
filtration. These large capacity baskets enable you to stack filtration
media in the precise combination of layers that will work best for
your aquarium. Each basket is lined with a foam insert and specific
filtering media to grant you the best performances in your aquarium.
The instant-release T-handles let you lift, then separate the basket
stack quickly and easily, making routine maintenance simple.
+LJK&DSDFLW\&DQLVWHU
The FX6’s compact, super capacity tank processes and recirculates fully
563 US gallons (2130 liters) of water every hour and accommodates
the stack of media baskets with their capacity of up to 1.5 gallons
(5.9 liters) of media. Yet this enormous-capacity tank is short enough
(21 in./54cm) to fit under most large aquariums.
EN-5

FLUVAL STATE-OF-THE-ART TECHNOLOGY
SMART PUMP
TM
7HFKQRORJ\
Designed and engineered for reliable filtration of delicately balanced
aquarium environments, Fluval’s FX6 Smart Pump technology employs an
electronic circuit board to continually monitor the pump. Impeller speed
and force are constantly measured to ensure powerful output and energy
efficiency.
Smart Pump technology is also critical in evacuating any air that may
build up in the system. Once every 12 hours, the filter will pause and allow
any trapped air to escape, thus maintaining maximum filtration efficiency.
6HOI3ULPLQJ,QVWDQW6WDUW6\VWHP
With the FX6, there’s never any need for manual siphoning. As soon as
you plug the filter in, the canister fills with water from your aquarium.
It pumps for 1 minute, pauses for 2 minutes to evacuate air from the
system, then immediately begins the filtering process.
3XUJH9DOYH
The FX6 canister features a purge valve drain at its base. This makes it possible for you to empty the canister
for maintenance before moving it.
&ORJ3URRI,QWDNH6WUDLQHU
The wide, rounded mouth of the FX6 intake strainer is shaped to
siphon water quickly. Covered by a fine screen that’s beveled to repel
debris, it is virtually clog-proof, so there is never a build-up of solids
that could impede water flow.
0XOWL'LUHFWLRQDO2XWSXW1R]]OH
The flared spout of the adjustable output nozzle sends multiple
streams of purified water toward all corners of the aquarium, creating
currents that agitate the water to break down wastes and help hold
them in suspension until they can be drawn into the filter by the intake
strainer. With more waste solids kept afloat, fewer settle, which means
that bottom surfaces, and in fact the entire aquarium, is kept cleaner.
FLUVAL FX6 SPECIFICATIONS
Aquarium Capacity: 400 gallons 1,500 liters
Pump Output: 925 g/h 3,500 l/h
Mechanical Area (Foam): 325.5 in.
2
2,100 cm
2
Biological Volume: 1.5 gallons 5.9 l
Filtration Volume: 5.28 gallons 20 l
Filter Circulation*: 563 g/h 2,130 l/h
Head Height (max.): 10.8ft 3.3 m
Wattages 120V/60Hz: 43W
Wattages 230-240V/50Hz: 41W
*Note: Flow rates were measured with intake and output
hoses of the same length and without media.
Purge
valve
Smart Pump
Tecnology
Self-priming
instant-Start
System
EN-6

INSTALLATION AND USE
IMPORTANT: Read all instructions before beginning.
s&ORBESTRESULTSTOPOFFWATERINAQUARIUMBEFOREBEGINNINGSETUP
s!LLOWMINUTESFORSETUPANDINSTALLATION
s4OOLSREQUIRED0HILLIPSSCREWDRIVERANDUTILITYKNIFE
DO NOT PLUG IN FILTER UNTIL SETUP IS COMPLETE AND UNIT IS FILLED WITH WATER.
8QSDFNDQGLGHQWLI\DOOSDUWV
Use the diagram on the inside front cover as a guide.
3UHSDUHWKHDTXDULXP
1. Decide on filter placement. Remember, this is a gravity-fed system. For it to work properly, all the
Installation Requirements below must be adhered to.
Installation Requirements
s&ORBESTRESULTSlLLAQUARIUMTOMAXIMUMLEVELBEFOREBEGINNINGSETUP
s4HElLTERLIDMUSTBEATLEASTINCMBELOWYOURAQUARIUMSWATERLEVELBUTNEVERMORETHAN
4.9 ft. (150cm). NEVER install the filter above the water level.
sIMPORTANT: The hosing supplied with the unit
is 13.1 ft (4m) long. If longer hosing is required,
intake hosing must not exceed 6.5 ft. (2m) and
the total length of intake and outlet hosing
combined must not exceed 16.4 ft. (5m).
s(OSING MUST FOLLOW A STRAIGHT PATH FROM THE
filter to the aquarium rim, with no slack and
no loops.
s4HEWATERLEVELSHOULDNEVERBEMORETHANIN
(20 cm) below your aquarium rim.
s&ORBESTPERFORMANCETHElLTERSHOULDBECOMPLETELY
beneath the aquarium (as in figure shown).
s0OSITION PURGE VALVE SO THAT YOU WILL BE ABLE TO
attach the supplied hosing without moving the unit.
<20 cm (7.8”.)
<20 cm (7.8”) to
< 150 cm (4.9’)
EN-7

2. Place the two rim connectors over the back top edge of the aquarium. Place one just above
the spot where you want to place the intake tube; place the other just over the spot where you
want to position the output nozzle. Be sure that the long end of the bracket is on the inside of the
aquarium.
The rubber rings on the connectors are designed to help them adhere to tank glass better.
If the aquarium walls are thinner than 5/8” (1.58 cm) replace the rubber ring with the four smaller
suction cups provided.
Important: Be sure to position the intake tube away from any air source—an air stone, an
aeration device, protein skimmer or the output valve. Air entering the intake strainer will diminish
filter efficiency.
INSTALLATION AND USE
Alternate Configurations
Note: A dropped ledge rim requires
purchase of an extra rim connector.
(See “Replacement Parts” for ordering
information.)
EN-8

INSTALLATION AND USE
3UHSDUHLQWDNHFRQQHFWLRQV
1. Connect the hosing to one of the two valves:
a. Loosen one of the metal clamps, and slide it onto one
end of the hosing (the rubber part).
b. Push the end of the hosing onto the valve; push it all the
way, as far as it will go.
c. Position the metal clamp over the rubber connector, and
tighten.
2. Measure and cut the hosing. You will need a length
of hosing that reaches comfortably from inside the
aquarium to the filter canister.
Important: Hosing should follow a straight path from
the filter to the aquarium rim, with no slack and no loops.
If the hosing is too long, the filter will not work efficiently
(the maximum length of the hosing is 6.5 ft / 2m).
a. Place the valve end of the hosing at the approximate
spot where it will be positioned on the filter lid (once the
filter is installed).
b. Stretch out the hosing so it rests over the “output”rim
bracket.
c. At a spot at least 6 in. (15cm) beyond the aquarium rim,
use a utility knife to cut the hosing. Do not cut it too
short. Remember, you can always cut it shorter during
final installation, if necessary.
3. Push the cut end of this “intake” hosing into the rubber
connector on the intake tube. Push the hosing in by at
least 1 in. (2.5cm) without twisting it.
4. Place the intake strainer in the tank, making sure it is
at least 3 in. (7.5 cm) from the bottom. Adjust the intake
tube for the best extension for your aquarium, respecting the
3 in (7.5 cm) from the bottom rule. Once the intake strainer
is properly positioned, lock it in place by pressing the suction
cups against the glass.
5. Fasten the intake strainer’s hosing onto the rim
connector using the three rim connector clips.
6 in.
(15cm)
5c
(15
4
3
5
EN-9

INSTALLATION AND USE
3UHSDUHRXWSXWFRQQHFWLRQV
1. Connect the hosing to the second valve
(Just as for the intake hosing):
a. Loosen the second metal clamp, and slide it onto the
factory-finished end of the hosing (not the cut end).
b. Push the end of the hosing onto the valve; push it all
the way, as far as it will go.
c. Position the metal clamp over the rubber connector,
and tighten.
2. Measure and cut the hosing. Again, you will need a
length of hosing that reaches comfortably from inside
the aquarium to the filter canister.
Reminder: Hosing should follow a straight path from
the filter to the aquarium rim, with no slack and no
loops. If the hose is too long, the filter will not work
efficiently.
a. Place the valve end of the hosing at the approximate
spot where it will be positioned on the filter lid (once
the filter is installed).
b. Stretch out the hosing so it rests over the “output”rim
bracket.
c. At a spot at least 6 in. (15cm) beyond the aquarium
rim, use a utility knife to cut the hosing. Do not
cut it too short. Remember, you can always cut it
shorter during final installation, if necessary.
3. Push the cut end of this “output” hosing into
the rubber connector of the output nozzle.
Push the hosing in by at least 1 in. (2.5cm) without
twisting it.
4. Place the nozzle in the tank about 1 in. (2.5cm)
below the water line.
5. Fasten the hosing to the “output” bracket
using the three rim connector clips.
6 in.
(15cm)
cm)
4
3
5
EN-10

3UHSDUHWKH)LOWHU
1. Loosen and disengage the eight lid fasteners.
2. Remove the filter lid and set it aside. Be careful not to damage the inlet stem connected to the
lid.
3. Using the red T-handles, lift the three media baskets from the filter canister. The T-handles
will fall outward so the baskets can be handled separately.
INSTALLATION AND USE
4. Rinse baskets and media materials under running tap
water to remove any dust, and place media in baskets. Or,
if you prefer, select other media of your own choosing.
5. Place rinsed and filled media baskets back in canister. Make
certain that each kind of media is positioned at the same
level it was packaged
in, unless you are
deliberately choosing a
different filtration plan
than the recommended setup. NEVER overfill baskets. Leave at
least 0.5 in. (1cm) free space on top of the media, so the baskets
will fit together properly.
Important: To prevent particles from entering the impeller
chamber, blocking and/or damaging the impeller, all
loose granule filter material (Carbon, Zeo-Carb, Ammonia
Remover, Peat Granules, etc.) must be placed in a filter
media bag. Please use the bags at the bottom basket for
these filtering media.
Media
Basket
Foam
Insert
T-handle
>0.5 in. (1 cm)
EN-11

INSTALLATION AND USE
6. Stack the baskets, carefully aligning them, so that all
shapes match. Reinsert the T-handles into their vertical slots,
and replace the baskets in the filter canister. The foam in the
upper basket should be just about even with the top edge
of the canister (the output tube, which is affixed to the
inside of the canister, will be protruding slightly).
7. Move the filter canister to its final position.
8. Be certain the purge valve is in the vertical (closed)
position.
9. Pour at least 2 gallons (8 liters) of water into the filter canister.
IMPORTANT: Correct water volume is necessary for system priming.
10. Place the filter lid back on the canister. Check to make sure the filter lid seal ring is present and
installed properly on the canister lid. There is only one orientation possible. Gently press the lid down
until the output tube is firmly seated in the OUT connection on the filter lid.
IMPORTANT: If the inlet tube attached to
the canister lid has slipped out of its seat,
be sure to fully re-insert it under the IN
connection of the lid.
11. Replace and hand-tighten the eight lid
fasteners. The lid is properly closed when
it is in direct contact with the canister. DO
NOT USE ANY TOOLS, AS DOING SO MAY
DAMAGE THE UNIT.
EN-12

,QVWDOOWKH)LOWHU
1. Once the filter unit is in its final position, make sure that the aquarium has the appropriate
amount of water.
Important Reminders:
s The filter lid must be at least 7.8 in. (20 cm) below your aquarium’s water level but never more than
4.9 ft. (150 cm). NEVER install the filter above the water level.
s 4HEHOSINGSUPPLIEDWITHTHEUNITISFTMLONGIf longer hosing is required, intake hosing
must not exceed 6.5 ft. (2m) and the total length of intake and outlet hosing combined
must not exceed 16.4 ft. (5m).
s IMPORTANT: Hosing must follow a straight path from the filter to the aquarium rim, with no slack
and no loops.
s &ORTHESELFPRIMINGFEATURETOWORKPROPERLYTHEWATERLEVELcannot be more than 7.8 in. (20 cm)
below your aquarium rim.
s &ORBESTPERFORMANCETHElLTERSHOULDBECOMPLETELYBENEATHTHEAQUARIUM
s 0OSITIONPURGEVALVESOTHATYOUWILLBEABLETOATTACHTHESUPPLIEDHOSINGWITHOUTMOVINGTHEUNIT
s !SSURETHELIDSEALRINGISALREADYINSTALLEDONTHElLTERCANISTERLID
2. Grasp the intake valve (which is at
the end of the hosing attached to
the intake tube); slide it onto the IN
connection on the filter lid, and press
until it clicks into place.
3. Grasp the output valve (which is at the
end of the hosing attached to the
output nozzle); slide it onto the OUT
connection on the filter lid, and press
until it clicks into place.
4. Be certain both valves are locked in place
and that the valve levers are in the open
(vertical) position before proceeding.
INSTALLATION AND USE
3
2
EN-13

6WDUWWKHÀOWHU
1. Check your installation.
Before turning the filter on, be sure that:
a. The purge valve is in the closed
(vertical) position, and its rubber cap is
secured in place by the lock nut.
b. All top lid fasteners are well tightened.
c. The IN and OUT valves are fully open
(valve levers should be vertical).
d. The intake strainer is fully submersed
in water.
e. There are at least 2 gallons (8 liters) of
water in the canister.
VERY IMPORTANT: You need to know that as
soon as the unit is plugged in, it will start, and
will immediately go through its automatic priming
sequence.
2. Plug the unit into an electrical outlet.
The electronic automatic priming sequence will begin.
This is what will happen:
a. The pump will run for 1 minute to fill the filter canister with aquarium water.
b. The pump will stop for 2 minutes to evacuate air from the filter canister.
c. The pump will start again; it will remain on and will run continuously until it is unplugged.
This sequence will repeat itself every time the unit is unplugged and plugged back in.
Approximately every 12 hours: The pump will stop for 1 minute to evacuate any air that may have
become trapped inside the unit.
INSTALLATION AND USE
EN-14

FLUVAL ADVANCED FILTRATION
There are three basic types of filtration. Mechanical filter
media removes waste particles and solid debris through
mechanical strainers. Biological filter media breaks down
and eliminate organic toxins—ammonia and nitrite—
through bacterial action. Chemical filter media actively
changes water characteristics through deliberately
managed chemical reactions.
Fluval offers a wide variety of filter media materials. Some
perform more than one job. This is the true power of the
Fluval system—the broad range of media available for use
in its baskets. These extensive choices give you maximum
flexibility in designing the aquatic environment just right
for your aquarium.
The Fluval Stack of Media Baskets
The stack of large capacity media
baskets in the Fluval FX6 filter
enables you to employ all three
types of filtration in whatever
configuration or sequence you
determine is best to meet the needs
of your aquarium environment.
Filtration always begins with a
mechanical stage of waste particle
removal as water is drawn through
the foam that lines the perimeter
of each basket. Subsequently, the
flow proceeds through the central
area of the three baskets from top
to bottom, where it is filtered by
additional mechanical, biological
and chemical stages: the water is
pumped down through the media in
the three baskets. Because you can
use the media of your choosing at
each level, you will be able to design
a system that provides additional mechanical, biological
and chemical filtration if you wish. For detailed information,
as well as general guidelines for media selection please
visit www.hagen.com.
GENERAL GUIDELINE
Location can determine function: For example, BIOMAX
can act primarily as a screen for debris or act more as an
environment for growth of beneficial bacteria, depending
on where it is placed in the filtration sequence. Proper
preparation is key: some materials, such as Ammonia
Remover, require thorough rinsing so that their finest
particles do not clog other modules or discharge into the
aquarium. For best results and the protection of your fish,
always read and follow the preparation instructions for the
media you are using. Use mechanical filter media in the
first stage of filtration: this helps ensure that the water
will be as free of debris as possible when it flows through
biological and/or chemical filters, which require clear water
for maximum effectiveness.
To achieve maximum effectiveness, Fluval FX6 offers three
types of mechanical filtration: the external white foam traps
the larger particles, the black foam traps smaller particles
and the carbon foam provides an additional barrier
to protect the pump. Protect chemical media from
debris: chemical filtering media modifies the chemical
characteristics of the water by absorbing toxic compounds
(eg, medicines, odours and organic contaminants). Therefore
it is necessary to prevent the chemical filter media from
clogging by macro and micro-particulate. Placing chemical
filter media at the last stage of filtration will allow it to
work best.
Top Media Basket
Media that continues the mechanical
capture of small particles should be
placed in the top basket, to purify water
and/or remove particles before they
can clog delicate pores of biological
or chemical substrates. The Bio-Foam
is ideal to remove small dirt particles
that are not retained by the Mechanical
Foam. In addition, this foam provides a
large surface to accommodate bacteria
colonies, providing a good environment
for proliferation of beneficial bacteria and
increasing the biological action of Fluval
BIOMAX.
Middle Media Basket
The middle basket is a good place to
establish the biological detoxification
process. A lot of media types provide both
mechanical filtration and biological treatment, creating an
excellent environment for beneficial bacteria to proliferate.
With the primary mechanical purification of the water
stream occurring in the Mechanical Foam and the Bio-
Foam, it is typical to load biological media such as BIOMAX
into the mid level basket.
Bottom Media Basket
This basket receives the clearest water, making it the
ideal place for dedicated chemical media. Placed here,
the supplied Carbon Foam or the additional Granules, for
example, efficiently remove discolorations, medications
and solubilized wastes that a mechanical screen cannot.
The bags included in the package are ideal for storing any
type of granular chemical filtering media. Please refer to
the following section for further information to choose the
best chemical media for your aquarium.
1
2
3
EN-15

FLUVAL FILTER MEDIA
Ammonia Remover (Bottom Media Basket)
A-1480 (3-pk., 180g ea.)
A-1485 (700g)
A-1486 (1600g)
A-1487 (2800g)
Fluval Ammonia Remover is a natural ion-exchange media designed to remove toxic
ammonia as water passes over it. Controlling ammonia levels reduces stress on fish.
Use this product to provide a healthy environment when setting up a new aquarium
or maintaining one that contains a higher than average fish stock. Ammonia
Remover gradually becomes inactive. Replace regularly, at least once a month.
For freshwater use only.
ClearMax (Bottom Media Basket)
A-1348 (3-pk., 100g ea.)
Fluval ClearMax is a science grade resin designed to absorb phosphate, nitrite and
nitrate. Removal of these compounds results in crystal clear water, reduces the
maintenance of your aquarium, and creates ideal conditions for fish and plants.
For freshwater and marine environments.
Peat Granules (Bottom Media Basket)
A-1465 (600g)
Fluval Peat Granules are the all-natural way to soften aquarium water and achieve the
pH levels required for breeding and rearing certain tropical fish. Peat contains humic
acid, tanning agents, and trace elements that are essential for various life processes.
Highly concentrated for maximum effectiveness, this product is recommended for
fish that prefer soft, acidic water.
For freshwater use only.
Zeo-Carb (Bottom Media Basket)
A-1490 (3-pk, 150g ea.)
A-1492 (1200g)
A-1493 (2100g)
Fluval Zeo-Carb is a premium blend of Fluval Carbon and Fluval Ammonia Remover.
Working together, these highly effective media eliminate liquefied impurities, odors,
and discoloration, while, at the same time, removing toxic ammonia, for a clean,
healthy aquarium. Combining two products into one gives you more space in your
filter system for other types of media. Replace once a month, more often if aquarium
is heavily populated. Remove when medication is being administered in aquarium
water. Use carefully when keeping live plants.
For freshwater use only.
EN-16

FLUVAL LAB SERIES MEDIA
Opti-Carb (Bottom Media Basket)
A-1504 (175g)
Hi-Capacity Ion Exchange Media. Opti-Carb’s mixture of ion-exchange
and synthetic organic removal resins, and research grade carbon combine
to create a powerful adsorbent water polishing media. Rapid reduction
of dissolved organic matter, removal of proteins before they break down
into toxic compounds, elimination of odors and discolorations can all be
accomplished with Opti-Carb resulting in sparkling clear aquarium water.
Use as everyday filter media or for removal of specific toxic metals and
organic compounds.
Does not affect pH, KH and general hardness. Treats up to 189 L (50 US
Gal.). For larger tanks use multiple bags.
Formulated for reef aquariums, freshwater or marine
environments.
Phosphate Remover (Bottom Media Basket)
A-1500 (150g)
Fluval Lab Series Phosphate Remover rapidly adsorbs large quantities
of Phosphate, silicate and dissolved organics without leaching adsorbed
substances. Maintaining low levels of phosphate will result in cleaner,
healthier aquarium water while allowing corals to efficiently absorb the
calcium they require to grow and reproduce. Phosphate Remover contains
ferric oxide, an iron-based phosphate binder ideal for use in aquarium
filters.
150g removes up to 20 mg/L PPM of phosphate in a 50 U.S. Gal. (189 L)
aquarium.
Will not affect pH or hardness.
For freshwater and marine environments.
Nitrate Remover (Bottom Media Basket)
A-1502 (150g)
Fluval Lab Series Nitrate Remover is a high capacity laboratory developed
ion exchange resin. Developed from a pure high grade strong base anion
exchange resin, Nitrate Remover rapidly and selectively removes nitrate
and eliminates toxic nitrite in a matter of hours, resulting in a healthy
environment for your fish.
s 3AFEFORlSHPLANTSANDINVERTEBRATES
s 7ILLNOTAFFECTP(ORHARDNESS
s $OESNOTCONTAINPHOSPHATES
Resin can be recharged several times. Removes up to 25 mg/L (ppm) of
nitrate in a 50 U.S. Gal. (189 L) aquarium.
For freshwater use only.
EN-17

MAINTENANCE PURGE VALVE DRAINING
WARNING: ALWAYS DISCONNECT ALL APPLIANCES IN THE AQUARIUM FROM ELECTRICITY SUPPLY
BEFORE PLACING HANDS IN THE WATER, BEFORE PUTTING ON OR TAKING OFF PARTS, AND
WHENEVER THE FILTER EQUIPMENT IS BEING INSTALLED, MAINTAINED OR HANDLED.
Filter media must be periodically replaced or cleaned in accordance with instructions on individual
packages. Please refer also to the “Maintenance Frequency Chart” at the beginning of this
instruction manual. Prior to periodic media care the FX6 filter canister must be drained.
The FX6 filter offers you two methods to drain the canister:
s/PTION0URGE6ALVE$RAINING
s/PTION&ILTER0UMP$RAININGKITSOLDSEPARATELY
3XUJH9DOYH'UDLQLQJ
Larger, heavier particles of aquarium debris will collect in the bottom of the canister, outside the bottom
media basket. The purge valve at the base of the unit allows for partial discharge of this heavy debris. There
is no need to open the filter lid or disconnect the hosing.
To use the purge valve to drain the water from the filter canister you could use the supplied drain hose that
is long enough to reach from the canister to a drain or basin.
1. Turn the IN and OUT valves in sequence to the closed (horizontal) position.
2. Unplug the pump from the electrical power supply.
3. Be certain the purge valve is in the closed (vertical) position; turn the lock nut clockwise to
loosen it, then remove the rubber drain cap.
4. Attach one end of the supplied hose to the purge
valve, and position the other end in an appropriate
basin or discharge drain. Be sure the hose is secured to
the purge valve.
5. First, turn the purge valve to the open (horizontal)
position by turning it counterclockwise. Then
disconnect the OUT valve: press its release button, and lift it from the filter lid. It is a good idea to
have a cloth handy as some water will escape when removing the AquaStop valve.
6. Water will immediately begin to drain from the canister. Since this is a gravity fed method,
water will stop draining once the water level in the canister and drain bucket equalize. Once this
happens simply close the valve and empty the bucket. Repeat the draining process until enough water
is removed to make the canister light enough to carry to your work area.
7. Once a sufficient amount of water has been removed, close the purge valve and disconnect
the drain hose. Replace the rubber drain cap and secure with the locknut, turn the locknut counter
clockwise to secure the drain cap in place. Disconnect the IN valve and move to an appropriate work
area.
EN-18

MAINTENANCE FILTER PUMP DRAINING
)LOWHU3XPS'UDLQLQJ
To use the filter pump to drain the water from the filter canister you
will need to prepare a drainage hose using the Fluval Pump Draining
Kit (sold separately). It is recommended as it will secure tightly to the
purge valve using the lock nut connector.
1. To prepare the drainage hose attach the AquaStop valve
to the hosing in the kit securing it to the valve with a
hose clamp. Follow the instructions in the “Installation and
Use” section, “Prepare intake connections” Step #1.
2. Unplug the pump from the electrical power supply. Note:
It is a good idea to have a cloth handy as some water will
escape when removing the AquaStop valve.
3. Turn the IN and OUT valves in sequence to the closed
(horizontal position).
4. Disconnect both the intake and output AquaStop valves
from the canister.
5. Attach the AquaStop valve with attached drainage hose
(prepared in Step 1 above) to the OUT connection on the
canister. WARNING: Be sure the drainage hose and AquaStop
valve is connected to the OUT connection.
6. Position the hose opening in an appropriate drain basin.
7. Plug the power cord into an electrical outlet, maintaining
the Aquastop in the closed position.
8. Open the AquaStop to the open vertical position. Let the
filter pump run until all the water is drained from the canister.
9. Once the filter is drained unplug the unit.
10. Disconnect the drainage AquaStop valve and move canister
to appropriate work area.
IMPORTANT: please remember the electronic automatic
priming sequence during the draining operation, if you use the
pump over an extended period of time.
EN-19
/