Page is loading ...

IMPORTANT:
RETAIN FOR FUTURE REFERENCE,
READ CAREFULLY
My Little Cloud
Cradle Swing
Model # 037696-333

Make sure all the locking equipment is installed well before using the cradle swing.
DO NOT use the cradle swing on an rough surface to avoid any injury to the infant.
DISCONTINUE USE of cradle swing when infant attempts to climb out.
DISCONTINUE USE of cradle swing when infant can roll over.
NEVER use the toy-bar to carry the cradle swing.
Age range suitability: 0 - 6mths/9kgs.
This cradle swing DOES NOT replace a cot or a bed. Should your child need to sleep, then it should be placed in a suitable
cot or bed.
DO NOT use accessories or replacement parts other than those approved by the manufacturer.
Read all instructions before assembly and use of the cradle swing. Keep
instructions for future use.
BEFORE ASSEMBLING THIS CRADLE SWING, READ AND UNDERSTAND THE INSTRUCTIONS.
Never leave the child unattended.
Never use this product on an elevated surface, eg. A table.
This reclined cradle is not intended for prolonged periods of sleeping.
Always use the restraint system.
Do not use the reclined cradle once your child can sit unaided (approximately 6 months until
9kgs).
To avoid injury ensure that children are kept away when unfolding and folding this product.
Do not let children play with this product.
Do not move or lift this product with the baby inside it.
Do not use if any components are broken or missing.
KEEP INSTRUCTIONS IN A SAFE PLACE FOR FUTURE REFERENCE.
SAFETY PRECAUTIONS
WARNING

Due to variations in the style and design of our products, the photographs and illustrations shown in this
instruction manual are generic, therefore product fabrics, colour and design may vary from images shown.
CNP Brands reserves the right to alter product specications without notice as a result of our ongoing
policy of product improvement.
Contents
Assembly contents list
Assembly / Operating instructions
How to care for your My Little Cloud Cradle Swing
Congratulations on your purchase of the My Little
Cloud Cradle Swing
This product has been designed and developed with safety,
comfort and functionality in mind. Please take the time to read
this manual carefully before using this product and keep it in a
safe place for future reference.
CONGRATULATIONS

ASSEMBLY CONTENTS
Check what you have received...
You have received 1 box. Please check the contents of the
box against the list below. If anything is missing, please contact
Customer Service.
In Australia, contact CNP Brands on 1300 667 137, in New Zealand
contact Wainhouse Distribution on 0800 567 5000.
Supplied loose in box:
Main module
with Toy arm
Right leg tube
x 1
x 1
x 1
x 1
x 1
x 1
x 1
x 1
Seat Frame
(pre-assembled
seat pad)
Support frame
Left leg tube
Canopy
Right support
tube
Left support tube

ASSEMBLY CONTENTS
Supplied loose in box continued:
There are no accessories recommended for use with this Childcare Cradle Swing.
Lower boom
tube x 1
x 2
x 1
x 4
x 1
Screw 1
(lower boom
tube)
Screw 3
(upper tube)
Screw 2
(lower boom
tube)
USB Adaptor

ASSEMBLY / OPERATING INSTRUCTIONS
To assemble Seat Support...
To assemble Swing Frame...
22mm screws
C
A
A
D
B
B
1
2
1
Connect the lower boom tube with the support
frame.
Secure the tube and the frame by inserting 4 x
(#2) screws.
Insert 2 x (#1) screws to lock the lower arm tubes
with the seat support, as shown in image.
Connect plastic seat with support frame, as shown in
image.
Ensure the corresponding letters that are displayed on
the sides of the frame match up and ensure the pop
pins ‘click’ allowing the pop-ins to engage securely.
Insert left leg tube onto left support tube, ensuring that
the label ‘A’ on each tube aligns as per diagram.
Repeat previous step for the right leg tube, ensuring
that the label ‘B’ on each tube aligns as per diagram.
1a.
1b.
1c.
2a.
2b.
1a.
1b.
3Align the canopy up with the back of the seat, as
shown in image.
Connect the zip and slide it to the end.
3a.
3b.

ASSEMBLY / OPERATING INSTRUCTIONS
To assemble Swing Frame continued...
To assemble Seat Support to Swing Frame...
To use Restraints / Harness...
c
c
D
D
2
1
2
1
Insert left support tube into the left tube of the main
module with toy arm, ensuring that the label ‘C’ on
each tube aligns as per diagram.
Insert right support tube into the right tube of the main
module with toy arm, ensuring that the label ‘C’ on
each tube aligns as per diagram.
Connect the lower boom tube into the swing tube on
the main module with toy arm.
Ensure that you hear a ‘click’ allowing the pop-pins to
engage securely.
Then use 1x screw (#3) to lock the tubes together as a
secondary locking device.
Place the infant in the seat as show in the diagram.
Insert the left and right sets of buckles into the
restraint latch.
Adjust the straps in the buckles as needed so that
the restraint ts snugly, but not too tightly.
2a.
2b.
1a.
1b.
2a.
1a.
1b.
1c.
PLEASE NOTE! If the position of the straps needs to be adjusted, it can be
done by threading through the straps from the back of the seat and
threading through a new slot. This should only be practised when infant is not
positioned in the seat. Please ensure that the straps are always level with the
slots they are inserted into.
3
3

ASSEMBLY / OPERATING INSTRUCTIONS
Battery Power...
1Locate the swing/music box at the back of the main
module with toy arm.
Unscrew the battery compartment cover.
Install 4 x ‘D’ (1.5V) alkaline batteries (not included)
into battery compartment.
Ensure that the batteries are facing the appropriate
polarity.
Replace the battery cover and screw back on.
1a.
1b.
Do not mix old and new batteries.
Do not mix alkaline, standard (carbon-zinc) or rechargeable (nickle-cadmium) batteries.
Adult supervision is required when charging rechargeable batteries.
Always remove at or exhausted batteries from the toy.
Do not short circuit the supply terminals.
Non-rechargeable batteries are not to be recharged
WARNING
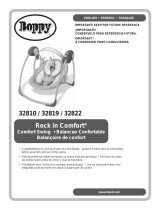
Water sound button
Music button ON/OFF
Time setting button
Swing stop/increase speed button
Battery compartment
Toy mobile control button
Twitter button
Time indicator
Music selection/volume control button
Swing stop/decrease speed button
Speed select indicator
Battery option
Power selector switch
To operate cradle swing Functions...
External power adapter option

ASSEMBLY / OPERATING INSTRUCTIONS
To operate cradle swing Functions continued...
1
2
3
4
5
Power (“ / ”) selector switch:
Slide selector switch toward “ ” to activate battery power supply operation.
Slide selector switch toward “ ” to activate external adapter power supply
operation - recommended where a 240V power point is available.
Swing Function
Five swing speeds available.
The indicator lamps will light once you press the swing start/ speed increase
button which means the rst speed has started.
The indicator lamps will light one after another while the swing speeds will
increase for every press “+” button.
The indicator lamps will turn off for every press “-” button which decreases the
swing speed until the swing has come to a stop and all lamps are off.
Time Function
There are three time settings available.
Press the button once and the eight minute light indicator will illuminate.
Press the button for the second time and two lamps will illuminate for fteen
minutes.
Press the button for the third time and three lamp lights will illuminate for thirty
minutes.
All the time functions will stop once the selected time is reached, then the swing
function will stop.
If you don’t select as time setting function all other functions will continue to work
until power off button is selected.
Music Function
Press music on/off button once to start the music, then press again to stop the
music.
The music selection/volume control button allows you to select other melodies for
each press of the button.
If you continue to press the button you can increase/decrease the volume.
Twitter Button
The twitter will start once you press the button, press again to stop.
1a.
1b.
2a.
2b.
2c.
2d.
3a.
3b.
3c.
3d.
3e.
3f.
4a.
4b.
4c.
5a.

ASSEMBLY / OPERATING INSTRUCTIONS
To operate cradle swing Functions continued...
Transformers used with the infant swing are to be regularly examined for damage to the
cord, plug, enclosure and other parts, and in the event of such damage, they shall not be
used.
The infant swing shall only be used with the recommended transformer.
Please note: The adapter and the batteries cannot be used at the same time.
WARNING
6
7
Water sound button:
The water sound will start once you press the button, press again to stop.
Toy mobile control button:
The toy mobile starts turning when you press the button once (the toy mobile’s
lamp will not ash).
When you press the button the second time the toy mobile will stop turning and
the toy mobile’s lamp will illuminate.
When you press the button the third time the toy mobile will start turning and the
toy mobile’s lamp will ash.
6a.
7a.
7b.
7c.

ASSEMBLY / OPERATING INSTRUCTIONS
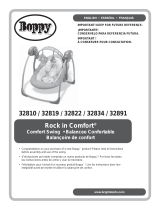
To operate Cradle Swing...
To operate Mobile Toy Arm...
To Fold...
1
2
1
1
The seat direction can be adjusted in three angles:
please revolve the seat to the left or right totally three
angles according to the arrowheads marked in the
diagram.
The seat backrest can be adjusted into two
positions by pushing on both buttons located on
the sides of the seat simultaneously
Release button at the desired location.
The toy mobile arm can be revolved to it’s side as
shown in the diagram.
Press the spring pin to fold the two supporting legs.
1a.
2a.
2b.
1a.
1a.

TROUBLE SHOOTING & CARE INSTRUCTIONS
Problems Solutions
1
2
3
4
Music or swinging motion cuts off • Batteries may be exhausted
• Ensure swing is assembled properly in all
areas
• Power adapter not connected properly
• Ensure power is in the ‘on’ position at
power point
No response when starting up • Check on battery polarity; ensure that
the battery is inserted correctly to avoid
damage to the battery and motor
head
• Power adapter not connected properly.
• Ensure power is in the ‘on’ position at
power point.
Long time storage
Rock inadequately
• Remove batteries
• Check on the frame lock tube; ensure it
is clicked into the correct position

HOW TO CARE FOR YOUR CHILDCARE CRADLE SWING
Cleaning
Maintenance
This product has been designed and developed with safety, comfort
and functionality in mind. Please take the time to read this manual
carefully before using this product and keep it in a safe place for
future reference.
To ensure the long-lasting use of your swing, do not use abrasive
cleaners. Always store product in a clean dry place.
Seat pad:
Remove from frame. Fasten buckles on seat restraint and seat pad.
Machine wash with cold water, gentle cycle. No bleach.
Snack tray:
Wipe clean with a damp cloth and mild soap. Air dry. Do not immerse
in water.
Storage:
Always store product in a clean and dry place.
Remove batteries prior to placing unit in storage to prevent battery
leakage/corrosion to battery compartment.
Always check parts regularly for tightness of screws, nuts and other
fasteners – tighten or replace if required. To maintain the safety of your
cradle swing, seek prompt repairs for bent, torn, worn or broken parts.
Use only those parts and accessories approved by CNP Brands.
If you have any difculties in assembling the cradle swing, please
contact our Service Department.
In Australia, contact CNP Brands on 1300 667 137, in New Zealand
contact Wainhouse Distribution on 0800 567 5000.

Distributed in Australia by CNP Brands
20 Calarco Drive,
Derrimut, VIC, 3030
Customer Service 1300 667 137
W: www.cnpbrands.com.au
E: info@cnpbrands.com.au
F: www.facebook.com/CNPBrands
I: @cnp_baby
Distributed in New Zealand by Wainhouse
Distribution
2-6 Argyle St, Morningside,
PO Box 41-014,
St Lukes, Auckland, New Zealand
Customer Service: 0800 567 5000
E: [email protected].nz
/