
1
Chapter
CardScan Getting Started
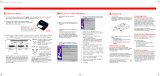
To transform business cards into an address book, follow these steps:
Check Requirements
• Windows 98 or later
• Pentium or later
•64 MB RAM
• 50 MB hard disk space
• CD-ROM drive
• USB Port
Install Software
• On Windows NT, 2000 or
XP: log in as Administrator.
• Insert CD-ROM.
• Click Install and
follow onscreen
installation instructions.
Connect Scanner
• Connect USB cable to
computer and scanner
USB ports. (If previously
connected, remove and
re-insert USB cable.)
Set up Scanner
•
Start CardScan and follow
the Scanner Setup Wizard.
Use Calibration Card to
calibrate scanner;
follow instructions on
Calibration Card.
Scan Cards
• Insert cards into scanner,
printed side up.
• Click Process when
scanning is complete.
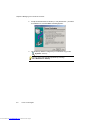
Save Contacts
• Choose File→Save As, and
save the file.
• When the dialog above
appears, click OK.
Downloaded from www.Manualslib.com manuals search engine

1
Copyright © 2003 Corex Technologies Corp. All rights reserved worldwide.
This guide is protected by federal copyright law. No part of this guide may be
reproduced or distributed, transcribed, stored in a retrieval system, translated
into any spoken or computer language or transmitted in any form or by any
means whatsoever without the prior written consent of:
Corex Technologies Corporation
810 Memorial Drive
Cambridge, MA 02139
Tel: (617) 492-4200
Fax (617) 492-6659
Trademarks: CardScan and CardScan.Net are registered trademarks of Corex
Technologies Corp. Windows is a trademark of Microsoft Corporation. All
other trademarks are the property of their respective owners.
Disclaimer of Warranties: Corex Technologies Corp. makes no warranty,
representation or promise not expressly set forth in this agreement. Corex
Technologies Corp. disclaims and excludes any and all implied warranties of
merchantability, title, or fitness for a particular purpose. Corex Technologies
Corp. does not warrant that the software or documentation will satisfy your
requirements or that the software and documentation are without defect or
error or that the operation of the software will be uninterrupted.
LIMITATION OF LIABILITY: Corex Technologies Corp.’s aggregate
liability, as well as that of the authors of programs sold by Corex Technologies,
arising from or relating to this agreement or the software or documentation is
limited to the total of all payments made by or for you for the license. This
limited warranty gives you specific legal rights. You may have others which
vary from state to state. Some states do not allow the exclusion or limitation of
incidental or consequential damages, so the above limitation or exclusion may
not apply to you.
Downloaded from www.Manualslib.com manuals search engine

Table of Contents
CardScan Getting Started i
Chapter 1 Welcome to CardScan!
CardScan Features ..................................................................... 1-1
Perform Basic Tasks ................................................................... 1-1
Manage Your Contacts as Suits You Best ....................................... 1-2
Safeguard and Access Your Contacts Remotely ............................... 1-2
Keep your contacts up-to-date ...................................................... 1-3
About This Guide and Other User Resources ........................................ 1-3
Other Sources of Information and Support ...................................... 1-4
Chapter 2 Installing CardScan
Before You Begin ....................................................................... 2-1
Installing and Setting Up CardScan ................................................... 2-2
Installing the Software ................................................................. 2-2
Connecting the Scanner .............................................................. 2-3
Setting Up CardScan for Your Scanner ........................................... 2-3
If a Previous Version is Installed ....................................................... 2-4
Uninstalling CardScan ................................................................ 2-4
Converting Files Created with Earlier Versions ................................. 2-4
Chapter 3 Creating Your Address Book
Scanning Business Cards .............................................................. 3-1
Importing Contacts
from Contact Managers and PIMs
..................................................... 3-4
Creating Files and Contacts Manually ................................................. 3-7
Creating Contacts by Dragging and Dropping
Text from Emails and Electronic Documents
.......................................... 3-7
Saving Your Contacts................................................................... 3-8
Chapter 4 Verifying, Editing and Organizing
Your Contacts
Why and When to Verify Contacts ..................................................... 4-1
Features That Make Verifying Simple ................................................. 4-1
Using Edit View ......................................................................... 4-1
Editing Text ............................................................................... 4-3
Checking Details of Names and Addresses ..................................... 4-3
Downloaded from www.Manualslib.com manuals search engine

Table of Contents
ii Corex Technologies
Adding Information to Contacts
........................................................ 4-4
Adding Phone Numbers .............................................................. 4-4
Adding Email and Web Addresses ................................................. 4-5
Features to Organize Contacts Quickly ............................................... 4-6
Using Categories ....................................................................... 4-6
Adding Notes ............................................................................ 4-7
Assigning Categories and Notes to a Batch ..................................... 4-8
Deleting Contacts....................................................................... 4-8
Chapter 5 Managing Your CardScan Contacts
Manipulating Multiple Contacts in a File ............................................... 5-1
Reviewing the Status of Your Contacts ........................................... 5-1
Sorting Contacts ........................................................................ 5-2
Finding Contacts........................................................................ 5-2
Finding Contacts with QuickSearch ............................................... 5-2
Methods to Find Groups of Contacts .............................................. 5-3
Managing Duplicate Contacts.......................................................... 5-4
Finding Duplicate Contacts............................................................. 5-4
Safeguarding Your Contacts Against Loss ............................................ 5-5
Backing Up Your Contacts ........................................................... 5-5
Chapter 6 Maximizing Your Contact Potential
with CardScan.Net
Getting Started with CardScan.Net .................................................... 6-1
About CardScan.Net Synchronization ................................................. 6-3
Conflict Resolution...................................................................... 6-3
Manual Synchronization................................................................ 6-4
Synchronizing One File ............................................................... 6-4
Synchronizing All Files ................................................................ 6-4
Automatic Synchronization ............................................................. 6-5
About AccuCard Service Updates ..................................................... 6-6
Downloaded from www.Manualslib.com manuals search engine

Table of Contents
CardScan Getting Started iii
Chapter 7 Exchanging Data with Other Applications
Data Exchange Wizard ................................................................. 7-1
CardScan Synchronization ............................................................. 7-2
Synchronizing Manually .............................................................. 7-4
Synchronizing Automatically ......................................................... 7-4
Chapter 8 Synchronizing with Palm OS™ Devices
First-Time Setup and Synchronization................................................. 8-1
Chapter 9 Synchronizing with Pocket PC® Devices
Setting up ActiveSync .................................................................. 9-1
Synchronizing Selected Files .......................................................... 9-3
Removing Corex CardScan ActiveSync Module ...................................... 9-3
Chapter 10 Communicating with Your Contacts
Reaching Your Contacts From Summary View ...................................... 10-1
Using Signature Card ................................................................. 10-2
Enabling Signature Card ............................................................10-2
Disabling Signature Card ............................................................10-2
Chapter 11 Printing
Selecting contacts to print ........................................................... 11-1
Starting the Print Wizard .............................................................11-2
Chapter 12 Troubleshooting and Support
Troubleshooting Tips .................................................................. 12-1
General ...................................................................................12-1
Cards that are difficult to read ......................................................12-2
Error messages ........................................................................12-3
Technical Support ..................................................................... 12-3
Downloaded from www.Manualslib.com manuals search engine

Table of Contents
iv Corex Technologies
Appendix A: CardScan Scanner Warranty
Appendix B: Compliance with FCC and EC
FCC Statement ......................................................................... B-1
EC Declaration of Conformity .......................................................... B-1
Index
Downloaded from www.Manualslib.com manuals search engine

CardScan Features
CardScan Getting Started 1-1
Chapter 1 Welcome to CardScan!
CardScan is an electronic address book that scans and stores business-card
information. After scanning a business cards, using a Corex or
TWAIN-compliant scanner, CardScan processes the image, and organizes the
information into the correct fields of an electronic contact. As you continue
scanning cards, your CardScan file is filled with contacts for you to save and
use as suits your needs. For example, you can:
• Create a CardScan address book, and manage your contact information
using CardScan. For an extensive introduction, see “Creating Your
Address Book” on page 3-1.
• Use the Data Exchange Wizard to help you get your contacts from
CardScan into your favorite contact manager, personal information
manager (PIM), or personal data assistant (PDA). For an extensive
introduction, see “Exchanging Data with Other Applications” on page 7-1.
• Save copies of your CardScan files to a secure, private account on
CardScan.Net—and have a guaranteed backup as well as access to your
contacts from anywhere, using your password and a web browser. For an
extensive introduction, see “Maximizing Your Contact Potential with
CardScan.Net” on page 6-1.
The following is a summary of CardScan features.
CardScan Features
CardScan features are designed to suit the needs of both the novice and
experienced users. These features allow you to:
• Perform basic tasks.
• Manage your contacts as suits you best.
• Safeguard and access your contacts from anywhere.
• Keep your contacts up to date.
Perform Basic Tasks
• Create an address book by scanning business cards into CardScan and
saving the file.
• Verify and edit contacts.
• Add notes and assign categories to individual contacts or a group of
contacts.
• Scan the back of a card to include its image in the existing contact.
• Drag and drop contacts from one CardScan file to another or from
CardScan to another application—and vice versa.
• Find contacts with Categories and QuickSearch.
Downloaded from www.Manualslib.com manuals search engine

Chapter 1 Welcome to CardScan!
1-2 Corex Technologies
1
• Email, dial contacts’ phone numbers, and visit their Web sites directly
from CardScan.
• Display a MapQuest-generated map of a contact’s address.
• Include your SignatureCard in your Microsoft Outlook email.
• Add new contacts by scanning, or typing, or dragging and dropping text
from emails and electronic documents, or by dragging and dropping
vCards.
Manage Your Contacts as Suits You Best
CardScan enables you to quickly get contacts into other applications, such as
your favorite contact manager, personal information manager (PIM), or
personal data assistant (PDA). The data-exchange features of CardScan
include:
• The CardScan Data Exchange Wizard to help you pick the method that
suits you best
• CardScan Synchronization to exchange contact information between
CardScan and your favorite, supported contact manager or PIM, and
keep consistent address books
• The Export Wizard to export contact information to a text file
• Transfer from CardScan to contact managers and PIMs, including Palm
OS Desktop
• Synchronization with PDAs, such as Palm OS™ handhelds and Pocket
PC
®
devices
Safeguard and Access Your Contacts Remotely
Save a copy of a CardScan file to a private, secure account on CardScan.Net.
With your CardScan.Net-enabled file, you can:
• Have a guaranteed backup in your CardScan.Net account.
• Access your contacts from anywhere, with a web browser and your
password.
• Make changes to the file on your PC or on CardScan.Net, and CardScan
will keep it synchronized, so the copies on your PC and in your
CardScan.Net Account are identical.
Downloaded from www.Manualslib.com manuals search engine

About This Guide and Other User Resources
CardScan Getting Started 1-3
Keep your contacts up-to-date
If your file is CardScan.Net-enabled—in other words, has a copy on
CardScan.Net—you can keep your contacts up-to-date using the AccuCard
Service. The AccuCard Service automatically notifies you of any updates
available for your contacts. The symbols indicating the status of your contacts
appear in your desktop CardScan file. When it is convenient, you can review,
accept, or reject the changes automatically, with a few mouse clicks.
About This Guide and Other User Resources
This User’s Guide is intended to introduce CardScan’s features and to help
you locate:
• Features you might use the most and
• Detailed descriptions of each feature in the Online Help
Each section in this Guide includes keywords for you to use when searching
the Help Index for more information. To use keywords:
1. Look for the symbol
.
2. Choose Help→Search for Help on, and type one keyword at a time, or
scroll down the list in the Index and click the keyword.
If you would like to browse the help as you would a book, open it at the Table
of Contents. You can do this using any of the following methods:
• Press the F1 key on your keyboard.
• Click the button on CardScan’s Toolbar (see page 1-4).
• Choose Help→Contents in CardScan window.
The following are conventions used in this Guide:
“Attention! Read carefully.”
“Here is a TIP for you!”
“To find more information, choose Help→Search for
Help on, and use the following keywords.”
“NOTE:”
Downloaded from www.Manualslib.com manuals search engine

Chapter 1 Welcome to CardScan!
1-4 Corex Technologies
1
Other Sources of Information and Support
There are several other sources of CardScan information and support, all
accessible from the CardScan Help menu.
Choose Help→View ReadMe to view important information unavailable at the
time the printed documentation was published.
Choose Help→View User’s Guide to view a printable version of this Guide, in
the PDF format.
Choose Help→Technical Support to contact our Technical Support. For more
directions to Corex Technical Support, see the cover of this book.
Balloon Help
Point at any feature in the CardScan window, and a balloon-help topic
appears, describing the usage of the feature. For example, point at any button
on CardScan’s Toolbar to get things done more quickly.
Glossary of Terms
The Glossary is included in the Online Help, listed at the top of the Table of
Contents.
Visit Corex Web site at www.cardscan.com
for:
• Technical Support Knowledge Base, at www.cardscan.com/support/
• The PDF document “Using CardScan with Other Scanners”, containing
detailed guidelines for users of TWAIN-compliant scanners
• Product and compatibility information
• Software and other updates
Downloaded from www.Manualslib.com manuals search engine

Before You Begin
CardScan Getting Started 2-1
Chapter 2 Installing CardScan
To begin using CardScan quickly, you should follow the installation and setup
sequences presented in this chapter. This chapter includes:
• Before you begin
• Installation and setup
• If upgrading from a previous version
Before You Begin
Before you begin to install the CardScan software, do the following:
1. Make sure you have the following:
• Windows 98 or later
• Pentium processor or later
• 64 MB of RAM
• 50 MB free hard disk space for a minimum installation and 110 MB for a
full installation
• CD-ROM drive
• USB port for scanner connection
• Modem for autodialing (optional)
• Windows-compatible network for multiple users
• Mouse, or other pointing device, recommended
2. If running Windows 2000, Windows NT, Windows XP, or later, log on as
Administrator or to an account with Administrator privileges.
3. Locate your software serial number in the CD-ROM package.
4. To use CardScan with Palm
or Pocket PC devices, install the desktop
software for these devices before installing CardScan.
Keywords: “Palm”, “Pocket PC”
5. If upgrading from a previous version, see “If a Previous Version is
Installed” on page 2-4.
Downloaded from www.Manualslib.com manuals search engine

Chapter 2 Installing CardScan
2-2 Corex Technologies
1
Installing and Setting Up CardScan
To install and set up CardScan, you must follow these steps:
1. Install the software.
2. Connect the scanner.
3. Set up CardScan to work with your scanner.
Installing the Software
To install the software:
1. Insert the CardScan CD-ROM. The Autorun screen appears.
2. Click Install CardScan. The CardScan InstallShield Wizard appears.
3. Follow the Wizard’s prompts to complete the installation. On the last
screen of the Wizard, check the box Launch CardScan After
Installation.
After a pause, the CardScan window opens, and the Scanner Set Up
Wizard appears.
Before proceeding with the setup, you must connect your scanner, as follows.
Downloaded from www.Manualslib.com manuals search engine

Installing and Setting Up CardScan
CardScan Getting Started 2-3
Connecting the Scanner
The following procedure is for CardScan 600 scanners. For any other
scanners, see the scanner documentation. To connect a 600 scanner:
• With the included cable, connect the scanner’s USB port to the USB port
on your PC.
• If your scanner includes an AC adapter, connect the AC adapter to the
scanner and plug the adapter into a power outlet.
The scanner’s light comes on red, then changes to solid green. If the
light is not solid green, see “Troubleshooting Tips” on page 12-1.
Setting Up CardScan for Your Scanner
The Scanner Setup Wizard enables you to set up CardScan to work with your
scanner, to calibrate the scanner and to scan your first business card.
To start the Scanner Setup Wizard any time, choose
Tools
→
Scanner Setup Wizard.
1. On the Scanner Setup Wizard, choose the option Yes, my scanner is
connected and click Next.
2. On the Select Scanner Type screen, select your scanner, and follow the
Wizard to detect, calibrate, and test your scanner.
For guidelines on using TWAIN-compliant scanners with CardScan,
search the Online Help on “TWAIN”. Also, visit www.cardscan.com
to
obtain a PDF document “Using CardScan with Other Scanners”.
Downloaded from www.Manualslib.com manuals search engine

Chapter 2 Installing CardScan
2-4 Corex Technologies
1
If a Previous Version is Installed
If you have a previous version of CardScan on your PC, you may have to do
the following:
1. Disconnect the scanner.
2. Uninstall the existing Cardscan software.
3. Install the new CardScan software (see page 2-2).
4. Reconnect the scanner (see page 2-3).
5. Set up CardScan to work with your scanner (page 2-3).
Uninstalling CardScan
The following procedure removes CardScan software from your hard
drive. It does not remove your contact files.
1. If running Windows 2000, Windows NT, Windows XP, or later, log on
with administrator privileges.
2. Choose Start→Settings→Control Panel. The Windows Control Panel
dialog appears.
3. Double-click Add/Remove Programs, select CardScan from the list of
programs, and click Remove. The InstallShield Wizard appears.
4. Follow the InstallShield Wizard to uninstall the CardScan software.
If you have been using a Palm device, you should exit and restart
HotSync Manager after uninstalling CardScan.
Converting Files Created with Earlier Versions
When you try to open an old CardScan file, you are prompted to convert it.
Once converted, a file cannot be opened by an earlier version of CardScan.
Therefore:
• CardScan saves a backup copy in the CardScan directory.
• If you choose to delete the backup files, make sure you are using a full
(not trial) version of CardScan.
Downloaded from www.Manualslib.com manuals search engine

Scanning Business Cards
CardScan Getting Started 3-1
Chapter 3 Creating Your Address Book
CardScan’s features (see “CardScan Features” on page 1-1) represent all
essential attributes of an electronic address book, where information is
accurate, manageable, safe, and can be utilized with a few clicks of the mouse
(for example, the ability to email your contacts or display the
MapQuest-generated map of an address, or dial phone and FAX numbers). If
you keep your contacts in several files, CardScan’s ability consistently to
organize files allows you to use any number of files simply as specific sections
of the same address book.
Use informative names for your CardScan files, to simplify the use of
your CardScan address book and make it more efficient.
There are several ways to create and expand your address book. These
include:
• Scanning business cards (in this chapter)
• Importing files from other applications (in this chapter)
• Creating new files and contacts manually (in this chapter)
• Dragging and dropping text from emails and electronic documents (in this
chapter)
• Dragging and dropping vCards into CardScan ( Keywords: “drag”)
• Saving a file
Scanning Business Cards
Scanning is the quickest way to create a file in your address book.
The following describes how to scan business cards with
CardScan 600 scanners, using the default settings (color scanning and
automatic detection of cards). If you are using a different scanner, see your
scanner documentation. Also, you can change the scan preferences.
Keywords: “scanning”, “preferences”
Downloaded from www.Manualslib.com manuals search engine

Chapter 3 Creating Your Address Book
3-2 Corex Technologies
1
To begin scanning business cards:
1. On the desktop, choose Start→Programs→CardScan to open
CardScan.
When you open CardScan for the first time, it creates a file
named “Untitled-1”. Therefore, when you scan and process the
contact information, it is collected in “Untitled-1”, until you save
the file with an informative name.
2. Insert a card in the scanner, with the front side facing up. The card is
pulled through, and the Scanning Options dialog appears.
Downloaded from www.Manualslib.com manuals search engine

Scanning Business Cards
CardScan Getting Started 3-3
This dialog allows you to:
• Process the saved image(s) to transform them into contacts.
•Use Batch Options to assign the same notes and categories to all
cards scanned continually. When processed, all the contacts in the
batch contain identical notes and belong in the same category.
Keyword: “Batch.”
• Click Close to save the scanned images without transforming them
into contacts.
3. Scan a few more cards, and click Process.
CardScan processes the image(s), closes the Scanning Options dialog,
and displays the contact scanned last in Edit view—so you can verify and
edit your new contacts.
To learn about the features of CardScan’s graphical interface,
point at any feature in CardScan’s window. A brief description of
the feature appears in the balloon help.
Alphabet Bar
Downloaded from www.Manualslib.com manuals search engine

Chapter 3 Creating Your Address Book
3-4 Corex Technologies
1
4. Click on the Alphabet Bar to display all contacts in the List view.
All new contacts are marked with ?, which indicates that they have not
been verified (see “Why and When to Verify Contacts” on page 4-1). The
red flag next to the question mark is the AccuCard Service Updates
indicator. For more information on the AccuCard Service, see “About
AccuCard Service Updates” on page 6-6.
Importing Contacts
from Contact Managers and PIMs
You can import contacts into CardScan from any contact manager or PIM that
can export contacts as a text file with the fields delimited by tabs or commas.
To import contacts:
1. Open the file in the source application.
2. Follow the instructions provided with the application to save or export the
information to your hard disk as a text file delimited by tabs or commas.
Unverified
contact
AccuCard
Service
Updates
Downloaded from www.Manualslib.com manuals search engine

Importing Contacts from Contact Managers and PIMs
CardScan Getting Started 3-5
3. Start CardScan and choose File→Data Exchange→Import. This dialog
appears:
The Data Exchange Wizard is a feature to help you pick the best way to
copy data between CardScan and other applications.
For example, if you intend to import contacts from ACT! 4.0 or later,
GoldMine 5.0 or later, Lotus Notes 4.6 or later, or Microsoft Outlook
98 or later, the Data Exchange Wizard will guide you to the CardScan
Synchronization—a new feature that is more efficient than Import. See
“Exchanging Data with Other Applications” on page 7-1.
4. If you prefer to import your contacts, choose No, I want to Import. The
Import file dialog (the standard Window’s Open dialog) appears.
5. Select the text file saved in step 2 and click Open. After a pause, the
Import dialog appears:
Use the scroll bar to see additional columns.
Click to view the drop-
down list of standard and
saved import templates.
Downloaded from www.Manualslib.com manuals search engine

Chapter 3 Creating Your Address Book
3-6 Corex Technologies
1
In the Import dialog, each row represents a contact in the text file, and
each column represents a field.
If the file contains more than four columns, use the scroll bar to
see the additional information.
Initially, all contacts are selected. To import only certain contacts, select
them. Use Shift+click or Ctrl+click to select multiple contacts.
6. If the columns don't look aligned, change the DELIMIT BY option to TAB.
7. To import using a predefined template, choose it from the I
MPORT
T
EMPLATES dropdown list and go to step 11.
To create your own import template, go to step 8.
8. For each column, use the dropdown list at the top of the column to
indicate the CardScan field into which to put the information.
9. To omit a column, choose [ignore]. To import a column that does not have
a corresponding CardScan field, choose Notes or Other (near the bottom
of the list).
10. Click Save As Template to save the import template you created or
modified.
11. Click Import to finish importing the text file. CardScan displays the
imported contacts in List View.
Downloaded from www.Manualslib.com manuals search engine
Page is loading ...
Page is loading ...
Page is loading ...
Page is loading ...
Page is loading ...
Page is loading ...
Page is loading ...
Page is loading ...
Page is loading ...
Page is loading ...
Page is loading ...
Page is loading ...
Page is loading ...
Page is loading ...
Page is loading ...
Page is loading ...
Page is loading ...
Page is loading ...
Page is loading ...
Page is loading ...
Page is loading ...
Page is loading ...
Page is loading ...
Page is loading ...
Page is loading ...
Page is loading ...
Page is loading ...
Page is loading ...
Page is loading ...
Page is loading ...
Page is loading ...
Page is loading ...
Page is loading ...
Page is loading ...
Page is loading ...
Page is loading ...
Page is loading ...
Page is loading ...
Page is loading ...
Page is loading ...
Page is loading ...
Page is loading ...
Page is loading ...
Page is loading ...
Page is loading ...
Page is loading ...
Page is loading ...
Page is loading ...
Page is loading ...
Page is loading ...
Page is loading ...
-
 1
1
-
 2
2
-
 3
3
-
 4
4
-
 5
5
-
 6
6
-
 7
7
-
 8
8
-
 9
9
-
 10
10
-
 11
11
-
 12
12
-
 13
13
-
 14
14
-
 15
15
-
 16
16
-
 17
17
-
 18
18
-
 19
19
-
 20
20
-
 21
21
-
 22
22
-
 23
23
-
 24
24
-
 25
25
-
 26
26
-
 27
27
-
 28
28
-
 29
29
-
 30
30
-
 31
31
-
 32
32
-
 33
33
-
 34
34
-
 35
35
-
 36
36
-
 37
37
-
 38
38
-
 39
39
-
 40
40
-
 41
41
-
 42
42
-
 43
43
-
 44
44
-
 45
45
-
 46
46
-
 47
47
-
 48
48
-
 49
49
-
 50
50
-
 51
51
-
 52
52
-
 53
53
-
 54
54
-
 55
55
-
 56
56
-
 57
57
-
 58
58
-
 59
59
-
 60
60
-
 61
61
-
 62
62
-
 63
63
-
 64
64
-
 65
65
-
 66
66
-
 67
67
-
 68
68
-
 69
69
-
 70
70
-
 71
71


Ask a question and I''ll find the answer in the document
Finding information in a document is now easier with AI
Related papers
Other documents
-
 CardScan 500 User manual
-
Targus AWU04EU Datasheet
-
Epson PhotoPlus User manual
-
 CardScan Lead Qualifier User manual
-
Canon BJC85 User manual
-
 DOC-BOX 10109 User guide
-
 Gear Head KB5500W User manual
-
Novell GroupWise Mobile Server 1 User guide
-
-


