g AMPLIFIER SECTION
RMS OUTPUT POWER both channel
driven simultaneously
10 % total harmonic distortion (THD)
1 kHz 3 W per channel (6 Ω)
PMPO Output Power
90 W
Input Music Port
Sensitivity 100 mV, 15 kΩ
Terminal Stereo, 3.5 mm jack
Output Headphone
Terminal Stereo, 3.5 mm jack
(16
Ω to 32 Ω)
Option Port Version 1
g TUNER SECTION
Frequency range
FM 87.50 MHz to 108.00 MHz (50 kHz)
AM 522 kHz to 1629 kHz (9 kHz)
520 kHz to 1630 kHz (10 kHz)
g DISC SECTION
Disc played [8 cm or 12 cm]
(1) CD-Audio (CD-DA)
(2) CD-R/RW (CD-DA, MP3)
(3) MP3
Sampling frequency
CD 44.1 kHz
MP3 32 kHz, 44.1 kHz, 48 kHz
Bit rate
MP3 32 kbps to 384 kbps
Decoding 16/20/24 bit linear
Pick up
Wavelength 785 nm
Laser power CLASS 1
(For Norge)
Bølgelengde 785 nm
Laserstyrke Ingen farlig stråling sendes ut
(med sikkerhets-beskyttelse)
Audio Output (Disc)
Number of channels 2 channel
Audio performance
Frequency response (CD-Audio)
20 Hz to 20 kHz
Wow and flutter Below measurement limit
Digital filter 8
D/A converter MASH (1 bit DAC)
g USB SECTION
Media file format support MP3 (*.mp3)
g SPEAKER SECTION
Type 1 way, 1 speaker system (Bass reflex)
Speaker unit(s)
Full range 7 cm cone type
Impedance 6 Ω
Input power (IEC) 3 W (Max)
Dimensions (W x H x D)
120 mm x 202.8 mm x 133.5 mm
g GENERAL
Power supply
AC 230 V, 50 Hz
AC 220 to 240 V, 50 Hz
AC 230 to 240 V, 50 Hz
Power consumption 30 W
Dimensions (W x H x D)
252.5 mm x 202.8 mm x 133.5 mm
Mass
With speakers Approx. 3.20 kg
Without speakers Approx. 1.90 kg
Operating temperature range
0 °C to +40 °C
Operating humidity range
35 % to 80 % RH (no condensation)
Before requesting service, make the following checks. If you are in doubt about any of the check points, or if the solutions indicated in the chart
do not solve the problem, consult your dealer for instructions.
No play.
The disc isn’t correctly set.
The disc is scratched or dirty. (Tracks skipped.)
There is moisture on the lens. Wait for about an hour and then try again.
•
•
•
MP3 cannot be read.
You may not be able to play MP3 if you have copied a multi-session disc that has no data between sessions.
When creating a multi session disc, it is necessary to close the session.
The amount of data on the disc is too small. Set the amount of data to greater than approximately 5 MB.
•
•
•
Sound is unfixed, reversed or
comes from one speaker only.
Check the speaker connections. (➡ page 4)•
No sound or there is a lot of
noise.
Noise may occur when playing MP3 if recording quality is poor.
Keep this unit away from mobile telephones if the interference is apparent.
Turn the volume up.
Switch the unit off, determine and correct the cause, then switch the unit on. Causes include shorting of the
positive and negative speaker wires, straining of the speakers through excessive volume or power, and using
the unit in a hot environment.
•
•
•
•
Humming heard during play.
An AC mains lead or fluorescent light is near the cords. Keep other appliances and cords away from this unit’s
cables.
•
A beat sound or noise is heard
while receiving a radio broadcast.
Switch the TV or other audio player off or separate it from the unit.
Switch off the portable audio player connected to “MUSIC PORT”.
•
•
A low hum or noise is heard
during AM broadcasts.
Keep the antenna away from other cables and cords.
Keep the AM antenna away from the unit.
•
•
The picture on the television near
the set disappears or stripes
appear on the screen.
The location and orientation of the antenna are incorrect.
The television antenna wire is too close to the unit. Separate the antenna wire of the television from the unit.
•
•
Remote control doesn’t work.
Check that the batteries are inserted correctly. (➡ page 3)
Replace the batteries if they are worn.
•
•
Display
--:--
You plugged the AC mains lead in for the first time and there was a power failure recently. Set the time.
(➡ page 9)
•
PGM FULL The number of programmed tracks is limited to 24. No further tracks can be programmed.•
NO PLAY A CD-ROM disc that is not CD-DA or MP3 format is inserted. It cannot be played.•
ERROR Incorrect operation performed. Read the instructions and try again.•
F76 There is a power supply problem. Consult the dealer.•
iPod
iPod does not turn on.
Verify that the iPod battery is not depleted before connecting it to the unit.
Before inserting your iPod into the dock, turn off both the unit and iPod. Power on the unit and select the
appropriate source.
Make sure PC is not connected to the main unit and activate PC Sync.
•
•
•
No sound is coming from the
speakers.
The iPod is not correctly inserted into the dock. Turn off the iPod, remove it from the dock connector. Reinsert
it and turn it on again.
Make sure that iPod is actually playing something.
Adjust the volume.
•
•
•
Music is distorted or the sound
level is too low.
Make sure the equalizer function of your iPod is turned off.•
Cannot control the iPod from the
CD Stereo System.
Make sure the iPod is inserted properly into the dock.
Check the dock connection and make sure that iPod is selected as the source of music. (➡ page 7)
•
•
iPod does not charge.
Check all connections. (➡ page 4)•
Unable to use PC Sync.
Turn the unit on.
Check PC and iPod connections. (➡ page 7)
•
•
USB
No response when [USB q/h]
button is pressed.
Disconnect the USB device and then reconnect it back. Alternatively, turn the unit off and then back on.•
The USB drive or it’s contents
cannot be read.
The USB drive format or it’s contents is/are not compatible with the system. (➡ page 8)
The USB host function of this product may not work with some USB devices.
USB devices with storage capacity of more than 8 gigabytes may not work in some instances.
•
•
•
Slow operation of the USB flash
drive.
Large file size or high memory USB flash drive takes longer time to read.•
“USB OVER CURRENT ERROR”
The USB mass storage device rating exceeds 500mA. Disconnect the USB device. Turn the unit off and then
back on.
•
“NO PLAY”
Check the content.
Only MP3 format files can be played.
•
•
Power consumption in standby mode:
2.6 W (approx.)
Notes:
Specifications are subject to change without
notice.
Total harmonic distortion is measured by the
digital spectrum analyzer.
•
•
Specifications
Caution for AC Mains Lead
For Southeast Asia
For other areas
For Southeast Asia
1
RQTV0293
For your safety, please read the following text carefully.
This appliance is supplied with a moulded three pin mains plug for your
safety and convenience.
A 5-ampere fuse is fitted in this plug.
Should the fuse need to be replaced please ensure that the replacement
fuse has a rating of 5-ampere and that it is approved by ASTA or BSI to
BS1362.
Check for the ASTA mark or the BSI mark on the body of the fuse.
If the plug contains a removable fuse cover you must ensure that it is
refitted when the fuse is replaced.
If you lose the fuse cover the plug must not be used until a replacement
cover is obtained.
A replacement fuse cover can be purchased from your local dealer.
If a new plug is to be fitted please observe the wiring code as stated below.
If in any doubt please consult a qualified electrician.
IMPORTANT
The wires in this mains lead are coloured in accordance with the following
code:
Blue: Neutral, Brown: Live.
As these colours may not correspond with the coloured markings identifying
the terminals in your plug, proceed as follows:
The wire which is coloured Blue must be connected to the terminal which is
marked with the letter N or coloured Black or Blue.
The wire which is coloured Brown must be connected to the terminal which
is marked with the letter L or coloured Brown or Red.
WARNING: DO NOT CONNECT EITHER WIRE TO THE EARTH
TERMINAL WHICH IS MARKED WITH THE LETTER E, BY THE EARTH
SYMBOL OR COLOURED GREEN OR GREEN/YELLOW.
THIS PLUG IS NOT WATERPROOF–KEEP DRY.
Before use
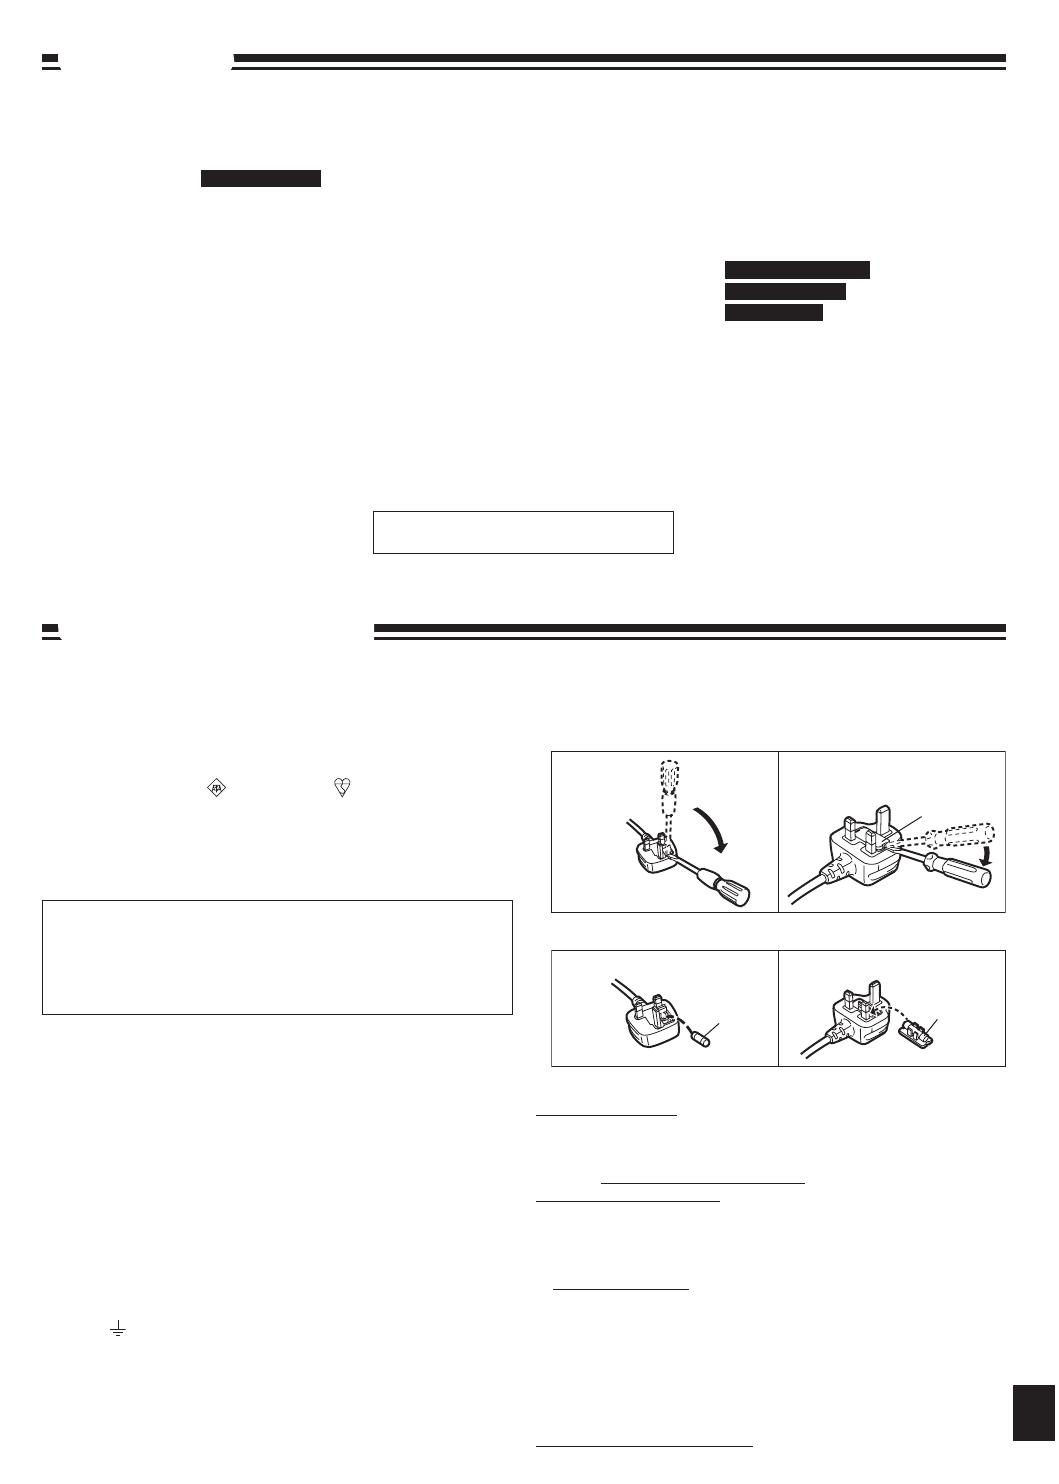
Remove the connector cover.
How to replace the fuse
The location of the fuse differ according to the type of AC mains plug (figures
A and B). Confirm the AC mains plug fitted and follow the instructions below.
Illustrations may differ from actual AC mains plug.
1. Open the fuse cover with a screwdriver.
2. Replace the fuse and close or attach the fuse cover.
� Sales and Support Information
Customer Care Centre
For UK customers: 0844 844 3852
For the Republic of Ireland customers: 01 289 8333
Visit our website for product information
Direct Sales at Panasonic UK
Order accessory and consumable items for your product with ease
and confidence by phoning our Customer Care Centre Monday-Friday
9:00am-5:30pm. (Excluding public holidays)
Or go on line through our Internet Accessory ordering application at
www.panasonic.co.uk
Most major credit and debit cards accepted.
All enquiries transactions and distribution facilities are provided directly
by Panasonic UK Ltd.
It couldn’t be simpler!
Also available through our Internet is direct shopping for a wide range of
finished products, take a browse on our website for further details.
Interested in purchasing an extended guarantee?
Please call 0870 240 6284 or visit our website
www.panasonic.co.uk/guarantee
.
•
•
•
•
•
•
•
•
•
•
1. Open the fuse cover with a screwdriver.
2. Replace the fuse and close or attach the fuse cover.
2. Replace the fuse and close or attach the fuse cover.
CAUTION!
IF THE FITTED MOULDED PLUG IS UNSUITABLE FOR THE SOCKET
OUTLET IN YOUR HOME THEN THE FUSE SHOULD BE REMOVED
AND THE PLUG CUT OFF AND DISPOSED OF SAFELY.
THERE IS A DANGER OF SEVERE ELECTRICAL SHOCK IF THE CUT
OFF PLUG IS INSERTED INTO ANY 13-AMPERE SOCKET.
by ASTA or BSI to BS1362.
Check for the ASTA mark or the BSI mark on the body of
Check for the ASTA mark or the BSI mark on the body of
EARTH TERMINAL WHICH IS MARKED WITH THE LETTER
E, BY THE EARTH SYMBOL OR COLOURED GREEN OR
caution for AC mains lead.indd 1 1/15/2008 6:33:34 PM
For continental Europe
SC-EN38_E,EB,GN,GCS (RQTV0293)_MP.indd 11 2/18/2008 2:11:39 PM


