Page is loading ...


PAG.
13
Español
rev 1.2
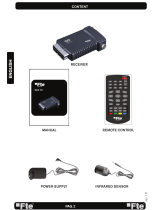
DESCRIPCIÓN DEL PANEL Y MANDO A DISTANCIA
1. DESCRIPCIÓN DEL PANEL Y MANDO A DISTANCIA
1.1. DESCRIPCIÓN DEL PANEL FRONTAL
1.2. DESCRIPCIÓN DEL PANEL TRASERO
1. Indicador POWER: Indica que llega alimentación.
2. Indicador LOCK: Indica que hay suficiente nivel de señal en la entrada IF IN.
3. Sensor-IR: Sensor de recepción para la señal IR del mando a distancia.
1
1. IF IN: Entrada de señal satélite. Max. 300mA
2.
HDMI: Salida HDMI para conectar al televisor.
3. USB: Conector para dispositivos externos tipo USB 2.0 de alta velocidad.
4. COAXIAL S/PDIF: Salida coaxial para audio digital (AC3).
5. DC IN: Entrada para conectar a una fuente de alimentación de 19 VDC.
1 2
3
2 3
4
5
Heruntergeladen von manualslib.de Handbücher-Suchmachiene

PAG.
31
Español
rev 1.2
OSD 64
5. Pulse [Exit] para salir de este menú.
4.7 CONFIGURACIÓN UNICABLE
Si dispone de una instalación Unicable, que le permita distribuir
la señal de un satélite por un único cable hasta 8 receptores
como máximo, en esta opción del menú puede configurar el
receptor (OSD 64). Puede hacerlo de 2 maneras:
1. Configuración manual: Pulse [OK] para ver las opciones:
- Canal FI: seleccione con las teclas [
] el
número del 1 al 8.
- Frecuencia FI: con las teclas [ ] elija la frecuencia.
2. Configuración automática. El sistema unicable asigna
automáticamente la frecuencia con la que trabaja cada
receptor.
Cada receptor del sistema Unicable debe tener un canal y
frecuencia diferentes al resto.
INSTALACIÓN
Heruntergeladen von manualslib.de Handbücher-Suchmachiene

Español
PAG.
48
rev 1.2
VIDEO
Decodificación
Bit rate
Relación de aspecto
Píxeles activos
Conector de salida
MPEG-2 SD&HD, MEPG-4 H.264/AVC SD&HD
Máx. 20 Mbps
4:3PS, 4:3LB, 16:9, Auto
480I, 576I, 576P, 720P_50, 720P_60, 1080I_25, 1080I_30,
1080P_50, 1080P_60, AUTO
HDMI
AUDIO
Decodificación
Modo
Bit rate
Conector de salida
MPEG-2/MPEG-1 layer I, II & III, AAC, Dolby Digital
Mono, Dual, Stereo, Joint stereo
Máx. 384Kbps
HDMI / SPDIF coaxial
DEMODULADOR
Demodulación
Velocidad de símbolo
Outer code
Inner code
Energy dispersion
QPSK, 8PSK
SCPC/MCPC
RS (204, 188, 8)
ALL DVB rates
DVB-S & DVB-S2 recommendation
SEÑAL DE ENTRADA
Frecuencia
Nivel de entrada
Ancho de banda del canal
Conector de entrada
950MHz ~ 2150MHz
-65dBm ~ -25dBm
36MHz
Conector tipo F
CONTROL LNB
Alimentación
Control polarizador
Control DiSEqC
13/18V (300mA máx.) con protección cortocircuito
Polarización 13/18V (vertical/horizontal)
DiSEqC1.0, DiSEqC1.1, DiSEqC 1.2 y GoToX
* Este receptor no permite mover motores
VARIOS
Conector USB
Alimentación
Fuente de alimentación externa
Consumo en stand-by (modo de bajo consumo)
Consumo
Temperatura de trabajo
Temperatura de almacenaje
Dimensiones (W x D x H)
Peso
2.0
19V DC, 0,8A Max.
100~240VAC 50~60 Hz
< 0,5 watt
Máx. 16 watt
+5° a +40°
-20° a +70°
138x113x33 mm
0.45Kg
8. ESPECIFICACIONES TÉCNICAS
ESPECIFICACIONES TECNICAS
Heruntergeladen von manualslib.de Handbücher-Suchmachiene

PAG.
49
Español
rev 1.2
“WE , UNIVERS BY FTE, DECLARE
THAT THE PRODUCT
U7000
IS IN CONFORMITY WITH FOLLOWING DIRECTIVES
LOW VOLTAGE DIRECTIVE 2006/95/EC
EMC DIRECTIVE 2004/108/EC”
SI DESEA UNA COPIA DE LA DECLARACIÓN
PUEDE SOLICITARLA A LA COMPAÑÍA.
DECLARACIÓN DE CONFORMIDAD
Heruntergeladen von manualslib.de Handbücher-Suchmachiene

English
PAG.
2
rev 1.2
SAFETY PRECAUTION
Danger of explosion if battery is incorrectly replaced. Replace only with the same or equivalent type.
Warning:
-The apparatus shall not be exposed to dripping or splashing and that no objects filled with liquids, such as vases,
shall be placed on the apparatus.
- Do not place naked flame sources, such as lighted candles on the apparatus; otherwise, there is the danger of
fire.
- The unit should be connected to a power supply only of the type described in the operating instructions or as
marked on the unit. If you are not sure of the type of power supply (for example: 120 or 230V) to your home, consult
your local dealer or local power company.
- Do not open the cabinet or touch any parts in the inner mechanism. Consult your local dealer for technical service
if the opening is required.
- The mains plug is used as the disconnect device, the disconnect device shall remain readily operable.
- Take attention to the environmental aspects of battery disposal. The battery of remote control should not be
exposed excessive heat such as sunshine, fire or the like.
- Maintenance man must use the appointed screw in the rear plate.
- Ensure a minimum distance of 5 cm around the apparatus for sufficient ventilation.
- Ensure that the ventilation is not impeded by covering the ventilation openings with items such as newspapers,
table-cloths, curtains, etc.
- Use the apparatus only in moderate climates (not in tropical climates).
- Do not open the cabinet to avoid the unit direct exposure to radiation.
Unit Cleaning: After the unit power is turned off, you can clean the cabinet, panel and remote control with a soft
cloth lightly moistened with a mild detergent solution.
Attachments: Never add any attachments and/or equipment without the manufacturer consent; as such additions
may result in the risk of fire, electric shock or other personal injury.
Locating: Slots and openings in the cabinet are provided for ventilation to protect it from overheating. Do not block
these openings or allow them to be blocked by placing the STB on a bed, sofa or other similar surface, nor should it
be placed over a radiator or heat register.
Power-Cord Protection: Place the power-supply cord out of the way, where it will not be walked on. Please take
special attentions to cords at plugs, convenience receptacles and the point where they exit from the unit.
Object and Liquid Entry: Never put objects of any kind into this STB through openings, as they may touch
dangerous voltage points or short-out parts that could result in a fire or electric shock. Never spill any liquid on the
STB.
Note: Moisture may be formed inside the unit in the following conditions:
When the unit is suddenly moved from a cold environment or an air-condition room to a warm place.
Immediately after a heater has been turned on.
In a steamy or very humid room.
If the moisture forms inside the unit, it may not operate properly. To correct this problem, turn on the power and wait
about two hours for the moisture to evaporate.
Parts Replacement: When the unit parts need to be replaced, user should make sure the service technician use the
replacement parts specified by the manufacturer or having the same characteristics as the original part. Unauthorized
replacement may put the unit in the risk of fire, electric shock or other hazards.
Safety Check: After all the maintenances and repairs are done, user is required to request the service technician to
conduct the overall safety check to ensure the machine is in the proper condition.
The lightning flash with arrowhead
symbol, within an equilateral triangle,
is intended to alert the user to
“dangerous voltage” and to prevent
from a risk of electric shock.
WARNING: To reduce the risk of
electric shock, don’t open the cabinet.
Refer servicing to qualified personnel
only.
The exclamation point within an
equilateral triangle is intended
to alert the user to important
operating and maintenance
(servicing).
Heruntergeladen von manualslib.de Handbücher-Suchmachiene

PAG.
3
English
rev 1.2
Example 1 – Basic System
Example 2 – DISEqC switches
QUICK INSTALLATION GUIDE
Follow next steps for the correct installation of this receiver.
STEP 1: OUTPUT VIDEO CONFIGURATION
In order to correctly visualise the reception signal on TV, you must configure the format and mode of
the video output.
- Video output mode: In order to get a correct visualization of the image select “HD” video output.
- Output format. You will be able to select among the following formats: 480I, 576I, 576P, 720P_50,
720P_60, 1080I_25, 1080I_30, 1080P_50, 1080P_60 or AUTO.
STEP 2: CONNECTIONS
The coaxial cable, with satellite signal, must be connected to the “IF IN” connector. The “HDMI” con-
nector must be connected to the TV set.
Depending on the type of installation, the receiver should be connected and configured following next
examples.
QUICK INSTALLATION GUIDE
Q: There will be no any video&audio output via HDMI when switch the Video Output to
“SD” or switch the Display Mode to “576I” or “480I” on some TV set.
A: Because the TV set itself does not support the display resolution on 576I&480I. When
it happened, there is a recovered way with double press the YELLOW Key from RCU.
The interval between the double press should not be too long, or it will do its own action
as normal.
Heruntergeladen von manualslib.de Handbücher-Suchmachiene

English
PAG.
4
rev 1.2
STEP 3: BASIC CONFIGURATION OF THE
RECEIVER
The receiver includes an installation assistant (Quick Setup)
that will help you to setup the different parameters.
When the receiver is turned on at first time, the next menu is
shown on the TV (Image 1):
The receiver is programmed with all the channels of Astra (at
position 1 of the DISEqC), Hotbird (at position 2 of the DISEqC),
Hispasat (at position 3 of the DISEqC) and Turksat (at position
4 of the DISEqC). If your installation is different to this case,
please follow installation steps to search the channels.
In order to move through the different options of this menu,
please use the keys [ ] of your remote control. If a “Short
circuit on the LNB” message is shown on the TV, please check
the connections before continuing the installation.
Language
: press [ ] to select languages. The selection
of languages include: English, German, French, Spanish,
Italian, Portuguese, Turkish, Polish, Russian, Danish, Greek,
Hungarian, Dutch, Arabic, Farsi, Kiswahili, Swedish, Bulgarian
and Slovak.
First Audio
: Some channels offer more than one audio language.
This function allows you to set the preferred audio language for
those channels using [ ]. If a channel offers the same
audio language as the “First Audio” you set the system will play
this audio language as default. If the channel does not offer
this audio language then the system will compare the offered
languages with the second audio language. The selections of
audio languages include: English, German, French, Spanish,
Italian, Portuguese, Turkish, Polish, Russian, Danish, Greek,
Hungarian, Dutch, Arabic, Farsi and Slovak.
IMAGE 1
QUICK INSTALLATION GUIDE
Example 3 – Combined with terrestrial
Heruntergeladen von manualslib.de Handbücher-Suchmachiene

PAG.
5
English
rev 1.2
Second Audio
: If the channel has no audio language that
corresponds with “First Audio” but with “Second Audio” the
system will play the second audio language as default. If no
audio language corresponds with the “Second Audio” then the
default language of the current channel will be played instead.
The selections of audio languages include: English, German,
French, Spanish, Italian, Portuguese, Turkish, Polish, Russian,
Danish, Greek, Hungarian, Dutch, Arabic, Farsi and Slovak.
LNB Power
: Here you can set the power output to the LNB. If
your receiver is connected to the LNB directly then you need to
set the LNB Power to “On”. If your receiver is connected to a
multi switch (SMATV signal distribution system) then it may be
that you don’t need to provide the power to the LNB. But since
this is depending on the kind of installed distribution system we
recommend you to contact your installer or to refer to the user
manual of this system to get the correct information.
Single search
: You can edit the following items (Image 2):
1. Satellite: Press [ ] to switch Satellites or press [OK] to
enter satellite list to select directly.
2. LNB Configuration: Selecting this option and pressing [OK],
the LNB Configuration menu will be displayed. In this menu,
next options can be modified (Image 3):
- LNB Type: Press [ ] to switch among “Standard”, “User”
and “Universal” mode. If you select “Standard” or “User”, the
frequency of the LNB can be changed. Pressing [OK] the
frequencies will appear to be edited. Select the frequency
you want to edit and change the value with [ ]
- 22K: Use [ ] to switch “ON” and “Off”. The 22 kHz sig-
nal is used in KU Universal LNBs to change between low
band and high band. After choosing LNB type “Universal”
you cannot modify 22K.
- DiSEqC1.0: Use [ ] to switch the options of DiSEqC
switches.
- DiSEqC1.1: Use [ ] to switch the options of DiSEqC1.1
switches.
- Positioner: Press [ ] to select between “None /
DiSEqC1.2 / GoToX”. *
* This receiver does not allow moving Diseq motors
- Polarity: Press [ ] to switch between “Auto / H / V”.
Once the LNB is configured, press [Exit] to save the chan-
ges and go to the previous window to continue configuring
the antenna.
- Toneburst: Press [
] to switch this function “On” or
“Off”.
3. DiSEqC1.0: Use [
] to switch the options of DiSEqC
switches.
4. On “TP Index” item use [ ] to select the desired
IMAGE 2
IMAGE 3
QUICK INSTALLATION GUIDE
Heruntergeladen von manualslib.de Handbücher-Suchmachiene

English
PAG.
6
rev 1.2
transponder.
5. In the “FTA Only” item, press [ to select to scan only
free channels or even scrambled channels. If you select “Yes” it
will scan free channels only.
6. In “Scan Channel” item, press [ ] to select to scan TV +
Radio Channels, or just TV channels or just Radio channels.
7. In “Scan Mode” item you can select “Auto Scan” to blind scan
or “Preset Scan” to scan all preset transponders.
8. Move the highlight to “Search” and press [OK] button to
start scanning. Bars are showing the progress of the channel
scanning in the lower part of the window and the found channels
are listed.
You can stop the scan with [Exit] and save the so far found
channels.
9. Press [Exit] to exit this menu. A window to confirm the
changes will appear.
Multi search
: You can edit the following items (Image 4):
1. On “Satellite” item press [OK] to open the satellite list.
Then press [ ] to move the highlight and press [OK]
to mark/unmark and [EXIT] to finish the selection. You can
select several satellites in this menu. At the bottom of the
screen you can see the selected satellites. The system will use
DiSEqC1.0/1.1, DiSEqC1.2 and GoToX functions to search
the marked satellites and scan channels.
2. On “FTA Only” item, press [ ] to select scanning of all
channels or just scanning of free channels. If you select “Yes” it
will scan free channels only.
3. On “Scan Channel” item, press [ ] to select the
scanning range from TV + Radio Channels, only TV channels or
only Radio channels.
4. On “Scan Mode” item, you can select “Auto Scan” to make
a blind scan or “Preset Scan” to scan all preset transponders of
the selected satellites.
5. Select “Search” and press [OK] to start scanning. In the
lower part of the window the progress of scanning and the
found channels are displayed.
6. Press [Exit] to cancel or finish the scanning and saving the
found channels.
Main Menu
: Selecting this option, the main menu will appear
on the TV.
IMAGE 4
QUICK INSTALLATION GUIDE
Heruntergeladen von manualslib.de Handbücher-Suchmachiene

PAG.
7
English
rev 1.2
IMAGE 5
STEP 4: TIME CONFIGURATION
It is recommended to setup the clock before starting to enjoy
the receiver, because correct time maybe is required by some
applications. Please complete following options:
Press the [Menu] key of the remote control for appearing the
main menu. Select the “System Setup” option and confirm
pressing [OK].
Once in the “System Setup” option, please select “Local Time
setting” option and press [OK]. Select “Time” option and press
[OK]. Image 5 is watched on the TV. For setting up the time,
please complete:
1. GMT Usage: this option will allow you to select if the date
and time will be introduced manually (GMT Usage: Off) or if
you wish to introduce the offset respect GMT manually (GMT
Usage: On).
2. GMT Offset: If GMT Usage is On, the offset respect GMT
has to be configured depending on your region or country. Use
the [
] keys to choose the offset. Remember that the
offset values are between -12:00 and +12:00
3. Summer: this option is only available when “USE GMT” is
enabled. Use [ ] to switch on/off the summer timetable.
4. Date / Time: In order to introduce manually the time and
date. Before these values can be modified, the automatic
control of GMT has to be turned off.
NOTE: If the current channel provides the correct time
information, you will see the current time after you entered
“Time” menu. If the channel doesn’t provide time information,
you have to input the date and time information manually. The
most channels support the time signal.
5. Show time: Use [ ] to switch on/off this option. When
the option is enabled, the time will be displayed at the TV in a
frame in the top right margin.
6. Press [Exit] to exit the menu.
QUICK INSTALLATION GUIDE
Heruntergeladen von manualslib.de Handbücher-Suchmachiene

English
PAG.
8
rev 1.2
TV Channel List: This option shows the list of TV stored channels.
Radio Channel List: This option shows the list of Radio stored channels.
Channel Setup: This option allows setting the receiver to start in a predefined channel.
Favourite Channel List Name: It allows changing the name of the favourite groups.
Delete All: This option deletes all TV and Radio stored channels.
Single Satellite Search: Once the antenna is configured, this option allows search for
the channels of one satellite.
Multi Satellite Search: Once the antenna is configured, this option allows search for the
channels of various satellites.
TP Scan: Once the antenna is configured, this option allows search for the channels of
one TP.
Satellite List: This option shows all the stored satellites. This list can be modified.
TP List: This option shows all the stored TP. This list can be modified.
Satellite Guide: After introducing some data, this application allows to know which
orientation and elevation should be the antenna.
Unicable Configuration.
QUICK INSTALLATION GUIDE
Heruntergeladen von manualslib.de Handbücher-Suchmachiene

PAG.
9
English
rev 1.2
Language: This option allows choosing the language of the menus.
TV System: This option allows choosing the video Standard and other parameters of
the screen.
Time & Timer Setting: Timer setting menu.
OSD Setting: This option allows configuring the subtitles of the channel information.
Parental Lock: In this option, user can lock the access to the menu and change the
password of the receiver.
Power setting: Activate or deactivate the automatic Standby option after 3 hours, turns
on or off the LNB power or enable / disable Low Power Consumption mode.
Information: Shows all the technical information for the selected channel.
Quick Setup: The installation assistant will be loaded.
Factory Default: This option resets the receiver and loads the factory default values.
Software Upgrade: For updating your receiver through USB or satellite (OTA) and also
for making backup of the information of the receiver in a USB device.
Media List: Allows to reproduce, to block and to delete recordings. Multimedia Player.*
Media control: It allows selecting the disk partition and formatting it. *
Disk Information: You can see the capacity of the hard disk. *
QUICK INSTALLATION GUIDE
* This function will only be available in models with PVR ready functionability
Heruntergeladen von manualslib.de Handbücher-Suchmachiene

English
PAG.
10
rev 1.2
1. Panel & Remote Control Description
1.1. Front Panel Description…….......................................…………………………13
1.2. Rear Panel Description……................................………….…………………..13
1.3. Remote Control Description…...............................................…………………………..14
2. Basic Operations
2.0. Switch on STB……………………….....................................………………………………...15
2.1. Standby ……………………..............................................………………………15
2.2. TTX …………..................................................……………………………………..15
2.3. Mute……………............................................………………………………………..16
2.4. Channel Number…………...........................……………………………………………………16
2.5. CH + / CH -…...............................................…………………….…………………………..16
2.6. TV/RADIO…………........................…………………………………………………….16
2.7. Vol+/Vol-…......................................……………………………………………………….16
2.8. Exit….................................……………………………………………………..16
2.9. Menu……………………...................................…………………………………..16
2.10. Recall…..............................................………………………………………...16
2.11. Channel List…………………….........................…………………………………...16
2.12. EPG…………………...............................…………………………………………...17
2.13. List………………................................…………………………………………………17
2.14. Favourites………....................................………………………………………………...17
2.15. Audio Track / Mode…...........................……………………………………………….18
2.16. Information……..................................…………………………………………...18
2.17. FAV +/-…..................................……………………………………………….18
2.18. ZOOM………………………………….............…………………………………...18
2.19. Subtitles……………………………….............……………………………………...18
2.20. LNB Short………………………….......…………………………………………...18
2.21. REC key........................................................................................19
2.22. TimeShift........................................................................................19
2.23. Go To........................................................................................20
3. Channel
3.1. TV Channel List…………....................……………………………………………..21
3.1.1. Favourite………...............................………………………………….……………21
3.1.2. Move.……………..........................……………………………………….…………21
3.1.3. Sort......................................………………………… …………………….………..22
3.1.4. Edit….......................................…………………………………………….22
3.1.4.1 Delete…........................................…………….…...22
3.1.4.2 Skip….......................…………………………………..…………..22
3.1.4.3 Lock..….................................………………………… …….……….23
3.1.4.4 Edit..........................…………………...………………………...23
3.1.5. Find…………….........................……………………..……..………………..…….23
3.2. Radio Channel List……..................................……………………………………......24
3.3 Channel Setup…………..................................………………………………......24
INDEX
Heruntergeladen von manualslib.de Handbücher-Suchmachiene

PAG.
11
English
rev 1.2
3.3.1. Start-up Channel……………................................……………………………......24
3.3.2. Channel Play Type………........................…………………………………......24
3.4. Favourite Channel List Name……..........……………………………………......24
3.5. Delete All…….....................…………........…………………………………….25
4. Installation
4.1. Single Search…………......................……………………..…………………..26
4.2. Multi Search………...........................…………...………..…………………….27
4.3. TP Scan………..………………................………………………..…………………...28
4.4. Satellite List………….............................………………………...………………...29
4.5. TP List………….............................………………………...………………...29
4.6. Satellite Guide…………..................…………………………..………………...30
4.7. Unicable Configuration…..................…………………………..………………...30
5. System Setup
5.1. Language………………….............………………………...…………………...31
5.2. TV System……………..............…………………………..…………………...32
5.3. Time & Timer Setting ………....................………………………...………………32
5.3.1. Timer.......................................................................................32
5.3.2. Local Time setting........................................................................34
5.3.3. Sleep Timer................................................................................34
5.4. OSD Setting…………………………………..............................…………………...34
5.5. Parental Lock…………………………............................…………………………….35
5.6. Power setting……………………….............................……………………………..35
6. Tools
6.1. Information…………………………...................................………………………….37
6.2. Quick Setup………………………………......................……………………...37
6.3. Factory Default………………………………………..………………..............................38
6.4. Software Update………………………….………………………............................38
6.4.1. Upgrade by USB...................................................................38
6.4.2. Backup to USB .................................................................................39
6.4.3. Upgrade by Satellite...................................................................39
7. Media Management
7.1. Media List.............................................................................................40
7.1.1. Record Management - Record List....................................................41
7.1.1.1. How to reproduce a recording....................………………………41
7.1.1.2. How to rename a recording.....................………………………41
7.1.1.3. How to block a recording..........................………………………41
7.1.1.4. How to copy a recording.......................………………………41
7.1.1.5. How to delete recordings.................………………………41
7.1.2. Multimedia player.............................................................................42
7.1.2.1. Edit files and folders................................…………..……………42
INDEX
Heruntergeladen von manualslib.de Handbücher-Suchmachiene

English
PAG.
12
rev 1.2
7.1.2.2. Addind a new file to the list.................………………………43
7.1.2.3. Search for file………….........………………………................43
7.1.2.4. Logo.............................................……………………………43
7.1.2.5. Configure the slide show.....................…………………………44
7.1.2.6. Audio player…………....………………………................44
7.1.2.7. Picture viewer.............................................…………….44
7.1.2.8. Video player.................................................................44
7.2. Media Control..............................................................................................44
7.2.1. Record type .......................................................................................45
7.2.2. Timeshift size...................................................................................45
7.2.3. Auto Timeshift......................................................................................45
7.2.4. Jump Step Value.................................................................................45
7.2.5. Disk ................................................................................................45
7.2.6. Format Disk..................………….............……….........…………………45
7.3. Disk Information..............................................................................................45
8. Technical Specification……………………………………........................................46
9. Conformity declaration……………………………………........................................47
INDEX
Heruntergeladen von manualslib.de Handbücher-Suchmachiene

PAG.
13
English
rev 1.2
PANEL & REMOTE CONTROL DESCRIPTION
1. PANEL & REMOTE CONTROL DESCRIPTION
1.1. FRONT PANEL DESCRIPTION
1.2. REAR PANEL DESCRIPTION
1. POWER LED: Indicates that the mains voltage is available.
2. LOCK LED: Indicates a sufficient signal level at the IF IN input.
3. IR-SENSOR: Reception sensor for the IR remote control signals.
1. IF IN: Satellite input. Max. 300mA
2. HDMI: HDMI output for connecting to a TV.
3. USB: Connector for external USB 2.0 HighSpeed devices.
4. COAXIAL S/PDIF: Coaxial output for digital audio (AC3).
5. DC IN: 19 VDC connection (power supply).
1 2 3
1 2
3
4
5
Heruntergeladen von manualslib.de Handbücher-Suchmachiene

English
PAG.
14
rev 1.2
PANEL & REMOTE CONTROL DESCRIPTION
1. POWER: Switches receiver ON or in stand-by-mode.
2. MUTE: Switches audio on and off.
3. NUMERIC KEYS: For direct typing values and names.
4. TXT: Opens and closes teletext.
5. Pause: If you press it once, you will stop the image, and it
will come back to normal mode when you press it again.
6. Menu: Opens the main menu.
7.- Exit: Exit menus or stop operations.
8. OK: Confirms selections or opens channel list.
9.
: Adjusts audio volume or controls the cursor in
menus.
10. : Changes channels volume or controls the cursor
in menus.
11. Recall: Watch the last viewed channel.
12. TV/R: Switches between TV and Radio channels.
13. Color Keys: Controls menu options.
14. EPG: Shows the EPG information.
15. Audio: Opens audio menu.
16. SUB: Switches subtitle on and off.
17. Zoom: Zoom function.
18. Info: Shows channel information with signal bar.
19.-
■
: Stop button for recording. *
20.-
: Quick start for recording. *
21.- FAV: Opens favourite channel list.
22.-
►
II
: Start / Stop button for recording. *
23.-
■
: Backward button for recording. *
24.-
■
: Forward button for recording. *
25.- GOTO: To move to the specified position. *
* This function will only be available in models with PVR
ready functionability
1.3. REMOTE CONTROL DESCRIPTION
Heruntergeladen von manualslib.de Handbücher-Suchmachiene

PAG.
15
English
rev 1.2
BASIC OPERATIONS
2. BASIC OPERATIONS
2.0. SWITCH ON STB
Switch the [Device’s Main Power] switch on.
When the STB is first used it will display the quick setup page
where the receiver can be configured quickly.
For further use the STB will play the same channel as last time
when it was switched off.
? FREQUENTLY ASKED QUESTION
Q: The power of my STB is on and it is running in TV mode but
the TV screen shows nothing:
A: Make sure the TV set has been set to the correct video input
(not the TV channels). For example, if you have connected the
STB to the Video1 input of the TV set, then you need to select
the corresponding Input on the TV. Mostly it is done with the AV
button of the TVs remote control unit.
Q: My STB is running in TV mode but the TV screen shows
nothing except one ball and “No Signal”.
A: That means the channel you selected has no signal. This can
be caused by several reasons:
1. The channel you selected is not from the satellite to which
your dish is pointing. Select another channel.
2. The signal of current TV channel is too weak. You can
try to change to other channels with a stronger signal. If the
problems still exist, please consult your local dealer or installer
for technical service.
3. You selected the wrong LNB type in the installation menu or
your DiSEqC switch configuration is not correct.
2.1. STANDBY
1. Press [Power] button to switch from TV mode to Standby
mode.
2. In Standby mode press [Power] button again to switch back
to TV mode. The last active channel will be showed.
3. To switch off the STB complete press the main power button
(placed at the rear panel of the receiver).
2.2. TTX
1. Press [TXT] button in TV mode to open the teletext page
(OSD 1). This service is depending on the support of the
channel provider.
2. If the channel does not support teletext information, it will
show “No Teletext Data” on the screen.
OSD 1
Heruntergeladen von manualslib.de Handbücher-Suchmachiene
/