RANGE
OF
APPLICATION
The GPS device is a navigation system.
By
using the 24 satellite
netwofk
circling the earth.
the posltion
of
user can
be
determined. This is possible at any time and averywhere in tha world.
• The
GPS
device
is
designed for use as a global positioning system.
• The
GPS
device servas mainly for tha measurement
01
distances. speed. altitude and
navigation by using
the US·Amarican
24
satellite natwork.
• The device
Is
not
usable for demanding applications such as paragliding, sky diving
or
soaring.
• The
GPS
device
is
designed for private use and not
su~able
for commercial use.
A use different other than described In this Instruction manual
Is
not advisable and can lead
to damage
or
injury.
We
assume no liability
lor
damages resulting from improper use.
Further directions and explanaUons
can
be
found
In
the Instruction manual.
GPS
Reception
To use the GPS function
of
your GPS device optimally, it
Is
imperative thai
the
following
instructions are followad.
The GPS device is a global positioning system (=GPS), which mainly serves for the
measurament
01
distances. speed, altitude and navigation by using the US·American
24 satellite network.
The United States of America operates this 24
sate
ll
~e
netwofk
and
is
responsible for its
accuracy and maintenance.
Only during
clear
weather
(dear
sky) and suitable reception
area·
open
a
....
a
nd
clear
Vie
.....
oflhe
aky
-
can
a faulUess
satellite reception
be
ensured.
Since satell
rta
Signals react very sensitively
to
outside Influences. bad weather
cond~ions
(such
as strong snowfall)
as
well as a disturbed reception area (GPS device Is covered
by
clothing
or
otherobj&ts.
high buildings
or
narrow valleys and gorges prevent re<:eption)
can seriously impair
the performance and accuracy
of
the GPS device.
The
GP$
reception
In
buildings Is very reduced or Impossible.
Nearwindows.
as
well
as
In
rooms
with large windows and
free sight
of
the sky, the position can be determined in certain
circumstances. depending on the current
pos~ion
of
the satellites. In closed rooms and in cellars
the GPS reception is practically always Impossible.
- 1 -
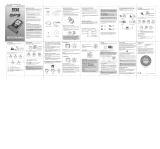
ACCESSORIES
Mounting Shoe
USB
Cl
ip Installation
CD
FUNCTION
BUTTONS
OF
THE
GPS
DEVICE
-
2-
®
~,.,
(3V
I CR2032)
~
Chest Belt