Page is loading ...

INSTALLATION GUIDE
STUDIO 55 SoundBar STUDIO55-SB
STUDIO 46 SoundBar STUDIO46-SB
STUDIO 39 SoundBar STUDIO39-SB

2
CARTON CONTENTS:
1. STUDIO SoundBar Speaker
2. Television Mounting Brackets (TMB)
o (24” for STUDIO39-SB & STUDIO46-SB; 29” for STUDIO55-SB)
2. Long Extension Plates
2. Short Extension Plates
1. Hardware Accessory Kit
o 1. 3mm Allen Wrench
o 8. Bracket to Bracket (B to B) Screws, M5 x 10 mm, Stainless Steel
o 4. Machine Screw, M4 x 11.5 mm
o 4. Machine Screw, M5 x 11.5 mm
o 4. Machine Screw, M6 x 11.5 mm
o 4. Machine Screw, M8 x 11.5 mm
o 4. Machine Screw, M10 x 11.5 mm
o 4. Flat Washer; 25 mm OD, 10 mm ID
o 4. Flat Washer; 25 mm OD, 5 mm ID
2. White Gloves
1. Installation Guide
If you are missing any of these parts or if you need assistance during the
installation of your Artison Studio SoundBar, please contact Artison’s Customer
Service Department during normal business hours, Pacific Time at (775) 783-4770

3
Thank you for choosing the Artison STUDIO SoundBar Speaker. We are pleased
that you have selected our high-performance audio product. The following
information will guide you through the installation of your Artison STUDIO
SoundBar Speaker.
INTRODUCTION
Artison STUDIO SoundBars are designed to attach directly to any Flat Panel TV (FPTV)
with the included hardware, brackets, and come with custom made grilles. Studio
SoundBars contain a Center Channel, Left Channel, and Right Channel; all housed in one
aluminum enclosure. All 3 speakers have independent air chambers and crossovers.
This creates one TOTAL INVOLVEMENT EXPERIENCE™.
The STUDIO SoundBar attaches to any FPTV using the VESA mounting points on the
rear surface. Using the Thin UMB, the LCR DM speakers can be attached to any FPTV in
a table top application or a wall-mount application in conjunction with a FPTV wall-mount
bracket.
G ST Grilles are available customized to the width and bezel color of any FPTV. Artison
maintains a database of popular FPTV’s and can match the exact width of any set. Any
Artison Dealer can order a custom made grille for your FPTV.
G ST Grilles used with Studio 39 are compatible with any FPTV that is 38.0”inches wide
tall or larger. G ST Grilles used with Studio 46 are compatible with any FPTV that is
45.4”inches wide tall or larger. G ST Grilles used with Studio 55 are compatible with any
FPTV that is 54.1”inches wide tall or larger.
All STUDIO models are compatible with displays that are 25.4 mm – 200 mm, (1.0” – 3.6”)
in depth.

4
INSTALLATION OPTIONS
The Artison STUDIO SoundBar Speakers were designed to have multiple installation
options using the included hardware and brackets.
Attachment to any Flat Panel TV (FPTV) in a Tablestand or Wall Mounted installation.
On-Wall/Surface Mounting.
Please read the instructions below before attempting your installation.
INSTALLATION PROCEDURES
The Television Mounting Brackets were designed in compliance with the VESA Mounting
Standards. When using a third party FPTV wall-mount, the Television Mounting Brackets
are placed between the FPTV chassis and the FPTV wall-mount. In cases where the
display utilizes a table top stand, the Television Mounting Brackets can be attached
directly to the FPTV’s chassis.
REMOVAL OF FPTV CURRENTLY INSTALLED
1. If your FPTV is currently wall mounted, disconnect any wiring connections and remove
the FPTV from the wall mount. NOTE: This step may require two people.
2. Place FPTV in safe location, display side down on a soft non-abrasive surface.
3. Remove any existing mounting brackets and screws from the VESA mounting points
on the rear of the FPTV.
TELEVISION MOUNTING BRACKET PLACEMENT
4. Position one Television Mounting Brackets across the left mounting points, one Thin
UMB across the right set of mounting points.
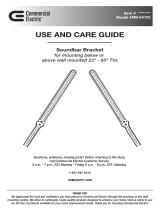
Align the flat inner return of the Television Mounting Brackets to extend beyond the
FPTV bezel by 1/8”, 1/4” if your FPTV is thicker than 1.8”. This will leave the required
space for the grille to fit between the FPTV and speaker cabinet, see FIGURE 1.
NOTE: If your television is too tall for the TMBs to align with both the upper and
lower set of mounting holes. Line up the TMBs with the closer mounting points
and use spacers on the other mounting points to keep the mounting brackets
parallel to the chassis.
5. The STUDIO SoundBar can be mounted on top or bottom of the FPTV. See
FIGURES 2 & 3.

5
FIGURE 1
FIGURE 2 FIGURE 3

6
EXTENSION PLATE SELECTION BASED ON FPTV THICKNESS
6. Depending on the FPTV depth the use of Extension Plates will vary. Refer to the
following; TABLE 1 and FIGURES 4-9.
Figure
FPTV
Thickness
Extension
Plate
Minimum
TV Wall Mount
Bracket Depth
4 & 5 1.0 - 1.4” No 1.0"
6 & 7 1.9 - 2.8” Short 1.0"
8 & 9 2.7 – 3.6” Long 1.0"
TABLE 1
FIGURE 4

7
FIGURE 5

8
FIGURE 6

9
FIGURE 7

10
FIGURE 8

11
FIGURE 9

12
HARDWARE KIT
7. Mounting Screw Selection
7.1.1. Match the threads in the FPTV chassis to one from the kit.
Thread: M4, M5, M6, M8, or M10.
7.1.2. First, check the thread depth of the mounting points on the FPTV.
7.1.3. Using the Television Mounting Brackets (Depth = 6.5mm), third party
wall-mount, and washers. Allow for 5 - 8 mm of screw threads into the FPTV
chassis. Be sure to account for the maximum thread depth into the TV.
8. Flat Washer: Select a washer that fits around the selected Mounting Screw.
9. If applicable, place your wall mounting brackets that the television will be hung by on
top of the Television Mounting Brackets.
10. Then loosely thread the mounting screws thru all of the bracket assemblies.
11. Tighten the screws on the rear of the television to hold all of the brackets in place on
the chassis.
12. You may now hang your FPTV on the wall, or place it onto the table stand.

13
MOUNTING THE SOUNDBAR TO THE TELEVISION MOUNTING BRACKETS
13. Using the correct accessories from STEP 6 assemble the SoundBar to the
Television Mounting Bracket using the B/B hardware and the 3 mm Allen Wrench.
There are Two sliders in the cabinet that will accept these screws. Simple slide the
sliders to meet the Television Mounting Brackets location.
14. Carefully adjust the speaker forward to sit just behind the bezel.
15. See FIGURES 10 & 11.
FIGURE 10 FIGURE 11

14
16. Attach the grille to the cabinet by slipping the grille around the cabinet. You will feel
a click as the grille seats. See FIGURES 12 & 13.
17. Tighten the B/B hardware to hold the position.
18. Slide the grille Left or Right to align with the sides of the FPTV bezel.
FIGURE 12 FIGURE 13

15
WIRING THE SOUNDBARS
3 CHANNEL METHOD (Left, Center and Right)
1. Operate the terminals by firmly pressing on them. An opening will be exposed in the
side of the terminal. Slip about 9 mm (3/8”) of bare speaker wire into this opening hole
and release the terminal. The spring loaded terminal will now securely hold the wire in
place.
2. Attach the three speaker wire pairs to the binding posts on the rear of the SoundBar.
The red terminal is the positive terminal and the black terminal is the negative terminal.
The outer sets of binding posts are Left and Right respectively and the center set of
binding posts is the Center Channel.
NOTE: The SoundBar is a 3 channel (Left, Center and Right) passive loudspeaker
device and requires 3 discrete audio signals from an external multi-channel amplifier.
The speaker wire gauge required is dependent upon wire length run, 16 gauge is
suggested as the minimum size.
12 gauge is the maximum that will fit into the
terminals.

16
FINE TUNING YOUR STUDIO SOUNDBAR
Satellite / Subwoofer Crossover Frequencies:
STUDIO 39:
‘SMALL’ Speaker on A/V Receiver / Processor
Left / Right Crossover Frequency: 100 Hz
Center Crossover Frequency: 80 Hz
STUDIO 46:
‘SMALL’ Speaker on A/V Receiver / Processor
Crossover Frequency: 80 Hz
STUDIO 55:
‘SMALL’ Speaker on A/V Receiver / Processor
Crossover Frequency: 80 Hz

17

18
SPECIFICATIONS & DIMENSIONS:
Studio 55 SoundBar
STUDIO55-SB
Dimensions: 4.1” x 53.4” x 2.2”, HWD Overall
4.7” x CUSTOM” x 2.7”, HWD w/ Minimum Grille
For use with FPTV’s: W ≥ 54.1”
Driver Complement: 6. 3½” Carbon Fiber, Long Throw, Midrange/Woofer
3. 25 mm XT25 Super Audio Tweeters
2. 19 mm Stage Tweeter
Cabinet / Finish: Extruded Aluminum / Black Anodized;
Grille Cloth available in Black or Light Grey
Frequency Response: 80 Hz – 50 kHz ± 3 dB
Recommended Power: 75 - 150 Watts
Nominal Impedance: 6 Ω
Sensitivity: 89 dB @ 2.83 Volts, 1 Meter
Enclosure Type: Bass Reflex
System Weight: 31 lbs. (14 kg.) incl. Speaker, Mounting Hardware & Grille

19

20
Studio 46 SoundBar
STUDIO46-SB
Dimensions: 4.1” x 44.7” x 2.2”, HWD Overall
4.7” x CUSTOM” x 2.7”, HWD w/ Minimum Grille
For use with FPTV’s: W ≥ 45.4”
Driver Complement: 6. 3½” Carbon Fiber, Long Throw, Midrange/Woofer
3. 25 mm DX25 Super Audio Tweeters
2. 19 mm Stage Tweeter
Cabinet / Finish: Extruded Aluminum / Black Anodized;
Grille Cloth available in Black or Light Grey
Frequency Response: 80 Hz – 40 kHz ± 3 dB
Recommended Power: 75 - 150 Watts
Nominal Impedance: 6 Ω
Sensitivity: 89 dB @ 2.83 Volts, 1 Meter
Enclosure Type: Bass Reflex
System Weight: 28 lbs. (13 kg.) incl. Speaker, Mounting Hardware & Grille
/