Page is loading ...

$
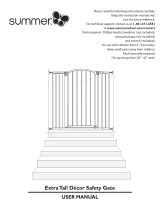
INSTRUCTION MANUAL
&86720),7:$/.7+58*$7(
0$,17(1$1&(
Regularly check hinge knobs to make sure the gate is securely in place.
Do not use the gate if any components are damaged or missing.
Wipe surface with a damp cloth or sponge, using mild detergent and
cold water.
To order a replacement hardware kit (LWHP), contact us
at the address/telephone number below.
Colors and styles may vary.
0$'(,1&+,1$1/19
6XPPHU,QIDQW,QF86$
1275 Park East Drive
Woonsocket, RI 02895
1-401-671-6551
© 2019 Summer Infant (USA), Inc.
We’re here to help! If you have questions or need assistance,
please contact our Consumer Relations Team at
1-401-671-6551 or www.summerinfant.com/contact
Please read the following instructions carefully.
Keep this instruction manual and save for future reference.
For technical support, contact us at
or ZZZVXPPHULQIDQWFRPFRQWDFW
Tools required: Phillips-head screwdriver (not included).
For use with children from 6 - 24 months.
Keep small parts away from children.
Adult assembly required.
Fits openings from 65" - 141" wide.

4
5
6
*DWH *DWH
72&5($7($)5((67$1',1*
3/$<<$5'86,1*7:2*$7(6
6WHS Remove the two screws from
the Upper Gate Hinge on one end panel
and replace with the Upper Connection
Hinge (Figure Q).
6WHS Remove the two screws
from the Lower Gate Hinge on the same
panel and replace it with with the Lower
Connection Hinge (Figure R).
6WHSRepeat steps 1-2 on one
of the end panels of the second
assembled gate.
6WHS Attach ends of each gate
by lining up the Upper and Lower
Hinges on each gate. The Lower Hinge
should snap into place (Figure S).
6WHSTurn the hinge knobs
clockwise on each gate to tighten.
8SSHU*DWH
+LQJH
8SSHU
&RQQHFWLRQ
+LQJH
/RZHU*DWH
+LQJH
/RZHU
&RQQHFWLRQ
+LQJH
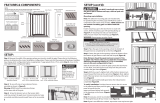
3DQHO*DWH For openings 65” – 87” (165 cm - 221 cm) use 2 panels.
For openings greater than 87” - 141” (221 cm - 358 cm) use 3 panels.
:DOO
7HPSODWHV
(2 on 1 sheet)
8SSHU
:DOO
+LQJHV (2)
/RZHU
:DOO
+LQJHV (2)
:RRG6FUHZV (8)
)HHW(2) :DOO$QFKRUV(8)
)($785(6&20321(176
Children have died or been seriously injured when gates are not securely installed.
• ALWAYS install and use gate as directed using all required parts.
• Install according to manufacturer’s instructions.
• Stop using when a child can climb over or dislodge the gate.
• Use only with the locking/latching mechanism securely engaged.
• To prevent falls, never use at top of stairs.
• NEVER use a gate to keep child away from pool.
• NEVER leave child unattended.
• ALWAYS close and lock the gate behind you.
• Do not use on uneven surfaces.
• Periodically check all hinge knobs to ensure they are tight and secure.
• This product will not necessarily prevent all accidents. Proper adult supervision is required
at all times.
• Do not use if any components are missing or damaged.
• Adult assembly required. Exercise care when unpacking and assembling product.
CAUTION: KEEP SMALL PARTS OUT OF CHILD’S REACH.
WARNING

2
3
7:23$1(/6(783)25
23(1,1*6
For openings 65" – 87" (165 cm - 221 cm)
6WHS Unscrew upper knob on
Hinge between end panel and
door panel (Figure O).
6WHS Squeeze tabs and separate
Lower Hinges (Figure P).
6WHSRemove entire end panel
and retain for future use.
6WHS Refer to steps 1-14 in
“3 PANEL SETUP” section.
&
%
7+5((3$1(/6(783)25
23(1,1*6
6WHS Cut out Wall Template (for mounting “3” Panel
Gate). Place it against the wall, bottom even with the floor,
making sure that sides are vertical and straight (Figure A).
Next, tape it temporarily in place (you will need to use the
Wall Template more than once).
1RWH Once you are sure the Template is straight, mark
the screw hole locations by lightly tapping the supplied
screw through the hole guides ( ) shown on the
Template. Carefully remove the Template for use on
the other end of gate.
,03257$17127(
Screws are provided for mounting the Hinges and Latches
directly to wood. If mounting into wallboard, use the Wall
Anchors and Screws provided. If you are mounting the gate
to another surface, purchase and use the appropriate
hardware.
1RWH If wall anchors are needed:
a) Pre-drill a hole in the wall (3/16" or 5mm drill bit).
b) Insert the wall anchors (included) into the hole
with a hammer, tap gently on the end until the wall
anchor is flush with the wall.
6WHS Mount one Lower Wall Hinge using 2 Wood
Screws in the bottom position, marked in Step 1.
Be sure that the hinge post faces up as shown in Figure B.
6WHS Repeat the mounting procedure with the Upper
Wall Hinge at the top position, marked in Step 1.
Be sure that the Hinge faces up as shown in Figure C.
$
6WHSLocate wall that the other end of the gate
will mount to and repeat Steps 1-3.
For openings 65" - 87" (165 cm - 221 cm), refer to “TWO PANEL SETUP”
section, and use Template for mounting 2 Panel Gate.

.
-
0
/
1
6WHS Repeat the mounting procedure in
Step 6 to connect end panel to wall.
6WHS Turn expansion handle(s)
counter-clockwise until tight (Figure J).
(Opposite of Step 8.)
6WHS Once both panels are
securely mounted to each wall,
turn the 4 hinge knobs clockwise
to secure gate (Figure K).
6WHS To open door, slide trigger
back and lift door panel up to swing door
open in either direction (Figure L).
127(Cut shipping tie located at bottom
of door panel to open and close door.
6WHS To close door, lift door
panel up and align over trigger tab
and push door panel down to click
and lock into place (Figure M).
1RWH Be sure that the door clip
(located on bottom of door, shown
in Figure N) is also aligned before
pushing door panel down into place.
7+5((3$1(/6(783FRQWLQXHG
GRRU
FOLS
+
,
)*
'(
6WHS Attach one end of gate to Upper
and Lower Wall Hinges as shown.
You should hear a snap when mounting
the Lower Hinge (Figures F and G).
6WHS Open the hook and loop fabric
door with “lock” logo on it to access the
expansion handles (Figure H).
6WHS Rotate expansion handle
clockwise until loose and panel is able
to expand freely (Figure I).
6WHS Repeat on other panel if
necessary until gate reaches Upper
and Lower Wall Hinges.
7+5((3$1(/6(783FRQWLQXHG
6WHS Unfold gate panels and attach 2 feet as shown in Figures D and E.
“lock”
logo
/