Page is loading ...

Item #20622
© Copyright 2015 Easthill Group, Inc. 8/15 Instruction #20622Q Rev. 0
If you have any questions about the use of this product, please contact
The Eastwood Technical Assistance Service Department: 800.544.5118 >> email: techelp@eastwood.com
PDF version of this manual is available online >> eastwood.com/20622manual
The Eastwood Company 263 Shoemaker Road, Pottstown, PA 19464, USA
US and Canada: 800.345.1178 Outside US: 610.718.8335
Fax: 610.323.6268 eastwood.com
MOTORIZED BEAD ROLLER
INSTRUCTIONS

2 Eastwood Technical Assistance: 800.544.5118 >> techelp@eastwood.com To order parts and supplies: 800.345.1178 >> eastwood.com 7
INCLUDES
The motorized bead roller ships in 2 boxes – one containing the assembled bead roller and one containing the unassembled stand. Open both boxes and verify
that all components are present.
(1) 24" throat motorized bead roller frame
(1) Foot pedal
(1) Stand
(1) Hardware pack for stand
(1) Mandrel storage rack
(1) ½" bead mandrel set
SPECIFICATIONS
• Maximum material working thickness: Steel = 18 Gauge, Aluminum = 16 Gauge
• Maximum panel width (working from center) = 48"
• Shaft diameter/Mandrel bore 3/4"
NOTE: Eastwood Bead Roller Forming Dies (#20267) are not compatible with this bead roller
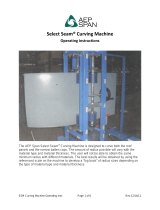
The Eastwood Motorized Bead Roller is a professional metal fabrication tool. It is excellent for producing strengthening ribs in replacement fl oor pans,
fi rewalls, trunk fl oors, inner fenders, and more. With its full range of bead mandrels, it can also create decorative custom designs in door panels, dashes and
much more. Channels and fl anges can be formed using offset fl ange mandrels.
AVAILABLE BEAD ROLLER DIE KITS:
#20623 – 1/8" Round Bead Kit
#20624 – 1/4" Round Bead Kit
#20625 – 3/8" Round Bead Kit
#20626 – 1/16" Step Roll Kit
#20627 – 1/8" Step Roll Kit
#20628 – 1-1/4" Spoiler Roll Kit
STORAGE:
• Apply a thin fi lm of light oil or rust-preventive to all bare steel areas.
• Store in a clean dry area, preferably under a loose fi tting breathable cover.
MAINTENANCE:
NOTE: Maintenance should be performed before each use.
• Clean dirt and debris from Mandrel Dies.
• Check tightness of all hardware.
• Check operation for binding.

LAYOUT & PLANNING
• Using a suitable marker, draw the pattern or shape you want to form with beads right
on the panel. We recommend using a T-square and straightedge or long ruler for
straight lines. For curves, use a circle or radius template.
• Work carefully and lay out your design lines as neatly as possible (FIG.G).
• When forming beads, be sure to work from the inside of the piece toward the outside.
The bead roller shrinks metal and if you work from the outside toward the center, the
bead you previously formed will be distorted and the entire piece may warp.
GETTING STARTED
• Ensure that the bead roller direction switch is in the off position.
Plug in the bead roller.
• Put the bead roller direction switch in the forward direction and slowly depress the
foot pedal. Check that the mandrel dies turn freely without binding. Reverse the direc-
tion of the bead roller and check again.
• Raise the upper shaft by turning the hand crank until the work piece can be slid between the mandrels.
• Center the upper mandrel die ridge over the previously drawn pattern line, then lower the upper shaft to take up the slack.
• Tighten the hand crank to begin forming the bead.
CAUTION: Do not over tighten as this may tear the metal work piece, jam the roller dies or deform the frame.
• Slowly depress the foot pedal to start the bead roller and begin forming a bead.
CREATING STRAIGHT BEADS
• Drive the bead roller slowly as you follow your marked guideline
(FIG. H).
• Keep the marked guideline aligned with the center of the upper
male mandrel die ridge as you go. When you reach the end of
the guideline, you may re-roll the bead by switching the drive
motor to the opposite direction. This produces a more sharply
defi ned bead. Tightening the hand crank and re-rolling will make
a more pronounced bead.
• When fi nished, turn the crank handle to raise the upper mandrel
die until the work piece can be removed.
FORMING CURVES
• The trick to forming curves with the bead roller is careful coor-
dination between the motor speed controlled by the foot pedal,
and the movement of the work piece through the mandrel dies.
• Proceed slowly, and keep the guideline aligned with the center
of the upper male mandrel die ridge as you go. If your design
forms an oval, start the bead in the center of a straight or larger radiused section.
• Do not start at a corner or a joint between two lines, since it will be extremely diffi cult to line up the bead perfectly when you fi nish.
• By using combinations of curves and straight lines, there is almost no limit to the designs you can create with the Eastwood Motorized Bead Roller.
6 Eastwood Technical Assistance: 800.544.5118 >> techelp@eastwood.com To order parts and supplies: 800.345.1178 >> eastwood.com 3
• Read and understand all instructions before using this machine. Save this instruction manual for future reference.
• Keep out of reach of untrained persons and children.
INJURY HAZARDS!
• The cut edges of sheet metal are sharp and can cause severe cuts to hands, arms, body and face. Wear thick, well fi tting work gloves
and protective clothing to prevent injury.
• This tool has rotating rollers which can quickly cause injury. Keep fi ngers and hands away from moving parts when operating.
• Unplug bead roller before adjusting or changing mandrels to prevent accidental starting and injury.
• Unplug bead roller when not in use.
• Wear eye protection.
SAFETY INFORMATION
In this manual, on the labeling, and all other information provided with this product:
DANGER indicates a hazardous situation which, if not avoided, will result in death or serious injury.
WARNING indicates a hazardous situation which, if not avoided, could result in death or serious injury.
CAUTION used with the safety alert symbol, indicates a hazardous situation which, if not avoided, could result in minor or moderate injury.
NOTICE is used to address practices not related to personal injury.
FIG. G
FIG. H

ASSEMBLY INSTRUCTIONS
1. Attach the vertical post to the base using (1) M12 x 1.75 socket head cap screw (FIG. A).
2. Attach the two feet to the base using (4) M8 x 1.25 hex head cap screws (FIG. B).
3. Attach the diagonal brace as shown below using (4) M8 x 1.25 hex head cap screws (FIG. C).
4. Attach the motorized bead roller to the base using (2) M10 x 1.5 socket head cap screws (FIG. D).
5. Hang the mandrel rack on the stand by putting the hook of the rack in the space between the (2) M10 x 1.5 socket head cap screws that hold the
bead roller to the stand (FIG. E).
MANDREL DIE INSTALLATION
• Remove the socket head cap screw and washer on the lower shaft
and install the female mandrel die of the die set. Replace the washer
and cap screw (FIG. F).
• Remove the socket head cap screw and washer from the upper shaft.
Using the hand crank, raise the upper shaft until the male mandrel die
can be installed. Replace the washer and socket head cap screw (FIG. F).
• Removal is the reverse of installation.
FIG. F
Hand Crank
Mandrel
Die Set
Foot Pedal
Fuse
Direction
Switch
FIG. A FIG. B
FIG. C
FIG. D
FIG. E
4 Eastwood Technical Assistance: 800.544.5118 >> techelp@eastwood.com To order parts and supplies: 800.345.1178 >> eastwood.com 5

LAYOUT & PLANNING
• Using a suitable marker, draw the pattern or shape you want to form with beads right
on the panel. We recommend using a T-square and straightedge or long ruler for
straight lines. For curves, use a circle or radius template.
• Work carefully and lay out your design lines as neatly as possible (FIG.G).
• When forming beads, be sure to work from the inside of the piece toward the outside.
The bead roller shrinks metal and if you work from the outside toward the center, the
bead you previously formed will be distorted and the entire piece may warp.
GETTING STARTED
• Ensure that the bead roller direction switch is in the off position.
Plug in the bead roller.
• Put the bead roller direction switch in the forward direction and slowly depress the
foot pedal. Check that the mandrel dies turn freely without binding. Reverse the direc-
tion of the bead roller and check again.
• Raise the upper shaft by turning the hand crank until the work piece can be slid between the mandrels.
• Center the upper mandrel die ridge over the previously drawn pattern line, then lower the upper shaft to take up the slack.
• Tighten the hand crank to begin forming the bead.
CAUTION: Do not over tighten as this may tear the metal work piece, jam the roller dies or deform the frame.
• Slowly depress the foot pedal to start the bead roller and begin forming a bead.
CREATING STRAIGHT BEADS
• Drive the bead roller slowly as you follow your marked guideline
(FIG. H).
• Keep the marked guideline aligned with the center of the upper
male mandrel die ridge as you go. When you reach the end of
the guideline, you may re-roll the bead by switching the drive
motor to the opposite direction. This produces a more sharply
defi ned bead. Tightening the hand crank and re-rolling will make
a more pronounced bead.
• When fi nished, turn the crank handle to raise the upper mandrel
die until the work piece can be removed.
FORMING CURVES
• The trick to forming curves with the bead roller is careful coor-
dination between the motor speed controlled by the foot pedal,
and the movement of the work piece through the mandrel dies.
• Proceed slowly, and keep the guideline aligned with the center
of the upper male mandrel die ridge as you go. If your design
forms an oval, start the bead in the center of a straight or larger radiused section.
• Do not start at a corner or a joint between two lines, since it will be extremely diffi cult to line up the bead perfectly when you fi nish.
• By using combinations of curves and straight lines, there is almost no limit to the designs you can create with the Eastwood Motorized Bead Roller.
6 Eastwood Technical Assistance: 800.544.5118 >> techelp@eastwood.com To order parts and supplies: 800.345.1178 >> eastwood.com 3
• Read and understand all instructions before using this machine. Save this instruction manual for future reference.
• Keep out of reach of untrained persons and children.
INJURY HAZARDS!
• The cut edges of sheet metal are sharp and can cause severe cuts to hands, arms, body and face. Wear thick, well fi tting work gloves
and protective clothing to prevent injury.
• This tool has rotating rollers which can quickly cause injury. Keep fi ngers and hands away from moving parts when operating.
• Unplug bead roller before adjusting or changing mandrels to prevent accidental starting and injury.
• Unplug bead roller when not in use.
• Wear eye protection.
SAFETY INFORMATION
In this manual, on the labeling, and all other information provided with this product:
DANGER indicates a hazardous situation which, if not avoided, will result in death or serious injury.
WARNING indicates a hazardous situation which, if not avoided, could result in death or serious injury.
CAUTION used with the safety alert symbol, indicates a hazardous situation which, if not avoided, could result in minor or moderate injury.
NOTICE is used to address practices not related to personal injury.
FIG. G
FIG. H

2 Eastwood Technical Assistance: 800.544.5118 >> techelp@eastwood.com To order parts and supplies: 800.345.1178 >> eastwood.com 7
INCLUDES
The motorized bead roller ships in 2 boxes – one containing the assembled bead roller and one containing the unassembled stand. Open both boxes and verify
that all components are present.
(1) 24" throat motorized bead roller frame
(1) Foot pedal
(1) Stand
(1) Hardware pack for stand
(1) Mandrel storage rack
(1) ½" bead mandrel set
SPECIFICATIONS
• Maximum material working thickness: Steel = 18 Gauge, Aluminum = 16 Gauge
• Maximum panel width (working from center) = 48"
• Shaft diameter/Mandrel bore 3/4"
NOTE: Eastwood Bead Roller Forming Dies (#20267) are not compatible with this bead roller
The Eastwood Motorized Bead Roller is a professional metal fabrication tool. It is excellent for producing strengthening ribs in replacement fl oor pans,
fi rewalls, trunk fl oors, inner fenders, and more. With its full range of bead mandrels, it can also create decorative custom designs in door panels, dashes and
much more. Channels and fl anges can be formed using offset fl ange mandrels.
AVAILABLE BEAD ROLLER DIE KITS:
#20623 – 1/8" Round Bead Kit
#20624 – 1/4" Round Bead Kit
#20625 – 3/8" Round Bead Kit
#20626 – 1/16" Step Roll Kit
#20627 – 1/8" Step Roll Kit
#20628 – 1-1/4" Spoiler Roll Kit
STORAGE:
• Apply a thin fi lm of light oil or rust-preventive to all bare steel areas.
• Store in a clean dry area, preferably under a loose fi tting breathable cover.
MAINTENANCE:
NOTE: Maintenance should be performed before each use.
• Clean dirt and debris from Mandrel Dies.
• Check tightness of all hardware.
• Check operation for binding.

Item #20622
© Copyright 2015 Easthill Group, Inc. 8/15 Instruction #20622Q Rev. 0
If you have any questions about the use of this product, please contact
The Eastwood Technical Assistance Service Department: 800.544.5118 >> email: techelp@eastwood.com
PDF version of this manual is available online >> eastwood.com/20622manual
The Eastwood Company 263 Shoemaker Road, Pottstown, PA 19464, USA
US and Canada: 800.345.1178 Outside US: 610.718.8335
Fax: 610.323.6268 eastwood.com
MOTORIZED BEAD ROLLER
INSTRUCTIONS
/