Page is loading ...

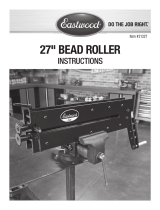
MOTORIZED BEAD ROLLER
FORMING DIES
INS TRUCTIONS
Item #21284

2 Eastwood Technical Assistance: 800.343.9353 >> techelp@eastwood.com
INCLUDES
(1) Polyurethane Lower Wheel (A)
(1) 180 Degree Lower Die (B)
(1) Inside Offset Die (C)
(1) Outside Offset Die (D)
(1) Knife Edge Tipping Die (E)
(1) Lower Edge Forming Die (F)
(1) 3/8” Tipping Die (G)
(1) 1/2” Tipping Die (H)
(1) Round Tipping Die (I)
(1) Lower Forming Die (J)
(2) 1.375” O.D. x 1.025” I.D. Shaft Adapter Sleeves (K)
(10) M8-1 x 10mm Set Screws
SPECIFICATIONS
Will fit Bead Rollers with 3/4” shafts and 2-3/4” shaft spacing.
The EASTWOOD MOTORIZED BEAD ROLLER FORMING DIE SET is an exclusive Eastwood in-house engineered die set designed by experienced metal craftsmen
for experienced metal craftsmen. Create hemmed edges, style lines, offsets, deep channels, radiused contours and other intricate forms in steel and aluminum,
when fabricating custom panels and complex metal parts. Fits the Eastwood #20622 Motorized Bead Roller and other units with 3/4” turned O.D., die-mounting
diameters and end threaded lockbolt attachment.

To order parts and supplies: 800.343.9353 >> eastwood.com 3
DANGER indicates a hazardous situation which, if not avoided, will result in death or serious injury.
WARNING indicates a hazardous situation which, if not avoided, could result in death or serious injury.
CAUTION used with the safety alert symbol, indicates a hazardous situation which, if not avoided, could result in minor or moderate injury.
NOTICE is used to address practices not related to personal injury.
READ INSTRUCTIONS
• Thoroughly read and understand this manual before using.
• Save for future reference.
PINCH AND CRUSH HAZARD!
• The Eastwood Powered Bead Roller and Forming Dies consist of rotating metal components which can present a hand/finger pinch
hazard and cause potentially serious injuries. Keep fingers and hands away from moving parts when operating.
CUT HAZARD!
• Handling sharp metal can cause serious cuts. Wear thick, well-fitting work gloves to prevent cuts from handling sharp metal.
EYE INJURY HAZARD!
• Metal particles can be ejected from the metal workpiece when forming. Sheet metal edges and corners are sharp and can injure eyes.
Always wear ANSI approved eye protection when operating this tool.
FALL HAZARD!
• Awkward reaching and positioning may be required when operating the Eastwood Powered Bead Roller and Forming Dies. Failure to
ensure proper footing can quickly result in a fall which could inflict serious personal injury or property damage. Always work in a clean,
uncluttered environment.
• Be sure there is sufficient working room around the tool to allow for safe handling of various sizes of metal.
• Before beginning ANY work with an Eastwood Powered Bead Roller and Forming Dies, it is necessary that it be properly installed and
securely anchored to the floor.
• The use of safety shoes is strongly recommended.
• Excessive resistance or motor strain while operating could indicate a defect with the workpiece material or broken or damaged
Eastwood Powered Bead Roller and Forming Die components. To avoid injury, stop work immediately and inspect workpiece material
for nicks, dents, welds, excessive scale or remaining coatings. Clean or repair as necessary or discard and begin with a new piece.
Also inspect Eastwood Powered Bead Roller and Forming Die components for looseness or damage.
• Follow The #20622 Eastwood Powered Bead Roller Instructions for complete Bead Roller use and operation. If Instructions are
unavailable or lost, contact Eastwood Tech at 1-800-345-1178 or www.eastwood.com and request Document #20622Q.
SAFETY INFORMATION
The following explanations are displayed in this manual, on the labeling, and on all other information provided with this product:

4 Eastwood Technical Assistance: 800.343.9353 >> techelp@eastwood.com
EXAMPLES OF METAL CONTOURS
THAT CAN BE CREATED WITH DIE
COMBINATIONS
The following images illustrate only some of the many contour
configurations that can be created in metal by combining the dies
in this kit. There are many more that can be created with your
imagination.
A good tip is to experiment with some stiff bodied paper or chip-
board that is close in thickness to the gauge of metal you wish to
use. This will enable you to determine the metal contour that will
result from your experimental combination without wasting metal.
I
A
15°-90°
C
D
Joggle
Bend
G
B
3/8"
Bead
A
H
15°-90°
With 1/2"
Radius
G
A
15°-90°
With 3/8"
Radius
E
J
45°
B
E

To order parts and supplies: 800.343.9353 >> eastwood.com 5
FIG. 1
SET UP
DIS-MOUNTING & MOUNTING BEAD ROLLER MANDREL DIES
– Mandrel Die Removal
• Set the Direction Control Switch to the center “OFF” position and unplug the
unit from the power source.
• Turn the Handcrank Counter Clockwise (as viewed from the top of the Bead
Roller Frame) to raise the Upper Shaft.
• Loosen and remove the Mandrel Die Retaining Socket Head Cap Screws
with a 4mm hex key (not included).
• Pull the Mandrel Dies from the shafts.
• Keep the Upper Shaft in the raised position
– Forming Die Installation
To do so:
• Thread the included M8-1 x 10mm Set Screws in each of the included
Forming Dies.
• Slide the Shaft Adapter Sleeves [K] over the upper and lower shafts until
they are fully seated (FIG 1).
• Thread the Die Retaining Socket Head Cap Screws with Washers, into the
ends of the Upper and Lower Shafts. Tighten securely. The Washers will
overlap the face of the Sleeves retaining them (FIG 2).
• Slide the Selected Dies over the Shaft Adapter Sleeves with the Set Screws
aligned with the with the flats of the Sleeves (FIG 3).
• Use care to position and align the machined profiles of the Dies
as required before tightening set screws (FIG 4).
• Use the Eastwood Powered Bead Roller as described in the #20622
Instructions.
PINCH AND CRUSH HAZARD!
The Eastwood Powered Bead Roller and Forming Dies consist
of rotating metal components which can present a hand/fin-
ger pinch hazard and cause potentially serious injuries. Keep
fingers and hands away from moving parts when operating.
The Eastwood Motorized Bead Roller Forming Dies are designed
to fit on the # 20622 Eastwood Powered Bead Roller shafts
with the included Shaft Adapter Sleeves [K] which must first
be mounted on the shafts in place of the original dies. The
individual Forming Dies are then mounted to the Shaft Adapter
Sleeves with the included Set Screws.
FIG. 2
FIG. 3
FIG. 4

6 Eastwood Technical Assistance: 800.343.9353 >> techelp@eastwood.com
LAYOUT & PLANNING
• Using a suitable marker, draw the desired pattern or shape to be formed with beads right on the panel. We recommend using a T-square and straightedge
or long ruler for straight lines. For curves, use a circle or radius template.
• Work carefully and lay out the design lines as neatly as possible.
• When forming beads, be sure to work from the inside of the piece toward the outside. The bead roller shrinks metal and if the work is started from
outside toward the center, the bead previously formed will be distorted and the entire piece may warp.
• Plan out what turns and moves will be needed while creating the pattern to avoid having to start and stop in the middle of a line.
• A little time taken at this stage will make the rest of the job go that much more easily and help avoid mistakes.
OPERATION
GETTING STARTED
• Set the Direction Control Switch to the center “OFF” position then Plug in the bead roller.
• Set the bead roller direction switch in the up “Forward” direction and slowly depress the foot pedal. Check that the mandrel dies turn freely without
binding. Reverse direction of the bead roller and check again.
• Raise the upper shaft by turning the hand crank Counter-Clockwise until the work piece can be slid between the mandrels.
• Center the ridge of the Upper Die over the previously drawn pattern line, then crank the upper shaft down to take up the slack.
• Begin forming the bead.
• Slowly depress the foot pedal to start the bead roller and begin forming a bead.
CREATING STRAIGHT BEADS
• Drive the bead roller slowly while following the pre-marked guideline.
• Keep the marked guideline aligned with the center of the upper male mandrel die ridge as the workpiece progresses through the dies. When the end of the
guideline is reached, stop and reverse the motor to the opposite direction. This produces a more sharply defined profile. Tightening the hand crank and
re-rolling will make a more pronounced bead.
• When finished, turn the crank handle Clockwise to raise the upper shaft and die until the work piece can be removed.
FORMING CURVES
• The trick to forming curves with the bead roller is careful coordination between the motor speed controlled by the foot pedal, and the movement of the
work piece through the mandrel dies.
• Proceed slowly, and keep the guideline aligned with the center of the upper male mandrel die ridge as the workpiece is progressed through the dies.
If the design forms an oval, start the bead in the center of a straight or larger radiused section.
• Do not start at a corner or a joint between two lines, since it will be extremely difficult to line up the bead perfectly when completed.
• By using combinations of curves and straight lines, there is almost no limit to the designs that can be created with the Eastwood Motorized
Bead Roller and Forming Dies.
STORAGE
• Apply a thin film of light oil or rust-preventive to all bare steel areas.
• Store in a clean, dust-free, dry, dampness free area preferably covered with plastic.
Follow The #20622 Eastwood Powered Bead Roller Instructions for complete Bead Roller use and operation. If Instructions are
unavailable or lost, contact Eastwood Tech at 1-800-345-1178 or www.eastwood.com and request Document #20622Q.
Do not over tighten as this may tear the metal work piece, jam the roller dies or deform the frame.

To order parts and supplies: 800.343.9353 >> eastwood.com 7
NOTES

© Copyright 2019 Easthill Group, Inc. 2/19 Instruction item #21284Q Rev 1
If you have any questions about the use of this product, please contact
The Eastwood Technical Assistance Service Department: 800.343.9353 >> email: techelp@eastwood.com
PDF version of this manual is available at eastwood.com
The Eastwood Company 263 Shoemaker Road, Pottstown, PA 19464, USA 800.343.9353 eastwood.com
ADDITIONAL ITEMS
#51088 Shrinker/Stretcher Set
#13475 Eastwood Electric Metal Shears
#11797 Throatless Shear
#14042 Versa Bend Sheet Metal Brake
#20254 Eastwood 24” Slip Roll
/