Page is loading ...

12" SLIP ROLL
instrUCtions
Item #20199
© Copyright 2014 Easthill Group, Inc. Instruction part #20199Q Rev. 7/14
If you have any questions about the use of this product, please contact
The Eastwood Technical Assistance Service Department: 800.544.5118 >> email: techelp@eastwood.com
PDF version of this manual is available online >> eastwood.com/20199manual
The Eastwood Company 263 Shoemaker Road, Pottstown, PA 19464, USA
US and Canada: 800.345.1178 Outside US: 610.718.8335 Fax: 610.323.6268 eastwood.com

2 Eastwood Technical Assistance: 800.544.5118 >> techelp@eastwood.com To order parts and supplies: 800.345.1178 >> eastwood.com 7
READ INSTRUCTIONS!
Thoroughly read and understand manual before using the 12” Slip Roll tool.
Save for future reference.
safety information
WARNING!
• Serious personal injury could result from the use of this tool if basic shop safety is
not used while operating it.
• Always wear eye and skin protection when working with sheet metal as it may
have sharp edges.
• Make sure that the tool is securely fastened to a work bench as described in this
instruction manual.
• Never put fingers or any other body parts in the rotational parts of this tool. Do not
force the tool; if it does not seem to be working right, it is most likely being used
improperly.
• Keep loose clothing and/or hair away from the rotating parts of this tool.
forminG roLLs in Wire
You will notice that your Eastwood Slip Roll has 3 grooves in the rollers. These are for forming solid
wire into arcs or rings. The three sizes of wire that this tool can be used to form are 1/8”, 5/32”,
and 3 /16”.
1. Loosen the Material Adjustment Knobs (B) to allow the wire to be inserted between the
Top Roller (D) and Bottom Roller (F).
2. Adjust the Roll Diameter Adjustment Knobs (C) so that the roller is all the way down.
3. Place the piece of wire you will be forming between the top and bottom front rollers and tighten
the Material Adjustment Knobs (B) until it is pinching the piece of wire. Make sure when making
this adjustment that both sides of the roller are tightened the same amount.
4. Rotate the Handle (A) clockwise (away from you) to begin feeding the piece into the rollers
until the end of the wire is directly above the rear roller.
5. Adjust the Roll Diameter Adjustment Knob (C) to set the radius of the piece. The more this
roller is raised, the smaller the radius of the part will be. Be sure to adjust the knobs equally
on both sides.
6. Rotate the Handle (A) clockwise (away from you) to form the piece. Continue rotating the
Handle (A) until the entire piece exits the rollers.
maintenanCe
The maintenance on the Eastwood Slip Roll is minimal but the required maintenance is important
to a long life of the tool.
• Clean the all of the rollers regularly with lacquer thinner or degreaser to remove dirt
or other debris.
• Grease the drive gears located on the top left hand side. Use a wheel bearing or
similar grease.
aCCessories
#28187 - Bead roller with 6 mandrel sets
#51088 - DIY Shrinker/Stretcher complete set
#13475 - Eastwood Electric Metal Shears
#11797 - Throatless Shear
#14042 - Versa Bend Sheet Metal Brake
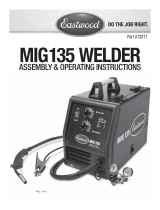
ComPonents
B
J
C
E
G
H
I
H
D
F
C
A
A - Handle
B - Material Adjustment Knob
C - Roll Diameter Adjustment Knob
D - Top Roller
E - Diameter Control Roller
F - Bottom Roller
G - Material Guide
H - Material Guide Plates
I - Top Roller Release Knob
J - Top Roller Latch

6 Eastwood Technical Assistance: 800.544.5118 >> techelp@eastwood.com To order parts and supplies: 800.345.1178 >> eastwood.com 3
CreatinG CyLinDers in sHeet metaL
Once the cylinder has been formed, you will need to remove it from the top following the
below instructions:
1. Loosen the Material Adjustment Knobs (B).
2. Loosen the Top Roller Release Knobs (I).
3. Slide the Top Roller Latches (J) out of the way.
4. Lift the Top Roller (D) out of the way on an angle but do not try and remove the roll.
Simply slide the work piece off the Top Roller.
5. Replace the Top Roller (D) back into the base, rotate the Top Roller Latches (J) back into
place and tighten the Top Roller Release Knobs (I).
CreatinG Cones in sHeet metaL
When fabricating sheet metal bends, sometimes the need for a cone shaped bend will arise.
The Eastwood Slip Roll can also achieve this type of bend.
1. Turn the Material Adjustment Knobs (B) to lower the front lower roller to make sure that
the top and bottom rollers are parallel.
2. Adjust the Roll Diameter Adjustment Knob (C) so that the roller is all the way down.
3. Place the piece of sheet metal you will be bending between the top and bottom front rollers and
tighten the Material Adjustment Knobs (B) until it is pinching the piece of sheet metal. Make
sure when making this adjustment that both sides of the roller are tightened the same amount
so that the same amount of pressure is being exerted across the entire length of the piece.
4. Rotate the Handle (A) clockwise (away from you) to begin feeding the piece into the rollers until
the piece is directly above the rear roller.
5. Adjust the Roll Diameter Adjustment Knob (C) to set the radius of the piece. The more this
roller is raised, the smaller the radius of the part will be. This step is where the cone form is
determined. Through trial and error with scrap pieces, adjust the Material Adjustment Knobs (B)
in different amounts to adjust the smaller and larger diameter ends of the piece. The tighter the
rear roller is against the piece, the smaller the radius will be. The looser the rear roller is against
the piece, the larger the radius will be. Adjust each of the rear roller adjustment knobs so that
each end has its set radius.
6. Rotate the Handle (A) clockwise (away from you) to form the piece. Continue rotating the
Handle (A) until the entire piece exits the rollers.
set UP
ASSEMBLY
1. Slide the Handle (A) over the square shaft on the Bottom Roller (F).
2. Tighten the set screw using a 3mm Hex Wrench.
3. Loosen both set screws on the Material Guide (G) and slide towards the handle enough to install
the Material Guide Plates (H) onto it.
4. Align the threads of the thumb screws on the Material Guide Plates (H) with the slot in the
Material Guide (G), and tighten the thumb screws so they slide left and right in the slot. Do not
fully tighten at this time as the position will be determined by the material width.
MOUNTING
It is necessary to mount the Slip Roll to a work bench to secure the tool in place while forming pieces.
It is also possible to clamp the Slip Roll in a large Vise if temporary use is desired. To mount the slip
roll follow the instructions below:
1. Locate a place on your work bench which has enough room for the tool as well as the maximum
size work piece you will be forming. The handle of the Slip Roll needs to be over the edge of the
table to allow for rotation.
2. Place the Slip Roll on your work bench with the handle on your right hand side.
3. Check the underside of the work bench for obstructions. Mark the four bolt holes onto your
table and drill 11/32” holes into the work bench.
4. Fasten the Slip Roll to the work bench using (4) 5/16” bolts, nuts, and washers. Use a washer
on top of the base as well as on the bottom of the work bench to prevent the bolts from pulling
through the bench.
5. Tighten the nuts and bolts until the Slip Roll is secure on your work bench.

4 Eastwood Technical Assistance: 800.544.5118 >> techelp@eastwood.com To order parts and supplies: 800.345.1178 >> eastwood.com 5
oPeration/aDJUstments
ADJUSTING MATERIAL THICKNESS
Depending on the thickness of the material being rolled, the Slip Roll will need to be adjusted to
properly feed the material being rolled. To set the material thickness:
• Loosen the Material Adjustment Knobs (B) so that the top roller lifts up to clear the material.
• Slide a piece of the material to be rolled between the top and bottom rollers and tighten
the Material Adjustment Knobs (B). These need to be tightened equally to apply the same
pressure. Tighten so that the rollers will pull the material through the rollers without slipping.
ADJUSTING ROLL DIAMETER
The Slip Roll can be adjusted to make a large range of roll diameters as well as cones. This is
determined by setting the Diameter Control Roller which is adjusted by the Roll Diameter Adjustment
Knobs. To set the roll diameter:
• Set the Diameter Control Roller (E) parallel to the bottom roller by loosening the Roll Diameter
Adjustment Knobs (C) until the roller is lowered all the way on both ends.
• To set the roll diameter turn in (clockwise) the Roll Diameter Adjustment Knobs (C) to raise the
roller. The more these are turned in and the roller is raised, the smaller the diameter will be in
the material being rolled. For the roll to be the same diameter across the entire width, both of
the knobs need to be adjusted equally. If a cone is desired, adjust the sides differently.
ADJUSTING MATERIAL GUIDES
The Slip roll has a Material Guide (G) and Guide Plates (H) to aid in keeping the material being rolled
fed in flat and straight. The Material Guide (G) requires no adjustment as it in simply held in place with
two set screws. The Material Guide Plates (H) are adjusted by simply loosening the thumb screws and
sliding them along the groove in the Material Guide (G). The Guides should be set to the width of the
piece of material that is being rolled. These are not necessary to use but can be helpful when trying to
feed a long piece in a straight line.
CreatinG roLLs in sHeet metaL
The Eastwood Slip Roll is a great metal working tool that will expand your metal working possibilities.
Before making an actual piece for your project, acquire additional pieces of the same size and thick-
ness to practice on and to dial in the desired radius. It is not possible to preset the Slip Roll to a pre
determined radius so it will require some trial and error to get the correct radius. The more often you
use the Slip Roll, the more familiar you will get with the adjustments to make a specific radius.
It is easiest to start with creating a larger diameter roll than desired and then adjust the roller
incrementally to a smaller radius until the desired size is achieved.
1. Loosen the Material Adjustment Knobs (B) until the piece of material to be rolled will fit between
the Top Roller (D) and Bottom Roller (F).
2. Set the Diameter Control Roller (E) parallel to the bottom roller by loosening the Roll Diameter
Adjustment Knobs (C) until the roller is lowered all the way on both ends.
3. Place the piece of sheet metal you will be forming between the top and bottom front rollers and tight-
en the Material Adjustment Knobs (B) until it there is enough pressure on the material for the rollers
to push it through. Make sure when making this adjustment that both sides of the roller are tightened
the same amount so that even pressure is being exerted across the entire length of the piece.
4. Rotate the Handle (A) clockwise (away from you) to begin feeding the piece into the rollers until
the piece is directly above the Diameter Control Roller (E).
5. Adjust the Roll Diameter Adjustment Knob (C) to set the radius of the piece. The more this roller
is raised, the smaller the radius of the part will be. Be sure to adjust the knobs equally on both
sides to avoid making a conical shape.
6. Rotate the Handle (A) clockwise (away from you) to form the piece. Continue rotating the hand
crank until the entire piece exits the rollers.
7. If the radius is still too large, simply adjust for a smaller radius and run the piece through the
rollers again.
CreatinG CyLinDers in sHeet metaL
The Eastwood Slip Roll can not only create contours but can also be used to form cylinders.
1. Determine the diameter of the cylinder you want to form and calculate the circumference by
using the formula: Circumference = 3.14 X Diameter
2. The circumference is the length of your piece. With a determined length you can cut your piece
to size. Ex: A 3” diameter cylinder is required. 3” x 3.14 = 9.42. The length of material needs
to be 9.42”
3. Set the Material Adjustment Knobs (B) following the instructions in the Adjustments section.
4. Adjust the Roll Diameter Adjustment Knobs (C) so that the roll is all the way down.
5. Place the piece of sheet metal you will be rolling between the top and bottom rolls and tighten
the Material Adjustment Knob (B) until it is pinching the piece of sheet metal. Make sure when
making this adjustment that both sides of the roll are tightened the same amount so that the
same amount of pressure is being exerted across the entire length of the piece.
6. Rotate the Handle (A) clockwise (away from you) to begin feeding the piece into the rolls until
the piece is near half way over the Diameter Control Roller (E).
7. Adjust the Roll Diameter Adjustment Knobs (C) to set the diameter of the piece. The more the
roller is raised, the smaller the diameter of the part will be. Be sure to adjust the knobs equally
on both sides to avoid making a conical shape. It is better to make the initial forming too large
of a diameter rather than too small as a diameter that is formed too large can be reformed to a
smaller diameter. If the diameter is made too small initially, it cannot be reformed and must be
scraped.
8. Rotate the Handle (A) until the entire piece has passed over the rolls. At this point you will have
formed a half of a cylinder.
9. Remove the piece from the slip roll and rotate the piece around to form the opposite end of
the piece.
10. Rotate the Handle (A) until the entire piece has passed over the rolls. At the point you will have
formed a complete cylinder. If the piece is not a complete cylinder and the ends do not touch,
raise the Diameter Control Roller (E) slightly at both ends equally and rotate the Handle (A) until
the entire piece has been rolled again. Continue making adjustments if necessary to get the
ends of the cylinder to come together to form a complete cylinder.
/