
ADG 175

Dishwasher Features.................................... ...3
A、Water Softener...........................................4
Attention before or after loading the Dishwasher
Baskets..........................................................9
Filtering System.............................................15
Caring for the Dishwasher...............................15
B、Loading the Salt into the Softener.................5
C、Fill the Rinse Aid Dispenser
.........................5
D、Function of Detergent
.................................7
Loading the upper Basket.................................9
Loading the Lower Basket...............................10
Cutlery Basket........................................... ...11
Wash Cycle Table...........................................12
Turning on the Appliance...............................13
Change the Programme..................................13
At the End of the Wash Cycle...........................13
Before calling for service.................................23
Error codes...................................................24
Technical information.....................................25
Control Panel...................................................3
Water Connection...........................................22
17
Please carefully read the installation instruction
.....................................................................
....17Aesthetic panel's dimensions and installation
Tension adjustment of the door spring 19..............
Connection of drain hoses.......................................19
Dishwasher installation steps..........................20
To review the section on troubleshooting Tips
will help you to solve some common problems
by yourself .
Dear Customer,
Please carefully read this manual before using the
dishwasher, it will help you to use and maintain the
dishwasher properly.
Pass it on to any subsequent owner of the appliance.
This manual contains sections on safety Instructions,
Operating Instructions, Installation Instructions and
Troubleshooting Tips, etc.
The manufacturer, following a policy of constant
development and updating of the product, may
make modifications without giving prior notice.
Keep it to referto it at a later date.
If you can not solve the problems by yourself ,
please ask for the help of professional technicians.

1
This applianc e must be grounded. In the event of a
malfunction or breakdown, grounding will reduce
the risk of anelectric shock by providing a path of
least resistance of electric current. This appliance
is equipped with a cord having an equipment-
grounding conductor and a grounding plug.
The plug must be plugged into an appropriate outlet
that is installed and grounded i n accordance with
all local codes and ordinances.
Imprope r connection of the equipment-grounding
conductor can result in the risk of an electric shock.
Check with a qualified electrician or service
representative if you are in doubt whether the
appliance is properly grounded. Do not modify the
plug provided with the appliance; If it doe s not fit
the outlet. Have a proper outlet installed by a
qualified electrician.
Keep children away from detergent and rinse aid, keep
child away from the opendoor of the dishwasher,
there could still be some detergent left inside.
ren
Do not abuse, sit on, or stand on the door or dish
rack of the dishwasher.
Do not wash plastic items unless they are marked
dishw a sher safe or the equivalent. For plastic items
n
ot so marked, check the manufacturer's
recommendations.
Us eo nly det ergent and rinse additiv es
design ed for an aut om atic d ishwasher.
Ne ver u sesoap, laun dr yde terg ent, or h and
wa shin gdeterg en t in you r d ishwa sher.Keep
these produ cts out of th ere ach ofchild ren.
During installation,the powersupplymustnot
be excessively ordangerouslybent orflattened.
Do not tamper with controls.
Do not operate your dishwasher unless all
enclosure panels are properly in place. Open
the door very carefully if the dishwasher is
operating, there is a risk of water squirting out.
Do not place any heavy objects the
door when it is open. The appliance could tip
forward.
on or stand on
When load in g ite ms to be w ashed :
1) Locatesharp itemssothattheyarenotlikely
todamagethedoorseal;
2 Warning: Kni ves and otherute nsils wi th
sh a rp p oi n t s mu st be loade d in t h e bas ket
w it h their poi nts d own orp lace di n a
horizontalposition.
)
When us ing you rdishw asher, you shoul d
preve ntplast ic items from comin gint oco ntact
wit ht he he ating element .(This i nstru ction i s only
applica ble tomachi nes w ith a visual heat ing
ele ment.)
I fth esuppl y cord is d am aged ,it must be repl aced
by the m anufact urer or itsse rvic eagent or a
si mi larly qual ifi ed per son i norder t o a void a
hazar d.
Pl ease dispos e of pack ing mat erials properl y.
U se the dishwasher only for its intended function.
Remove the door to the washing compartmentwhen
removing an old dishwasher from service or discarding it.
Dishwasherdetergentsare stronglyalkaline, they
can be e xtremely dang erous i f swa l l owe d.Avoid
contact with skin and eye sand ke ep chil dren away
from th e dishw asherwh en t he door isopen.
Check that the detergent comparmentisempty
aft er compl etio nof the w ashcycle.
Th e app lian ceis to b eco nn ected to t he water
mainsusingnew hosesets and that oldhose-sets
should n ot b e r eused.
The maximumnumber of place settingstobe
was hed i s9 .
The maximumpermissibleinletwaterpressureis
1Mpa .
The minimumpermissibleinletwater pressureis
0.04Mpa.
Children should be supervised toensure that they do
not play with the appliance.
T his appliance is not intended for use by persons
(including children with reduced physical, sensory or
mental capabili ties, or lack of experience and
knowledge ,unless they hav e been given supervision
o r instruction concerning use of the appliance by a
person responsible for their safety .
)
When usin g your dishwashe r, fo l low the p rec aut ions lis ted b el ow:
Th e doo rsh ould not be l eft o pen,
since th is co uld incr ease the ris k of tr ipping.

2
D ispo se o f t hedishwas herpac kag ing m aterial c orre ctly.
All pa ckaging material sca nbe r ec y cled.
Pl ast ic pa rtsare m arked w itht hestand ardint ernat ional abbrevi ations:
PE fo r po lyeth yle ne,e .g.sheet wr apping m ater ial
PS for polystyrene,e.g.paddingmaterial
PO M polyox ymethylene, e.g. pla stic c lips
PP pol ypr opy lene, e.g. Sa lt fi ller
AB S Acr yl onitr ileBu tadiene Sty rene, e .g. Co ntr ol Pa nel .
Packaging material couldbedangerous for children!
Fo rdi spos ing of pa ckage a nd th ea ppliance ple ase go t o a r ecycling cen tre. Ther efor e cut
offthe powersupplycableandmakethe doorclosingdeviceunusable.
Cardboardpackaging ismanufactured fromrecycled paperand shouldbedispos edin the
w aste p ap erc ollec tion f or re cy cling .
By en surin gthi spr oduc ti s disp osed of correctl y, you wil l hel pprevent po tent ialn egat ive
con se que nces for the e nvi ronment a nd human h eal th,w hic h cou ld o ther wise be c aused
byinappropriatewaste handling of thisproduct.
Fo rm ored eta il ed informat iona bou trec ycli ngo fthis pro duc t, pl ease con tact you r loc al
ci tyoffice and your hou seh old w aste dis posal se rvi ce.
DISPOSAL :Do not dispose th is pr odu ctas unsorte dmuni cip alwaste .Coll ect ion of such
waste sep arate ly for spe cialtr eatment i s n eces sary.
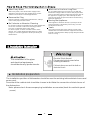
WARNING!

Togetthe bestperformancefromyourdishwasher, readall
operating instructions beforeusingit for the firsttime.
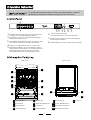
3
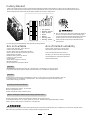
Ba ck Vi ew
Fr ont v iew
4
Po we r light:To co me on w hen Pow erON/O FF
button ispresseddown.
8
7
6
ON/O FF Butt on: To t urn on/ offthe po wer sup ply.
Display: To di splay delay t ime or err orcodes.
5
3
1
Salt and RinseAid Warning Light: To come on when
the softenerordispenser needs tobe refilled.
2
Program indicatorlight:when youselect was hing
pro gram , the correspo nd l i ght w ill d i splay.
Pro gram Ke y- pre s s:To select wash i ng p rogram
whenpresstheKey-press.
Delayed StartButton: Pre ss thisbuttonto setthe
delaye dhours for wash ing .Yo u can de lay the sta rt
of w ashing up to 2 4hours. One pr esson th is
but ton d elays th est art of was hing by o neh ou r.
3in1 i ndi cat o rl ig ht / 3in1
functions Button:To selectandshow 3in1
MainFilter
Deterg entDis penser
CupShelf
CutleryBasket
CoarseFilter
Rinse Ai d Disp enser
Inletpipe connector
Drainpipeconnector
Low er B aske t
Sp rayA rms
Upp er B ask e t
1
Sa lt C ontainer
5
6
7
8
9
10
12
11
3
2
4
11 12
1
2
3
4
5
6
7
8
9
10
on
Off
13
Tray ass
13

4
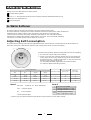
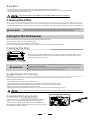
Be fo re u si ng you r di shwa sher for th e first time :
Th e wat er so ften er must bes et m anu al ly, usin gthewa terha rd ness di al.
Th e wat er soften eris des ign edto remove min era lsan dsalts f rom t hew ater, w hich woul dha ve
adetrimentalor adverseeffect on theoperationofthe appliance.Thehigherthe
content of t hese minerals and sal ts,the harde ryour w ater is. T he s of te ners hou ld b e
adj usted acco rding t o the har dness o ft he wa ter in you rarea. Your local WaterAut hority
can adviseyouonthehardnessofthewaterinyourarea.
Adjusting Salt Consumption
Th e dishw asher is de signed to al low for a dj ustment in the amo unt of sa ltco nsumed bas ed onthe ha rdness of
thewaterused.Thisis intendedtooptimiseandcustomisethelevel o f salt consumption.
1. Unscrew the cap fromthe saltcontainer.
2. Ther eis ar ingo nthe contai nerwi thana rrow on it (see figure
ontheside), ifnecessary, ro tate thering in theanticlockwise
direction fro mthe"-"Setting towardthe"+"sign, based o nthe
hardne sso f the w at er being u se d.
It is recomm end e dt hat a djustme ntsshou ldbe made i n
acco rd ance wit h t he f oll owin g sc h em e:
Contact yo urlocal wat erbo ar dfor i nformation on the har dnessof y our wat ersuppl y.
dH
mm ol /l
0~1 40~8 0~1.4
/
0
/
14~3 98~22 1.4~3.9 - 20 50
39~8022~45 3.9~8 Mid 4 0 25
+
60 16
fH
0~1 0
10~28
28~56
Clar ke
°
Clark: British degree
°
fH: French degree
°
DH : Ger man degree
dH =1.25 Clarke=1.78 fH=0.178mmol/l
Note:1
°°
WATER HARDNE SS
SelectorPosition
Salt consum pt ion
(gram/cycle)
Aut o nomy
(cycles/1kgs)
Pl eas e follow the s teps bel ow f or adjus tmen t in salt con sum pt io n.
°
""/
"-"
"+ "
"Mid"
Note:2
Settingtowardthe"+"sign
Settingtowardthe"-"sign
Settingtowardbetween
the "-" sign and "+" sign
No sa ltn eed adde d
45~60 80~1 07 56~75 8~11
A. Water Softener
A. Set t he wate rsoftener
B. Pou r 1 2 li tre o fw ater i nside thesa ltcont ain erand then fill w ith d ishwash er sa lt/
C. Fi ll the rinse ai d d i spens er
D. Fillindetergent

5
nor mal for a s mall amount o f water to come out of t he sa l t c on tainer.Itis
1.The salt con tai ne rmust only be refil le dwhen t he sal twarning l ight in t he cont rol pan elcomes on.
Depend ing on how wel l t hesalt diss olve s, t hes alt warni ng li ght may st ill be on even t hough the
salt container is fill ed.
If there is n osalt w arni ng light in the con trol p anel(fo rsome Mode ls),you c ane st imate when t o f ill
the s altint o the so ftene r by th e cycles that t hedi shwasher has run.
2. If th ereare spills o fthe salt ,a soa kor a r apid pr ograms hould be ru nto remove t he excessive sa lt.
Always u se the salt i ntended for use wi thdishw asher.
The sa lt c ontain er i slocat edben eath the l ower bas ket and sh ouldb efilled a sexpla ined i n th e
foll ow ing:
Attention!
Only use salt spe cifi ca lly designe dfort he usei nd ishw ashers! E very other type of
salt n ot speci fical ly de sig ned fo rtheu se in ad ishwa sher, espe cially tab le salt, wi ll
damage the w ater sof tener. I n case of d amages caused b y the use of un suit able
salt t he ma nufact ur er does not gi ve any wa rrant y nor is liable for any damage s cau sed.
Only fil lwi thsal tjust b efo re star tingone o ftheco mp let e wa shingp ro gra ms.
This wi ll p reve ntany g rains of s alt or salty wate r, wh ich ma yhave been spi lled,
remain ing on the bo ttom o fthe machi ne f or anyp eriod of ti me, which maycau se
c o rrosio n.
B. Loading the Salt Into the Softener
C. Fill the RinseAid Dispenser
Th er i nse aid i srel ease dd uring the fi nal rin seto preve nt wat er f rom forming dr oplets o nyo ur dis hes, whic h can leave
spots and s treaks. It al so improv esdryi ngby allow in g water t o roll off the di shes .Your di shwasheris designed t o
usel iquid rin seaids. The rinse aid di spenser isl ocated inside the d oor nex t tothe det ergentdi spense r. To fill the
dispenser,open thecapandpourthe rinseaidintothe dispenseruntil thelevelindicator turnsc ompletelyblack.
Thevo lumeo fthe r ins eaid contai ner is abou t110 ml .
RinseAid Dispenser
Function of RinseAid
Rinse aid is aut oma tic ally a dded duri ng t helast ri nse, ensuring th orough rinsing, and spo tand s treakfr ee drying.
Attention!
Only usebranded rinseaid fordishwasher. Neverfilltherinseaid dispenser withanyother substances
(e.g. Dishwasher cle aning ag ent, liqu id d eterge nt ).Th is would dam age t he a pp li ance.
A Removethe lower basket and thenunscrewandremovethe cap fromthesaltcontainer.
B Before thefirst wash,fill1lt.of water inthe saltcontainer of your machine.
C Place the end of t hefun nel ( su ppli ed)in to the hole and i ntrod uce abou t 1kg of s alt .
D Af terf il ling the co ntain er, scr ewthe c apt ightly bac k clockwise .
E Usually, the s alt war ning light will stop bei ng i llumi nated with in 2- 6 days af te rth es a lt c ont ain erha sbe en fi lled wit h
sal t.
F Imm ed iat el ya fterf illin gt hesalt in to the sa ltco ntainer, a w ashing progr am should be start ed ( Wesuggest to use t he
soak orrapidprogram).Otherwisethe filtersystem, pumpor other importantpartsof the machinemay bedamaged
bysalty water.This is outofwarranty.

6
To op ent he di spens er,t urn the cap tothe " ope n" ( left )arr ow an dl ift i t out.
Po ur t he rins e aid int oth e dispe nser,be ing car eful n ot t oo verfi ll .
Replace the ca pby in se rting it a ligned wit h "open" arrow and turnin git tot he closed ( ri ght) arrow.
Adjusting RinseA id Dispenser
The ri nse aid dis penser has si x or four s ett ings.Al ways sta rt wi th th edi spe nser
set on "4". I fspots and p oo r dr yin gare a p roblem, incre ase t he amount o fr inse
aid disp ensedby removin g the d ispe nserli dand rotat ing t he d ial to "5" .If the
dishes s til l are not d ryi ng prope rlyo r ar eshow sp ots ,adj ustt he di al to the n ext
highe r lev eruntil y our dish es a re sp ot-f ree. Th e r ecom men ded set ting is "4".
(Factory value is"4".)
Increasethe dose ifthereare drops of waterorlimespotsonthe dishes afterwashing.
Reduce i tifthere aresticky whitis hstains on your dish es o rabluishfilmon glasswareor
knife blades.
1
2
3
As t he ri nse aidd imin ishes, t he si zeo f th e black do t
ontherinse aidlevel indicator changes, asillustratedbelow.
Full
3/4full
1/2full
1/4full - Should refilltoeliminate spotting
Em pt y
Adjust lever
(Rinse)
When to Refill the RinseAid Dispenser
Ifth erei s no r ins e-ai d wa rning ligh tin thec ont rolp anel, you can estimat ethe amount f ro m th e col our
ofth eopti ca ll ev el ind icator C loc ated ne xt to t hecap. Whe nth erinse-ai dc ontai ner i sfu ll, the whole
indicato rwill be d ark .As t her inse -aid di minishes, t hesi zeof the dark dot decr ea ses. You should n ever let
t he r ins e aid l evel fa ll 1 / 4 full.
durin gthe nex twa sh. Don' tfor get t ore pla cethe cap be fore you clos edis hwa sher d oor.
Clean u p an y r inse aid spill ed while du ring filli ng with a n ab sorbe nt c lot h t o av oid ex cessi v e f oam i n g
NOTE:
Deterge nt s w ith its c hemic al ingredie nt s a re ne cessary to re mov e dirt, c rus hdirt an d trans port it ou tof t he di sh washer.
Mostofth ecommercial quality deterge ntsare suitableforthispurpose.
D. Function of Detergent
Detergents
The re are 3 sor ts of det e rgent s
1.Withphosphate andwithchlorine
2.With phos phate and wit hout chlo rine
3.Wit hou tphosph ate and without chlo rine
""
C (R ins e- A id in d ic ato r)
6

7
Amount ofDetergenttoUse
Prop er U seo fDe terg ent
Use o nly det erge nts pecifical lyma de f or the u sein dis hwas her s.Ke ep your deterge ntf resh and dry.
Don't putpowdereddetergent into the dispenseruntilyou'reready towash dishes.
Dishwash erde tergen t is co rrosi ve!Ta kecar e to keepi t out of reach of c hildr en.
WARNING!
Based ontheir chemicalcomposition, detergentscan besplitin two basictypes:
The use of normal washingprogra ms incombinationwith concentrated detergents
redu ces pollution a nd is g ood for your dish es ; these wash p rog ram sare specif ic ally matche d
to t he di rt-di ssol ving pro pert i es ofth ee nzyme s of the con cent rate dde tergent. For this reas on
normal washprogramsin whichconcentrated detergentsareusedcanachievethe same
resultsthatcanotherwise onlybe achievedusing intensive programs.
“”
“”
“”
Detergenttablets ofdifferent brandsdisso lve atdifferent speeds. Forthisreasonsome
dete rgent t ablets ca nnot dissolve and dev elop the irful lcle ani ng po wer dur ing s ho rt
prog ra ms.There fore please u sel ong program swh en u sin gde terg entt able ts,t o
ensu r e the c ompl et e r e mov a l of de t erge n t r e sidual s.
Th e disp ens er m ust b e re fi lled be fore the start of each was hcyclef ollowing the i nst ructions
provided in t he w ash cycle ta bl e . Your dis hwa sher uses le ssde ter gent and rins eaid tha n
Conventionaldishwasher.Generally, onlyonetablespoon of detergent is neededfor
anormalwashload. Moreheavily soileditems needmore detergent.Alwaysaddthe
dete rgen tj us tbe fore star ti ng the dish was her, ot herw ise it coul dg et da mp a nd w ill not
di s sol v e pr operly.
Concentrated Detergent
DetergentTablets
Detergent Dispenser
Always a dd th edetergent just b efo re start ing ea chwash cycle.
Onlyuse branded detergentaidfordishwasher.
If the l id i sclose d:press rele ase butt on.T heli d wi ll sp ring ope n.
conventional,alkalinedetergentswith causticcomponents
l ow a lk al i ne conc ent r ated deter ge nts w i t h natur a l enzymes
Normally ne w pu lverised dete rge nt is with out phos ph ate.T hus the wate rso ftener fu ncti on o f
phos ph ate is no t gi ve n. I n th i s c a se w e r e com m e nd to f i l l sal t i n th e sa lt co nt a i ner e ven whe n
the h ard ness o fwater is only 6 d H. If dete rg entsw it ho ut ph osphate ar e usedin the case of hard water
often white s pots app ear ond ish esan dglasse s. In this cas epl ease add mo red eter gen t to r each
bett er r esults . D et e rgents wit h out chl or in e d o on ly ble ach a l i ttl e. Str o ng an d c olo u red sp o t s w i ll no t
bere moved complete ly. I nth isca sep leas echoos ea progr am with a hi gher te mperature .
°

8
I fyou use 3i n1 ta ble ts in other pr ogr am s,t he a pp liance will not achi eve a go od p erfo rma nce.
Only the 3in1 fun ction (for the prog ram :i nt ensi ve/No rmal/ Eco. ) Can be used w it h3in 1t ablet s.
Fillt hede ter gent disp ens erwit hdeter gen t.
Th e m arking in d icates the dosing l e vels , a s
i ll us tra ted o n t he ri gh t:
Th ep la ceof main w ashcyc le de terg ent pl aced ,
M IN me ans approxi mately 2 0go f det erge nt.“”
Th ep laceo fpr e- wa shc ycle det erge ntp lace d,
ap proximat ely5 go f detergen t
Pleaseo bserve t hemanu facturer sdo sing and sto rage
Recommendationsas statedonthedetergent packaging.
Close the lid and press untilit locks in place.
I f th e di sh es ar e heav i ly so il ed , pl ace anad di tional
detergen tdo sein the pre-w as h de tergent cham be r. Th isdet er gen twill take effect d uring the pre-wa shphas e.
A
B
Fill in Detergent
You f indin formation about the a mo unt o f de terg en t forth esi ngle pr ogram me on t he l astp age .
Pl eas eaware ,tha taccordi ng t othe le velso iling and the spec if ic hardnes sof wa terd iff erence sa repo ssib le.
Pleaseobservethemanufacturer'srecommendations onthe detergentpackaging.
When using 3i n1 combi nation / co mpact D etergents ,p leas epay atten tionto ma kesure th at
the size of the combi nation detergent s fits t othe dispe nser so th atcombin at ion
deterge ntscan b e ea sily put i nto the d ispense r, and th edispen ser would not b ebroken.
,
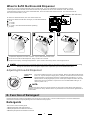
Your dish wa sher h as a 3i n1fu nct ionw hich nee dsno sal tand r inse aid b uta 3 In 1 t ab let.
This dishwas her c om esw ith a 3in 1 tabl et containe ras ana cce ssory.
1.The figurebelowshowshowto hangthe3in1 tabletcontaineron theupperbasket.
2. Rot ateth eup per spra yeran dch ange the locat ion o f the conta iner to en sure the uppe rsp rayer i sn ot
obstructedby the 3in 1 tabletcontainer. Refertothe figurebelow for reference.
3.Put the 3in1 tablet intothecontainer ,then start the 3in1pro gram.
How To Use The 3IN1 Function
6

9
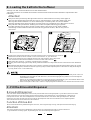
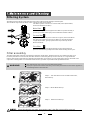
For b est pe rfo rmance of t h edish wa sher, f o ll ow the selo ading gu ide lines. Feat ures and
appea rance of bask ets an d cutler ybasket s may va ry from yo ur mod el.
Attention before or after Loading the Dishwasher Baskets
Scr ape off any la rgeam ounts of le ftov er fo od. Soft enr emnants of bur nt food in pans.
It is n ot necess ar yto r inse the dis hes un der running wa ter.
Plac eobj ects int hedishw asher in follo wing way:
1.Ite mss uch as c ups, gl asses, p ots/pans, et c. ar efaced dow nw ards .
2.Cur ved item s,or ones w ith r ecesses, sho uld b el oaded as lant so that water can run off.
3.All utensilsare stackedsecurely and can not tipover.
4.All uten sils are pl ac edi n the wa ytha tthe spr ayarm s can rotat e fre ely d ur ingw ashing.
Ve rysma ll i te ms shou ld not be washe d in t hedishw ash er a sthe yc ould easi ly fa ll ou tof th eb aske ts.
Bowl M Bowl L() ()
Glasses
Dessert plate
Saucers
Cup s
Front
(Eg g )
Gravy ladle
Loading the Upper Rack
The u p pe r r ack i s desig n ed to hol d more delicate a nd l ighter d i shware suc h as g lasses , cof fee
and tea c up a nd sauc ers, as well as pl ates ,small b ow ls an dsha ll ow pa ns(a slo ng a sthe yar e
not t oodi rty ).
Po sition the dishes a ndc ookware so t hat t hey do n ot g et m ove dby the spra yof wa te r.
Upper wheels
Lower wheels
Adjusting the UpperBasket
Th e hei ght o fthe up per b ask etca nbe a dj ust ed i n order to creat emo re sp ace f orlar ge u te nsils
bothfor theupper/lower basket.The heightof the upper basketcanbeadjusted byplacingthe
wheels on di fferen t h eigh t of the r ails. Lo ng items , ser vi ng cu tlery, sala dserve rsan d kn ives
should be pl acedo n the sh elf so t hatthe yd o not o bstr uctt herota tion of the spr ay a rms.
Th e she lfca nbe fold ed b ac k or be remove dw he n not requ ired for use.

10
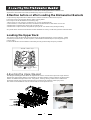
Loadingthe Lower Basket
Werecommendthatyouplacelargeitems whicharemost difficultto cleanintothelower basket:
pots, pans,lids,servingdishes andbowls, asshownin the figureto theright.
I t is p refer abl e to plac eserving dis hes and li ds ont hesi deof the ra c ksi n order t o avoi dblock ing
therotationofthetopsprayarm.
Pots, servingbowls,etc.must always beplaced top down.
D eep pot sshould bes lan tedto allo ww ater t of low o ut.
Th eb ottom baske t feature f ol d dow ntin er ows soth at la rge r or m or e pots andp ansc anbe lo aded .
1. Cutlery basket
2. Dessert plates
3. Soup plates
4. Dinner plates
5. Oval platter
6. Saucer

11
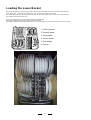
Cutlery Basket
Fo rwashi ng in th ed ishw ashe rt he fol lowing cut ler y/ dishe s
Cutle ryw ith w ooden, hor n chi naor
mothe r-of-pe arlha ndles
Plas tic items t hatar enot h eat re sistan t
Older c utlery with glued p arts t hat are not
temperatureresistant
Bondedcutleryitemsordishes
Pewte r or c ooper i tems
Crystalglass
Steel i te mssubj ectto r usting
Woodenplatters
Itemsmadefrom synthetic fibres
Do n ot p utin it ems th atare d irty o f cig arette a sh,c andle wax,l acquer or p aint.
If you buy new d ishes please mak es ureth atthey are su itable for d ishwashe rs.
Somety pes of g lass es can b ecome
dullaftera largenumberofwashes
Si lver a nd al u mi nu m p a rts have a
tendenc yto disc olou r du ri ngwas hin g
Glazed pa tt er n s m a y f ad e i f mac hi n e
was he d fr equently
Pleas e do not over lo ad your d ishwa she r. There is o n l y s pace f or 9 standar d d i s hes. D o not
us ed ish that isno tsui table f or dish wa shers .T his i s im port ant f org ood resu lts a ndfo r
reasonablee nergyconsume.
B efore lo adin gthe dis hes, you sho uld:
Removelarge left-over
S ofte n re mnants of bu rntf ood in p ans
Dishesandcutlery mustnotimpedetherotationof thespray arms
Lo ad holl owite ms suc has cup s,g lass es, p ans etc .with the ope ning do wnwa rds s ot hat
w ater can not colle cti n the con tain ero r a deep b ase
NOT E:
NOT E:
Arenotsuitable
Are of limited suitability
Loading cutlery anddishes
When loadi ngthe dishesandcutlery, pleasenote:
Cutlery shoul d b eplace din the cut lery b asket with th ehan dle sat the bott om. I f the rack ha sside b askets ,the
spoons shoul d be loaded s eparat el y into the ap propri ate sl ots, es pecial lyl on g ute nsils sho uld be pl aced i n t he
horizont al po sition at th efron t of the u ppe rbasket a ss how nin the pi cture.
Alwa yslo adsh arp u ten sils wi th the shar p
poin t dow n!
1 2 3456 7
3553
1551
3553
3553
1561
3213
3244
1244
2244
2214
1214
7274
1. Tea spoons
2. Dessert spoons
3. Soup spoons
4. Forks
5. Knives
6. Serving forks
7. Serving spoons
Do not l eave any item e x tend th ro ugh bot tom .
Knivesand otherutensilswithsharp points
mustbe loaded in th eba sket with the irpoi nts
dow nor pl ac edi n an hor izo nt al p osit ion.
Itis dangeroustoopenthedoorwhenwashing,becausethe hotwatermaybe scaldedtoyou.The doorshouldnot be
leftintheopenpositionsincethiscouldpresentatrippinghazard.

12
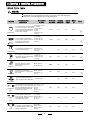
Me ani ng: ne ed t o f ill r i ns ei n t o t he R i nse- A id Disp ens e r.
()
*En50242: Thi sprogramis the tes tcycle,ther inse-aid dispenser
se tt ing i s r ec omm end ed t o b e set t o p os it ion 6.
Daily
Intensi ve
EN50242
5/22g
F o r no r mally soile d loads ,
such as , pla tes,g lasses
a nd lightly so iled pans.
Stand ar d daily cycle.
po t s
F o r th e h eavie st soiled l oads,
such as pot s, p ans , c asserol e
dishesand dishesthat have
beensittingwithdried food
onthemfor a while.
Ashorterwashforlightly
soiled l oads t hat d onot
need drying.
Pre -was h
Forlightly soiled loads,
su c h as g lass e s , c r ystal a n d
fine ch ina.
Delicate
Pre -w as h 5 0
-wash
Wash (60 )
Rinse
Rinse (70 )
Drying
()
℃
℃
℃
Pre
Rinse
Pre-wash
Was h (4 0 )
Rinse (70 )
℃
℃
Drying
Pre- wa sh
Wash (50 )
Rinse (60 )
Dryi ng
℃
℃
Was h (4 0 )
Rinse (45 )
℃
℃
171
0.81
173
1.4
28
0.35
118
0.8
18.4
13 .0
Ec o.
22 g
F o r l i g ht l y s oi l ed lo a d s,such
as p lat es,g la sses,bowls and
lightlysoiledpans.
Pre- wa sh
Wash (4 5 )
Rinse (60 )
Drying
℃
℃
111
0.7
11.0
Fordishes thatneedto be
ri nsed an d dried o nly.
San i rinse
Wa sh(45 )
℃
Rinse (70 )
Drying
℃
98
0.8
8. 0
7. 0
11.0
5/22g
To rin sedishesthat you
plantowash later that day.
Pre -wash
11
0.01
6.0
Expr ess
15 g
15 g15 g
Da ily
Ec o.
Intensive
3in1
3in1
For norm ally s oiled l oads ,
such as , p lates, gla sses
and l ightl y soil ed pan s.
standarddaily cycle.
pots
For lightl ys oiled loads,such
as plat es,gla sses,bow ls and
lightlysoiledpan s.
For theheaviestsoiled loads,
such as p ots ,pans , ca sserol e
dishes and d ishe sthat h ave
been s itting wit hd ri ed f ood
onthem for a w hile.
Pre-wash 60
Was h (70 )
Rinse
Rinse
Rinse(70 )
Drying
(
℃)
℃
℃
Pr e-was h
Was h (50 )
Rinse(70 )
Drying
℃
℃
Pr e-was h
Was h (45 )
Rinse (70 )
Dry ing
℃
℃
14 8
1.0
12 8
0.8
161
1.5
15.1
12 . 7
12 . 7
3in1
3in1
3in1
3in1
+
+
+
+
+
+

13
Premi se:
1. Acycl e tha tis und erway can on ly be modified if it has on ly been r unning
for a short time . Other wise, the det ergent may have alr eady b een released ,
and the appl iance may have alrea dyd rained t he w ash water.If th is is the c ase,
the dete rgen t dispens ermust be refi lled( see t he s ect io n enti tl ed " Lo adingthe
Detergent" ).
2. Pre sscurrentprog. Button morethan3 secondsto canceltheprogram ,
then you can chan ge the p rogr am t othe d es ired c ycle s ett ing (s eethe sec tion
entitl ed " Star ting a washc ycle. . . " ).
3. Pre ss one of other s pr og.B utton mo rethan 3 s econds t o cancel ther uning progr am ,
transla sethe program w hich you p ress.
4. Pre ss t he di splay bu tton more tha n 3 se co nds to re- edit d isp lay t ime .
WARNING!
It is dan geroustoop enthedoor when was hing,because the hot watermay s cald you.
When t he w orkin g c ycl e h as finished, t he b u z zer of the d ish wash e r w ill soun d f or 8 s econ ds, t hen st op. T u rn o ff
t he a pp li a n ce u si ng t heON/OFF b utton, sh ut o ff the w ater supp l y and op en t he do or of th e di sh was her.
Waitfor afewminutesbeforeunloadingthedishwasherto avoidhandlingthedishes and utensilswhilethey
are still hot a ndm or e suscep tibl e tob reak age. Th eyw il lal sod rybetter.
Openthedoorcarefully.
H ot d ishes ar e sensit iveto kno cks. The dis hes shou ld ther efore bea llow edt ocool d ownarou nd 1 5minutes
befor eremovi ngfrom the appli ance.
O pen the dish was her's door, leave i t aj arand w ait a f ewmi nutes bef or er em oving t he dis hes. In this way they
w il l be cooler and the dryi ng wi ll be im proved.
Unloadingthedishwasher
It is normal that t he dis hwashe ris we tinsid e.
Empt ythe l ower b asketfirst a nd then the up perone .T hiswi llavoid wate rdri pp ing f ro mthe uppe r Bas ket onto
the di shesin the l ower on e.
TurningOn theAppliance
Change the Program...
Forgot toAdd a Dish?
AttheEndoftheWashCycle
Startinga cycle wa sh
1 Draw out thelowerandupperbasket,load the dishesand push themback.
It is com mende d t olo ad t he l owe r basket f irst, then the upper o ne (s eethe s ect ione ntit le d
Loading the Dishwasher ).
2 P our in t hedet e rgen t ( see t h e se ct ion e ntitle d Sa lt , Det e rgent and Ri ns eA id ).
3 I nse rt the plu gin tot he so cket. The powers upplyi s 220 -240 VAC /50 HZ , th e spec ific atio n of th e
socket i s 10A 25 0VA C. Make sur ethat the wa ter s upp lyis turne don to f ullp ressure.
4
“”
“”
Ope nthe doo r, p ress the ON/OFF butto n, a nd t heON/O FFl ight will turn on.
Press th epro gra m bu tton toa sired wa sh c ycle . and clo seth ed oor.Aft er 3se con ds, the m ac hine wil l work .
Aforgotten dish can be added at any time befo re the detergent cup opens.
Load the forgotten dishes.
Close the door, the dishwasher will start running aga in
after 10 seconds.
After the spray arms stop working,you can open the door
completely.
2
Open the door a little to stop the washing.
1
3
4
2. Tur n of f t he wat er ta p!
1.Switc ho ffth edis hw ashe rby p res sing the ON/OFF bu tton .
Th eb uzze rof the d ishwasher m oos for 8s econ ds, o nly i nthis ca se th ep rogramm ehas en ded .
Switch Offthe Dishwasher

14
The f ilter pre ventsl ar ger remn ant sof food or o ther obj ects f rom get ting i nsi deth ep um.
Theresidues may blockthefilter, inthiscasethey must be removed.
The fi lter syst emconsi sts of a coar se f ilte r,a flat (M ain f il te r)
A n da mi c rofi lter( F i ne fi lte r ) .
Food and soil particles trapped inthisfilterarepulverizedby a
specia ljet ont he l owe r spr aya rman dw ash edd own tod rain.
Lar g er item s, s uc h as pie c esof bo nes or glass, t ha t cou ld blo ck
thedrainaretrappedin the coarse filter.To removetheitems
caugh t by t he filter, gen tly s que eze the t ap on th eto p of t his
filterandliftout.
Thisfilter holds soiland foodresiduesinthe sumpareaand
preventsitfrombeing redepositonthe dishesduring washcycle.
Main filter
1
Coarse filter
2
Fine filter
3
2
3
1
Filtering System
Filterassembly
Thefilterefficiently
For b es t perfo rm ance and re sults, t he filte rmust b e cleane dre gul arly. t his r eason, i t isa goo dide ato
r emo ve th el arger fo odpa rti cl estr app edin the filte raft ere ach was hcy cle b yrin sing the s em icir cular f il te ran d
c up u nderru nnin gwa ter. Tore mo veth efil terd evic e,p ull th ec up handle in t he u pwardd irect ion.
re mo vesf oodpart icle s fro mt he wa shw at er,all owin g it t obe rec ycle ddu ring t he cycl e.
For
WARNING!
T he di sh was her mus t n e ver beused witho ut t he f il t er s.
Imp ro per replace men tof the f ilter may reduce the performanc elevel o ft he applian ce
and damage dishesandutensils.
St ep 1 Turn t he filter in ant i-clockwis edirectio n,
t hen lif t it up.
:
St ep 2 l ift the Ma in fil te rup:
Step 3 lift theF inefilter up:
When following this procedure from step1 to step 3, the filter system will be removed;
when following it from Step 3 to Step 1, the f ilter system will be installed.

15
Th e cont ro lp ane l can be cleaned by u si nga lig htly dampened c loth .
Aft ercle anin g,m ake sure to dry it tho roug hly.
For the ext e ri or, us e a go od app li anc e po lis h wax .
Neveru sesharp obj ects, sco ur ing pads or h arsh clean ers ona ny part o fthe dis hwa sher.
ProtectAgainst Freezing
1.Cutoffthe electrical power tothe dishwasher.
2.Tur noff th ewater su ppl y and disco nnect the w ater i nlet pi pe from the w ate rvalve.
3.Drainthewater fromthe inletpipe andwatervalve. (Use apanto catchthewater)
4.Reconnect the water inl etpipe t othe wate rvalve.
5.Remove t hefilte rat the bott omo f the t ub and use a spong eto soak up wate rin the sump.
pl ease t akefros tprotect io n m easures o nt he dishw asher in wint er. Ev ery fter wa shingcycle s,
pl ease op erate as f ollows
time a
:
Caring for the Dishwasher
- Ins pect the filters for blo ckin ga fter e ver yti meth edis hwa she rhas been used .
- By uns crewing the coar sefil ter, y oucan rem ove t he filter sys tem. Re movean yfoo dr emna nts and
cleanthefilters underrunningwater.
Remarks:
Cleaningthe Filter
CleaningThe Door
To c le an t h e c o a rse f ilter a nd t he fin e filt e r, us e a clean i n g bru sh. Reas se mbl e t hef il t er par ts as sho wn i n t h e f igur es
on t he la st p age a nd r eins ert t he enti re ass em bly in the dis hwa sher, pos itio ning it i n i tss eat and pres sing dow nw ar ds .
Theentire filterassemblyshould be cleanedoncea week.
Whencleaning thefilters, don't knock onthem. Otherwise, thefilters could be
contorted andtheperformance ofthedishwashercouldbedecreased.
WARNING!
To cle an th ee dge around t hedoor, you shoul duse o nly a sof twarm, d am p cl oth.
To avoi d pene trat i ono f wa te ri nto t hedoor lock and el ect rical co mpo nent s,d o no t
usea spr ay cle aner of any ki nd.
WARNING!
Never u sea spr ay cl ean er t oclean t he door pan elas i tm ay dam age the door loc k
and electrical components.
Ab rasive ag entsor some pa pe r towels s hou ldnot be use dbecau se o f th er is ko f
sc r a t c hi ng or l eav in g s pots on the st ai n les s steel s ur fa ce.
Cleaning the SprayArms
It is necessary to cl ean the spra yarms regul arly in orde rto
remove the accum ulation of s calefr omthe hard water
and thus preve nt bl ocking of spray arm jet sand bear ings.
We Suggest to poke the b locked spray arm jets wit ha nee dle
to e nsure good w ashing effect.
I f y ou r di shwa sher can n ot w ork be cau s e o f the i c e, ple a se cont a ct pro fe ssion al serv i ce per so ns.
Unscrew

Theinstallationof thepipes
and electrical equipments
should bedonebyprofessionals.
ElectricalShoc kHazard
Di sc onne ct e l ectri cal p o we r be fore
installingdishwasher.
Failuretodosocanresultindeathor
electricalshock.
Theinstallationpositionofdishwashershouldbe near theexistinginletanddrainhoses and
powercord.
Onesideof the cabinetsinkshouldbe chosento facilitate the connectionofdrain hosesof
thedishwasher.
Installation preparation
Note: pleasecheck theaccompanyinginstallation accessories(hookforaestheticpanel
,screw)
●
16
Itis recommend thatyourun awashcycle withthe
di shwasher e mptyan dthe nr emove t he plu gfro mt he
socket, turn offth ewa te r supp ly and l eave the door of
t he app lian c e s l i ght ly ope n. T his will help th e doo r
sealstolastlonger andpreventodoursfromforming
withintheappliance.
If the app lian cemust be move d, tr yto keep it in the
verticalposition. Ifabsolutelynecessary,itcanbe
positi oned on its back .
Oneofthefactorsthatcauseodourstoforminthe
dishwasher is foo dth atr emains tr appe din the seal s.
Periodic cleaning with ad amp sponge will prev entt his
f r o m oc cu rr ing.
Af ter ever y wa sh, turn off t hewa ter supply to the
applia nce and leave t he doo rs lightl yop en soth at
m oist urean dodour sar en ottra pped in side.
Befo re cleani ng or p erforming mainten ance, always
remove the p lugfr om the socket.
Tocleanthe exteriorandrubberparts ofthe dishwasher,
donot use solventsor abrasivecleaningproducts.
O nly use a c lo th w ith warm so a py wat e r.
Tor em ov e s pots o r s t ain s f rom the sur face oft he
interi or, usea cloth dampened withwaterana little
v inega r, o r a c lean ing pro duct mades pecifical lyf or
dishwashers.
After EveryWash
Remove the Plug
No Solvents orAbrasive Cleaning
Mov ing t heApplia nce
Seals
WhennotinUse for aLongTime

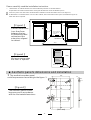
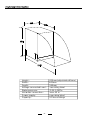
(Unit: mm)
3.5
15
444
1.5
390
179
175
19
38
52
418
Cabinet
Dishwasher
Door of
dishwasher
Minimum space of 50mm
90 °
90 °
450 mm
820mm
100
580mm
80
Space between cabinet
bottom and floor
Electrical, drain and
water supply line
entrances
Pleasecarefullyread theinstallation instruction.
●
Illustrations ofcabinetdimensionsandinstallationposition of thedishwasher
Prepar ations shou ldb ema debefo removi ng th edishwas her toth eins tallat ionp la ce.
C hoo se a plac enear the si nk to fac ilitate t he ins talla tion of in leta nd d rain hoses (s ee f igu re 1) .
If dishwa sher is install eda tt he cor nero fthe ca binet ,the resh oul db e som esp ace (i llustrat ed in figu re2 )
w hen the door is o pene d.
2
1
Minimumspace when
the door is opened
【】Figure 2
Cabinetdimensions
【】Figure1
1
Theaestheticwoodenpanel
couldbeprocessedaccording to the figure 3
Theaestheticpanelshould
beprocessed in accordance
withthe illustrated dimensions
【】Figure3
● Aesthetic panel's dimensionsand installation
Lessthan5mm
between thetop
ofdishwasherand
cabinetandthe
outer dooraligned
tocabinet.
17

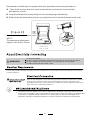
Installationof aesthetic panel
【】Figure 4a
2
Installthe hook onthe aestheticwoodenpanel andput the hookinto theslotof theouterdoor of
dishwasher(see figur e4a).After positioning ofthe panel ,fix thepanel ontotheouterdoor by
sc r ew s and bo lt s(See f igu re 4 b) .
Installationof aesthetic
woodenpanel
【】Figure4b
.takeawaythecover
.pinupthescrew
. get bac k t he c o ver
1
2
3
Outer door of
dishwasher
Aesthetic panel
Hook for aesthetic panel
4X18 screw
Spacer for aesthetic panel
Cover
Hop hook
St4 countersunk
head screw
Lower hook
18
Page is loading ...
Page is loading ...
Page is loading ...
Page is loading ...
Page is loading ...
Page is loading ...
Page is loading ...
-
 1
1
-
 2
2
-
 3
3
-
 4
4
-
 5
5
-
 6
6
-
 7
7
-
 8
8
-
 9
9
-
 10
10
-
 11
11
-
 12
12
-
 13
13
-
 14
14
-
 15
15
-
 16
16
-
 17
17
-
 18
18
-
 19
19
-
 20
20
-
 21
21
-
 22
22
-
 23
23
-
 24
24
-
 25
25
-
 26
26
-
 27
27


Ask a question and I''ll find the answer in the document
Finding information in a document is now easier with AI
Other documents
-
Groupe Brandt LFI-047IT Owner's manual
-
Prima LPR661 User manual
-
-
Brandt VH1472J User manual
-
White-Westinghouse WDFE12JGCWD Owner's manual
-
White Knight DW1260WA Owner's manual
-
Teka LP8 850 User manual
-
White Knight DW0945WA User manual
-
Svan SVJI452 Owner's manual
-
Aspes ALV1045X Owner's manual