Page is loading ...

READ AND SAVE THESE INSTRUCTIONS
Skuttle
®
Indoor Air Quality Products
Model 60-Series High-Capacity
Steam Humidifiers
(Models 60-1, F60-1, 60-2 and F60-2)
`
Warranty
`
Installation Instructions
`
Operating and Maintenance
Instructions
CONTRACTOR: Read these instructions before installing or
servicing humidifier.
HOMEOWNER: Save this manual for future reference.
Model No.
Mfg. Date (see label on unit)
Installation Date:

TABLE OF CONTENTS
Page
Thank You! . . . . . . . . . . . . . . . . . . . . . . . . . . . . . . . . . . . . . . . . . . . . . . 4
Warranty Validation Notice (IMPORTANT! PLEASE READ.) . . . . . . . . . . . . . 4
Skuttle
®
Limited One-Year Product Warranty . . . . . . . . . . . . . . . . . . . . 5
CONTRACTOR:
How To Install a Skuttle Model 60-Series Steam Humidifier . . . . . . . . 7
• Safety Precautions . . . . . . . . . . . . . . . . . . . . . . . . . . . . . . . . . . . . . . . 7
•Tools & Materials Needed . . . . . . . . . . . . . . . . . . . . . . . . . . . . . . . . . 8
• Selecting a Location . . . . . . . . . . . . . . . . . . . . . . . . . . . . . . . . . . . . . 9
• Mounting the Humidifier (Options A-D) . . . . . . . . . . . . . . . . . . . . . . 10
• Connecting to a Power Source . . . . . . . . . . . . . . . . . . . . . . . . . . . . 18
•Wiring the Air Mover . . . . . . . . . . . . . . . . . . . . . . . . . . . . . . . . . . . . 19
•Wiring the Fan Switch . . . . . . . . . . . . . . . . . . . . . . . . . . . . . . . . . . . 21
• Plumbing and Setting the Water Level . . . . . . . . . . . . . . . . . . . . . . 22
How To Maintain a Skuttle Steam Humidifier . . . . . . . . . . . . . . . . . . . 25
Trouble Shooting . . . . . . . . . . . . . . . . . . . . . . . . . . . . . . . . . . . . . . . . . 27
Replacement Parts . . . . . . . . . . . . . . . . . . . . . . . . . . . . . . . . . . . . . . . 28
Maintenance Record . . . . . . . . . . . . . . . . . . . . . . . . . . . . . . . . . . . . . . 30
HOMEOWNER:
How Your Humidifier Works . . . . . . . . . . . . . . . . . . . . . . . . . . . . . . . . 31
How To Extend the Life of Your Humidifier . . . . . . . . . . . . . . . . . . . . . 32
GENERAL INFO:
FAQs about IAQ . . . . . . . . . . . . . . . . . . . . . . . . . . . . . . . . . . . . . . . . . 33
Skuttle Automatic Flushing Timer . . . . . . . . . . . . . . . . . . . . . . . . . . . . 35
Skuttle Model 216 Make-Up Air Control . . . . . . . . . . . . . . . . . . . . . . . 36
Skuttle High-Efficiency Air Cleaners . . . . . . . . . . . . . . . . . . . . . . . . . . 37
The Skuttle “Happy House” – Your Assurance of Enhanced IAQ . . . . 38
Contact Information . . . . . . . . . . . . . . . . . . . . . . . . . . . . . . . Back Cover
2

LIST OF FIGURES
Page
Figure 1: Duct Edge Mount . . . . . . . . . . . . . . . . . . . . . . . . . . . . . . . . . 10
Figure 2: External Side Mount . . . . . . . . . . . . . . . . . . . . . . . . . . . . . . 12
Figure 3: Duct Center Mount . . . . . . . . . . . . . . . . . . . . . . . . . . . . . . . 14
Figure 4: Internal Side Mount . . . . . . . . . . . . . . . . . . . . . . . . . . . . . . . 16
Figure 5: Model 60-1 Wiring . . . . . . . . . . . . . . . . . . . . . . . . . . . . . . . . 19
Figure 6: Model 60-2 Wiring . . . . . . . . . . . . . . . . . . . . . . . . . . . . . . . . 19
Figure 7: Wiring with Air Conditioning . . . . . . . . . . . . . . . . . . . . . . . . . 20
Figure 8A: Wiring without Air Conditioning (External Relay) . . . . . . . 20
Figure 8B: Wiring without Air Conditioning (G Contactor) . . . . . . . . . 21
Figure 9: Raising the Water Level . . . . . . . . . . . . . . . . . . . . . . . . . . . . 23
Figure 10: Lowering the Water Level . . . . . . . . . . . . . . . . . . . . . . . . . 23
Figure 11: Models 60-1, F60-1, 60-2 and F60-2 Parts . . . . . . . . . . . . 28
LIST OF TABLES
Page
Table 1: Trouble Shooting . . . . . . . . . . . . . . . . . . . . . . . . . . . . . . . . . . 27
Table 2: Models 60-1 and F60-1 Replacement Parts . . . . . . . . . . . . . 28
Table 3: Models 60-2 and F60-2 Replacement Parts . . . . . . . . . . . . . 29
Table 4: Maintenance Record . . . . . . . . . . . . . . . . . . . . . . . . . . . . . . . 30
3

Thank you for purchasing a Skuttle whole-house Steam Humidifier. We
appreciate your business and consider you a valued customer. We
sincerely hope you are satisfied with our product and its performance.
Skuttle is the oldest manufacturer of residential humidifiers, having been
in business since 1917. Our longevity and dedication to our customers
has resulted in products that are unsurpassed in quality and ease of
operation. Features such as automatic controls, high-quality materials
and superior workmanship make this Skuttle Steam Humidifier a valuable
enhancement to your home's HVAC system. In addition to humidifiers, we
manufacture air filters, make-up air controls and indoor air quality (IAQ)
accessories to improve the comfort and healthfulness of your home.
As always, quality, performance and customer satisfaction are our
highest priorities. The information contained in this manual will aid you
and your HVAC contractor with the installation and periodic maintenance
necessary to keep your humidifier operating at peak efficiency. If, at some
point, you need parts or service, follow these simple procedures:
• First, try calling the heating and air conditioning dealer who installed
your humidifier. This information may be located on the back of this
booklet, or the dealer may have placed a reference label on your
heating system.
• If you cannot locate your original installer, check the Yellow Pages
under "Heating & Air Conditioning Contractors".
• If these attempts fail, email Skuttle Indoor Air Quality Products at
[email protected], or call us toll-free at (800) 848-9786.
We'll be glad to assist you.
For further information regarding the benefits, operation and maintenance
of your new Skuttle steam humidifier, refer to the applicable sections of
this manual.
4
IMPORTANT:
WARRANTY VALIDATION
The completion and return of the Warranty Registration Card
(enclosed separately in your Skuttle humidifier carton) is required
for warranty coverage.
The warranty described herein is not valid unless the Warranty Card is completed and
mailed to Skuttle Manufacturing Company within 15 days of equipment installation.

5
Skuttle
®
Limited One-Year Product Warranty
This limited one-year warranty covers this Skuttle product as
designated on the return portion of the Warranty Registration Card,
excluding wiring, plumbing and installation.
Skuttle Manufacturing Company warrants that this product is free
from defects in material and workmanship under normal, non-commercial
use and service. Skuttle will remedy any such defects if they appear
within 12 months from the date of the original installation, as evidenced
by receipt of the Warranty Registration Card, subject to the terms and
conditions of this limited one-year warranty stated below:
1. THIS LIMITED ONE-YEAR WARRANTY IS GRANTED BY
SKUTTLE MANUFACTURING COMPANY, 101 Margaret Street,
Marietta, OH 45750.
2. This warranty shall extend only to any non-commercial owner who
has purchased this residential product other than for purposes of
resale.
3. The completion and return of the Warranty Registration Card is a
condition precedent to warranty coverage and performance.
Warranty is not valid unless this card is completed and mailed to the
factory within fifteen (15) days of equipment installation.
4. All components are covered by this limited warranty, except
expendable items.
5. If, within the warranty period, this product or any component requires
service, it must be performed by a competent heating and/or
plumbing contractor (preferably the installing contractor). Skuttle will
not pay shipping or labor charges to remove or replace such
defective parts or components. If the part or component is found by
inspection to contain such defective material and/or workmanship, it
will either be repaired or exchanged, free of charge, at Skuttle's
option, and returned freight collect.
6. In order to obtain the benefits of this limited one-year warranty, the
owner must notify the dealer or distributor in writing of any defects
within thirty (30) days of the discovery. If after reasonable time, the
owner has not received an adequate response from the dealer or
distributor, he/she should notify in writing: Skuttle Manufacturing
Company, 101 Margaret Street, Marietta, Ohio 45750. (SKUTTLE
WILL RECEIVE, FREIGHT PREPAID, ONLY REMOVABLE PARTS
OR COMPONENTS OF SUCH DEFECTIVE PRODUCTS.)
7. This limited warranty does not apply to any part or component that is:
damaged in transit or handling; has been subject to abuse, neglect or
accident; has not been installed, operated and serviced according to
Skuttle's instructions; has been operated beyond the factory-rated

6
capacity; or has been altered in any such way that its performance is
affected. There is no warranty due to neglect, alteration or ordinary
wear and tear. Skuttle's liability is limited to replacement of defective
parts or components, and does not include the payment of the cost
of labor charges to remove or replace such defective components or
parts.
8. Skuttle will not be responsible for loss of use by any product, loss of
time, inconvenience or any other indirect, incidental or consequential
damages with respect to person or property, whether as a result of
breach of contract, neglect or otherwise. (SOME STATES DO NOT
ALLOW THE EXCLUSION OR LIMITATION OF INCIDENTAL OR
CONSEQUENTIAL DAMAGES, SO THE LIMITATION OF EX-
CLUSION IN THE PRECEDING SENTENCE MAY NOT APPLY TO
YOU.)
9. THIS WARRANTY GIVES THE OWNER SPECIFIC RIGHTS, AND
YOU MAY ALSO HAVE OTHER RIGHTS WHICH VARY FROM
STATE TO STATE.
10. Any warranty work will be performed within a reasonable time,
usually within one-hundred-twenty (120) days after notice of defect
and delivery to the Skuttle factory, subject to delays beyond the
manufacturer's control.
11. Any warranty by Skuttle of merchantability, fitness for use or any
other warranty (express, implied or statutory), representation or
guarantee other than what was set forth herein, shall expire at the
expiration date of this limited warranty. (SOME STATES DO NOT
ALLOW LIMITATION OF HOW LONG AN IMPLIED WARRANTY
LASTS, SO THE LIMITATION IN THE PRECEDING SENTENCE
MAY NOT APPLY TO YOU.)
12. Skuttle reserves the right to make changes in the design and material
of its products without incurring any obligation to incorporate such
changes in the units completed prior to the effective date of such
change.

7
CONTRACTOR
How to Install a Skuttle
Model 60-Series Steam Humidifier
NOTES: This humidifier must be installed by a qualified professional
contractor. Failure to comply with this requirement may nullify the
warranty.
Read all instructions before beginning installation of the humidifier.
Skuttle Manufacturing Company assumes no responsibility under
warranty if the contractor and user do not follow these printed
instructions.
FOR INSTALLATION OF THE HUMIDISTAT, PLEASE SEE SEPARATE
INSTRUCTIONS ENCLOSED IN THE HUMIDIFIER CARTON.
Safety Precautions
1. Do not install a humidifier where the surrounding temperatures may
exceed 200°F.
CAUTION: Excessive heat will damage the humidifier, possibly
causing an overflow condition and water damage to the home.
2. Do not install a humidifier where the surrounding temperature may be
32°F or colder (e.g., attics, garages, etc.).
CAUTION: Freezing water will damage the humidifier and burst the
supply pipe, resulting in damage to the home.
3. Do not cut or drill into any air conditioning or electrical accessories
during humidifier installation.
DANGER: Electrocution is possible if you come in contact with
a live electrical wire; blindness can occur if Freon contacts your
eyes.
4. When the humidifier is installed in a finished basement or any area
where water damage could occur, be sure to connect the humidifier's
overflow provision to a suitable drain.
5. For above-ceiling installations, install an additional drain pan
plumbed to a suitable drain.
6. Installation, wiring and plumbing of the humidifier must comply with
local codes, ordinances and regulations.

8
Tools and Materials Needed
1. Safety goggles
2. Tin snips or aviation snips
3. Electric drill
4. 3/8" and 7/64" drill bits
5. Pliers
6. Screwdriver (medium flat point and Phillips #1)
7. Level
8. Hammer
9. Small adjustable wrench
10. Center punch
11. Knife
12. Wire and hardware to connect Fan Control
13. Additional relay or fan sail switch as described under “Wiring the Air
Mover”
For some installations:
14. Duct tape
15. 1/4" copper water line
16. Tubing and fittings for the overflow connection
17. 2 conductor low-voltage wire

9
CONTRACTOR
Selecting a Location
1. For most installations, mount the humidifier under the horizontal
warm air supply duct. As an alternative, the unit can be mounted on
a vertical plenum using a fabricated transition for support. (See
“Mounting the Humidifier”, pgs. 10-17.)
NOTE: The Skuttle Steam Humidifier is not intended for
installation in or on the return air duct or plenum. (Although some
contractors may install the humidifier under return air ducts or on
plenums without complications, it is not our practice or recom-
mendation for such application.)
2. Select a location where the humidifier can be plugged in without the
use of an extension cord. (See “Connecting to a Power Source”, pg.
18.)
3. Select a location that will not allow steam to condense on the system
air mover, electrical components, etc.
4. Mount the unit on rigid metal ductwork, never on duct board or
internally-insulated duct.
CAUTION:
For all installation configurations, the mounting area
must be strong enough to support the humidifier’s weight when
it is full of water (approximately 18 lbs.), and to hold the humidifier
in a level position for safe, reliable operation. Otherwise, additional
duct reinforcement will be necessary.
NOTE: If the installation includes exposed insulated-type materials, a
section of the ductwork must be removed and replaced with rigid
metal duct extending at least 6 feet downstream from the humidifier.
5. Mount the unit at least 4-to-6 feet after the plenum transition. Avoid
sudden turns or transitions in the ductwork in the immediate area
downstream from the humidifier.

10
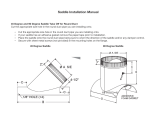
Mounting the Humidifier
Figure 1 - Duct Edge Mount
Option A: Duct Edge Mount
Option A is the preferred method of mounting because it requires the
least amount of duct reinforcement to support the humidifier and keep it
level. A duct width of at least 10 inches is necessary. Wider ducts may
need to be reinforced in order to hold the humidifier level.
DANGER: Wear safety glasses when cutting or drilling. Do not cut
into any air conditioning or electrical accessories during installation.
Electrocution is possible if you come in contact with a live electrical
wire; blindness can occur if Freon contacts your eyes.
To install:
1. Fold the humidifier mounting template along the line marked “FOLD
LINE”. Attach the template so the top/front is located on the side of
the duct, and the remainder of the template is on the bottom of the
duct.
2. Drill three (3) holes marked “A” with a 7/64" drill bit. Drill a hole in the
center of the shaded area of the template and remove the shaded
area using tin snips.
CAUTION: Follow the dotted line carefully.

11
CONTRACTOR
3. Remove the template.
4. Cut two (2) pieces of S-Cleat 8" long and one (1) piece 10-1/2" long.
5. Place the 8" long S-Cleats on the narrow sides of the opening in the
duct, with the slots protruding down and out. Place the 10-1/2" long
S-Cleat on the longer side, closest to the center of the duct, in the
same way as the shorter S-Cleats.
6. Attach the L-shaped bracket with six (6) holes to the top/front of the
humidifier, so that the vertical wall is toward the reservoir.
7. Adjust the water level. (See #8 in “How To Maintain a Skuttle Steam
Humidifier”, pg. 25.)
8. Slide the flanges of the reservoir into the S-Cleats until the mounting
bracket comes in contact with the side of the duct.
9. Secure the humidifier to the duct with the screws provided.

12
Option B: External Side Mount
Figure 2 - External Side Mount
Option B requires a transition to be made and usually needs duct
reinforcement to hold the humidifier securely in place (see Figure 2).
NOTE: For this configuration, the humidifier is mounted on the outside of
the plenum, rather than the inside, so as not to restrict airflow.
DANGER: Wear safety glasses when cutting or drilling. Do not cut
into any air conditioning or electrical accessories during installation.
Electrocution is possible if you come in contact with a live electrical
wire; blindness can occur if Freon contacts your eyes.
To install:
1. Construct a transition and attach it to the plenum.
2. Attach the humidifier mounting template to the location selected at
the base of the transition.
3. Drill two (2) holes marked “B” with a 7/64" drill bit. Drill a hole in the
center of the shaded area of the template and remove the shaded
area using snips.
CAUTION: Follow the dotted line carefully.
4. Remove the template.

13
CONTRACTOR
5. Cut two (2) pieces of S-Cleat 8" long and one (1) piece 10-1/2" long.
6. Place the 8" long S-Cleats on the narrow sides of the opening in the
duct, with the slots protruding down and out. Place the 10-1/2" long
S-Cleat on the longer side, closest to the center of the duct, in the
same way as the shorter S-Cleats.
7. Attach the L-shaped bracket with six (6) holes to the top/front of the
humidifier, so that the vertical wall is toward the reservoir.
8. Adjust the water level. (See #8 in "How To Maintain a Skuttle Steam
Humidifier", pg. 25.)
9. Slide the flanges of the reservoir into the S-Cleats until the mounting
bracket comes in contact with the side of the duct.

14
Option C: Duct Center Mount
Figure 3 – Duct Center Mount
Option C requires duct reinforcement to hold the humidifier securely in
place (see Figure 3).
DANGER: Wear safety glasses when cutting or drilling. Do not cut
into any air conditioning or electrical accessories during installation.
Electrocution is possible if you come in contact with a live electrical
wire; blindness can occur if Freon contacts your eyes.
To install:
1. Attach the humidifier mounting template to the selected location on
the bottom of the duct.
2. Drill two (2) holes marked “B” with a 7/64" drill bit. Drill a hole in the
center of the shaded area of the template and remove the shaded
area using tin snips.
CAUTION:
Follow the dotted line carefully.
3. Remove the template.
4. Cut two (2) pieces of S-Cleat 8" long and one (1) piece 10-1/2" long.

15
CONTRACTOR
5. Place the 8" long S-Cleats on the narrow sides of the opening in the
duct, with the slots protruding down and out. Place the 10-1/2" long
S-Cleat on the longer side, closest to the center of the duct, in the
same way as the shorter S-Cleats.
6. Adjust the water level. (See #8 in “How To Maintain a Skuttle Steam
Humidifier”, pg. 25.)
7. Slide the flanges of the reservoir into the S-Cleats until the mounting
bracket comes in contact with the side of the duct.
8. Secure the humidifier to the plenum with the screws provided.

16
Option D: Internal Side Mount
Figure 4 - Internal Side Mount
Option D requires a transition to be made and usually needs duct rein-
forcement to hold the humidifier securely in place (see Figure 4).
DANGER: Wear safety glasses when cutting or drilling. Do not cut
into any air conditioning or electrical accessories during installation.
Electrocution is possible if you come in contact with a live electrical
wire; blindness can occur if Freon contacts your eyes.
To install:
1. Construct a transition and attach it to to the plenum.
2. Attach the humidifier mounting template to the location selected on
the side of the transition.
3. Use a 7/64" drill bit to drill eleven (11) holes, as indicated on the
template. Drill a hole in the center of the shaded area of the template
and remove the area between the solid bold line using tin snips.
CAUTION:
Follow the dotted line carefully.
4. Remove the template.
5. Attach the L-shaped bracket with six (6) holes to the top/front of the
humidifier, so that the vertical wall is toward the reservoir.

17
CONTRACTOR
6. Adjust the water level. (See #8 in “How To Maintain a Skuttle Steam
Humidifier”, pg. 25.)
7. Slide the humidifier into the hole, making sure all wires and con-
nections are outside the duct.
8. Align the holes and secure the humidifier to the transition.

18
Connecting to a Power Source
When selecting a location for mounting the humidifier, make sure that
electrical connections can be made without the use of an extension cord.
CAUTION: The electrical receptacle must be rated at the correct
voltage and amperage, or hazardous conditions could result.
• Models 60-1 and F60-1 require a receptacle rated at 120 VAC, 15
amperes (NEMA configurations 5-15R).
• Models 60-2 and F60-2 require a receptacle rated at 240 VAC, 15
amperes (NEMA configurations 6-15R).
All wiring must comply with local codes and ordinances.

CONTRACTOR
Wiring the Air Mover
Figure 5 - Wiring diagram for Model 60-1 and F60-1 (120 volt) Steam Humidifiers.
Figure 6 - Wiring diagram for Model 60-2 and F60-2 (240 volt) Steam Humidifier.
Due to the high-capacity design of Skuttle Steam Humidifiers, it is nec-
essary that the furnace air mover be wired to function in cooperation with
the humidifier’s operation (see Figures 7, 8A and 8B, pgs. 20 & 21). To
achieve synchronization and prevent condensation inside the duct-work,
Skuttle has incorporated a thermostatic sensor for low-voltage applica-
tions into the design. The sensor/switch, attached to the humidifier wall,
is a sealed unit, preset to turn on when the humidifier’s water temperature
reaches 170°F, and to turn off when it falls below 120°F.
NOTE: Even if the heating and cooling system’s fan switch is left in the
“ON” position, it cannot be assumed that the homeowner will allow
constant operation of the fan motor. Therefore, it is necessary to install
a fan sail switch or a Skuttle A50 relay, mounted in the system supply
duct and wired into the low-voltage humidistat circuit. This prohibits the
humidifier from operating if the furnace fan fails to function or if it is man-
ually turned off.
19

20
CAUTIONS: Be careful not to activate, deactivate or alter the normal
functions of the home’s heating and cooling system, except to coordinate
the systems’ air moving operation with the humidifier.
If these precautions are not heeded, hazardous conditions could result,
causing serious damage to the heating and cooling system, and to the
home.
Figure 7 - Typical wiring for a humidifier in a dual-speed air mover application with
air conditioning.
Figure 8A - Typical wiring for a humidifier in a single-speed air mover application
without air conditioning (switching through an external relay).
/