Page is loading ...
1
+
Contents
What is the File Utility?.........................................................................2
Using File Utility as a Plug-in software (Windows) ..............................4
Starting the File Utility..........................................................................5
Main Window .........................................................................................5
Menu Bar................................................................................................6
Tool Bar..................................................................................................8
MIDI Device Setup .................................................................................9
MIDI Port Setup (Windows)(When starting File Utility as a stand-alone application)
...9
OMS Settings (Macintosh)...................................................................................10
File Utility Setup...................................................................................................12
Browsing and Editing Files/Folders ....................................................13
Receiving Files (instrument/media to computer) ...............................18
Transmitting Files (computer to instrument/media) ..........................19
Utility Function....................................................................................20
Converting SMF Data...........................................................................22
Renaming SMF Files ............................................................................23
Changing the Names of all Selected Files (Windows)........................24
Saving a File List (Windows) ...............................................................26
Error Messages....................................................................................27
• Copying of the software or reproduction of this manual in whole or in part by any means is expressly forbidden
without the written consent of the manufacturer.
• The software and this owner’s manual are exclusive copyrights of Yamaha Corporation.
• Copying of the commercially available music sequence data and/or digital audio files is strictly prohibited except for
your personal use.
•Yamaha makes no representations or warranties with regard to the use of the software and documentation and cannot
be held responsible for the results of the use of this manual and the software.
• The screen displays as illustrated in this Owner’s Manual are for instructional purposes, and may appear somewhat
different from the screens which appear on your computer.
• Click on the red-colored text to jump to the related item in this manual.
• The OMS
®
and
in this Owner’s Manual are the trademarks or registered trademarks of Opcode Systems,
Inc.
• The company names and product names in this Owner’s Manual are the trademarks or registered trademarks of their
respective companies.
Important
Some functions of the File Utility cannot be used depending on the particular MIDI instrument
connected to your computer. For details, refer to the Installation Guide of the MIDI instrument.
© 2002 Yamaha Corporation. All rights reserved.
This owner’s manual assumes that you are already familiar with basic Windows/Macintosh operations. If you are not,
please refer to the owner’s manual which came with your Windows/Mac OS software before using File Utility.
For information about hardware requirements, the interconnection of devices and the installation of the File Utility
software, refer to the separate “Installation Guide” as well as the Owner’s Manual for the respective MIDI device.
2
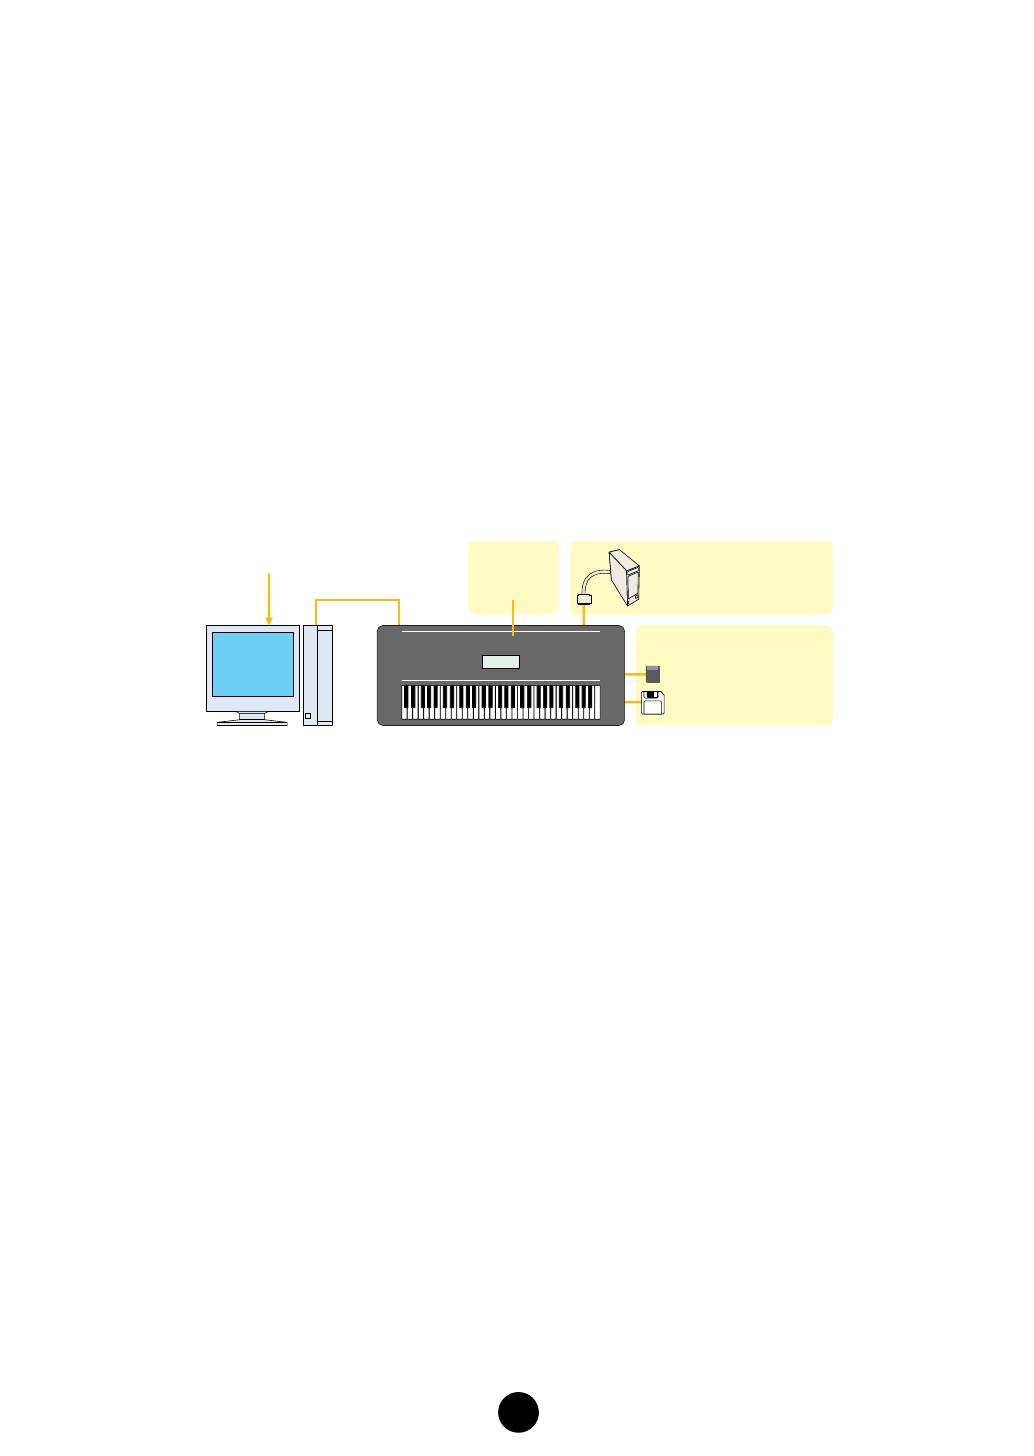
What is the File Utility ?
File Utility is a convenient and versatile program that lets you use a computer to access and organize data
stored on compatible Yamaha instruments, including various synthesizers and Clavinovas. With File Utility,
you can transmit data from the computer directly to storage devices installed or connected to your particular
MIDI instrument (as listed below). You can also save data contained on the relevant storage device to your
computer.
Storage devices and media compatible with File Utility:
• Storage devices built into or installed to the MIDI instrument
If the compatible MIDI instrument is equipped with pre-installed or optionally installed floppy disk,
memory card, and/or hard disk drives, File Utility can access them.
• Storage devices connected to the MIDI instrument
If the compatible MIDI instrument is equipped with a SCSI terminal to which SCSI storage devices (such
as memory card, hard disk and CD-ROM drives) are connected, File Utility can access them.
• Internal memory of the MIDI instrument
If the MIDI instrument is equipped with Flash ROM handled as Memory Drives, the File Utility can access
them.
Note that Drives which can be handled by the File Utility may differ depending on the MIDI instrument.
n
Built-in or optionally installed storage devices may differ depending on the MIDI instrument.
n
For details about how to connect your particular MIDI instrument to the computer, refer to the owner’s manual of
the relevant instrument.
File Utility can perform the following eight functions.
●
Browsing or editing the files/folders on the media handled by the MIDI
instrument
• Files or folders (directories) on each media can be viewed and manipulated from your computer, just as
if they were on the computer itself.
• You can delete or rename files/folders on each device
(page 13)
.
• New files or folders (directories) can be created or moved on each device.
●
Copying files/folders between the media handled by the MIDI instrument
(if the MIDI instrument can handle more than one storage device)
●
Transmitting/Receiving files between the media handled by the MIDI
instrument and the computer
You can transmit data from your computer to the media handled by the MIDI instrument, and vice versa.
●
Transmitting/Receiving file information between the media handled by the
MIDI instrument and the computer
You can retrieve file/folder directory information of the relevant media to your computer, and transmit that
information to another media handled by the MIDI instrument.
Memory Card (SmartMedia™)
inserted to the instrument's card slot
Built-in or optionally
installed storage devices
SCSI storage devices, etc.
Internal Memory
Drive
Floppy disk inserted to the
instrument's disk drive
MIDI instrumentComputer
File Utility should be installed.
USB cable, etc.

3
●
SMF Format Conversion
You can convert Standard MIDI Files saved on your computer from Format 1 to Format 0 so that they
can be played back on your MIDI instrument. This function applies only to the files on the computer
regardless of whether connected or not.
●
Renaming SMF files (Windows only)
This special batch operation lets you change the names of SMF files to the corresponding song names
contained (as Meta Events) in those SMF files. This function applies only to the files on the computer.
●
Adding a number to the top of the name of all the selected files on the media
handled by the MIDI instrument, according to the current order of the files
(Windows only)
●
Creating and storing a list of the files/folders located on the specified folder
on the media handled by the MIDI instrument as a text file (Windows only)
Important
Some File Utility functions may not be available, depending on your particular MIDI instrument. For
details, refer to the Installation Guide of the MIDI instrument.
4
Using File Utility as a Plug-in Software
(Windows)
You can start the File Utility software as either a stand-alone software or a plug-in application in the
Open Plug-in Technology compatible application.
Refer to the owner's manual of the client application (sequencer, etc.) for details on using the File
Utility as a plug-in software.
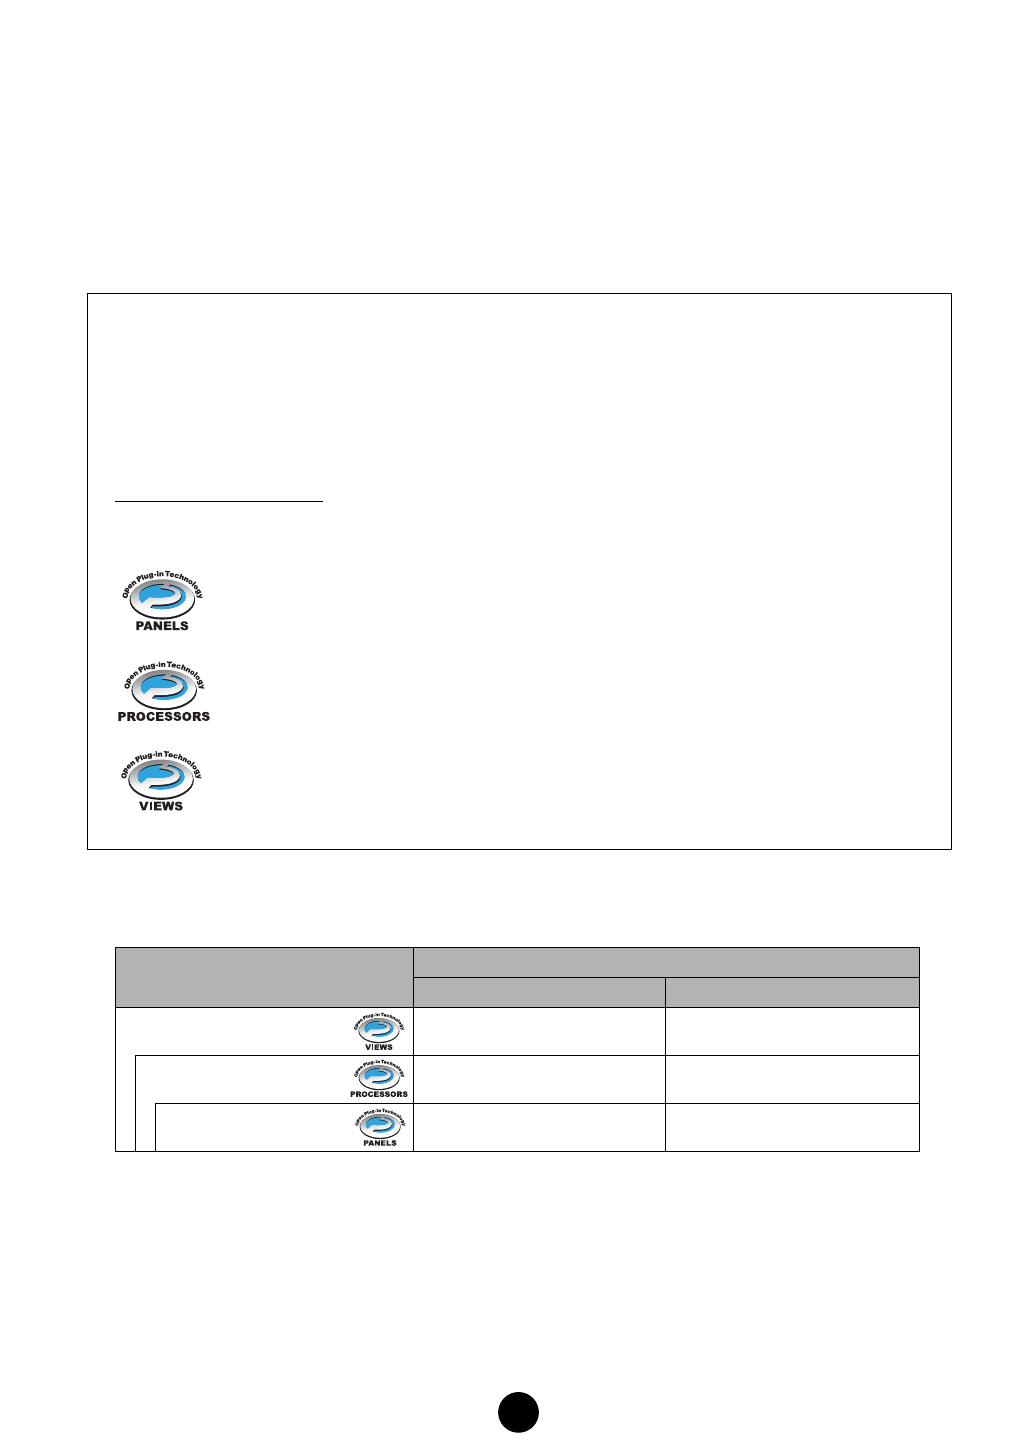
About Open Plug-in Technology
Open Plug-in Technology (OPT) is a newly developed software format that allows control over
MIDI devices from a music software sequencer. For example, this allows you to start up and
operate various parts of your music system, such as plug-in board editors, and mixing control
editors – directly from an OPT-compatible sequencer, without having to use each separately.
This also makes it unnecessary to set MIDI drivers for each application, streamlining your music
production system and making all operations more convenient and seamless.
About the OPT Levels
The client application and its compatibility with OPT can be divided into three levels, as shown
below.
Level 1
– OPT Panels provides basic support for opening and displaying OPT control
panels that can transmit data via the clients’ external MIDI ports. Typically this will allow
basic hardware editor control panels to operate properly.
Level 2
–
OPT Processors provides support for real-time MIDI processors and panel
automation. Typically this will allow both real-time and offline MIDI effects (e.g.
Arpeggiators, transposers etc.) to operate properly and supply automation to OPT panels.
Level 3
– OPT Views provides support for edit views and MIDI processors/panels that
require direct access to client sequencer storage structures. Typically this will allow
sophisticated MIDI edit views to be supported (e.g. List editors, Auto Accompaniment,
Data Checkers etc.).
OPT Level Implementation for the File Utility
This chart shows the OPT-compatibility of the File Utility.
n
Certain operations may not work as expected if there is no corresponding function in the client
application (sequencer, etc.). The highest level of implementation for the client application is indicated
in the OPT logo (which appears along with the version information in the application).
OPT levels of the client application
File Utility operation
Operation support Operation limits
VIEWS (Level3)
Yes None
PROCESSORS (Level2) Yes None
PANELS (Level1) No —

5
Starting the File Utility
Once you have connected your MIDI instrument (e.g., the Yamaha MIDI instrument) to your computer
and installed the File Utility software, you are ready to start using the File Utility.
n
An error message appears if your computer’s MIDI driver has not been properly installed or if your computer and
MIDI instrument are not connected correctly. For details about error messages, see page 27.
Windows
Click [Start], go to Program Files and select “File Utility” from “YAMAHA OPT Tools.”
The MIDI Setup toolbar appears, then the Main window opens.
n
Refer to the owner's manual of the client application for details about how to start the File Utility when using it as a
plug-in software.
Macintosh
n
If you are using the File Utility on a Macintosh computer, open the “Chooser” from the Apple menu and turn off
“AppleTalk.”
n
If you use a sequencer software together with the File Utility, turn MIDI Thru off.
Open the “YAMAHA Tools” folder, then open “File Utility for Macintosh” and double-click the “File
Utility” icon. The Main Window following the opening display appears.
Main Window
MIDI Setup toolbar
Main window
Menu bar
Status bar
Status bar
Windows
Macintosh
Toolbar
Detailed window
Device list
Toolbar
List/Icon window

6
Menu Bar
■
File
1
New Folder
..........................Creates a new folder in the selected directory.
2
Open
....................................Displays the Open (file open) dialog from which you can select the desired
file.
3
Delete
...................................Deletes the currently selected file.
4
Rename
...............................For changing the name of the currently selected file.
5
Properties
............................Displays the Property dialog of the currently selected file.
6
Exit (Quit)
............................Quits the File Utility.
■
Edit
1
Cut
........................................Cuts (deletes) all selected characters and moves them to the clipboard.
2
Copy
.....................................Copies all selected characters or files to the clipboard.
3
Paste
....................................Pastes the contents of the clipboard to the destination.
4
Select All
.............................Selects all the files and folders in the currently selected directory.
■
Setup
1
MIDI Port Setup
..................Opens the “MIDI Ports Setup” window where you can specify your
computer’s “MIDI IN Port” and “MIDI OUT Port,” which are used to
communicate with your MIDI instrument.
2
File Utility Setup
.................Opens the “File Utility Setup” window where you can specify the settings
necessary for MIDI data transmission/reception. See page 12 for details.
3
OMS Port Setup...
...............Opens the “OMS Port Setup” window. See page 11 for details.
4
OMS Studio Setup...
...........Opens the “OMS Studio Setup” window. See page 11 for details.
5
OMS MIDI Setup...
...............Opens the “OMS MIDI Setup” window. See page 11 for details.
Windows
Macintosh
1
2
5
3
4
1
2
5
3
4
6
6
Windows
Macintosh
1
2
3
4
1
2
3
4
Windows
Macintosh
1
2
3
4
5
2

7
■
View
1
View Form
............................Determines how the files in the File List window are displayed. Select
“Icon” or “List.”
2
Sort (Arrange)
.....................Determines how the Files in the List are arranged. Select “Name” or “Type”
or “Size” or “Date.”
3
ToolBar
.................................Switches the toolbar on or off.
4
StatusBar.............................Switches the status bar on or off.
5 Refresh All Windows..........Refreshes the information of all the media, folders, and files indicated in the
window.
6 Refresh Selected Items......Refreshes the information of the selected device, media, folder, and file.
7 View Option.........................Opens the View Option dialog. You can determine whether all the files are
displayed or only the files supported by Yamaha MIDI devices are
displayed.
■ Tool
1 Send Path Information .......Sends the path (directory) information to the MIDI instrument.
2 Convert SMF Format..........Opens the Convert SMF Format dialog. See page 22 for details.
3 Rename SMF Files..............Opens the Rename SMF Files dialog. See page 23 for details.
4 Rename All Files.................Adds a number to the top of the name of all the selected files, according
to the current order of the files. See page 24 for details.
5 Save File List.......................Creates and stores a list of the files/folders located on the specified
folder as a text file. See page 26 for details.
n Functions 3, 4 and 5 above are available only for computers running Windows.
■ Help
1 Manual (Help...)...................Opens the PDF manual.
2 Version.................................Indicates the current version of the File Utility.
Windows
Macintosh
1
2
5
3
4
1
2
5
3
4
6
6
7
7
Windows
Macintosh
1
2
1
2
3
4
5
Windows
Macintosh
1
2
1

8
Toolbar
1 Computer icon....................Drag a file and drop it to this icon. If you double-click this icon, the Work
directory set in the File Utility Setup dialog appears.
2 Refresh All Windows..........Refreshes the information of all the media, folders, and files indicated in the
window.
3
Refresh Selected Items
........Refreshes the information of the selected device, media, folder, and file.
4 File Utility Setup .................Specifies the MIDI driver settings required for data communication. Same
as “File Utility Setup” in “Setup” menubar.
5 New Folder..........................Creates a new folder in the currently selected directory. Same as “New
folder” in “File” menubar.
6 Open ....................................Opens the folder or volume (media). Same as “Open” in “File” menubar.
7 Properties............................Indicates the properties of the currently selected file, folder, and volume.
8 Delete...................................Deletes the currently selected file.
9 Cut........................................Cuts the currently selected data and copies it to the clipboard.
) Copy.....................................Copies the selected data to the clipboard without changing. In Windows,
the file contents can be copied to buffer.
! Paste....................................Pastes all the data in the clipboard to the specified destination. In Windows,
the file in buffer is duplicated.
@ To Upper Folder ..................Available only in Windows. Click this to go to the next highest folder.
# Change View Form .............Determine whether the files are indicated in a list or as icons. Same as
“View Form” in “View” menu bar.
Windows
Macintosh
123456789)!@#
1234 #567 8 9) !
9
MIDI Device Setup
You will need to specify the MIDI device drivers through which your computer will communicate with your
MIDI instrument (such as the MIDI instrument). If you are using a USB port, you should install the necessary
Yamaha USB MIDI driver. If you are using a COM port, you should install the necessary Yamaha CBX driver.
For sake of example in the explanations below, the MIDI instrument is connected to the computer via USB.
n If you are using a Macintosh, refer to the section “OMS Settings” on page 10.
MIDI Port Setup (Windows)
(When starting File Utility as a stand-alone application)
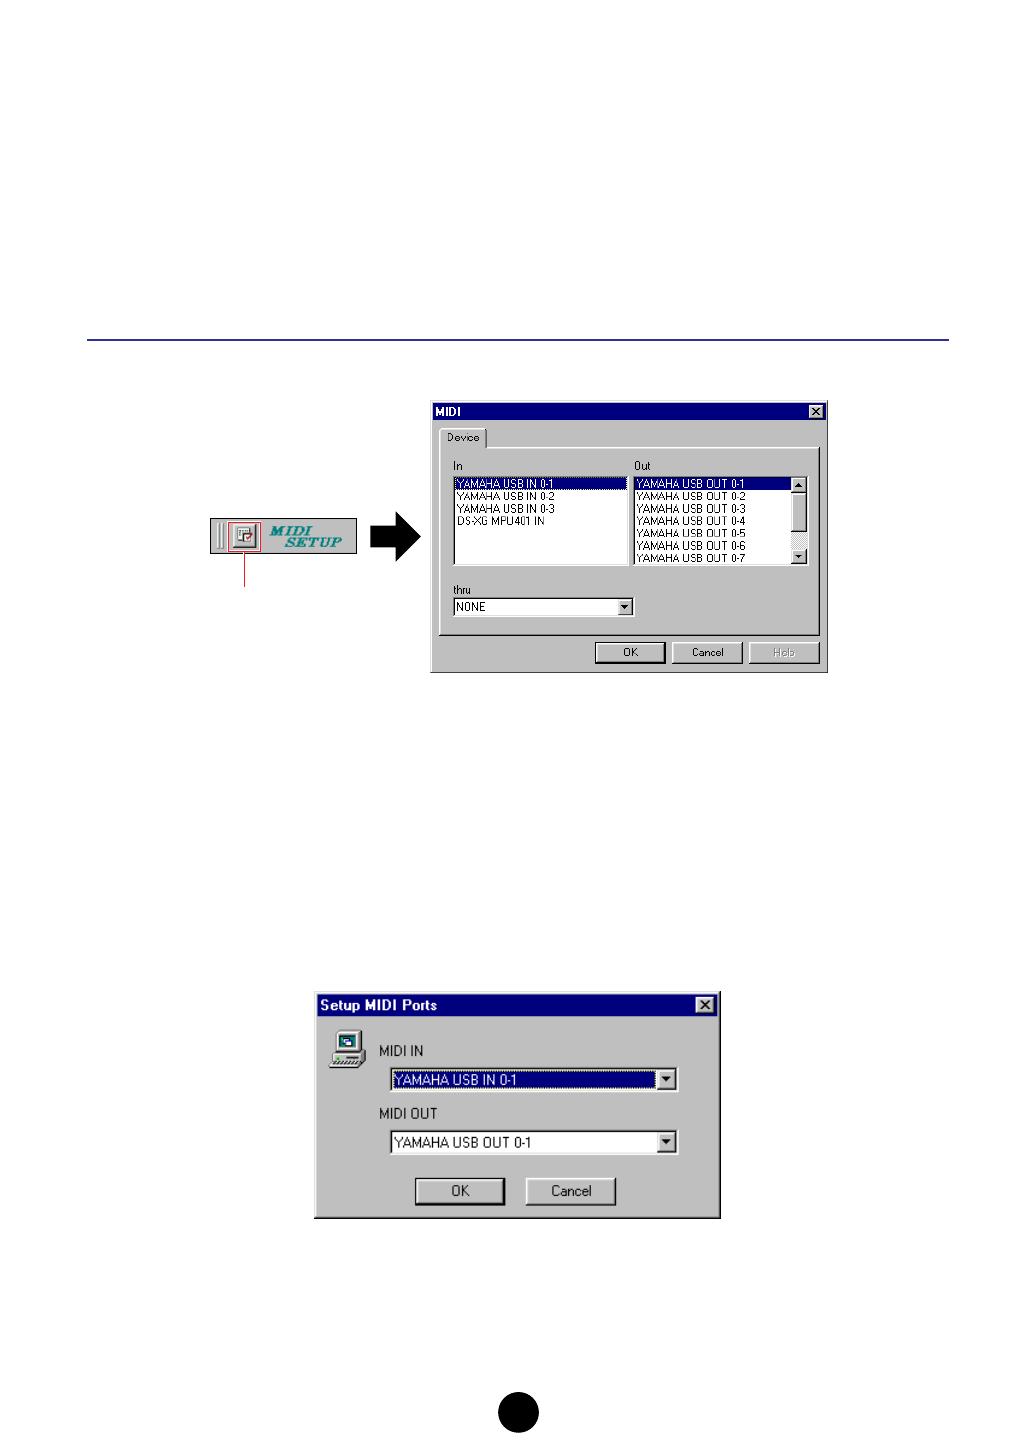
1. Click the [Setup] button to open the “MIDI Setup” window.
n Regarding the settings here, refer to the owner's manual of the MIDI instrument or the client application software
(if starting the File Utility as a plug-in application in the OPT).
2. Click the [▼] button at the right end of each box and select the driver as follows.
MIDI In .................................Select “YAMAHA USB IN 0-1.”
MIDI Out 1 ...........................Select “YAMAHA USB OUT 0-1.”
MIDI Out 2~4 .......................Select nothing. Keep this box set to “NONE.”
MIDI Thru .............................Select nothing. Keep this box set to “NONE.”
3. Click the [OK] button to close the dialog and the setup becomes active.
4. Select “MIDI Port Setup” from the Setup menu.
The “Setup MIDI Ports” dialog box is displayed.
Setup button

10
5. Click on each of the [▼] buttons for the “MIDI IN” or “MIDI OUT,” and select the MIDI driver from the
drop-down list that is displayed.
● If the MIDI instrument’s USB terminal is connected directly to the computer’s USB port:
Select “YAMAHA USB IN 0-1” for the “MIDI IN,” and “YAMAHA USB OUT 0-1” for the “MIDI OUT.”
n For information about how to install Yamaha USB MIDI Driver, refer to the Installation Guide manual.
● If the MIDI instrument’s MIDI ports are connected to the computer via a MIDI interface:
Select “YAMAHA CBX Driver” for the “MIDI IN,” and “YAMAHA CBX A Driver” for the “MIDI OUT.” Refer
to the owner’s manual of your MIDI interface.
6. Click [OK] to close the dialog and the setup becomes active.
OMS Settings (Macintosh)
The File Utility software uses OMS (Open Music System) for MIDI input/output. To use the File Utility
software, OMS must be installed beforehand. For sake of example in the explanations below, the MIDI
instrument is connected to the computer via USB.
n For information about installing OMS, refer to the separate Installation Manual.
About OMS
File Utility uses the OMS (Open Music System) to transfer MIDI data to an external MIDI device. OMS is a system
driver that goes in the Mac OS System folder, and is designed to manage the MIDI data stream (input & output) in a
computer, to enable MIDI data transfer between MIDI software and hardware attached to the computer. OMS is a de
facto standard of the MIDI environment under the Mac OS, and various music software manufacturers have released
OMS-compatible sequencers and other software.
OMS has the following merits:
• As OMS-compatible MIDI applications communicate with various MIDI devices via OMS, it is
no longer necessary for you to set up multiple MIDI drivers for those applications. Thus, you
can avoid conflicts between different drivers with the same purpose (MIDI control).
• Once a Studio Setup is read in OMS, any OMS-compatible application will be aware of it, even
if you need to reconfigure the routing of the MIDI data stream or change the current Studio
Setup. OMS-compatible applications will commonly recognize the new configuration.
•You can have different Studio Setups to choose one from, to switch to a different MIDI routing
(patches between MIDI devices and software) fast and easily.
• Every time the OMS Setup application is opened, any MIDI device connected to the computer
is automatically detected, and its icon appears with a current MIDI status (channel number,
port number, patches, etc.). Once devices are properly configured with OMS Setup, you don’t
need to worry about the status.
n For more information about OMS features, see the READ ME file included with OMS.

11
Setting up OMS
The procedure below assumes a MIDI instrument is connected to the computer via USB. The setup file for
the MIDI instrument and the computer is provided on the CD-ROM supplied with the MIDI instrument. Copy
the setup file located in “OMS Setup for YAMAHA” in the OMS folder to your computer. For details about the
name of the Setup file, see the owner’s manual (Installation Guide) of the MIDI instrument.
1. Make sure the USB terminal of the MIDI instrument and the Macintosh USB port are properly connected.
2. Double-click the “OMS Setup” icon in the “OMS Application” folder.
3. Choose “Open” from the File menu and select the setup file for the MIDI instrument.
n If you are using a computer with no USB port (such as the conventional Power Macintosh series), use
the Modem port or Printer port with the serial MIDI interface.
4. Choose “Make Current” from the File menu. The setup for your MIDI instrument is now saved as the
current studio setup.
5. Choose “Quit” from the File menu to close OMS Setup.
n The File Utility is not compatible with versions of OMS earlier than 2.0.
OMS Port Setup
Having set up OMS, you now need to start up the File Utility and set the OMS ports.
1. Start up the File Utility by double-clicking its icon.
n If AppleTalk is enabled, you will get an alert message. Click “OFF.” It will take some time for AppleTalk
to be disabled.
2. Choose “OMS Port Setup” from the File Utility’s Setup menu, then select the port settings.
3. Click [OK] to close OMS Port Setup.
n The MIDI Thru function is not available in the File Utility. If you use another OMS application software
together with the File Utility, make sure that MIDI Thru is turned off on that software.
n Make sure that “Run MIDI in background” in the OMS MIDI setup dialog (called up from the Setup
menu) is checkmarked.
Select your MIDI instrument
Select your MIDI instrument
12
File Utility Setup
This lets you specify the directory that is to be indicated in the Device list in the Main window.
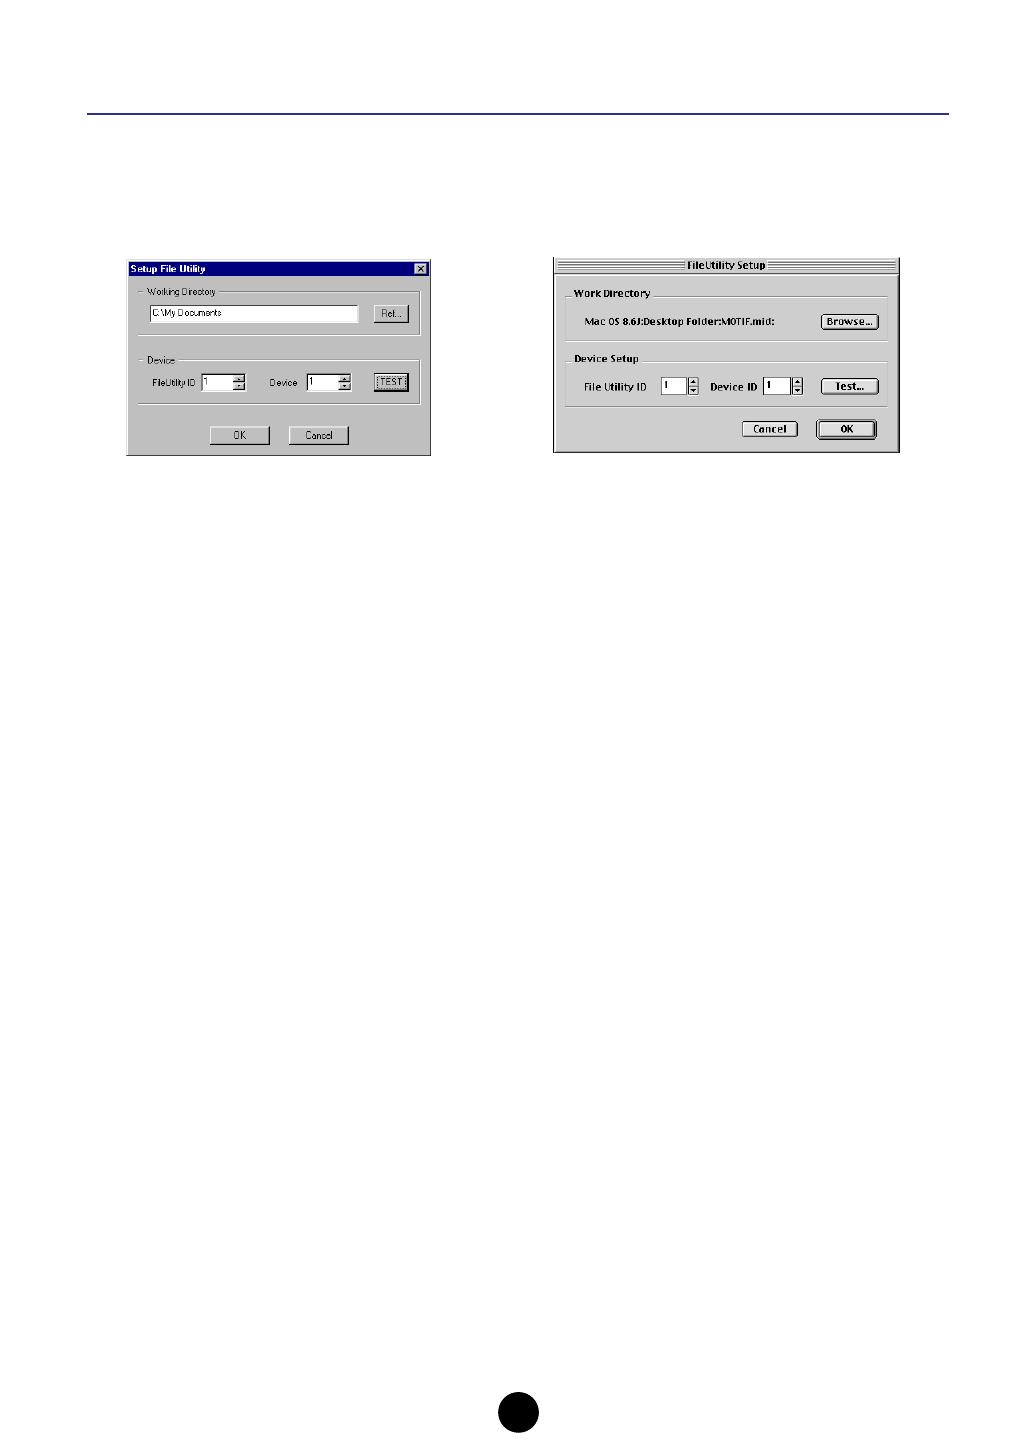
1. Select “File Utility Setup” from the Setup menu.
The following window appears.
2. Enter the File Utility ID number.
Enter the same number as the one specified in the instrument’s MIDI setup display.
n If the File Utility ID number is different from the one specified in the instrument’s MIDI setup display,
communication cannot be done.
3. Click the [TEST] button.
The File Utility checks whether the communication is done properly between the MIDI instrument and the
computer. If the communication test is successful, the Host name and the MIDI instrument’s version are
displayed.
n If an error message appears, check whether the connection and MIDI driver settings are appropriate.
4. Specify the Work Directory.
Click the [Browse] button to open the dialog and select the desired directory (folder).
When you drag the desired file/folder and drop it to the Computer icon, the file/folder will be saved to the
directory (folder) specified here.
5. Click the [OK] button to quit the File Utility Setup.
Windows
Macintosh
13
Browsing and Editing Files/Folders
File Utility gives you comprehensive control over the files on the relevant storage devices — letting you
delete files as well as change the file names or create new folders.
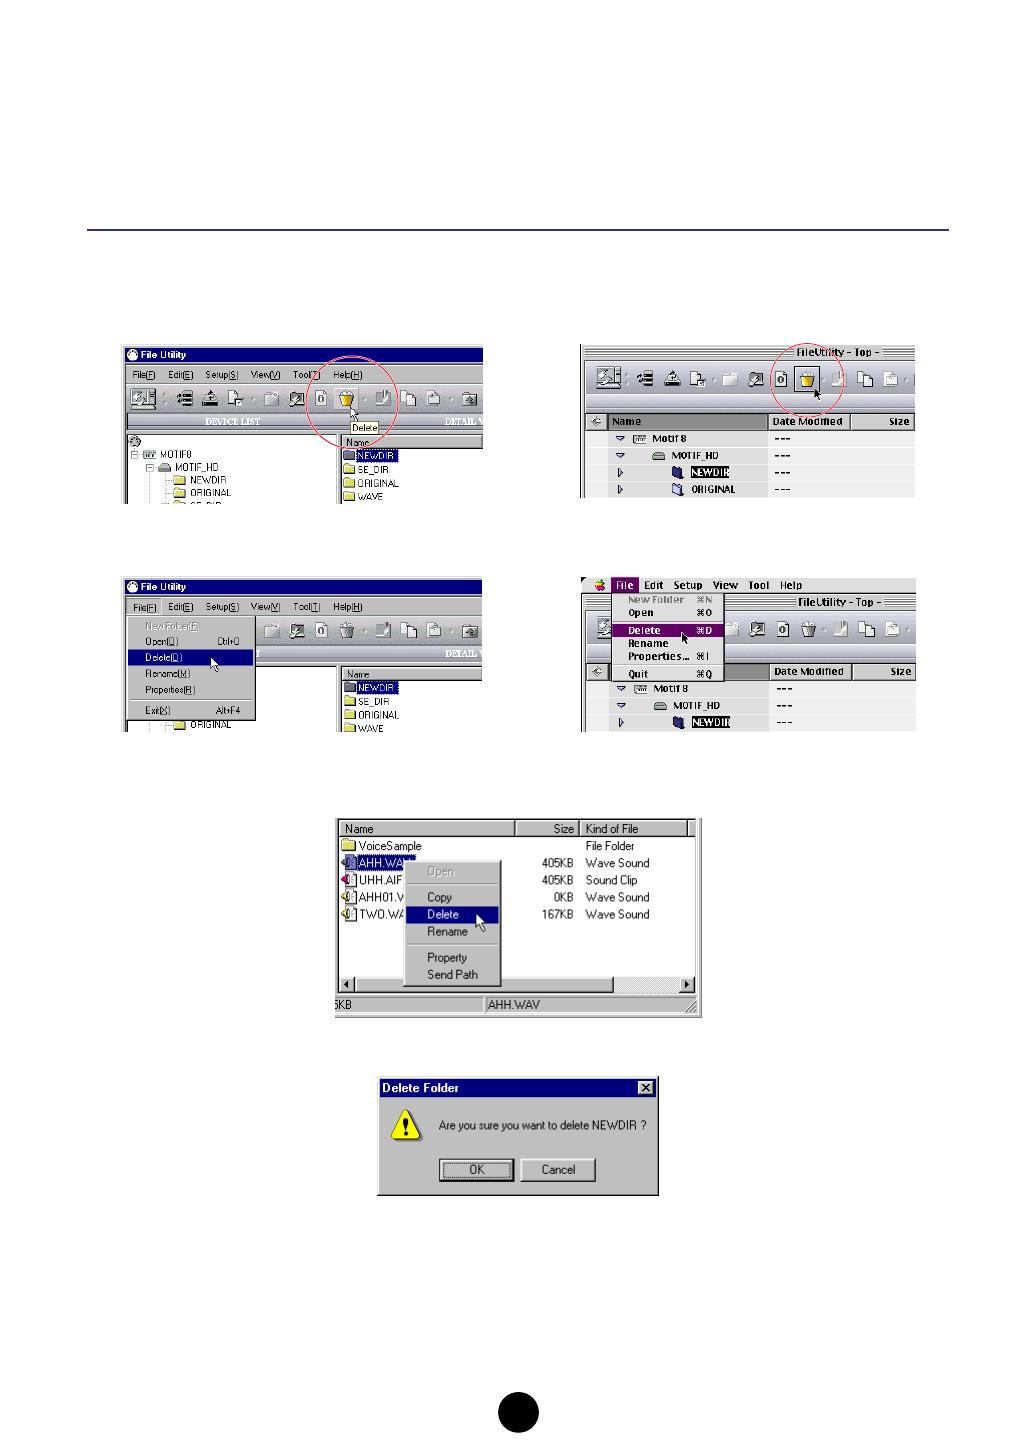
Deleting a file/folder
1. Select a file/folder to be deleted. The following three methods are available.
● Select a file/folder to be deleted and click the Delete icon from the toolbar.
● Select a file/folder to be deleted and select “Delete” from the file menu.
● Select a file/folder to be deleted, click the right mouse button with the mouse (if using a Macintosh
computer, click the mouse while holding the [control] key on the keyboard), and select “Delete” from the
pop-up menu.
2. Execute the Delete operation. The following confirmation display appears.
n If you select the folder that contains files, the confirmation display above appears. In this case, you can
delete all the files in the selected folders by clicking the [OK] button.
n The Volume cannot be deleted.
3. Click the [OK] button to delete the selected file and go back to the Main window. To abort the delete
operation, click the [Cancel] button.
Windows
Macintosh
Windows
Macintosh

14
Changing a name of a file/folder (Rename)
1. Select a file/folder to be renamed. The following three methods are available.
● Click a file/folder name to be changed to enter the text edit mode.
● Select a file/folder to be renamed and select “Rename” from the File menu.
● Select a file/folder to be renamed, click the right mouse button with the mouse (if using a Macintosh
computer, click the mouse while holding the [control] key on the keyboard), and select “Rename” from
the pop-up menu.
2. Enter the name by using the computer keyboard and press the [Enter] ([return] or [enter] in Macintosh)
key to actually change the file/folder name.
n On the Macintosh, file names can contain up to 31 characters.
n The Macintosh allows you to input special characters that are not available on MS-DOS or Windows
systems. However, since the MIDI instrument is not capable of recognizing these characters, errors
may result when using them.
When naming files and folders, we recommend that you use only lowercase letters and numbers.
Windows
Macintosh
Windows
Macintosh
15
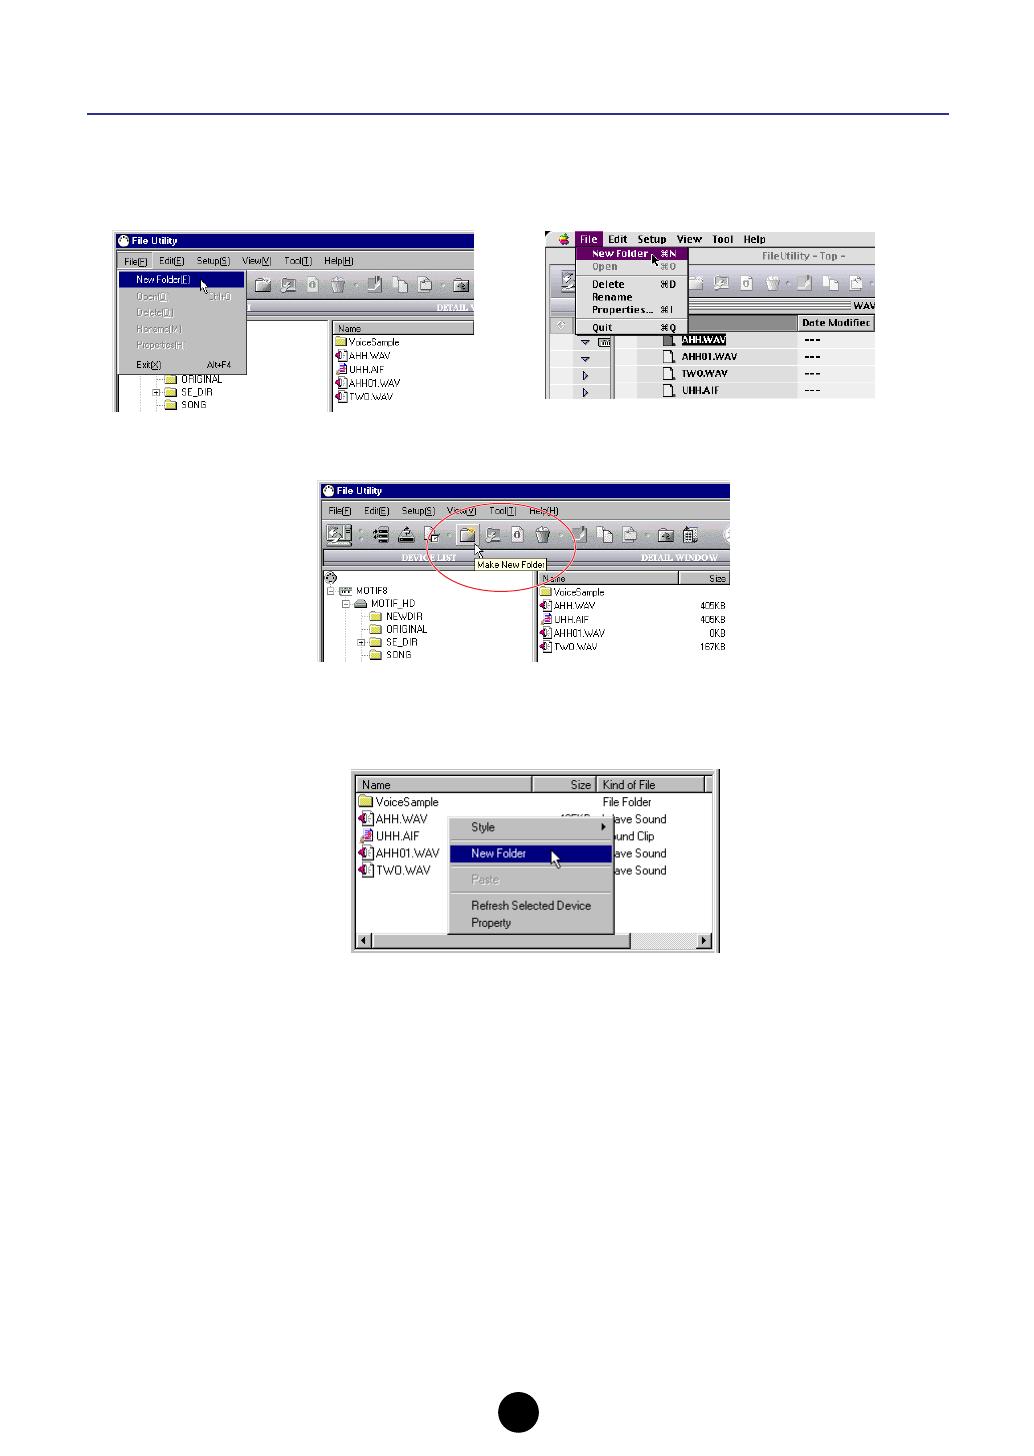
Creating a new folder
The following three methods are available.
● Enter the directory in which you wish to create a new folder and select “New Folder” from the File menu.
● Enter the directory in which you wish to create a new folder and click the New Folder icon button from the
toolbar.
● Enter the directory in which you wish to create a new folder and click the right mouse button with the
mouse (if using a Macintosh computer, click the mouse while holding the [control] key on the keyboard),
and select “New Folder” from the pop-up menu.
Windows
Macintosh

16
Copying files/folders
The following methods are available. These are the same as conventional copy operations on your
computer.
1. Copying files/folders between different volumes (media)
● Drag a file/folder to be copied and drop it to another volume icon or folder (destination).
n If you use a Macintosh computer, you can double-click the volume or folder to open the sub-window.
2-1 Copying the file/folder to another directory within a volume (media)
● Drag the desired file/folder while holding the [Ctrl] key ([option] key if you are using a Macintosh) and
drop it in the destination directory.
2-2 Duplicating the file/folder within a folder
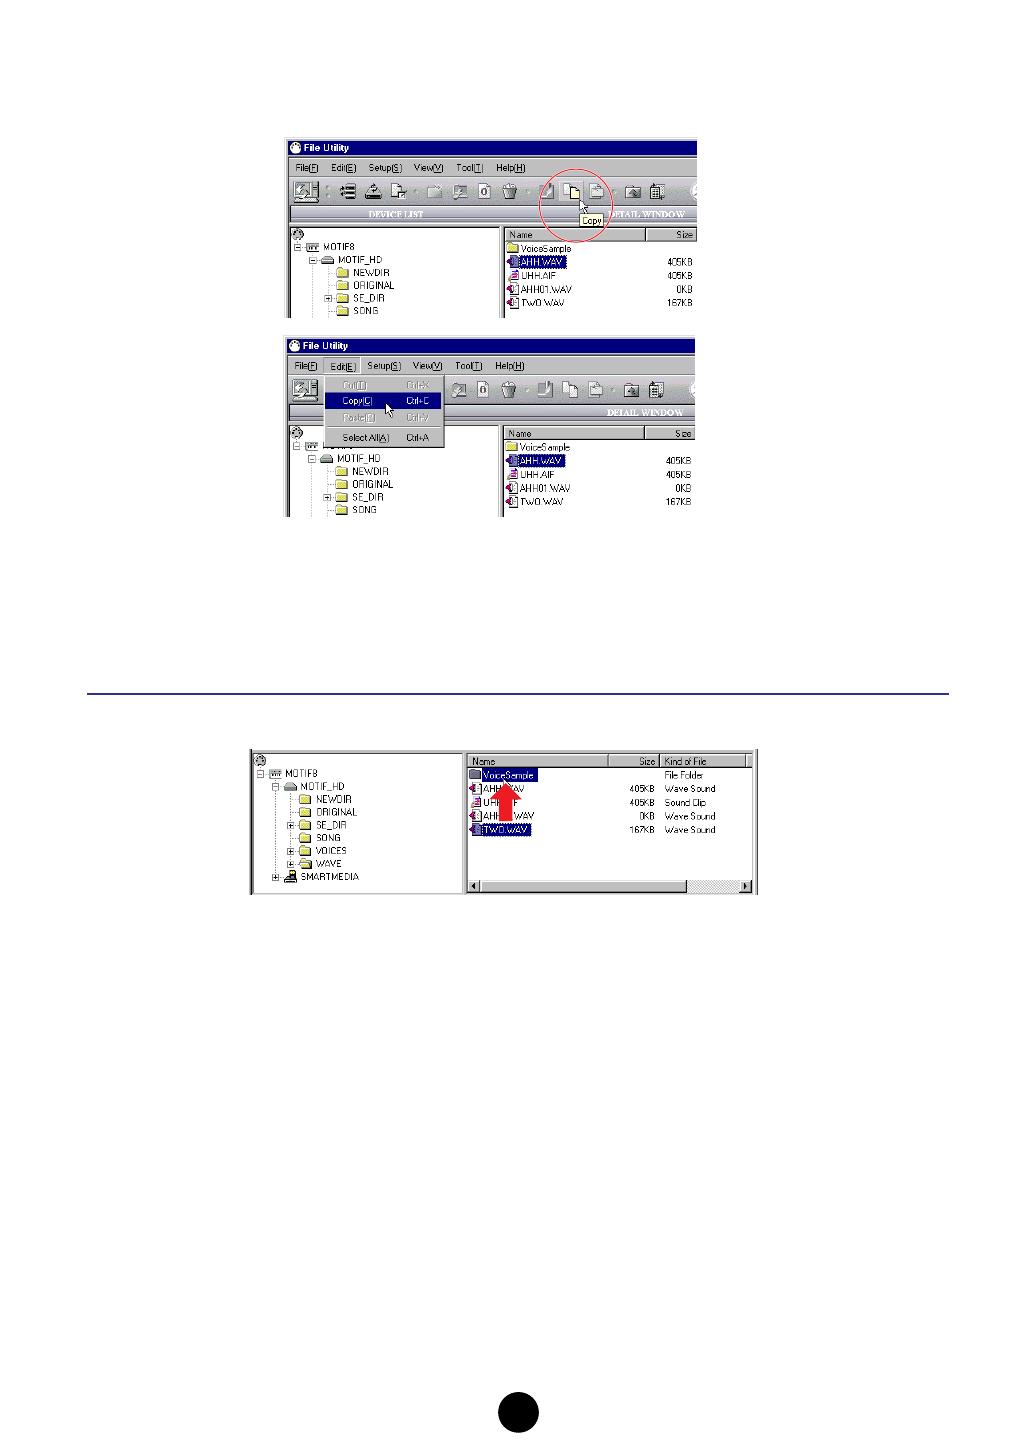
● Select a file/folder to be copied and click the right mouse button with the mouse and select “Copy” from
the pop-up menu. If using a Macintosh computer, select a file/folder to be copied while holding the
[control] key and select “Duplicate” from the pop-up menu.
Windows Macintosh
17
● Select a file/folder to be copied, click the Copy icon button in the toolbar or select “Copy” from the File
menu, and then execute the paste operation (Windows only).
n These two methods (available only for Windows) can be used to copy the files/folders to the other
folder.
n If using a Macintosh computer, the Copy icon button or “Copy” in the File menu can be used to edit text
when renaming the file or folder.
Moving files/folders
● To copy the file/folder to another directory within a volume (media), drag and drop the desired file/folder.
18
Receiving Files
(instrument/media to computer)
You can access data that is stored to media handled by the File Utility-compatible MIDI instrument (such as
synthesizers and Clavinovas) and directly save it to your computer. Moreover, you can do this without
having to make any panel settings on the MIDI instrument itself.
n Built-in or optionally installed storage devices may differ depending on the MIDI instrument.
1. Drag the desired file icon in the Main window and drop to the Computer icon or the desired
location.
If you are using a Macintosh computer, double-click the appropriate folder to open the sub-window, then
drag-and-drop the desired file to the Computer icon.
2. Data transfer from the MIDI instrument to the computer begins immediately (as long as there is no
problem in reading the file and recognizing the destination directory).
CAUTION
In Windows, errors may occur when performing certain operations to the destination files on computer, while
in the process of copying files from the MIDI instrument to the computer. To prevent this, make sure to follow
the instructions below:
• Do not close the window of the destination file (on the computer).
• Do not rename or delete the destination folder (on the computer).
• Once you’ve started a copy operation within Explorer by dragging and dropping a folder/file to a destination folder,
do not make any changes to the indication status of the file/folder within Explorer.
Receive
Memory Card (SmartMedia™)
inserted to the instrument's card slot
Built-in or optionally
installed storage devices
SCSI storage devices, etc.
Internal Memory
Drive
Floppy disk inserted to the
instrument's disk drive
MIDI instrumentComputer
USB cable, etc.

19
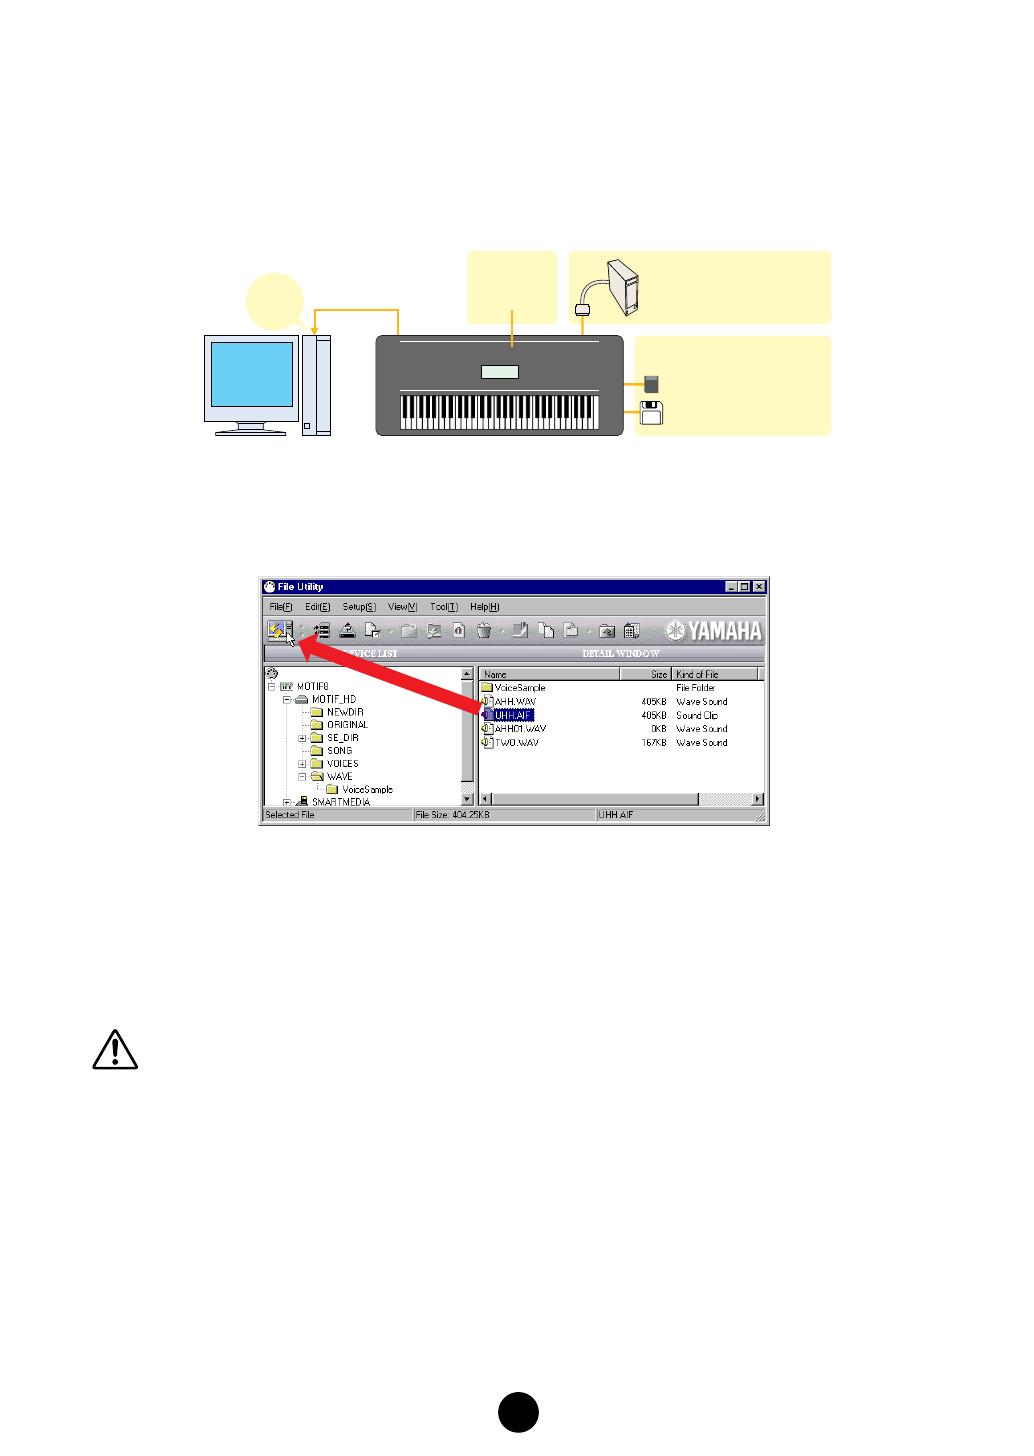
Transmitting Files
(computer to instrument/media)
You can directly transmit data from your computer to the desired media handled by the File Utility-
compatible MIDI instrument (such as synthesizers and Clavinovas). Moreover, you can do this without
having to make any panel settings on the MIDI instrument itself.
n Built-in or optionally installed storage devices may differ depending on the MIDI instrument.
1. Open the window (folder) that contains the file to be transmitted.
n Double-click the Computer icon at the left corner of the toolbar to open the directory specified in the
File Utility Setup dialog. To make your data organization chores easier, you may want to create a
special File Utility folder and save all your File Utility files there.
n If you use a Macintosh computer, you can double-click the volume or folder in the Main window to open
the sub-window.
2. Select a file to be transmitted from the window opened in step #1.
3. Drag a file and drop it to the desired location (directory) in the Main window in the File Utility.
You can drop it directly to the volume (media) icon.
4. Data transfer from the computer to the media handled by the MIDI instrument begins immediately (as
long as there is no problem in reading the file and recognizing the destination directory).
n Keep in mind that the time needed for this operation differs depending on the configuration and
specifications of your particular computer.
Transmit
Memory Card (SmartMedia™)
inserted to the instrument's card slot
Built-in or optionally
installed storage devices
SCSI storage devices, etc.
Internal Memory
Drive
Floppy disk inserted to the
instrument's disk drive
MIDI instrumentComputer
USB cable, etc.
20
Utility Function
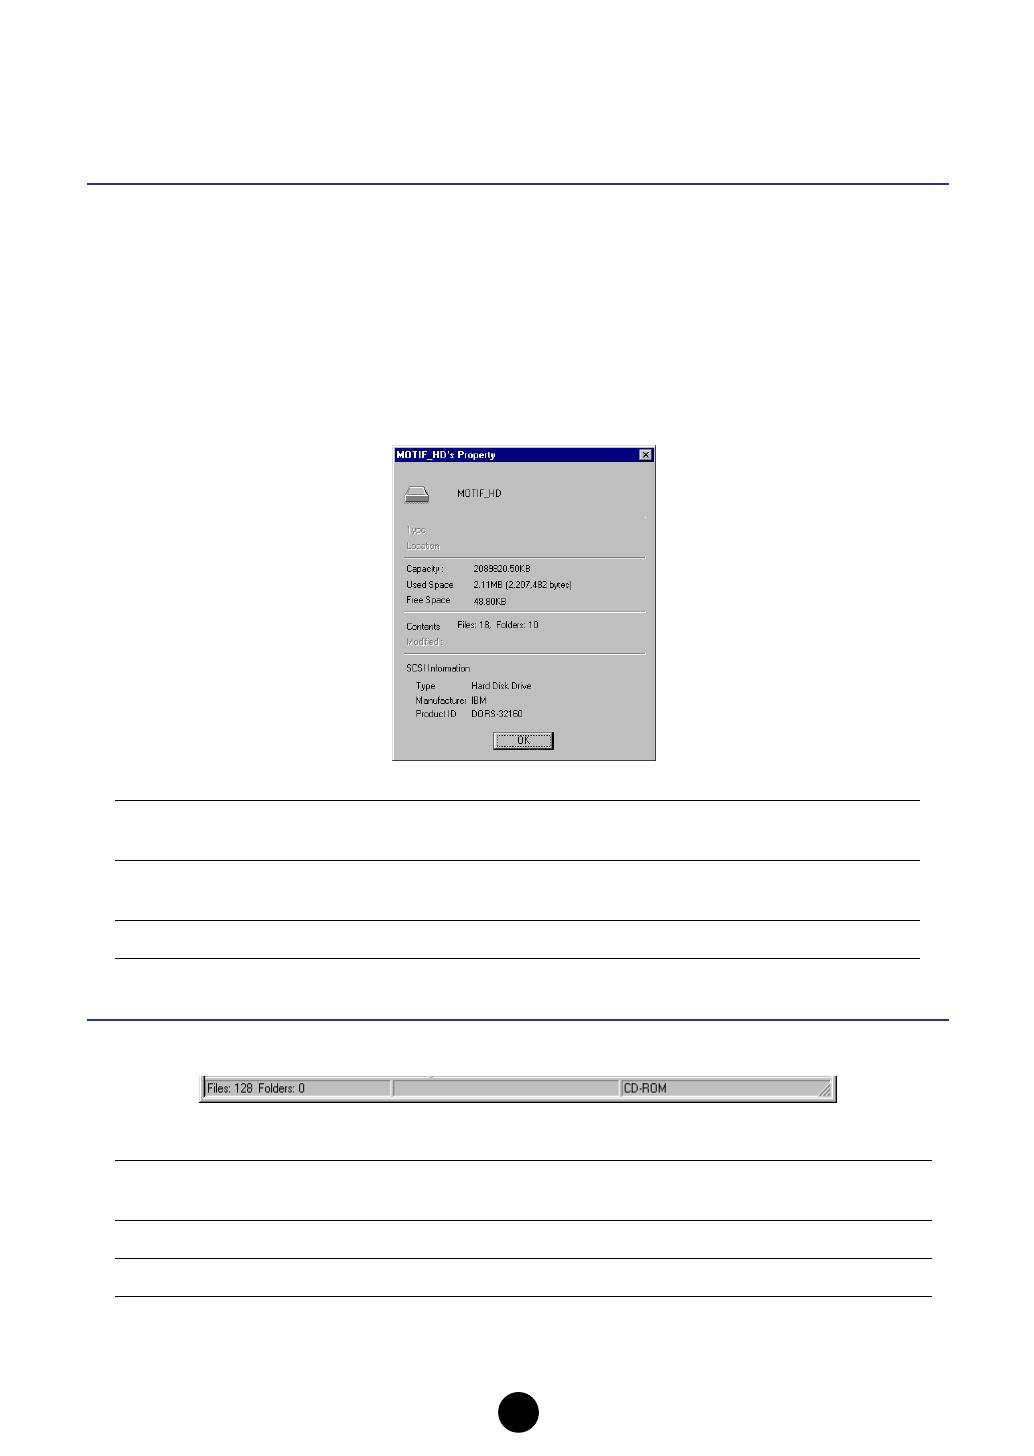
Properties
1. Select the media (Memory card or SCSI device), file or folder from the Main window.
2. Open the Properties dialog, using one of the following three methods.
● Select “Properties” from the File menu.
● Click the Properties icon button.
● Select a media/file/folder and click the right mouse button with the mouse (if using a Macintosh computer,
click the mouse while holding the [control] key on the keyboard), and select “Properties” from the pop-up
menu.
Properties dialog
Status Bar
This indicates basic information of the currently selected media, file, folder.
When selecting the volume
(media)
Name, available memory size, used memory size, unused memory
size, number of folders, number of files, SCSI information
When selecting a folder
Name, type, path, amount of the contained files (in bytes), number
of files, number of folders
When selecting a file
Name, type, path, file size
Left Center Right
When selecting the volume
(media)
Number of files,
folders
— Volume name
When selecting a folder
— Folder size Folder name
When selecting a file
— File size File name
/