Page is loading ...

1 2 3 4
8
7
6
5
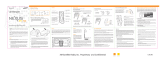
Step 2: Install the vent or swivel mount
You can use either the vent mount or the swivel mount for your
Xpress
RC
depending on your particular situation.
Installing the vent mount
1 Locate a vent with horizontal slats sturdy enough
to hold your XM cradle and radio.
2 Adjust the clamps to t your vent.
3 Snap the mount onto the vent.
To remove, push the mount into the vent, then lift up.
You can adjust this screw
to adjust the tension of the
mount with a screwdriver.
TIP! Always be careful to include enough slack in your cable to accommodate
open doors or trunk lids. Use things typically found around the home, like
electrical tape, to secure cables in areas so that hinges do not pinch the cable
with the door. Hide any excess cable in the trim.
If you placed the XM antenna on the front
of the vehicle, route the cable across the
top of the windshield. Gently pry up the
rubber weather seal and tuck the cable
underneath. Follow the weather seal
down to the door jam. Tuck the cable into
the door jam and up to the dash or under
the carpet to the car cradle as shown.
If you placed the XM antenna on the
rear of the vehicle, route the cable
under the weather seal of the rear
window. Route it into the trunk and
through any existing wire passages or
cargo passages to the rear passenger
compartment. Tuck the cable under the
door jam trim or under the carpet to
the radio as shown.
5-way navigation knob
• Turn the knob to scroll through a list.
• Press the center of the XM button to make a selection.
• Press the edge of the XM button to select display, jump, or .
Toggle right Toggle left Toggle up
Toggle down
Press center button
(XM button)
Vehicle Installation
Step 1: Mount the XM Antenna
1 Choose the best location for your XM
antenna considering your own
personal situation. Pay particular
attention to any accessories that you
may have like luggage racks and how
frequently you may use them.
The XM antenna contains a strong magnet which
will stick to any metal parts of your vehicle.
Magnet
Xpress
RC
functions
60-Minute Replay Buttons
Pause and replay up to 60
minutes of live XM broadcast.
Power Button
Display
Customize the way you view
content on the display
Left and Right Arrows
Search for channels by
category.
5-way Navigation
Knob
Previews channels; also selects
various menu options.
Menu
Access advanced features
and configuration options.
XM Button
Confirms selection for
channel and menu items, also
press and hold to GameSelect,
to TuneSelect or to save a song.
Fav
Choose among direct
channel entry, favorite
channels, and SongSaver
mode.
Jump
Switches between
current channel and
previous channel.
Info
Displays either your
personal stock or info
extras information.
Number Keys
Enter a channel
directly, select your
favorite channels, or
access songs saved
in SongSaver.
WARNINGS:
When using this product it is always important to keep your eyes on the road and hands on
the wheel. Not doing so could result in personal injury, death, and/or damage to your Xpress
RC
Receiver, accessories, and/or to your vehicle or other property.
Xpress
RC
should be placed in your vehicle where it will not interfere with the function of
safety features, e.g., deployment of airbags. Failure to correctly place Xpress may result in injury
to you or others if the unit becomes detached during an accident and/or obstructs the deploy-
ment of an airbag.
What’s in the Box?
8
5
2
7
4
1
9
6
3
mute
info
menu
display
0
jump fav
+
Xpress
RC
Car Cradle
Remote Control
XM Car Antenna
Swivel Mount
Swivel Mount
Preparation Kit
Car Power Adapter
Swivel Mount
Vent Mount
Extra Adhesive
Pad
Installing the swivel mount
CAUTION: The adhesive used with the swivel mount may make it dicult to remove. Do not
install this mount on leather surfaces and make sure the air temperature is at least 60°F (15°C).
1 Locate a at surface for the mount. Make sure there is ample room
for the XM cradle and radio when installed.
2 Clean the surface with the preparation kit and let it dry thoroughly.
3 Peel o the adhesive liner. Position, press, and hold the swivel mount
in place for 30 seconds.
IMPORTANT: Let the adhesive cure for 24 hours before attaching the XM
cradle and radio to the mount.
4 Turn the swivel to accommodate the XM cradle and radio. Adjust the tension via
the center screw.
Step 3: Connect your Xpress
RC
1 Plug the antenna into ANT IN on the cradle.
2 Plug the power adapter into DC IN on the cradle.
3 Plug the audio adapter into AUDIO OUT on the cradle.
• Use the Cassette Adapter if your vehicle has a built-in cassette player.
• Use a mini audio cable (sold separately) if your vehicle has
an audio input jack.
4 Insert the cradle into the mount.
5 Insert your Xpress
RC
into the cradle.
NOTE: If your car does not contain a cassette player or an audio input, you will need to
use either the XM SureConnect (sold separately) or the FM Direct adapter (sold separately).
To remove, carefully lift the adhesive pad with your ngers or a spoon. Warming
the pad with a hair dryer for several minutes will help soften the adhesive.
You can reinstall the swivel mount using the extra adhesive pad.
ANT IN
AU
D
IO OUT
DC IN
XM Antenna
Power Adapter
Cassette Adapter
Xpress
RC
Car Cradle
Cassett Adaptor
Vent Mount
•
•
Dash
Vent
Dash
Vent
•
•
XM SureConnect (sold separately): You can listen to your Xpress
RC
through your car
stereo by using Xpress
RC
’s built-in FM modulator and the XM SureConnect. Simply nd
an unused FM frequency on the stereo and set your Xpress
RC
to transmit on that same
frequency. Refer to Set the FM frequency page in your user guide for more information.
FM Direct Adapter (sold separately): This option directly connects the Xpress
RC
to your
car’s audio system and antenna. A professional installation is recommended if you choose
to use this method.

9 10 11
14
13
12
Quick Guide
NOTE: The XM Radio ID does not use the letters I, O, S, or F.
3 Activate your service:
• Browse to http://activate.xmradio.com and follow the instructions.
OR
• Call 1 800 XM RADIO (1-800-967-2346).
4 When your service is activated, your Xpress
RC
will receive all channels.
This usually takes 10 to 15 minutes, but may take up to an hour. Your radio
must remain on until activated.
Using your Xpress
RC
Listening to XM
Enter a channel
1 Turn the knob to scroll through the list
of channels.
2 You’ll see the channel logo and cur-
rent artist. In a few seconds,
the current song title appears.
TIP! You can change the display mode to
show both the current channel
and all channels. Refer to Changing the
display in your user guide.
3 Press the XM button to select a channel.
TIP! You can congure Xpress
RC
to automatically tune to the channel you scroll to.
Refer to page 32 for instructions on how to eliminate the need to enter your selection.
View a category
With so many channels to choose from, XM Satellite Radio has organized them into
categories to make it easier for you to nd the ones that suit your taste.
1 To view a category, press or .
2 Scroll through the category to nd the channel you want.
3 Press the XM button.
TIP! To briey listen to each channel in the category, select Scan, then press the XM
button.
Change the display mode
You can view multiple channels on the display to see what else is playing.
Choose from:
To change the mode, press display.
TIP! When in split screen with the channel list, you can scroll through the list
of channels, just like when it appears on the full screen. Press or to change
categories. Press the XM button to select a channel.
TIP! Press jump to change to the previous channel.
split screen with channel listsingle current channel
split screen with previous
Set your favorite channel
You can assign up to 10 of your favorite channels to the number buttons so you can
quickly access them.
To assign a favorite channel to a button:
1 Tune to the desired channel.
2 Be sure you are in Favorite Channels
mode. Press fav until Favorite Channels
appears in the title bar.
3 Press and hold the number button you
want to use for that channel.
To listen to a favorite channel:
1 Be sure you are in Favorite Channels
mode. Press fav until Favorite Channels
appears in the title bar.
2 Press the number button where the desired channel is programmed.
TIP! To see your list of Favorite Channels, press or . Select a favorite and press
the XM button to listen to that channel.
FCC Statement
Please note that the power cable that has been supplied with your device is supplied with permanently
attached ferrite beads. It is the responsibility of the user to use the power cable with the ferrite beads.
The user is cautioned that changes or modications not expressly approved by XM
Satellite Radio Inc. can void the user’s authority to operate this device. This device complies with Part 15 of
the FCC Rules. Operation is subject to the following two conditions:
• This device may not cause harmful interference.
• This device must accept any interference received, including interference that may cause
undesired operation.
This equipment has been tested and found to comply with the limits for a Class B digital device, pursuant to
Part 15 of the FCC Rules. These limits are designed to provide reasonable protection against harmful
interference in a residential installation.
This equipment generates, uses, and can radiate radio frequency energy and, if not installed and used in
accordance with the installation instructions, may cause harmful interference to radio communications.
However, there is no guarantee that interference will not occur in a particular installation. If this equipment
does cause harmful interference to radio or television reception, which can be determined by turning the
equipment o and on, the user is encouraged to try to correct the interference by one or more of the
following measures:
• Reorient or relocate the receiving antenna of the aected receiver.
• Increase the separation between the XM equipment and the aected receiver.
• Connect the XM equipment into an outlet on a circuit dierent from that to which the aected receiver
is connected.
• Consult the dealer or an experienced radio/TV technician for help.
WARNING! The FCC and FAA have not certied this Satellite Radio Receiver for use in any aircraft
(neither portable nor permanent installation). Therefore, XM Satellite Radio cannot support this type
of application or installation
SA10316
XM name and related logos are registered
trademarks of XM Satellite Radio Inc. A ll
other trademarks are the property of their
respective owners.
Delphi Corporation
1441 West Long Lake Road
Troy, Michigan 48098-5090 U.S.A.
1.877. GO.DELPHI
www.delphi.com
Printed on Recycled Paper
© 2007 Delphi Corporation. All rights reserved.
Step 4: Turning on your Xpress
RC
.
1 Turn on your car radio.
2 Insert the cassette adapter.
NOTE: If you are using the XM SureConnect or the FM Direct
adapter, refer to Turn the FM modulator on/o on page 50 for
more information.
3 Turn on your Xpress
RC
.
NOTE: You may experience a brief delay while your Xpress
RC
powers up. If you press
the power button during this time, you will see a “Please Wait” message.
Activation
Before you can listen to any of XM’s great channels, you must rst activate your
Xpress
RC
.
1 Make sure your Xpress
RC
is properly installed and receiving the XM
signal so that you can hear the audio on channel 1.
2 Make a note of your XM Radio ID. You can nd it:
• On XM channel 0
• On the rear package label
• On the label on the back of your Xpress
RC
DPSS-07-E-074
XM - 9 80 0 - 0 1 25 - 0 0
/