Page is loading ...

Date Code 20220510 SEL-651R and SEL-651RA Configurable Labels
Overview
The SEL-651R and SEL-651RA Configurable Labels Kit provides the
materials and information needed to customize the target LED and operator
control pushbutton areas of the front panel. Figure 1 and Figure 2 show the
pocket areas and openings.
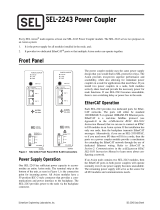
Figure 1 SEL-651R (Dual-Door Enclosure) Configurable Labels Area With
Fac to ry-D efa ult Labe ls
Figure 2 SEL-651R (Single-Door Enclosure) and SEL-651RA Configurable
Labels Area With Factory-Default Labels
The SEL-651R and SEL-651RA feature a versatile front panel that you can
customize for your needs. Use SELOGIC® control equations and slide-in,
configurable front-panel labels to change the function and identification of
Configurable Label Openings
Configurable Label Openings
Configurable Label Openings
Configurable
Label
Opening
NOTE: T h e S E L- 6 5 1 R a n d SE L- 6 5 1 R A
ship with factory-default labels and
settings. When applying configurable
labels, verify that any customized
target LED or operator control label
matches its corresponding control
module programming.
SEL-651R and SEL-651RA Configurable
Labels

SEL-651R and SEL-651RA Configurable Labels Date Code 20220510
2
target LEDs and operator control pushbuttons and LEDs. The operator control
labels and front-panel pockets are keyed for left and right placement,
corresponding to the left and right operator control pushbuttons and LEDs.
The SEL-651R and SEL-651RA come with pre-printed labels. Alternatively,
you can write on the back side of the pre-printed labels, use the blank labels
provided in this kit, or print your own customized labels.
If you need additional configurable label kits (see Table 1), contact your
Technical Service Center or the SEL factory to obtain these kits (see Techn ical
Support on page 3).
Removing Labels
Use the label removal tool to remove labels from the front-panel pockets.
Step 1. Slide the tip of the tool under the label at the pocket opening
(see Figure 1 and Figure 2 for example opening locations).
Step 2. Push the exposed edge of the label against the label removal
tool while pulling out both the label and label removal tool.
Creating Laser-Printed Labels
Use the following procedure to create laser-printed labels. You can find
label template files on the SEL website (selinc.com).
Step 1. Open the appropriate Microsoft® Word template.
Step 2. Fill in the fields.
Use the Tab and Arrow keys or your mouse to move from field
to field. Field space is limited; only the text that displays on the
screen prints on the label.
Save the file often to preserve your work in progress.
Step 3. Test the position of the label text.
a. Print the template file to plain paper.
b. Examine the printed sheet for proper alignment.
Carefully compare the printed page to the perforated
stock sheets.
c. If the printed sheet is not aligned properly, proceed to
Step 4.
d. If the labels appear as desired, proceed to Step 5.
Table 1 Configurable Label Kits
Kit Number Description
9260011 SEL-651R Dual-door enclosure (horizontal)
9260021 SEL-651R Single-door enclosure (vertical)
SEL-651RA
NOTE: The default template font is
from the Arial family. You can use this
font or choose a different font that is
available on your computer system.
NOTE: You can adjust the font size to
accommodate more text within the
cell.

Date Code 20220510 SEL-651R and SEL-651RA Configurable Labels
3
Step 4. Make adjustments to margin settings, as necessary, to print in
the proper location on the test sheet.
a. Use the Page Setup dialog box to adjust only the top or
left margins as needed to correct the alignment.
DO NOT adjust the right or bottom margins.
b. Do another test print on plain paper.
c. Examine the label position.
d. Repeat as necessary until the alignment is correct.
Save the file often to preserve your work in progress.
Step 5. Print the labels on the perforated stock sheets.
If the labels printed incorrectly, repeat this procedure beginning with
Step 3.
Step 6. Fold and tear the perforated edges of the stock paper to remove
the labels from the sheet.
Step 7. Remove the existing labels from the front-panel label pockets
with the label removal tool.
Step 8. Insert the newly created labels in the appropriate pockets on the
front panel.
Technical Support
We appreciate your interest in SEL products and services. If you have
questions or comments, please contact us at:
Schweitzer Engineering Laboratories, Inc.
2350 NE Hopkins Court
Pullman, WA 99163-5603 U.S.A.
Tel: +1.509.338.3838
Fax: +1.509.332.7990
Internet: selinc.com/support
Email: [email protected]
NOTE: Place the perforated stock
sheet in the printer tray as indicated
by the printer (either face up or face
down).
Also, if your printer has duplex
capability, be sure to set the printer to
print single sided.

SEL-651R and SEL-651RA Configurable Labels Date Code 20220510
4
© 2004–2022 by Schweitzer Engineering Laboratories, Inc. All rights reserved.
All brand or product names appearing in this document are the trademark or regis-
tered trademark of their respective holders. No SEL trademarks may be used with-
out written permission. SEL products appearing in this document may be covered by
U.S. and Foreign patents.
Schweitzer Engineering Laboratories, Inc. reserves all rights and benefits afforded
under federal and international copyright and patent laws in its products, including
without limitation software, firmware, and documentation.
The information in this document is provided for informational use only and is sub-
ject to change without notice. Schweitzer Engineering Laboratories, Inc. has
approved only the English language document.
This product is covered by the standard SEL 10-year warranty. For warranty details,
visit selinc.com or contact your customer service representative. *PLS651R-01*
2350 NE Hopkins Court • Pullman, WA 99163-5603 U.S.A.
Tel: +1.509.332.1890 • Fax: +1.509.332.7990
www.selinc.com • [email protected]
/