Thank you for buying RAB lighting xtures. Our goal is to design the best quality products to get the job done right. We’d like to hear your comments.
Call the Marketing Department at 888-RAB-1000 or email: marketing@rabweb.com
®
WPLED 260W 360W INSTALLATION INSTRUCTIONS
WALL MOUNT WITH ARM
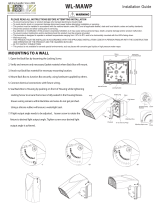
1. Separate Wall Mount Cover and Wall Mount Box.
2. Orient box so that “TOP” is on top.
3. Secure Wall Mount Box to a sturdy wall. Use appropriate
mounting hardware such as lag bolts and anchors with
washers suitable for the mounting surface.
WARNING - The xture weighs 80lbs. Make sure
mounting surface and hardware supplied by others
can withstand the weight of the xture.
4. Silicone around the edge of Gasket and/ or junction box.
5. Feed supply wires through Wall Mount Box, Wall Mount
Cover Gasket, and Wall Mount Cover.
6. Check that Wall Mount Cover Gasket between Wall
Mount Box and Wall Mount Cover is secure and screw
the cover on box using four screws.
7. Bring xture up to the Wall Mount Box and slide the
stainless steel Tether from the xture into the Key Hole
Slot for hands free wiring.
8. Line up Arm and Wall Mount Cover. Place at washers,
lock washers and 3/8-16 bolts from wall bracket inside the
Arm and tighten securely.
9. Feed wires through the Arm Gasket into Arm. Make
necessary connections in the Arm.
10. Replace the Arm Cover. Be sure Arm Cover Gasket on
Arm Cover is in place.
11. Tighten Close Up Plugs and apply weatherproof
silicone sealant to all unused conduit entry points. Use
weatherproof silicone sealant between wall and Wall
Mount Box.
Arm
3/8-16 bolts
Wall Mount Cover
Gasket
Plugs
Arm Gasket
Wall Mount
Cover
Wall Mount Box
Arm Cover Gasket
Key Hole Slot
WALL MOUNT BOX DETAILS
FLAT WALL MOUNT, NO ARM
1. Separate Wall Mount Cover and Wall Mount Box.
2. Orient box so that “TOP” is on top.
3. Secure Wall Mount Box to a sturdy wall. Use appropriate
mounting hardware such as lag bolts and anchors with
washers suitable for the mounting surface.
WARNING - The xture weighs 80lbs. Make sure
mounting surface and hardware supplied by others
can withstand the weight of the xture.
4. Silicone around the edge of Gasket and/ or junction box.
5. Bring xture up to the Wall Mount Box and slide the
stainless steel Tether from the xture into the Key Hole
Slot for hands free wiring.
6. Feed supply wires through Wall Mount Box and wire the
xture using suitable wire connectors.
7. Check that Wall Mount Cover Gasket between Wall
Mount Box and Wall Mount Cover is secure and screw
the cover on box using four screws.
8. Tighten Close Up Plugs and apply weatherproof silicone
sealant to all unused conduit entry points. Also use
sealant between the wall and Wall Mount Box.
Arm Cover
Wall Mount Cover
Gasket
Screws
Plugs
Set Screws (4)
6.86”
174.31mm
6.86”
174.31mm
5.21”
132.5mm
5.21”
132.5mm
0.82”
20.92mm
0.82”
20.92mm
Hardware (not supplied)
Wall Feed Conduit Feed
Hardware (not supplied)
Tether