NextStone CL-OC-APG-4 is a versatile device designed for efficient and precise installation of Country Ledgestone products, particularly outside corners and column wraps. With its intuitive design and user-friendly features, it empowers users to achieve professional-looking results in their home improvement projects. Key capabilities include:
-
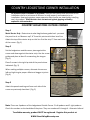
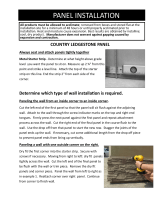
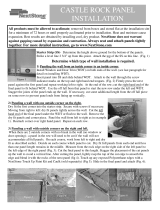
Outside corner installation: The device simplifies the installation of outside corners for Country Ledgestone panels, ensuring proper alignment, staggering, and offset for a seamless and visually appealing finish.
-
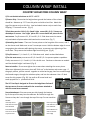
Column wrap installation: It streamlines the process of installing column wraps, providing guidance for proper spacing and attachment of corners to create a visually cohesive and durable column design.
NextStone CL-OC-APG-4 is a versatile device designed for efficient and precise installation of Country Ledgestone products, particularly outside corners and column wraps. With its intuitive design and user-friendly features, it empowers users to achieve professional-looking results in their home improvement projects. Key capabilities include:
-
Outside corner installation: The device simplifies the installation of outside corners for Country Ledgestone panels, ensuring proper alignment, staggering, and offset for a seamless and visually appealing finish.
-
Column wrap installation: It streamlines the process of installing column wraps, providing guidance for proper spacing and attachment of corners to create a visually cohesive and durable column design.


-
 1
1
-
 2
2


NextStone CL-OC-APG-4 Installation guide
- Type
- Installation guide
- This manual is also suitable for
NextStone CL-OC-APG-4 is a versatile device designed for efficient and precise installation of Country Ledgestone products, particularly outside corners and column wraps. With its intuitive design and user-friendly features, it empowers users to achieve professional-looking results in their home improvement projects. Key capabilities include:
-
Outside corner installation: The device simplifies the installation of outside corners for Country Ledgestone panels, ensuring proper alignment, staggering, and offset for a seamless and visually appealing finish.
-
Column wrap installation: It streamlines the process of installing column wraps, providing guidance for proper spacing and attachment of corners to create a visually cohesive and durable column design.
Ask a question and I''ll find the answer in the document
Finding information in a document is now easier with AI
Related papers
-
NextStone BK-OC-AR-4 Installation guide
-
NextStone SS-L-IC-GPH-2 Installation guide
-
NextStone RVRP-SD-1 User manual
-
 NextStone CLP-DVW-4 Installation guide
-
 NextStone CRP-WIB-4 Installation guide
-
 NextStone RR-OC-DB-4 Installation guide
-
-
 NextStone SS-L-OC-C-2 User manual


