®
INSTRUCCIONES DE INSTALACIÓN
Piso de Regadera
Distributed Exclusively by Ferguson and Wolseley Canada
© 2012 Ferguson Enterprises, Inc. All Rights Reserved 10643 02/12
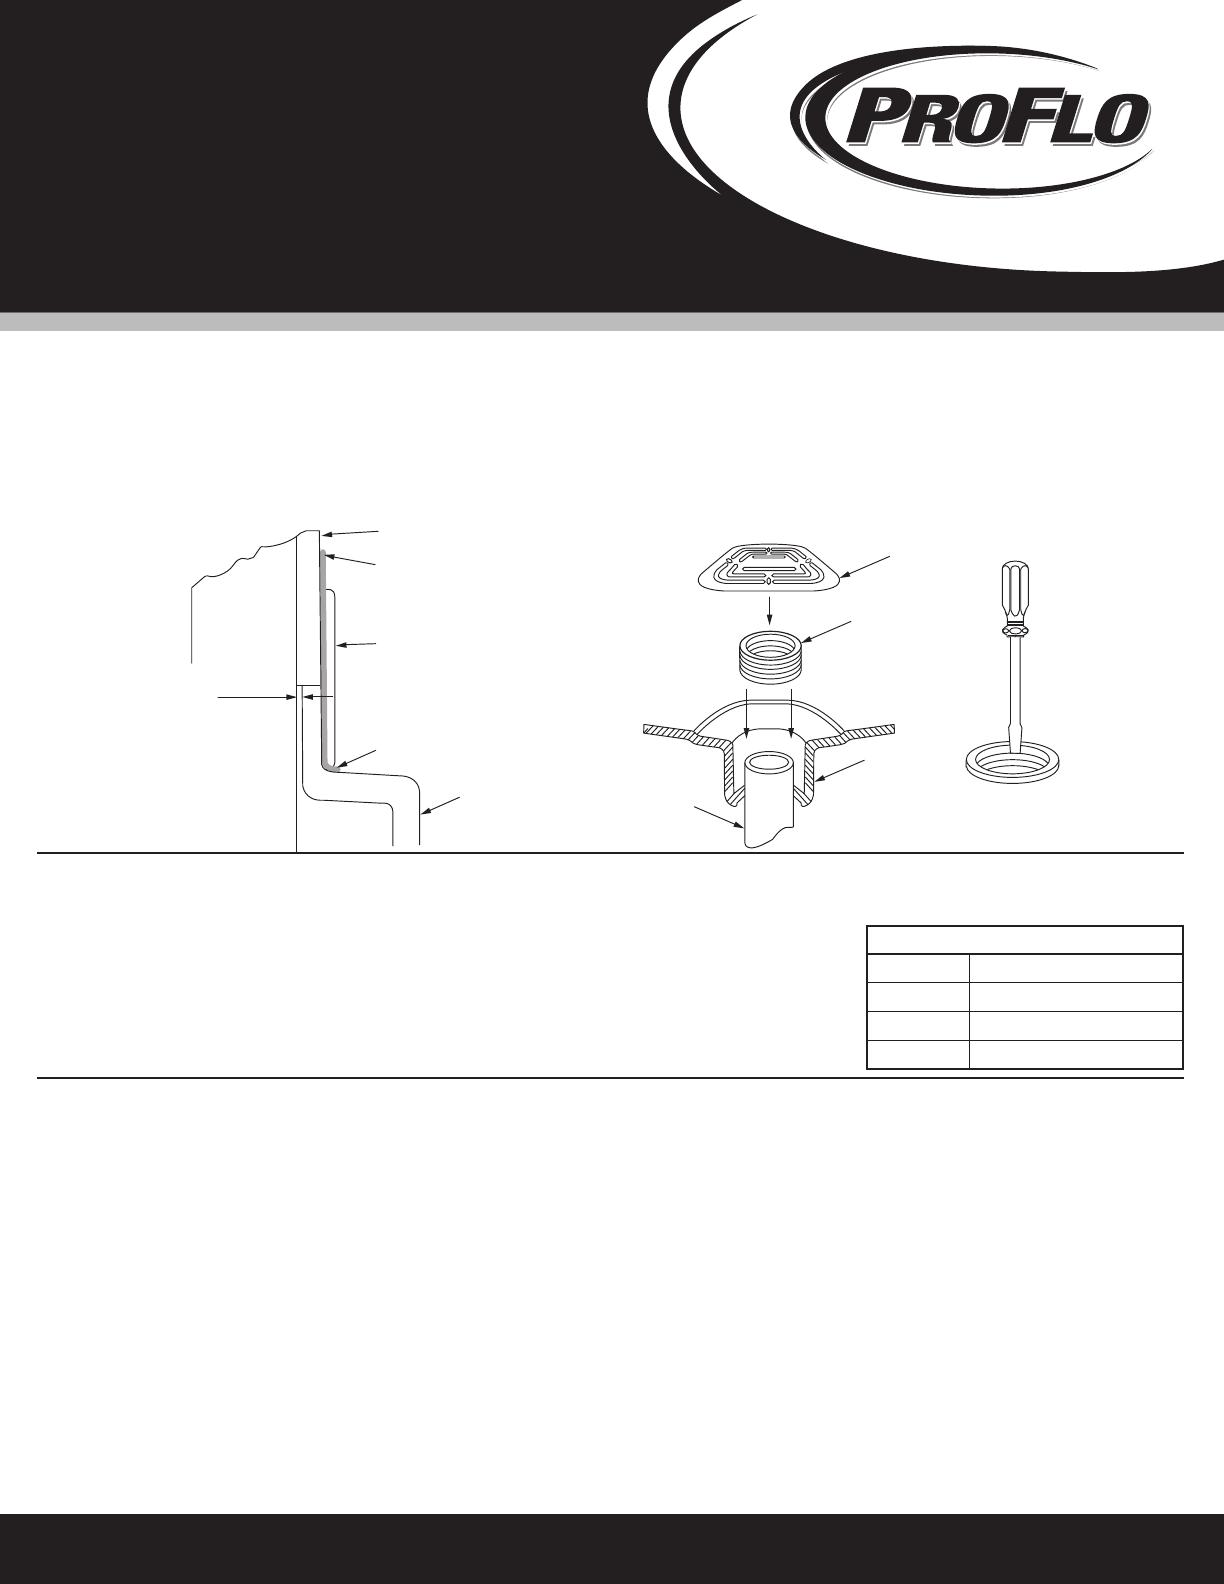
Place shower floor in studded alcove. Level shower floor, place level across
dam and along side. Shim as required. Space unit in alcove as indicated in
Note “A”.
Shower floor is not fastened to the studs.
If using drywall for shower walls, be sure to waterproof wall surface. Use
waterproof adhesive when installing ceramic tile.
Install Drywall onto Studs:
1/2" Recommended
Use Approved Waterproof
Ceramic Tile Adhesive
Ceramic Tile
Sealant
Studding
Shower
Floor
Strainer
Rubber
Gasket
2" Dia.
Waste Pipe
Install shower drain fitting. Slip 2” diameter pipe (supplied by installer) through
shower drain hole in receptor.
Install Rubber Gasket over the drain pipe. Use a screw driver to make sure the
gasket is seated to the bottom of the drain receptor.
Complete installation by snapping Strainer into place.
NOTE: Watertight installation of the drain is installers responsibility.
Drain leakage is excluded from the limited warranty.
NOTE “A”:
Clearance between
studding and shower floor.
1/4" to 5/16" for models
PFSB3232WH, PFSB3636WH,
PFSB4834WH and PFSB5434WH.
1/8" to 3/16" for all other models.
SHOWER BASE CARE AND CLEANING
This shower base is stain resistant with a semi gloss finish. It requires reasonable care to maintain its finish.
Day-to-day cleaning: Wash with warm water, a soft cloth, and mild liquid detergent.
For stubborn stains: Use a Non-Abrasive, liquid detergent cleaner, applied using a soft cloth. More persis-
tent stains, tar,or paint can be removed with naptha or mineral spirits. Remove excess plaster by scraping
with a sharpened soft wood stick. Avoid wire brushes, metal scrapers, or tools.
NEVER USE ABRASIVE SCOURING POWDERS, SOLVENT BASED CLEANSERS,OR SCOURING PADS AS THEY
TEND TO DULL THE FINISH.
NOTE: We recommend URC Fiberglass Tub and
Shower Cleaner. Ask for it where you purchased
your unit.
DESCRIPTION
PACKING LIST
QUANTITY
Shower Floor
Drain Gasket (Qic-2 Rubber Gasket)
Strainer
1
1
1
®
Distributed Exclusively by Ferguson and Wolseley Canada
© 2011 Ferguson Enterprises, Inc. All Rights Reserved 8856 07/11
Installation Instructions
Shower Floor
DAMAGE TO THIS PRODUCT OR ANY COMPONENT
THEREOF CAUSED BY THE USE OF ABRASIVE CLEAN-
ERS.
How to Obtain Warranty Service
US Customers:
The purchaser should contact their local Ferguson
location, installing contractor or builder from whom
the product was purchased. To find your nearest
Ferguson location please visit www.ferguson.com
and enter in your address into the Find a Location
field.
Canadian Customers:
The purchaser should contact their local Wolseley
Canada location, installing contractor or builder from
whom the product was purchased. To find you nearest
Wolseley Canada location please visit
www.wolseleyinc. ca, then click on Find a Location
and enter in your address into the location field.
PROFLO is a registered trademark of Ferguson
Enterprises, Inc.
Warranty
What is covered?
Ferguson Enterprises, Inc. “Ferguson” or the
“Company” warrants its products to be free from
defects in material and workmanship under normal
use and service FOR A PERIOD OF ONE (1) YEAR FROM
THE DATE OF INSTALLATION.
What is not covered?
The warranty set forth in paragraph 1 does not cover
installation or any other labor charges and does not
apply to products which have been damaged as a
result of any accident, abuse, improper installation or
maintenance, or modification of original plumbing
product. The warranty of such products is limited to
the warranty extended to Ferguson by the product
manufacturer. Finally, FERGUSON SHALL NOT BE
RESPONSIBLE OR LIABLE FOR ANY FAILURE OR
LIMITATIONS OF IMPLIED WARRANTY AND
DISCLAIMER OF CONSEQUENTIAL OR INCIDENTAL
DAMAGES FERGUSON DISCLAIMS ANY LIABILITY FOR
CONSEQUENTIAL OR INCIDENTAL DAMAGES AND
DISCLAIMS ALL EXPRESS OR IMPLIED WARRANTIES,
INCLUDING THOSE OF MERCHANTABILITY AND
FITNESS FOR A PARTICULAR PURPOSE, AS SET FORTH
ABOVE. IMPLIED WARRANTIES OF THE PRODUCTS AND
PRODUCT COMPONENTS SET FORTH IN PARAGRAPH 1
ABOVE ARE LIMITED TO THE DURATIONS OF THE
RESPECTIVE WARRANTY. Some states do not allow the
exclusion or limitation of incidental or consequential
damages or limitations on how long an implied
warranty lasts, so the above limitations may not apply
to you. This warranty gives you specific legal rights
and you may also have other rights, which vary from
state to state.
Garantía
¿QUÉ CUBRE LA GARANTÍA?
Ferguson Enterprises, Inc. (“Ferguson” o “la compañía”)
garantiza que sus productos están libres de defectos de
materiales y mano de obra, en condiciones normales de uso
y mantenimiento, DURANTE UN PERÍODO DE UN (1) AÑO A
PARTIR DE LA FECHA DE LA INSTALACIÓN DEL PRODUCTO.
¿QUÉ EXCLUYE LA GARANTÍA?
La garantía estipulada en el párrafo 1 no cubre la instalación
ni cualquier otro gasto de mano de obra y no es válida
para productos que hayan resultado dañados debido a
accidente, abuso, instalación o mantenimiento inadecuados
o la modificación de los productos originales de plomería. La
garantía de tales productos está limitada a la garantía que haya
otorgado el fabricante del producto a Ferguson. Por último,
FERGUSON NO SE HACE RESPONSABLE DE NINGUNA FALLA O
DAÑO AL PRODUCTO O A CUALQUIERA DE LOS COMPONENTES
DEBIDO AL USO DE LIMPIADORES ABRASIVOS.
CÓMO OBTENER SERVICIO DE GARANTÍA
Clientes de los Estados Unidos:
El comprador debe comunicarse con la tienda Ferguson de
su localidad, el contratista de la instalación o la empresa
constructora a la que se le compró el producto. Para buscar
a tienda Ferguson más cercana visite www.ferguson.com e
ingrese su dirección en el campo Find a Location.
Clientes de Canadá:
El comprador debe comunicarse con la tienda Wolseley Canada
de su localidad, el contratista de la instalación o la empresa
constructora a la que se le compró el producto. Para buscar la
tienda Wolseley Canada más cercana visite www.wolseleyinc.
ca y haga clic en Find a Location e ingrese su dirección en el
campo location.
PROFLO es una marca comercial registrada de Ferguson
Enterprises, Inc.
LÍMITACIONES DE LA GARANTÍA IMPLÍCITA Y EXENCIÓN
DE RESPONSABILIDAD DE DAÑOS CONSECUENCIALES O
INCIDENTALES FERGUSON ESTÁ EXENTA DE CUALQUIER
RESPONSABILIDAD POR DAÑOS CONSECUENCIALES O
INCIDENTALES, ASÍ COMO DE CUALQUIER GARANTÍA EXPRESA
O IMPLÍCITA, INCLUIDAS AQUELLAS RELACIONADAS CON LA
COMERCIALIZACIÓN E IDONEIDAD DEL PRODUCTO PARA UN
FIN DETERMINADO, COMO SE ESTIPULA EN LOS PÁRRAFOS
PREVIOS. LAS GARANTÍAS IMPLÍCITAS DE LOS PRODUCTOS
Y COMPONENTES DEL PRODUCTO ESTIPULADAS EN EL
PÁRRAFO 1 ANTERIOR SE LIMITAN A LA DURACIÓN DE LA
GARANTÍA CORRESPONDIENTE. Algunos estados no permiten
la exclusión o limitación de daños incidentales o derivados,
o bien de limitaciones sobre la duración de una garantía
implícita. Por tanto, puede que las limitaciones previamente
descritas no sean válidas en tal caso. Esta
garantía otorga al comprador del producto derechos legales
específicos y es posible que dicho comprador tenga otros.
Coloque el piso de la regadera en el nicho apuntalado. Nivele el piso de la regadera,
coloque el nivel a través del dique y a lo largo del costado. Calce según se requiera.
Distribuya la unidad en el nicho como se indica en Nota “A”.
El piso de la regadera no está sujeto a los largueros.
Si se utiliza tablaroca para las paredes de la regadera, asegúrese de impermeabilizar
la superficie de la pared. Use adhesivo a prueba de agua al instalar azulejos.
Instale las conexiones de drenaje de la regadera. Deslice tubería de 2”” de diámetro
CUIDADO Y LIMPIEZA DE LA BASE DE REGADERA
Esta base de regadera es resistente a manchas con un acabado semi-satinado. Requiere cuidado razonable para mantener
su acabado.
Limpieza diaria: Lave con agua tibia, un trapo suave y detergente líquido suave.
Para manchas resistentes: Use un limpiador detergente líquido no abrasivo, aplicado usando un trapo suave. Manchas más
persistentes, brea o pintura pueden eliminarse con nafta o solventes minerales. Elimine el exceso de mastique tallando con
una herramienta de madera blanda afilada. Evite cepillos de alambre, herramientas o raspadores metálicos.
NUNCA USE POLVOS LIMPIADORES ABRASIVOS, LIMPIADORES BASADOS EN SOLVENTES O FIBRAS YA QUE
TIENDEN A OPACAR EL ACABADO.
Installez la paroi sèche sur les poteaux de
cloison : 1,27 cm (1/2 po) recommandé
Use un Adhesivo Impermeable
Aprobado para Azulejos
Azulejo
Largueros
Sellador
Coladera
Junta de Hule
Piso de
Regadera
Tubería de
Descarga de
2” de Diám.
LISTA DE EMPAQUE
CANTIDAD DESCRIPCIÓN
1 Piso de Regadera
1 Junta de Drenaje (Junta de Hule)
1 Coladera
(suministrada por el instalador) a través del orificio de drenaje en el receptor.
Instale la junta de hule sobre el tubo de drenaje. Use un destornillador para asegurar
que la junta asiente en la parte inferior del receptor de drenaje.
Complete la instalación sujetando la coladera en su lugar.
NOTA: La hermeticidad de la instalación es responsabilidad del instalador.
Una fuga en el drenaje no está contemplada en la garantía limitada.
NOTA: recomendamos Limpiador para Tina y
Regadera de Fibra de Vidrio URC. Pregunte por
él en donde compró su unidad.
NOTA “A”:
Tolerancia entre el material de
anclaje y el piso de la regadera.
1/4” to 5/16” para modelos
PFSB3232WH, PFSB3636WH,
PFSB4834WH y PFSB5434WH.
1/8” a 3/16” para el resto de
los modelos.