Page is loading ...

INSTALLATION INSTRUCTIONS FOR 5954-126
For Wall Mount Fixture
WARNING! SHUT POWER OFF AT FUSE OR CIRCUIT BREAKER .
MOUNTING THE FIXTURE
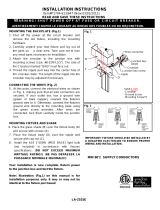
Installation (see fig.1)
1.Disconnect power at main electrical panel before
installation.
2.Attach the mount plate to the junction box using two
junction box screw. The side of the crossbar marked
“GND” must face out.
3.Guide fixture wires through hole in center of mounting
plate
4.Follow wiring instructions carefully (see fig.2)
5.Mount fixture by aligning mounting holes in fixture
back plate with mounting screws and threading ball
nuts(F) onto mounting screws. For additional stability
on large fixtures, use the two screws(E) and plastic
anchors(G) provided for end mounting.
6.Attach the glass shade(B) and collar ring(C) on lamp
holder, then lock it securely with check ring(D).
7.Install the light bulbs in accordance with the fixture’s
specifi io OT EXCEED THE MAXIMUM cat ns. DO N
AGE RATINGWATT !
Wiring (see fig.2)
1.Connect the electrical wires as follows. Connect the
Black wire from the fixture to the black house (hot)
Wire. Connect the white wire from the fixture to the
white (neutral) house wire. Make sure all wire nuts are
secured. You may wrap the connections with electrical
tape. If your outlet box has a ground wire (green or bare
copper) connect fixture’s ground wire to it. Other wise
attach the bare copper fixture wire to the green ground
screw on the crossbar.
2.Tuck the wire connections neatly into the wall
junction box.
Fig.2
Fig.1
american
lighting
association
(Hot)
WIRES
Black
HOUSE
Black or
WIRES
FIXTURE
(Ground)
Copper
WIRES
Bare
FIXTURE
(Neutral)
FIXTURE
WIRES
White or
HOUSE
White
WIRES
WIRES
HOUSE
Green or
Bare Copper(Ground)
Smooth
Ribbed
U
R
Listed
L
/