Page is loading ...

INSTRUCTION MANUAL
POWER TO THE PEOPLE
SOLAR
MICRO INVERTOR

PRODUCT SERIES
WARM TIPS BEFORE USING THE PRODUCT
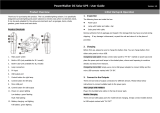
1) Checking the product
Before using the product for the first time, check each item carefully to be matching
with the user manual remarked items. If not matching, please contact your local
supplier for help.
2) Charging the battery
Each LED lamp is equipped with a built-in Lithium battery, which is not charged at
the factory.
When using the system for the first time, please charge the battery for at least 6
hours before using.
POWER TO THE PEOPLE
Micro Invertor Kit has two functions:
1. It’s a complete solar lighting kit - comes with 3/2/1 LED lamps for each set The
solar panel absorbs energy from the sun and charges a built-in Lithium battery in the
lighting bulb.
2. It can charge many types of mobile phones, ipad etc.,
Caution: 1) please do not switch on the bulbs while charging mobiles.
2) Mobile charger should be connected only to the USB port marked in HUB5, your mobile
may be damaged if you connect the cable to any other port.
3 Bulb Kit 2 Bulb Kit
1 Bulb Kit 1 Bulb Direct to Panel
1 Bulb Direct to Roof Tile

The carton contains the following items:
PRODUCT PACKING INFORMATION
Hub5, plug & play
inter-connection
box with additional
expansion terminal
USB Charger plug for different
type mobile and Mobile charger
with USB cable (2m)
Remote controller
with dimmer function
Solar panel with 480cm cable
DC cable with bayonet plugs (480cm)
and ceiling rose
POWER TO THE PEOPLE
3W LED Lamp
with dimming function

With remote control adjustment
1st, 100% brightness, 300lm working for 3-4 hours
2nd, 50% brightness, 150lm working for 8-12 hours
3rd, 10% brightness, 30lm working 30-40 hours
HOW DOES THE SYSTEM WORK?
One button control adjustment
Every time presses the button reduces the brightness level
Press the button at the first time for to turn on the power, the three seconds
red LED indicator will flash.
Press the button at the second time, the lamp will be began to work at 100%
brightness level.
Press the button at the third time, the lamp will be changed to work at 50%
brightness level.
Press the button at the fourth time, the lamp will be changed to work at 10%
brightness level.
Press the button fifth time for one second to turn off the power.
When battery is under charging: Green LED indicator is ON.
PS: Emergency light also can be charged without solar panel, using DC car charger or
AC 220V charge.
HOW TO KNOW WHETHER THE LIGHT IS CHARGING?
HOW TO CONNECT THE SYSTEM?
POWER TO THE PEOPLE

INSTALLATION INSTRUCTIONS
POWER TO THE PEOPLE
Planning the installation
Before beginning to install the system, please consider where you would like
to suspend the lighting and the solar panel’s location on or near the roof.
The Solar panel needs to face the equator, so choose the correct side of the
roof.
The solar panel must not be overshadowed by trees or buildings throughout
the day.
Judge the best placement and height to get the light distribution you want for
the room.
See the section on how to switch if you want to study beforehand its light
distribution in the room.
Make sure the total distance from the solar panel to the Hub5 and the lights
will not exceed the length of the cables. The Hub5 should be placed above the
ceiling, at roughly equal distances to all the lights.
2
Installing the Solar Panel
It is very important that the solar panel be
positioned facing the equator. If necessary, also
adjust the solar panel ‘s tilt angle, so that at 12
o’clock the sun’s rays should fall straight on the solar
panel’s top surface for an optimal sunlight energy
Harvest.
Connecting the Hub5
Under the roof, place the HUB5 somewhere
between the future locations of the LED Lamps.
Insert the Bayonet Plug of the cable from the Solar
Panel, to one of the four ports on the HUB5 except
the USB port. Twist the Bayonet Plug clockwise to
lock it in place. (For 3 Light, connect one HUB5 to
another using the extra cable with Bayonet Plugs).
3
1

INSTALLATION INSTRUCTIONS
Connecting the cables
Put the cable end into the round Connector, do
revolve the end of terminal toward right to make
sure the plug is locked up with connector, otherwise
the light will not charge normally.
Remarks:
Each cable end can be removed from the round
connector after fully charged, 1/2/3 lamp(s) can be
taken anywhere you need lighting. So even if a room
without power is far away, there is no problem, because
the light can be taken to anywhere but no need to connect with the solar panel or
connector.
After the lamp finish power just need connect the plug with connector once again
for new charge.
The same lamp can also be removed from the cables after full charge and you can
use as a torch light.
Installing the light
The LED light is designed to be suspended from the
ceiling.
At the precise location on the ceiling where you have
planned to suspend the led light, drill a hole 2cm in
diameter, barely large enough to allow a Bayonet Plug
to pass through.
Insert the Bayonet Plug of the cable provided, into
the port on top of the light.
Pass other bayonet plug and rest of the cable through
the hole in the ceiling you just made.
Slip the cable into the Ceiling Cap provided, through a slit on its side.
Maintain the led light at desired height.
Then fasten Ceiling Cap to the ceiling with screws, covering up the hole on the ceiling.
Connect the bayonet plug that has been passed through the ceiling, to any available
ports on the Hub4 Repeat the above steps for all lamps in the kit.
POWER TO THE PEOPLE
4
5
Since it is a battery operated product, regular usage (Charge & Discharge) is required
for longer life of batteries.

SPECIFICATIONS
2600mah
Light out put loss
3 hours
7% after 5years
12 hours
4% after 5years
40 hours
2% after 5years
100% output 50% output 10% output
Brightness
Working time
Battery capacity
CONFIGURATIONS
1 pcs solar panel/3bulbs
1 pcs solar panel/2bulbs
1 pcs solar panel/1bulb
1 pcs solar panel/1bulb
12W
9W
6W
3W
2600mah
2600mah
2600mah
2600mah
3 watts *3
3 watts *2
3 watts *1
3 watts *1
Solar Panel
Battery Capacity (mah)
No. of LED
Choice
*Customization is not restricted only to the above parameters; can choose the configurations freely by yourself.
CAUTIONS
Contact your local supplier, distributor or manufacturer if you face any problem with
the product. DO NOT open and repair by yourself.
Make sure the cable-end is locked up tight or battery cannot charge.
PLEASE DO NOT charge your mobile in the lamp charge hole, or your mobile will burn
because of high current.
MAKE SURE to charge your mobile from the mobile charge hole and connect following
our steps (how to connect the product).
Working time of the light depends on battery charging capacity and it will be affected
by weather and season of the year.
Solar Panels do not receive as much direct sunlight in winter months. Therefore, the
number of hours the light stays on will be reduced during winter.
Make sure the solar panel is placed where it can get the maximum amount of direct
sunlight every day.
Do not cover the solar panel or install under a tree, to avoid debris accumulation of the
top of solar panel.
POWER TO THE PEOPLE

FUNCTIONALITY PROBLEMS (FAQ)
Light cannot work
1) Check if button is pressed
2) Check if battery is low or without power
How to solveTroubles
Cannot charge
Short working time
1) Check the solar panel for debris and dirt accumulation,
that can prevent the battery from charging
2) Check whether the cables locked up tight or not
(put cable end into the round connector hole then
turn it right to lock)
1) Long cloudy and rainy days prevent battery from
getting charged or fully charged
2) Make sure solar panel is placed where can get
maximum sunlight most of the day, or battery
will not be full charged
We warrant our Solar Home Light System to be free from defects in materials and
workman-ship under normal application, installation, usage and service conditions for
two (2) year from the date of sale to the original consumer purchaser. If the module
fails to confirm to this warranty then, for a period ending two (2) year from the date of
sale to the original consumer purchaser, we will either repair or replace the product.
This warranty shall only apply while the original consumer purchaser owns the product.
WARRANTY
DISCLAIMER
The limited warranties set forth herein do not apply to any product which has been
subjected to misuse, neglect or accident, or which has been damaged through abuse,
alteration, improper installation or application or negligence in use, storage,
transportation or handling or has been repaired or in any way tempered with by
anyone other service representative. These limited warranties do not cover any
transportation costs for the return of a module or for reshipment of any repaired for
replaced product or the costs associated with installation, removal or reinstallation of
the product.
Design and production quality ensure that the breakage of LED occurs only as a result
of external force and therefore this is not covered under any warranty.
Because of continuous research and development of our products, the information and
specifications in this data sheet are subject to change with prior notice, maintain the
copyright.
thanks
Anu Solar Power Pvt. Ltd.
#248, 3rd Phase, P.I.A, Bangalore - 560 058 | Ph: +91-80-43550200
Customer Care: +91 80 43550203 (24x7 IVR Support)
/