Muskoka Electric Fireplace Mantel MEF2808CHG User manual
- Category
- Fireplaces
- Type
- User manual
This manual is also suitable for

Assembly Instructions
Instructions d'assemblage
Instrucciones de montaje
MEF2808CHG
REV00
11
YEAR
ANNÉE
AÑO
I
N
H
O
M
E
W
A
R
R
A
N
T
Y
G
A
R
A
N
T
I
E
À
L
A
M
A
I
S
O
N
G
A
R
A
N
T
Í
A
E
N
S
U
P
R
O
P
I
A
C
A
S
A
save These InsTrucTIons
conserver ces InsTrucTIons
guarde esTas InsTruccIones
eLecTrIc FIrePLace
ManTeL
ManTeauX de cheMInÉe
ÉLecTrIQues
rePIsas Para
chIMenea eLÉcTrIcas

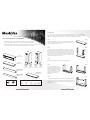
TIPS FOR THE ASSEMBLY OF YOUR NEW MANTEL
• Beforeyoubeginassembly,locatetheinstructionsandhardware.Takeoutallthepartsand
comparethemtothediagramsbelow.Besureyouhaveallthepartsandcanidentifythem.
• Ahelpinghandisalwaysgood.Assembleyourmantelwithanadultassistantifpossible.Somepiecesareheavy
andwillneedtobeheldbyahelper.Assemblytimewilltakeapproximately30-60minutes.
TOP 1PC
CHERRY: ZZ.2808CHG.08
BASE 1PC
CHERRY: ZZ.2808CHG.01
UPPER FACinG PAnEL 1PC
CHERRY: ZZ.2808CHG.06
AnTi-TiP DEViCE 2 SETSWinGnUT AnD LOCK WASHER
2PCS 2PCS 4PCS 4PCS
17PCS 17PCS
4PCS
FiREBOX SHELF 1PC
CHERRY: ZZ.2808CHG.09
LOWER FACinG PAnEL 1PC
CHERRY: ZZ.2808CHG.07
LEFT FROnT
PAnEL 1PC
CHERRY:
ZZ.2808CHG.05
inSiDE
ViEW
OUTSiDE
ViEW
LEFT SiDE
PAnEL 1PC
CHERRY:
ZZ.2808CHG.03
RiGHT FROnT
PAnEL 1PC
CHERRY:
ZZ.2808CHG.04
RiGHT SiDE
PAnEL 1PC
CHERRY:
ZZ.2808CHG.02
Get Ready to Start
Beforeassembly,usescissorstounwrapthepartsfromthepackaging.DO NOTuseaboxcutterorexacto-knife
asyoumaycutintothemantelpiecesinsidetheboxanddamagethenish.Checkforthehardwarebagwhichis
REDandlocatedinsidethepackaging,tapedtothetopbox.BesureyouDO NOTdiscardanypieces.
Step 1
Locatethebaseandplaceitontheoor.Donotputitupagainstthewallatthis
pointintheassembly,asyouneedtogetinbehindthemanteltoinsertseveral
wingnuts,lockwashersandreboxscrews.
Step 2
Locatetheleftsidepanelandtheleftfrontpanel.Facingthefrontofthebase,
taketheleftsidepanel,positioningitsotheholesintheblocksonthebottom
lineupwiththeholesonthebase.Positiontheleftfrontpanelnexttotheleftside
panel,lininguptheholesintheblockswiththeholesonthebase.Attachtheleft
frontandsidepaneltothebasebyinsertingandtightening1wingnutand1lock
washertoeachpiece.Attachtheleftsideandfrontpanelstogetherbyinserting
andtightening2wingnutsand2lockwashers.
Step 3
RepeatStep2,butwiththerightsidepanelandtherightfrontpanel.
Step 4
Locatethelowerfacingpaneland
thereboxshelf.Attachthelowerfacing
panelbyplacingthenishedsidetothe
frontthenlineuptheholesoneachside
andinsert1wingnutand1lockwasher
intoeach.Placethereboxshelfin
behind,rightupagainstthelower
facingpanel.
Step 5
Locatetheupperfacingpanelthatwillbeattachedtotheleftandrightlegsand
willsitabovetherebox.Positionthispanelwiththenishedsidefacingthefront
ofthemantel.Lineuptheholesoneachsideandinsertandtighten1wingnutand
1lockwasheroneachside.
Step 1
Step 2
Step 4
Step 5
21

Step 6
Getyourassistantandlocatethetopofyourmantel.Thistopisveryheavy.It
willtake2peopletoliftandpositionitinplace.Ensurethetopgoesoverthe
positioningguidelocatedontheheader.Thetopmustgooverthisguidetobe
positionedcorrectly.Lineuptheholesonthetopofthemantel,insertandtighten
5wingnutsandlockwashers.
Step 7
Takeyourelectricreboxoutofitspackagingandpositionitbetweenthe2legs
ofthemantel.Onceyouareclosetothewall,plugthereboxintothenearest
outlet.
Thereboxcomeswith3metalbracketsand20blackscrews.Thesemetal
bracketsmustbeattachedtoboththesidesofthereboxandthemantelto
ensurethatyourreboxdoesnotmovearoundasyouuseit.2ofthebrackets
have2largeholesononeside.Theselargeholeslineupwith2screwsonthe
sideoftherebox.Theotherscrewsprovidedmustbeinsertedintotheholesat
theotherendofthebracketandintotherebox.Theothersideofeachbracket
attachestothemantel.
The3rdbrackethasnoholeson1side.Thatsideshouldgoupagainstthe
reboxtopbutshouldnotbeattachedastheheatersitsrightunderneaththe
bracket.Onlythemantelsideshouldbeattached.
Ifyouhaveanyquestionsaboutthereboxpleasereferencetheinstallation
instructionsthatcomewiththerebox.PleasereferencetheQuickTipssection
ofthatinstructionmanual.
Step 8
Youarenowreadytopositionyourmantelagainstthewall.Thissteprequires2
peopletomovetheunit.
Anti-tipping device
Atthispointyoumustattachtheanti-tippingdevicetoyourmantelandyourwall.
Thisdeviceisasafetyfeaturethatwillpreventyourmantelfromtippingoverifa
weightisappliedwhichcanunbalancetheunit.
Step 6
WARRANTY
GreenwayHomeProductsispleasedtoofferin-homewarrantyrepairs.PleaserefertoyourFireboxUseandCareGuideforwarranty
informationonyourFirebox.
DO NOT RETURN THIS PRODUCT TO THE STORE:
PleasecontactCustomerServiceat:1-866-253-0447
MondaytoThursdayfrom8:30AMto5:00PM(EST),Fridayfrom8:30AMto4:00PM(EST)
Web:www.greenwayhp.com
Email:[email protected]
Canada:
400SouthgateDr.,Guelph,Ontario,Canada,N1G4P5
USA: 6507FaireldDr.,Northwood,Ohio,USA,43619
Limited Warranty Definitions:
GreenwayHomeProducts:
(Greenway) Manufacturer.
Mantel: MantelmanufacturedbyGreenwayHomeProducts.
Purchaser: PurchaseroftheMantel
Distributor: FacilityauthorizedtosellGreenwayHomeProducts.
WarrantyCard GreenwayHomeProductsLimitedWarrantyRegistrationCardidentifyingthePurchaserandproductmodel.
Greenway Limited Warranty:
GreenwaywarrantstothePurchaserthattheMantelisfreefromdefectsinmaterialandworkmanship,undernormaluseandservice,
for1year(1yearlimitedparts)fromthedateofpurchase.
AllwarrantyrepairsmustbepreauthorizedbyGreenwayHomeProducts.Greenwaywill,atits’option,replaceorrepairfreeofcharge
anydefectivepart,whichthePurchasershallnotifytheirDistributororGreenwayHomeProductswithinthewarrantyperiod.The
obligationofGreenwayHomeProductsunderthiswarranty,isexpresslylimitedtosuchreplacementorrepairs.
The provisions of this limited warranty shall not apply to the following:
1. Accidents.
2. Unauthorizedrepairsoralterations.
3. Normalmaintenance.
4. Changesmadetootherunitsmanufacturedafterthismantelwasmanufactured.
5. Incidentaldamagescausedbyfailureofthemantelsuchasinconvenienceorlossofuse.
6. Improperinstallation.
Theprovisionsofthislimitedwarrantyshallnotapplytodeteriorationduetowearandexposurebeyondthefollowinglimitations:
1. For180daysfromthedateofpurchaseforexteriornishedsurfaces.
Duetothepropertiesofnaturalwood,GreenwayHomeProductsmakesnowarrantyagainstmineralingofwoodcomponents.
Greenway Limited Warranty is void unless the following conditions are adhered to:
1. WarrantyregistrationmustbecompletedandreturnedtoaGreenwayHomeProducts.
2. AllwarrantyrepairsmustbepreauthorizedbyaGreenwayrepairfacility.
3. Greenwayreservestherighttoinspectdefectivepartsthathavebeenreplacedunderwarranty.Dealerisexpectedtohold
defectivepartsfor60days.
4. Onlypartsandaccessoriesandothermaterial,availablethroughGreenwayHomeProductsaretobeusedintheperformance
ofwarrantyservice.
5. Purchasersareresponsibleforpresenting/notifyingtheirDistributorassoonaproblemexists.Thewarrantyrepairsshouldbe
completedinareasonableamountoftimefromthedateofauthorization.Nottoexceed30dayspastnotication.
Thislimitedwarrantyisexpresslyinlieuofanyotherexpressedorimpliedwarranty,includinganyimpliedwarrantyormerchantability
ortnessforaparticularpurposeandofanyobligationsorliabilitiesonGreenwayHomeProductswhichneitherassumesnor
authorizesanyotherpersontoassumeforitanyotherliabilityinconnectionwiththeMantel
manufacturedbyit.
Thewarrantyisnullandvoidifusedincommercialorindustrialapplications.
43
-
 1
1
-
 2
2
-
 3
3


Muskoka Electric Fireplace Mantel MEF2808CHG User manual
- Category
- Fireplaces
- Type
- User manual
- This manual is also suitable for
Ask a question and I''ll find the answer in the document
Finding information in a document is now easier with AI
Related papers
-
Muskoka MEF253OK User manual
-
Remington MM251CH User manual
-
-
-
-
-
-
-
-
Other documents
-
Imperial IMP 50-4009 Operating instructions
-
Remington MM251CH User manual
-
 Greenway Home Products MM258E User manual
-
 Greenway Home Products Nottingham GEF257OK User manual
-
 Greenway Home Products MM255CH User manual
-
 Greenway Home Products MEF253OK User manual
-
 Greenway Home Products GEF252AEE User manual
-
 Greenway Home Products MEF2021WL User manual
-
 Greenway Home Products MM284SOK User manual
-
 Greenway Home Products GEF28WCDO User manual


