
Assembly Instructions
Instructions d'assemblage
Instrucciones de montaje
MEF2822CWG
REV04
11
YEAR
ANNÉE
AÑO
I
N
H
O
M
E
W
A
R
R
A
N
T
Y
G
A
R
A
N
T
I
E
À
L
A
M
A
I
S
O
N
G
A
R
A
N
T
Í
A
E
N
S
U
P
R
O
P
I
A
C
A
S
A
save These InsTrucTIons
conserver ces InsTrucTIons
guarde esTas InsTruccIones
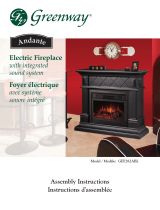
eLeganT eLecTrIc FIrePLace
with corner option
FoYer ÉLÉganT
avec coin facultatif
chIMenea eLeganTe
con opción para poner en rincon

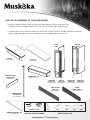
BOTTOM SUPPORTER
UPRIGHT SUPPORTER
TIPS FOR THE ASSEMBLY OF YOUR NEW MANTEL
• Beforeyoubeginassembly,locatetheinstructionsandhardware.Takeoutallthepartsand
comparethemtothediagramsbelow.Besureyouhaveallthepartsandcanidentifythem.
• Ahelpinghandisalwaysgood.Assembleyourmantelwithanadultassistantifpossible.Somepiecesareheavy
andwillneedtobeheldbyahelper.Assemblytimewilltakeapproximately30-60minutes.
1
BOTTOM SUPPORTER
UPRIGHT SUPPORTER
TOP 1PC
ZZ.2822CWG.08
BASE 1PC
ZZ.2822CWG.01
FIREBOX SHELF 1PC
ZZ.2822CWG.11
UPPER FACInG
PAnEL 1PC
ZZ.2822CWG.06
AnTI-TIP DEVICE 2 SETSWInGnUT AnD LOCK WASHER
2PCS 2PCS 4PCS 4PCS 4PCS
CORnER ATTACHMEnT 1PC
ZZ.2822CWG.08-1
LEFT FROnT
PAnEL 1PC
ZZ.2822CWG.05
InSIDE
VIEW
OUTSIDE
VIEW
RIGHT SIDE
PAnEL 1PC
ZZ.2822CWG.02
CORnER BOTTOM
SUPPORT 1PC
ZZ.2822CWG.09
CORnER UPRIGHT
SUPPORT 1PC
ZZ.2822CWG.10
LEFT SIDE
PAnEL 1PC
ZZ.2822CWG.03
RIGHT FROnT
PAnEL 1PC
ZZ.2822CWG.04
LOWER
FACInG PAnEL 1PC
ZZ.2822CWG.07
20PCS 20PCS
InCLUDES 1 SPARE

GET READY TO START
Beforeassembly,usescissorstounwrapthepartsfromthepackaging.DONOTuse
aboxcutterorexacto-knifeasyoumaycutintothemantelpiecesinsidetheboxand
damagethenish.Checkforthehardwarebagwhichisredandlocatedinsidethe
packaging,tapedtothetopbox.BesureyouDONOTdiscardanypieces.
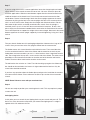
Step 1
Locatethebaseandplaceitontheoor.Donotputitupagainstthewallatthispoint
intheassembly,asyouneedtogetinbehindthemanteltoinsertseveralwingnuts,lock
washersandreboxscrews.
Step 2
Locatetheleftsidepanelandtheleftfrontpanel.Facingthefrontofthebase,takethe
leftsidepanel,positioningitsotheholesintheblocksonthebottomlineupwiththe
holesonthebase.Positiontheleftfrontpanelnexttotheleftsidepanel,liningupthe
holesintheblockswiththeholesonthebase.Attachtheleftfrontandsidepanelto
thebasebyinsertingandtightening1wingnutand1lockwashertoeachpiece.Attach
theleftsideandfrontpanelstogetherbyinsertingandtightening3wingnutsand3lock
washers.
Step 3
RepeatStep2,butwiththerightsidepanelandtherightfrontpanel.
Step 4
Locatethelowerfacingpanelandthereboxshelf.Attachthelowerfacingpanelby
placingthegranitesidetothefrontthenlineuptheholesoneachsideandinsert1
wingnutand1lockwasherintoeach.Placethereboxshelfinbehind,rightupagainst
thelowerfacingpanel.
Step 5
Locatethegraniteupperfacingpanelthatwillbeattachedtotheleftandrightlegsand
willsitabovetherebox.Positionthispanelwiththegranitesidefacingthefrontof
themantel.Lineuptheholesoneachsideandinsertandtighten1wingnutand1lock
washeroneachside.
Step 6
Getyourassistantandlocatethetopofyourmantel.Thistopisveryheavy.Itwilltake
2peopletoliftandpositionitinplace.Ensurethetopgoesoverthepositioningguide
locatedontheheader.Thetopmustgooverthisguidetobepositionedcorrectly.Lineup
theholesonthetopofthemantel,insertandtighten5wingnutsandlockwashers.
2
Step 1
Step 2
Step 4
Step 5
Step 6

Step 7
Ifyouareusingthismantelinacornerapplication,locatethetriangularpieceofwood
whichattachestothemanteltocreatethecornerunit.Youmustattachthispiecefor
allcornerapplications.Slidethecornerbottomsupportintothechannellocatedatthe
middleofthebackofthehearthbase.Placethetopcornerattachmentontheoor
upsidedown.Protectitfromdamage.Attachthecorneruprightsupporttothecorner
attachmentbylininguptheholeinthecorneruprightwithholeinthecornertopinsert
with1nutand1lockwasher.Simplytakethetriangleandslidethebracketswiththe
holesontothepinswhicharealreadyattachedtothemantel.Oncethetriangleis
attached,pushitupsoitislevelwiththemantelandlockitintoplace.Tolockitinto
placesimplyturnthehorizontalwoodenblocksattachedtotheundersideofthemantel
intoaverticalpositiontosupporttheweightofthecornertriangle.Nowattachthecorner
bottomsupporttothecorneruprightsupportbyinsertandtightening1wingand1lock
washer.
Step 8
Takeyourelectricreboxoutofitspackagingandpositionitbetweenthe2legsofthe
mantel.Onceyouareclosetothewall,plugthereboxintothenearestoutlet.
Thereboxcomeswith3metalbracketsand20blackscrews.Thesemetalbrackets
mustbeattachedtoboththesidesofthereboxandthemanteltoensurethatyour
reboxdoesnotmovearoundasyouuseit.2ofthebracketshave2largeholesonone
side.Theselargeholeslineupwith2screwsonthesideoftherebox.Theotherscrews
providedmustbeinsertedintotheholesattheotherendofthebracketandintothe
rebox.Theothersideofeachbracketattachestothemantel.
The3rdbrackethasnoholeson1side.Thatsideshouldgoupagainstthereboxtop
butshouldnotbeattachedastheheatersitsrightunderneaththebracket.Onlythe
mantelsideshouldbeattached.
Ifyouhaveanyquestionsaboutthereboxpleasereferencetheinstallationinstructions
thatcomewiththerebox.PleasereferencetheQuickTipssectionofthatinstruction
manual.
NOTE: Some fireboxes come with pre-attached trims
Step 9
Youarenowreadytopositionyourmantelagainstthewall.Thissteprequires2people
tomovetheunit.
Anti-tipping device
Atthispointyoumustattachtheanti-tippingdevicetoyourmantelandyourwall.This
deviceisasafetyfeaturethatwillpreventyourmantelfromtippingoverifaweightis
appliedwhichcanunbalancetheunit.
Step 7
Step 8
Step 9
3

WARRANTY
GreenwayHomeProductsispleasedtoofferin-homewarrantyrepairs.PleaserefertoyourFireboxUseandCareGuideforwarranty
informationonyourFirebox.
DO NOT RETURN THIS PRODUCT TO THE STORE:
PleasecontactCustomerServiceat:1-866-253-0447
MondaytoThursdayfrom8:30AMto5:00PM(EST),Fridayfrom8:30AMto4:00PM(EST)
Web:www.greenwayhp.com
Email:[email protected]
Canada:
400SouthgateDr.,Guelph,Ontario,Canada,N1G4P5
USA: 6507FaireldDr.,Northwood,Ohio,USA,43619
Limited Warranty Definitions:
GreenwayHomeProducts:
(Greenway) Manufacturer.
Mantel: MantelmanufacturedbyGreenwayHomeProducts.
Purchaser: PurchaseroftheMantel
Distributor: FacilityauthorizedtosellGreenwayHomeProducts.
WarrantyCard GreenwayHomeProductsLimitedWarrantyRegistrationCardidentifyingthePurchaserandproductmodel.
Greenway Limited Warranty:
GreenwaywarrantstothePurchaserthattheMantelisfreefromdefectsinmaterialandworkmanship,undernormaluseandservice,
for1year(1yearlimitedparts)fromthedateofpurchase.
AllwarrantyrepairsmustbepreauthorizedbyGreenwayHomeProducts.Greenwaywill,atits’option,replaceorrepairfreeofcharge
anydefectivepart,whichthePurchasershallnotifytheirDistributororGreenwayHomeProductswithinthewarrantyperiod.The
obligationofGreenwayHomeProductsunderthiswarranty,isexpresslylimitedtosuchreplacementorrepairs.
The provisions of this limited warranty shall not apply to the following:
1. Accidents.
2. Unauthorizedrepairsoralterations.
3. Normalmaintenance.
4. Changesmadetootherunitsmanufacturedafterthismantelwasmanufactured.
5. Incidentaldamagescausedbyfailureofthemantelsuchasinconvenienceorlossofuse.
6. Improperinstallation.
Theprovisionsofthislimitedwarrantyshallnotapplytodeteriorationduetowearandexposurebeyondthefollowinglimitations:
1. For180daysfromthedateofpurchaseforexteriornishedsurfaces.
Duetothepropertiesofnaturalwood,GreenwayHomeProductsmakesnowarrantyagainstmineralingofwoodcomponents.
Greenway Limited Warranty is void unless the following conditions are adhered to:
1. WarrantyregistrationmustbecompletedandreturnedtoaGreenwayHomeProducts.
2. AllwarrantyrepairsmustbepreauthorizedbyaGreenwayrepairfacility.
3. Greenwayreservestherighttoinspectdefectivepartsthathavebeenreplacedunderwarranty.Dealerisexpectedtohold
defectivepartsfor60days.
4. Onlypartsandaccessoriesandothermaterial,availablethroughGreenwayHomeProductsaretobeusedintheperformance
ofwarrantyservice.
5. Purchasersareresponsibleforpresenting/notifyingtheirDistributorassoonaproblemexists.Thewarrantyrepairsshouldbe
completedinareasonableamountoftimefromthedateofauthorization.Nottoexceed30dayspastnotication.
Thislimitedwarrantyisexpresslyinlieuofanyotherexpressedorimpliedwarranty,includinganyimpliedwarrantyormerchantability
ortnessforaparticularpurposeandofanyobligationsorliabilitiesonGreenwayHomeProductswhichneitherassumesnor
authorizesanyotherpersontoassumeforitanyotherliabilityinconnectionwiththeMantel
manufacturedbyit.
Thewarrantyisnullandvoidifusedincommercialorindustrialapplications.
4
-
 1
1
-
 2
2
-
 3
3
-
 4
4
-
 5
5


Muskoka MEF2822CWG User manual
- Type
- User manual
- This manual is also suitable for
Ask a question and I''ll find the answer in the document
Finding information in a document is now easier with AI
Related papers
-
Muskoka MEF253OK User manual
-
-
-
-
-
-
-
Muskoka Electric Fireplace Mantel MEF2808CHG User manual
-
-
Other documents
-
 Greenway Home Products MEF253OK User manual
-
Imperial IMP 50-4009 Operating instructions
-
 Greenway Home Products Muskoka MM289CW User manual
-
 Greenway Home Products MM281CBL User manual
-
 Greenway Home Products MM281MCH User manual
-
 Greenway Home Products GEF282ABL User manual
-
 Greenway Home Products MM282ABL User manual
-
 Greenway Home Products MM284SOK User manual
-
 Greenway Home Products Nottingham GEF257OK User manual
-
 Greenway Home Products MEF2808CHG User manual


