Page is loading ...

RTX220 QR - Manual
RTX
™
430-3QR User Manual
A9-430-0001 Revision: 1.0
• Quadruple Connectivity – RTX430-3QR is compatible with four different interfaces; USB3, USB2,
eSATA, and FireWire 800.
• FiveEasy-to-CongureRAIDModes–RAIDsetupisnear-instantaneousandiscapableofRAID0,1,5,
and10.Itisalsocapableofsettinguphotsparesforathree-diskRAID5.
• RuggedDurability–Thesturdymetalcaseprovidesexcellentheatdissipationandruggedendurance.
A heavy-duty handle also allows for easy transport.
• TrayFree™Technology–TrayFreebaysmakeinstallingdrivesabreeze.Itreallyisaseasyasopening
thedoor,slidingthedrivein,andclosingthedoor.Noscrews,notrays,itjustworks.
Models Covered:
RTX430-3QR
RTX
TM

RTX220 QR - Manual
Page2
1. Pre-Installation Steps
1.1 Check the Accessories with Your RTX Secure
Thefollowinglistcontainstheitemsthatareincludedwiththisdevice.
PleasecontactCRU-DataPortifanyitemsaremissingordamaged:
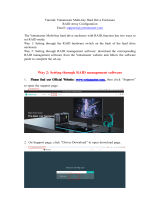
1.2 Identifying Parts
TakeamomenttofamiliarizeyourselfwiththepartsofRTXSecure.
Thiswillhelpyoutobetterunderstandtheremaininginstructions.
USB 3.0/2.0 Port
eSATA Port
FireWire 800 Ports
Power Switch
PowerSocket
CoolingFans
USBModeSwitch
Table of Contents
Accessories Quantity
RTX430-3QR Enclosure 1
Power cord 1
USB3 Cable 1
eSATA Cable 1
FireWire 800 Cable 1
1. Pre-Installation Steps
1.1 Accessories 2
1.2IdentifyingPartsoftheRTXSecure 2
1.3WarningsandNotices 3
2. Introduction to RAID
2.1SummaryofRAIDLevels 3
2.2 Hot Spares (Host Standby) 3
3. Installation Steps
3.1HardDriveInstallation 3
3.2ConnectingandPoweringtheRTX430-3QR 4
4. LED Behavior
4
5. LCD Menu Screens
4
6. RAID Conguration
6.1CreatingaNewRAID 4
6.2ChangingtheRAIDType 5
6.3AddingaNewDrivetoaRAID 5
7. Buzzer and Temperature Conguration
5
8. Usage with Mac and Windows Operating Systems
8.1UsagewithMacOSX 6
8.1.1FormattingaDrive 6
8.1.2MountingandUnmountingVolumes 6
8.1.3CreatingaBootDrive 6
8.2UsagewithWindowsOperatingSystems 6
8.2.1FormattingaDrive 6
8.2.2MountingandUnmountingVolumes 7
9. RAID Is Not A Backup
7
10. Frequently Asked Questions
8
11. Technical Specications
9
Front of the RTX 430-3QR
Back of the RTX 430-3QR
NavigationButtons
DrivePowerandActivityLEDs
PowerLED
SystemStatusLED
TrayFreeDriveBay
EjectionHandles
LCDDisplay
RAIDStatusLED

RTX220 QR - Manual
Page3
1.3 Warnings and Notices
Please read the following before beginning installation.
General Care
• The main circuit board of the HDD is susceptible to static
electricity.Propergroundingisstronglyrecommendedtoprevent
electricaldamagetotheenclosureorotherconnecteddevices,
including the computer host. Avoid all dramatic movement,
tappingontheunit,andvibration.
• Avoid placing hard drives close to magnetic devices, high
voltagedevices,ornearaheatsource.Thisincludesanyplace
where the product will be subject to direct sunlight. Do NOT
allowwatertomakecontactwiththedrivesorenclosure.
• Beforestartinganytypeofhardwareinstallation,pleaseensure
that all power switches have been turned off and all power
cords have been disconnected to prevent personal injury and
damagetothehardware.
• Toavoidoverheating,theRTXenclosureshouldbeoperatedina
well-ventilatedareaandinsuchawaythatsufcientairowis
maintained across the controller chips.
• Remove the drives before transporting the RTX enclosure to
preventdamagetothedriveinterfaces.
RAID
• Useonlyharddrivesthatareinperfectcondition.Avoidusing
drives that have ever developed bad sectors during previous
usage.Thiscouldleadtopossibledevicefailureorlossofdata.
• The RTX430-3QR supports SATA hard drives of various
specicationsanddifferentcapacities.However,werecommend
usingdrivesofthesamebrandandtypeforoptimalperformance.
IfdrivesofdifferentcapacitiesareusedinaRAID,thecapacity
of the smallest drive will determine how much of each drive is
used.The additional capacityon the largerdrives will notbe
usedbytheRAID.
• RAIDlevel0willallowyoutousethefullcombinedcapacityof
the drives, and offers the best data transfer speeds. However,
RAID0offersnoprotectionforthedata.Ifonedrivefailsina
RAID0,thedataonallofthedrivesisirretrievablylost.Before
creatingaRAID,investigatethevariousRAIDtypesandchoose
the one that is best for your needs.
• AlwaysbackupdatabeforeswitchingRAIDtypes.Switching
RAID types will destroy current data. You must reformat
your drives afterward.
2 Introduction to RAID
ARAID(RedundantArrayofIndependentDisks)isanarrayofmultiple
hard drives that are combined in a way that provides faster performance
and/ordatasafety.YourRTXunitiscapableofcreatingandmanaging
severaldifferentvarietiesofRAID.YoumaychooseyourpreferredRAID
levelbased on factors suchas disk capacity, desired datasafety, and
desired performance.
2.1 Summary of RAID Levels
TheRTX430-3QRsupportsRAIDLevels0,1,5,and10.RAIDLevel5
ismostcommonlyusedbythoseseekinganoptimalbalanceofspeed
and data safety.
RAID
Level
Description
Required
No. of
Drives*
Data
Redundancy
0 Also known as striping. Data distributed
across multiple drives in the array. There is
no data protection.
2 Nodata
protection
1 Also known as mirroring. All data repli-
catedontwoseparatedisks.Thisisahigh
availability solution, but due to the 100%
duplication,onlyhalfthetotaldiskcapacity
isavailablefordatastorage.
2 1 drive
5 Also known as Block-Interleaved Distrib-
utedParity.Dataandparityinformationis
subdividedanddistributedacrossalldisks.
Can withstand the failure of one drive. The
total capacity of all but one of the drives is
availablefordatastorage.
3 or 4 1 drive
10 Also known a stripe of mirrors. Data is
stripedacrosstwoseparatedisksandmir-
roredtoanotherdiskpair.
4 1 drive**
*TheRAIDlevelbecomesavailableasamenuoptionwhenexactlythesenumbersof
hard drives are installed inside of the RTX enclosure.
**IfbothdrivesineithertheRAID0orRAID1setfail,thentheentireRAIDwillfail.If
onlyonedriveineachoftheRAID0andRAID1setsfail,thentheRAIDispreserved.
2.2 Hot Spares (Host Standby)
HotsparesareconnectedaspartofyourRAIDandareswitchedinto
operation when a drive fails. RAID 5 will support hot spares when
conguredwiththreeharddrives(displayedasa“RAID53d”onthe
LCD).Whenadrivefails,theRTXenclosurewillimmediatelyrebuild
theRAID.Afterthatanewdrivewillneedtobeinsertedinplaceofthe
failed one. Replacement drives should preferably be the same model
and capacity as the failed one.
3 Installation Steps
3.1 Hard Drive Installation
a. PulltheejectionhandleontheTrayFreebaytoopenthebaydoor.
b. InsertaSATAharddriveintothebay.Makesureitislabel-sideup
withtheSATAconnectiononthedriveinsertedrsttowardtherear
of the enclosure.
c. Shut the bay door.

RTX220 QR - Manual
Page4
3.2 Connecting and Powering the RTX430-3QR
The RTX430-3QR has one USB3 port, one eSATA port, two FireWire
800ports,andonecongurationswitchontherearoftheunit.
a. Choose one of the connection types and connect the applicable
cablefromyourcomputertothecorrespondingportontheRTX.
b. Connectthepowercordtotheunitandtheotherendtoagrounded
electrical outlet.
c. If you’re using USB, make
suretheUSBModeSwitchis
set to USB 2.0 or 3.0 to match
the USB connection type used
to connect the RTX enclosure
to your computer.
d. Withtheharddrivesintheunit,ipthepowerswitchtoturnonthe
RTX enclosure.
4 LED Behavior
LED Behavior
Unit Power Glowsgreenwhenthepowerswitchisinthe“on”position.
System • Glowsgreenwhensystemisperformingasexpected.
• Glowsamber when a drive or the enclosure interior reaches the
presetwarningtemperature.
• Glowsredwhenadriveortheenclosureinteriorexceedsthe
presetwarningtemperature.
RAID • Glowsgreenwhensystemisperformingasexpected.
• GlowsamberwhentheRAIDisdegradedorisbeingrebuilt.
• GlowsredwhentheRAIDhasfailedorisinvalid.
DrivePower Glows greenwhenthedriveisintheunitandreceivingpower.
DriveActivity Glows amber*whenthedriveisbeingaccessed,eitherreadingor
writingfromthedrive.
*TheDriveActivityLEDiscontrolleddirectlybytheharddrive.Whencertainmodelsof
harddrivesareused,theamberglowmayremainconstantorwillnotlight.Thisisconsid-
ered normal operation.
5 LCD Menu Screens
UsetheNavigationButtonstochangescreens.
Screen Description
Mode ShowstheRAIDlevelused.
Status IndicatestheoverallhealthoftheRAID.Availablestatusmessages
areNormalorDegraded.
Disk# Indicatesthestatusoftheindividualdiskinthenumberedharddrive
slot:
• OK:Indicatesthattheharddriveisinuseorreadytouse
• No Disk:Indicatesthatthehardwasremovedornotinstalled
(continued,nextcolumn)
Screen Description
Disk#,
continued...
Indicatesthestatusoftheindividualdiskinthenumberedharddrive
slot:
• Unused:AnewdrivewasinstalledandisnotusedbytheRAID
• Failing:Indicatesthedriveismalfunctioning.Possiblecauses
ofafailuremessageincludeaninabilitytorecognizethedrive,
acompatibilityproblem,ordamagedsectors.
Disk#Temp Displaystemperatureoftheindividualdiskinthenumberedslot.
Sys Temp Displaysoveralltemperatureinsidethesystem.
Fan Status Indicateswhetherthefanisoperatingnormallyorhasfailedandisin
need of a replacement. Contact Technical Support if the fan has failed
toarrangeforarepair.
ChangeRAID
Mode
AllowsyoutochangetheRAIDlevel(seesection6.2).
6 RAID Conguration
YoumayskipthissectionifyoupurchasedtheRTX430-3QRpre-cong-
uredwithdrives.TheRTX430-3QRshipswithRAID5asthedefaultmode.
TheRTX430-3QRoffersfouroptionsforRAIDconguration.Seesection
2.1 for details on the available options. Stop all data transfers before set-
tingorchangingRAIDtypesorrebuildingadegradedarray.Failure to do
so can result in the loss of data. TosetuporchangetheRAIDtype,
disconnect all data cables and reboot the RTX enclosure. After the unit
hasinitialized,theLCDwilldisplaythedrives’modeandstatus.
6.1 Creating a New RAID
UsetheLCDandmenuselectionbuttonstocompletethesestepsif
youdidnotpurchaseyourunitpre-congured.Changing RAID levels
will erase any data on the drives. Make a backup copy of any
data you wish to keep before changing the RAID.
a. DisconnecttheRTXenclosurefromthecomputer.
b. Insertfourharddrives(preferablyallthesamemake,model,and
capacity)intotheRTXenclosureandipthepowerswitchonthe
rear of the unit.
c. Afterthe RTXenclosure bootsup,it willbeginalarming andthe
LCDwilldisplaytheerror“Error:NotaRAIDSet”.PresstheEnter
button to silence the alarm.
d. Press the EnterbuttonasecondtimeandtheLCDscreenwillask
“MakeNewRAID?”PressEntertoconrm.
e. The LCD will display “Select RAID Type”. Press Up or Down to
cyclethroughtoyourdesiredRAIDtypeandpressEnter.
f. Thescreenwilldisplay“WillEraseallDataOK?”Pressing Enter
will result in the loss of all data on the drives. Ensure all data
isbackedup,thenpressEnter.
g. ThenewcongurationwillbeselectedandtheRTXenclosurewill
reboot.TheRAIDisnowcreated.

RTX220 QR - Manual
Page5
6.2 Changing the RAID Type
a. DisconnecttheRTXenclosurefromthecomputer.
b. Press the UpbuttontocycletheLCDmenutothe“ChangeRAID
Mode”screenandpresstheEnter button.
c. The LCD will display “Select RAID Type”. Press Up or Down to
cyclethroughtheavailableoptionstoyourdesiredRAIDtypeand
press Enter.
d. Thescreenwilldisplay“WillEraseallDataOK?”Pressing Enter
will result in the loss of all data on the drives. Ensure all data
isbackedup,thenpressEnter.
e. ThenewcongurationwillbeselectedandtheRTXenclosurewill
reboot.TheRAIDisnowcreated.
f. TheRTXenclosurehasbeenconguredandisreadyforoperation.
Followtheinstructionsfortheappropriateoperatingsystemusage
instructionstoinitializeandformatthedrives.
6.3 Adding a New Drive to a RAID
NOTE: Any data on the new hard drive will be destroyed when
thedriveisaddedtotheRAID.
RAID 0
Never remove a drivefrom a RAID 0 as this will cause the loss of
alldata.IntheeventofadiskfailureforaRAID0,theRAIDwillbe
destroyed. Add a drive and then press the Up button to create a new
RAID.Followthedisplaypromptstobuildanewarray.
RAID 1, 5, and 10
In theevent of a disk failure orremoval, the RAID will continue to
functioninadegradedstate.AddanewdisktotheRTX430-3QRto
rebuild the RAID. After the new drive has been detected, the RTX
enclosurewillasktoaddanewdisk.PresstheEnterbuttontodoso.The
diskwillbeaddedtotheRAIDandtheRAIDwillbegintorebuild.The
LCDscreenwilldisplaythepercentcompletefortherebuild.Rebuild
timesvary,a1TBharddrivetakesjustover3hourstorebuild.Youcan
toggle to the approximate time remaining by pressing enter on the
front panel.
7 Buzzer and Temperature Conguration
The RTX430-3QR is compatible with
CRUCongurator3.5orhigher,which
allows IT administrators to change
internal settings to meet individual
needs. Congurator allows the user
to set the password, enable and dis-
able audible alarms, and change
temperature alarms and warnings settings. To download Congurator
and thefull Congurator manual, visit www.wiebetech.com/software/
congurator.php.
7.1 Accessing RTX Enclosure’s Settings
In order for Congurator to access the RTX enclosure, change the
congurationswitchonthebackpaneltoUSB 2.0 Mode and connect
theRTXenclosuretothehostcomputerusingaUSB2.0cableinserted
into the USB port.
7.2 Customizable Options
The following options are available on the Alerts tab of the
Congurator:
Conguration PIN
This feature allows you to set a PIN to prevent unauthorized
conguration.ThedefaultPINis0000.TheRTXenclosureonlyrequires
youtoenteraPINifadifferentvaluehasbeenset.
Buzzers
Placeacheckintheboxestoindicatewhichwarning/alarmbuzzers
youwanttobeactivatedorremoveacheckfromtheboxesnexttothe
buzzersyouwanttodeactivate.Whenabuzzersounds,pressEnter on
the front of the RTX enclosure to temporarily silence it until the RTX
enclosureisnextrebooted.
System Warning Buzzer
This buzzer will sound when a drive reaches the temperature set
usingtheDrive temperature warning slider below.Thisbuzzeris
disabledbydefault.Asavisualalert,theSystemStatusLEDwillglow
amberwhenthe temperatureis reached,regardlessof whetherthe
buzzerisenabledornot.
System Alarm Buzzer
Thisbuzzerwillsoundon3occasions:
• When a drive reaches the temperature set using the Drive
temperature alarm slider below

RTX220 QR - Manual
Page6
• When the enclosure reaches the temperature set using the
Enclosure temperature warning slider below
• When the fan fails
Asavisualalert,theSystemStatusLEDonyourRTXenclosurewill
glow red when any of these three situations occur, regardless of
whetherthebuzzerisenabledornot.
RAID Warning Buzzer
ThisbuzzerwillsoundwhentheRTXenclosureisindegradedRAID
mode (a drive has failed and is in need of rebuild or the RAID is
rebuilding).Thisbuzzeris disabledbydefault.TheRAID StatusLED
will glow amber if this occurs, regardless of whether the buzzer is
enabled or not.
RAID Alarm Buzzer
This buzzer will sound when the RAID has failed or is invalid. The
RAIDStatusLEDwillglowredifthisoccurs,regardlessofwhetherthe
buzzerisenabledornot.
Temperature Sliders
WhenyourRTXenclosurereachesacertaintemperature,buzzerswill
soundiftheyareenabled(seetheBuzzerssubsectionabove)andthe
fanwillkickon.Youmaywanttochangethesedefaulttemperatures
accordingtoyourenvironment.Withthesesliders,youcanchangethe
default temperatures of the:
• Enclosurefankick-on
• Enclosuretemperaturewarning
• Drivetemperaturewarning
• Drivetemperaturealarm
8 Usage with Mac and Windows Operating Systems
8.1 Usage with Mac OS X
8.1.1 Formatting a Drive
To format, use Disk Utility (pictured above, right), which can be
found in the Applications folder.
a. Clickonthedriveinthewindowtotheleft.
b. ClicktheErase tabinthewindowtotheright.
c. Select the format type. Most users prefer Mac OS Extended
with Journaling (HFS+),whichisrequiredforcompatibilitywith
TimeMachine(OS10.5ornewer).IfyouneedtouseyourRTXwith
bothMacandWindowscomputers,selectMS-DOS File System
instead.
d. EnteranameforthenewvolumeandthenclickErase to start the
process.
8.1.2 Mounting and Unmounting Volumes
IftheharddriveinstalledintheRTXenclosureisalreadyformatted,
aniconrepresentingthedrive’svolumewillappear(mount)onthe
desktop.Youcanbeginusingthevolumerightaway.Ifthedriveis
unformatted,amessagewillappearonthedesktopsayingthatthe
diskisunreadable.UseOSX’sDiskUtilitytoeasilyformatthedrive
(see section above).
Unmount the volume before
powering down the unit by
draggingthevolume’sicontothe
Trash,orbyselectingthevolume
then pressing Command-E.
Disconnecting the unit without
rst unmounting the volume can
result in data loss.
8.1.3 Creating a Boot Drive
Toactivatethisfeature,youmustrstinstallOSXontheharddrive
inyourcarrier.Theeasiestwayto dothisis toclonean existing
systemdriveusinga utilitysuchasCarbonCopy ClonerorSuper
Duper. Next, go to System Preferences → Startup Disk. A
window will list the available bootable volumes. Select the volume
from which you wish to boot. Another method is to hold down the
Option keyduringbootup.Ascreenshouldappearthatallowsyou
to select the volume you wish to use. This is useful if you are only
sporadicallybootingfromtheRTXharddrive.
8.2 Usage with Windows Operating Systems
8.2.1 Formatting a Drive
Whenyou rst mounta drive to aWindows operating system,a
pop-up window will ask you if you would like to format it. Click

RTX220 QR - Manual
Page7
Format DiskandskiptoStepF.Ifthepromptdoesnotpopup,use
theDiskManagementutilitybyfollowingthesesteps:
a. Right-clickontheMy Computer icononthedesktop(Windows
XP) or the Computer button in the Start Menu (Windows
Vista,7,Server2008,Server2008R2,Server2012),thenselect
Manage. For Windows 8, select your Desktop, then open
Windows Explorerfromthetoolbar.Right-clickonComputer
in the left-hand navigation pane and select Manage. The
ComputerManagementwindowwillopen.
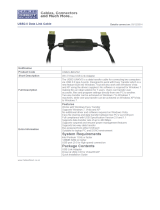
b. Intheleftpaneofthiswindow,left-clickonDisk Management
(labeled‘B’inthepicturebelow).
c. ThedriveshouldappearinthelistofDisksinthelowermiddle/
rightpane.Youmayneedtoscrolldowntoseeit.Ifthedriveis
already formatted, you can identify it easily by its volume name.
If the Device Properties Box (labeled ‘C’ in the picture below)
says “Not Initialized”, you’ll need to initialize the disk before
formattingit.
Right-clickontheDevice Properties Box and select Initialize
Disk.Ifyouarepromptedtoselectapartitiontype,selectMBR
for volumes 2TB or smaller, or GPTforvolumeslargerthan2TB.
NOTE: Windows XP does not support GPT for volumes
largerthan2TB.
d. To format the volume, right-click the Drive Properties Box
(labeled‘D’inthepicturebelow)andselectNew Partition…
(Windows XP) or New Simple Volume...(WindowsVista,7,8,
Server 2008, Server 2008 R2, Server 2012).
e. Unless you wish to customize the settings in these dialog
prompts,ClickNext on the Select Partition Type (shows up in
Windows XP only), Specify Volume/Partition Size, and Assign
DriveLetterorPathdialogprompts,leavingthedefaultsettings.
f. Youwillnowseeawindowthatallowsselectionofalesystem.
Choose NTFS and enter a name for the new volume. Be sure to
checktheboxlabeledQuick Format, which will ensure that the
formattingprocesstakeslessthanaminute.
g. ClickNext and then Finish to start the format process. When
theformatiscomplete,theDrivePropertiesBoxwillupdateto
show the new volume name. The new volume can now be found
by double-clickingon the My Computer icon on thedesktop
(WindowsXP),byclickingontheComputer button in the Start
Menu(Windows Vista,7, Server 2008,Server 2008 R2),or by
clicking on Computer in the navigation pane of a Windows
Explorerwindow(Windows8,WindowsServer2012).
8.2.2 Mounting and Unmounting Volumes
IftheharddriveinsideoftheRTXcarrierisalreadyformatted,you
canbeginusing thevolumeright away. WhentheRTX enclosure
is properly connected and turned on, a window may open to allow
youaccesstothevolume.Ifnowindowappears,ndthevolumeby
double-clickingontheMy Computer icononthedesktop(Windows
XP),byclickingtheComputer buttonintheStartMenu(Windows
Vista,7,Server2008,Server2008R2),orbyclickingonComputer
in the navigation pane
ofa WindowsExplorer
window (Windows 8,
Windows Server 2012).
UnmounttheRTXunitbeforepoweringitdownbyleft-clickingthe
green arrow icononthetask bar(inWindowsXP) ortheUSB
plug icon with the green checkmark on the Desktop task bar
(WindowsVista,7,8,Server2008,Server2008R2,Server2012),
andthenselectingtheproperdevicefromthemenuthatpopsup.
YoumayhavetoclickontheShow Hidden Icons arrow on the
taskbartondthecorrecticon.Windowswillindicatewhenitis
safetodisconnecttheRTXenclosure.Disconnectingtheenclosure
withoutrstejectingitcanresultindataloss.
9 RAID Is Not A Backup
BecauseyourRTX430-3QRfeaturesredundantRAIDmodeswhichpro-
tect against ahard drive mechanical failure, it is an excellent part of
anybackupstrategy.However,aRAIDisnot,initself,abackupstrategy.
Manythingsbesidesharddrivefailurecandamageoreraseyourdata:
• Corruption caused by unexpected disconnection during data
access(e.g.acableisunpluggedduringadatatransfer,orthe
computercrashesorlosespowerwhilewritingtothedrives)
• Corruption or destruction caused by viruses or other malware

RTX220 QR - Manual
Page8
• Sabotagebyadisgruntledemployeeoracquaintance
• Theft of your RTX enclosure
• Naturaldisasterssuchasre,ooding,etc.
Considering these possibilities, any single copy of your important
data must always be considered at risk. That’s why backing up is so
important.Followthe3-2-1backuprule.Datashouldexistinthreedif-
ferentplacesontwodifferentstoragemediaandatleastoneofthose
copies should be maintained offsite.
Withoutaneffectivebackupstrategy,recoveringdatamaybeimpossible,
orthecostofdatarecoverymaybequiteexpensive.TheCRUwarranty
does not cover costs associated with data loss (nor do the warranties of
other hard drive manufacturers).
Planaccordinglyandbackupdatatominimizedowntime!
10 FAQ
Q: Why won’t my RTX430-3QR mount?
A: First, ensure that you have properly connected the unit to power,
powered the unit on, and have connected it to your host computer
viaUSB2or3,eSATA,orFireWire800.Thenmakesureyouhavea
properlyconguredandformattedRAID.SeeSection6forinstruc-
tionsonhowtocongureaRAID,andSection8forinstructionson
how to format the RAID in WindowsorMac operating systems.
If you still have trouble and you are connected via USB, double
checkto make sure thatthe USB Mode Switch on the rear of
the RTX enclosure is set to the correct interface that your computer
supportsandthatyouareusingthecorrecttypeofUSBcable.Even
thoughUSB3.0interfacesonyourcomputerwillsupportUSB2.0
Mode,USB 2.0 interfaceson yourcomputer cannot supportUSB
3.0Mode.
IfyouareconnectedviaeSATA,makesureyouhaveeSATAdrivers
properlyinstalledinyouroperatingsystem.Foranyfurtherissues,
please contact Technical Support (See Section 10.8).
Q: I’ve attached my RTX430-3QR and can see the volume, but it
shows up twice. Which one is real?
A:If you are seeing your RTX volume mounted twice, chances are
theunitisconnectedtoyourcomputerusingboththeeSATAand
FireWireconnections.Whenthisisthecase,theOSmayattempt
tomounttheRTXenclosuretwiceresultingintwovolumesappear-
ing.Simplyunmountthevolumes,turnofftheRTXenclosure,and
unplugoneoftheconnectionstoresolvetheproblem.
Q: Why won’t the computer let me eject or unmount my drive?
A:If the drive is connected via eSATA, it cannot be ejected in
Windows the way FireWire drives can. However, the third party
freeware utility called Hotswap can provide a similar function.
This is available here: http://mt-naka.com/hotswap/index_enu.htm
Ifyouare notconnectedvia eSATA,thisis notadefect orissue
caused by the RTX enclosure, but may instead be a software ap-
plicationrunninginthebackgroundwithanactivelinktothedrive.
Sometimes you may see a message such as “The disk is in use
andcouldnotbeejected.Tryquittingapplicationsandtryagain.”
InvoketheForceQuitfeatureinOSXtoseewhatsoftwaremaybe
runningbypressingCOMMAND-OPTION-ESC. For Windows, the
equivalentcommandisCTRL-SHIFT-ESC.
Q: What is an acceptable temperature for my hard drives and
the RTX enclosure?
A: Your hard drives can run between 86-104° Fahrenheit (30-40° Cel-
sius)withoutanyriskofoverheating.TheRTXenclosureshouldtrig-
gerthefanstooperatewhentheenclosurereaches96.8°F(36°C).
Contacting Technical Support
Stillneed help? Pleasecontact ourTechnical Supportteam through
CRU-DataPort.com or call us toll free at (800) 260-9800, or (360) 816-
1800.

RTX220 QR - Manual
Page9
FOR OFFICE OR COMMERCIAL USE
11 Technical Specications
ProductName RTX430-3QR
RAIDLevelsSup-
ported
RAID0,1,5,10
InterfaceTypes&
Speeds
• USB2:upto480Mbps
• USB3:upto3.2Gbps
• eSATA:upto3Gbps
• FireWire800:upto800Mbps
Compatibility 3.5”SATAharddrives(SATA1,SATA2,andSATA3)
DataConnectors One(1)USB3connector(backwardcompatible)
One(1)eSATAconnector
Two (2) FireWire 800 connectors
Auto-Rebuild Yes(3-diskRAID5congurationonly)
LEDIndicators • PowerIndicator
• SystemIndicator
• RAIDIndicator
• BayPowerIndicator(oneperbay)
• DiskActivityIndicator(oneperbay)
ControllerDisplay LCDscreenwithbacklight/controlpanel
OperatingSystem
Requirements
• Windows8,7,Vista,orXP
• WindowsServer2012,2008,and2003productfamilies
• MacOSX10.4.xorhigher
• Linuxdistributionsthatsupporttheconnectiontypeused
OperatingTem-
perature
86 – 104° Fahrenheit (30 – 40° Celsius)
OperatingHumid-
ity
5%to95%,non-condensing
Power Switch 2position:On/Off
Power Supply Input:100-240VAC
Output:120Watts
Torque 3.5-inchharddrives,#6-32screws:6inch-poundsmax.
Compliance EMIStandard:FCCPart15ClassA,CE
EMCStandard:EN55022,EN55024
ShippingWeight 13 pounds (without drives)
18 pounds (with drives)
ProductDimen-
sions
10.63”x6.89”x7.87”(270mmx175mmx200mm)
Technical Support Contact us at www.cru-dataport.com/support. We also offer
phone support at (800) 260-9800 or (360) 816-1800.
RTXandTrayFreearetrademarksofCRUAcquisitionsGroup,LLC.Othermarksarethepropertyoftheirrespectiveowners.
©2008,2012CRUAcquisitionsGroup,LLC.
Limited Product Warranty
CRU-DataPort(CRU)warrantsthisproducttobefreeofsignicantdefectsinmaterialandworkmanshipforaperiodof
twoyearsfromtheoriginaldateofpurchase.CRU’swarrantyisnontransferableandislimitedtotheoriginalpurchaser.
Limitation of Liability
Thewarrantiessetforthinthisagreementreplaceallotherwarranties.CRUexpresslydisclaimsall otherwarranties,
including but not limited to, the implied warranties of merchantability and tness for a particular purpose and non-
infringementofthird-partyrightswithrespecttothedocumentationandhardware.NoCRUdealer,agent,oremployeeis
authorizedtomakeanymodication,extension,oradditiontothiswarranty.InnoeventwillCRUoritssuppliersbeliable
foranycostsofprocurementofsubstituteproductsorservices,lostprots,lossofinformationordata,computermalfunc-
tion,oranyotherspecial,indirect,consequential,orincidentaldamagesarisinginanywayoutofthesaleof,useof,or
inabilitytouseanyCRUproductorservice,evenifCRUhasbeenadvisedofthepossibilityofsuchdamages.Innocase
shallCRU’sliabilityexceedtheactualmoneypaidfortheproductsatissue.CRUreservestherighttomakemodications
andadditionstothisproductwithoutnoticeortakingonadditionalliability.
FCC Compliance Statement:“ThisdevicecomplieswithPart15oftheFCCrules.Operationissubjecttothefollowing
two conditions: (1) This device may not cause harmful interference, and (2) this device must accept any interference
received,includinginterferencethatmaycauseundesiredoperation.”
ThisequipmenthasbeentestedandfoundtocomplywiththelimitsforaClassAdigitaldevice,pursuanttoPart15of
theFCCRules.Theselimitsaredesignedtoprovidereasonableprotectionagainstharmfulinterferencewhentheequip-
mentisoperatedinahomeorcommercialenvironment.Thisequipmentgenerates,uses,andcanradiateradiofrequency
energyand,ifnotinstalledandusedinaccordancewiththeinstructionmanual,maycauseharmfulinterferencetoradio
communications.
IntheeventthatyouexperienceRadioFrequencyInterference,youshouldtakethefollowingstepstoresolvetheproblem:
1)Ensurethatthecaseofyourattacheddriveisgrounded.
2)UseadatacablewithRFIreducingferritesoneachend.
3)UseapowersupplywithanRFIreducingferriteapproximately5inchesfromtheDCplug.
4)Reorientorrelocatethereceivingantenna.
/